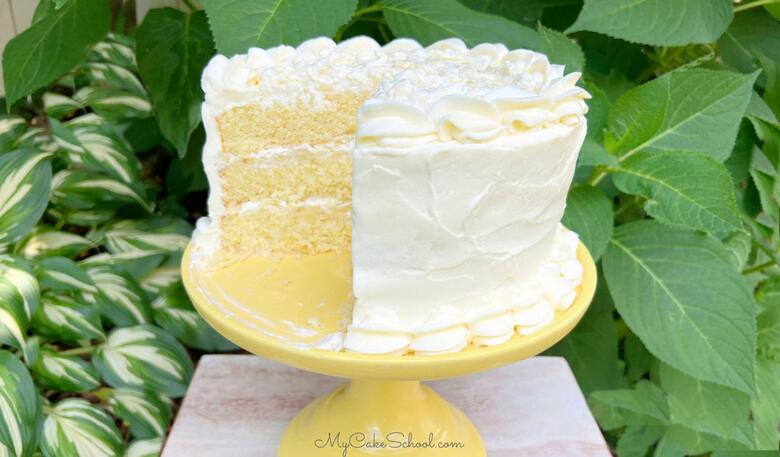
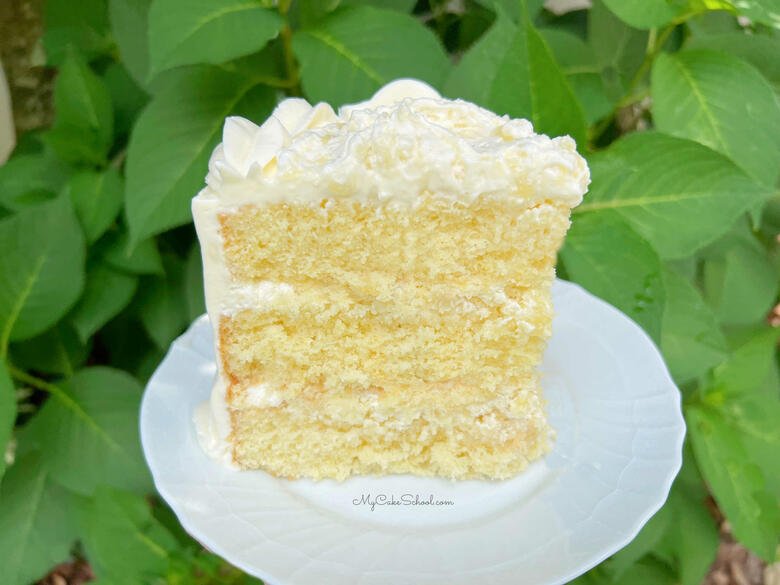
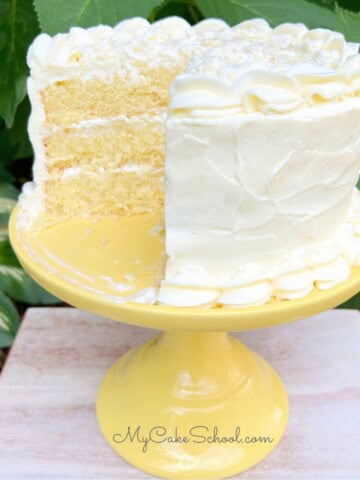
Pineapple Dream Cake
Pineapple cake layers are filled with whipped pineapple cream cheese frosting in this refreshingly light and flavorful Pineapple Dream Cake.

If you love pineapple, this cake is for you!
Crushed pineapple is baked right into the cake batter, and the resulting moist cake layers are brushed with pineapple juice and filled with pineapple cream filling.
All of these components contribute to the cakes' refreshingly sweet pineapple flavor.
Table of Contents
How to Make Pineapple Dream Cake
You can find the full, printable pineapple cake recipe further down in this post, but here is a quick review of our steps!
- Preheat Oven & Prepare Pans: Preheat the oven to 325 degrees F. Grease (with vegetable shortening) and flour three 8×2 inch round pans. We also like to line the bottom of the pans with parchment paper as well.
- Flour Mixture/Dry Ingredients: In a medium bowl, whisk the cake flour, baking powder, baking soda and salt for 30 seconds. Set aside
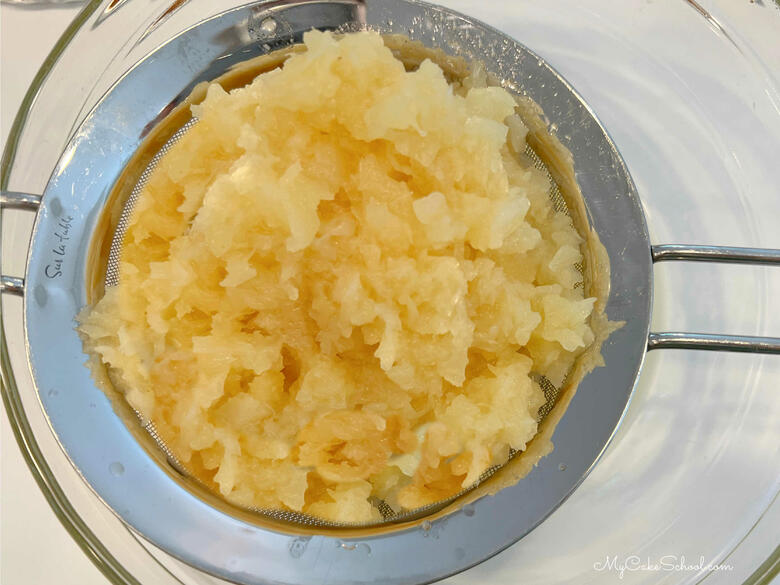
- Pineapple-Drain the Crushed Pineapple in order to avoid excess liquid- we used a strainer for this.
- Buttermilk Mixture/Wet Ingredients: In another bowl, add the buttermilk, vegetable oil, drained pineapple, and vanilla. The mixture will become fairly thick as the pineapple reacts to the buttermilk. Set aside.
- Butter and Sugar: In the large mixing bowl for your mixer, add the butter and mix at medium speed until smooth. Gradually add the sugar and continue to mix on medium speed for 3 to 5 minutes until lightened in color and fluffy.
- Eggs: Add the room temperature eggs one at a time mixing after each addition until the yellow of the egg yolk is blended.
- Alternating Dry and Wet Ingredients: With the mixer on low speed, alternately add the flour mixture and buttermilk mixture, beginning and ending with the dry ingredients (3 additions of dry ingredients and 2 of liquid). After the last addition, mix just until combined. Be careful not to over-mix.

- Fill the Pans! Divide the batter between the three prepared 8 inch round cake pans.
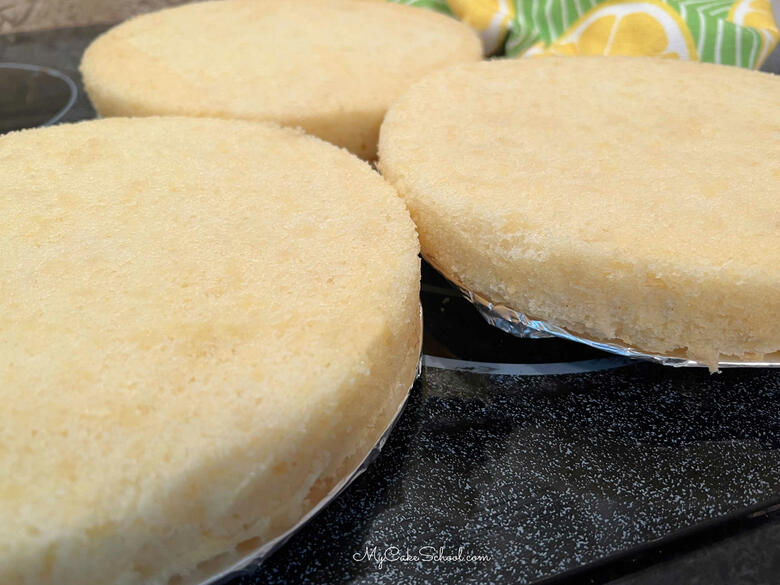
- Time to Bake! Bake at 325 degrees for 28-30 minutes or until a toothpick inserted in the center of the cake comes out clean or with just few moist crumbs attached. Let the cake layers cool on a wire rack for 10 minutes while still in the pans and then turn out.
Filling for the Pineapple Cake
There are many fillings that would be perfect with this recipe! For pineapple cakes, we often do a layer of our cooked pineapple filling (or even just crushed, drained pineapple) paired with a layer of sweetened whipped cream.
Our popular Easy Pineapple & Cream Filling which uses a "mousse" from instant vanilla pudding mix and crushed pineapple is also a great choice for pineapple cakes, as we used in our other Pineapple Cake Recipe.
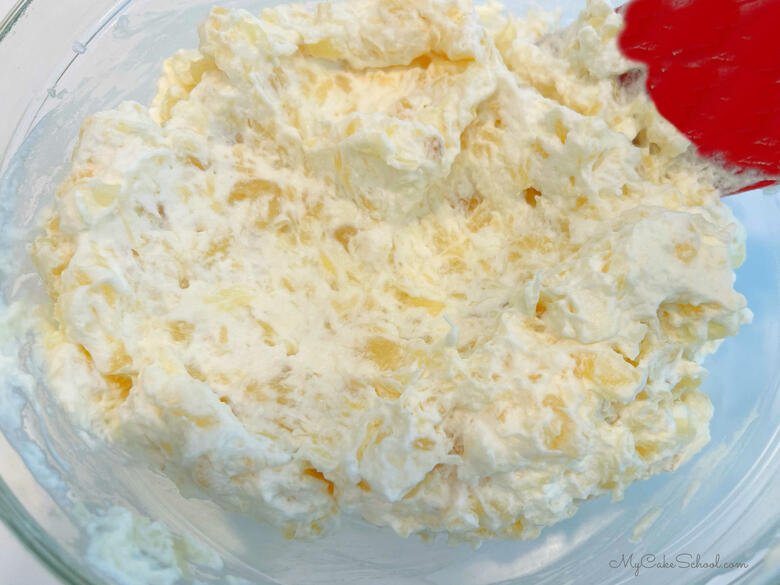
Today, we are going with a combination of our Whipped Cream Cheese Frosting and drained, crushed pineapple for a thick and flavorful filling!
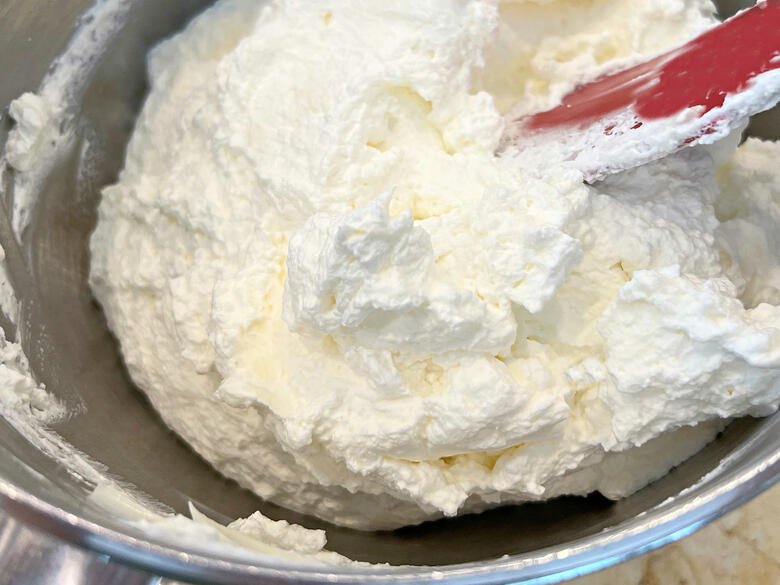
We first made our Whipped Cream Cheese Frosting which is a combination of softened cream cheese, confectioners sugar and vanilla extract, with freshly whipped cream folded into it.
We will use most of this to frost the cake later, but we reserved two cups for the filling, which we will be combining with drained pineapple.
After straining the pineapple, you can reserve the juice for brushing on top of the cake.
Here is our lovely finished Pineapple Whipped Cream Cheese Filling.
We gently folded the drained, crushed pineapple into the two cups of whipped cream cheese frosting. We will use this in between our pineapple cake layers as well as on top.
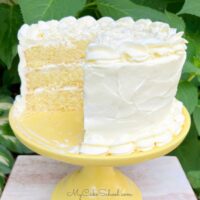
Assembling and Decorating the Cake
We kept things very simple with our pineapple dream cake design today. Sometimes simple is best- especially when working with soft frostings.
To assemble, place the first cake layer on the cake plate or pedestal.
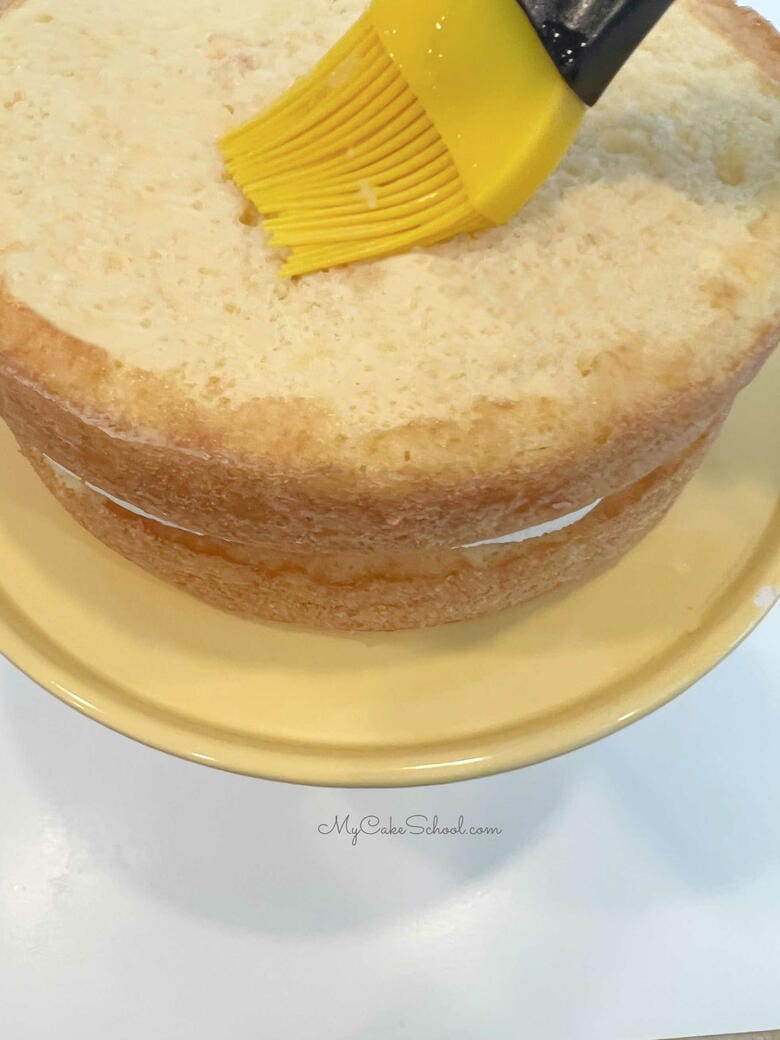
Brush with Reserved Pineapple Juice
Next, we brushed the top with pineapple juice. This step is optional but it gives our cake layers an added boost of pineapple flavor.
(You will not use all the pineapple juice from the can of crushed pineapple).
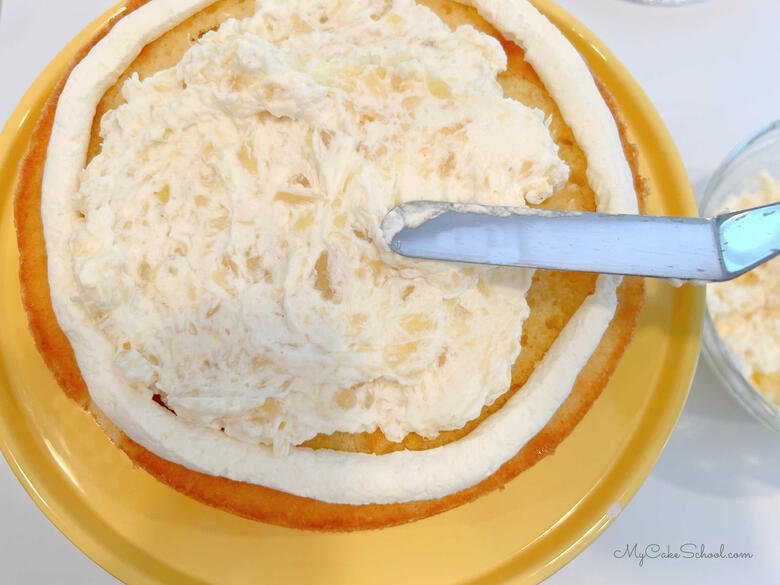
Filling the Cake
Next, we piped a dam of our frosting about ¼-1/2 inch from the edge of the cake using a piping bag with the tip snipped away. Then apply the pineapple & cream filling.
The purpose of the dam is to keep the filling from escaping as the layers are stacked.
You could probably get away with skipping the dam if you are careful not to take the filling all the way to the edge- but we piped one anyway ;0)
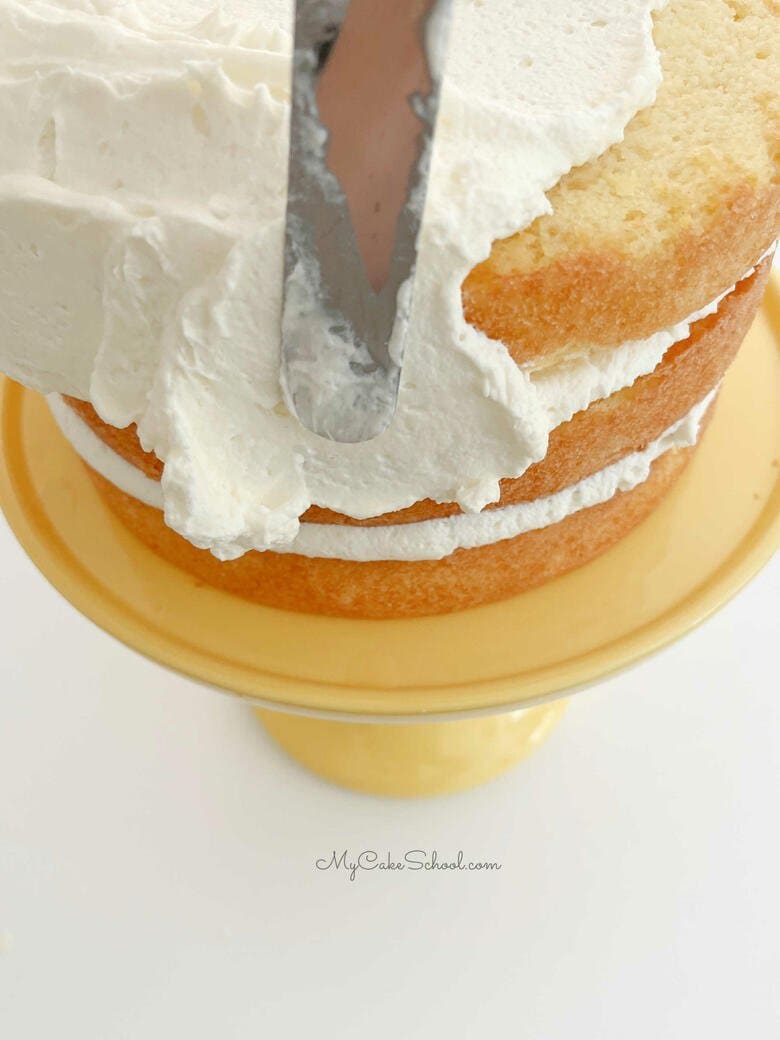
Apply the second cake layer, brush with pineapple juice, pipe a dam, and fill once again.
Next, top with the third cake layer, brush with pineapple juice, and frost a thin coat of frosting on the top and sides of the cake. Reserve the remaining flavorful pineapple filling for the top.
Crumb Coat and Chill
When frosting our cakes, we apply a crumb coat (thin coat) of frosting first and then chill the cake. We place it in the freezer for about 15-20 minutes to firm things up before applying the second coat of frosting.
No freezer space? The refrigerator is fine-- it just may take a bit longer to firm up.
The chilling step is optional but it helps prevent the cake layers from shifting as you are frosting the cake.
Decorating the Cake
I applied the second coat of frosting, adding a bit of texture using my offset spatula. Even though it is super simple, textured frosting makes for a beautiful cake.
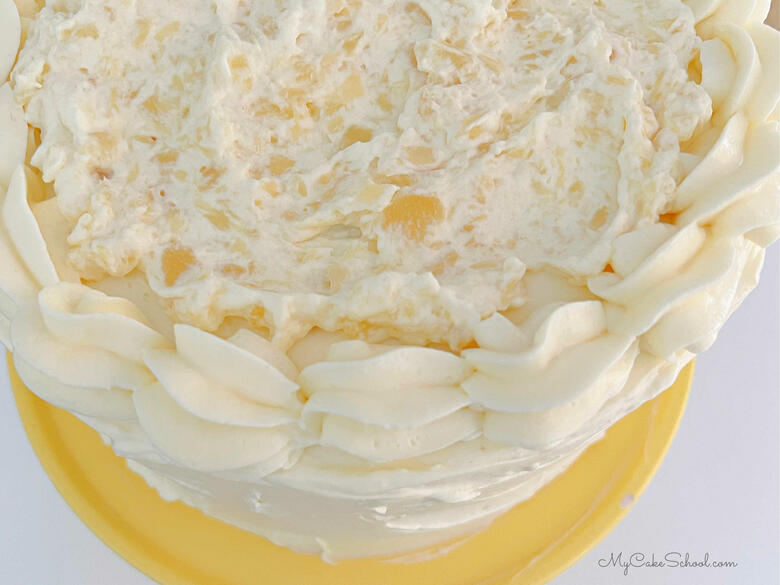
I finished things off by spreading additional filling on top of the cake in the center-leaving room for a border- and piped a large shell border around the top edge using a large 1M piping tip. (See our tutorial for Piping with a Star Tip for more details!)
I repeated this simple border around the bottom of the cake also.
.
Recipe FAQs
More Pineapple Cakes to Try
If you love pineapple cakes, make sure to put these other favorite cake recipes on your list as well! There are so many wonderful flavor pairings for pineapple!
Some of our favorites are Pina Colada Cake, Pineapple Upside Down Bundt Cake, Pineapple Coconut Cake, Pineapple Cake Recipe, and Hummingbird Cake!
If you are interested in pound cake or bundt cakes, we have a great pineapple coconut pound cake also!


Thanks so much for stopping by. We hope that this scratch pineapple dream cake with its moist texture and bright flavor will become one of your favorite desserts!
It is the perfect birthday cake recipe, holiday cake, and summer cake when our fruity cake cravings are in full swing!
Make sure to check out our full collection of favorite cake recipes, including cake recipes from scratch as well as cake mix recipes!
We also have a huge collection of Cake Decorating tutorials.
Have you made this? We would LOVE for you to leave a ⭐️ rating as well as a comment and photo below! We really appreciate your feedback!
Pineapple Dream Cake
Ingredients
For the Cake
- 1 ½ sticks (170g) unsalted butter, softened (holds it shape but dents when pressed)
- 2 cups (400g) sugar
- 4 large eggs, room temperature (If in a hurry, place eggs in a bowl of warm water for 5 minutes.)
- 3 cups (342g) cake flour (If not using a digital scale, lightly spoon into measuring cup and leveled off) If you do not have cake flour see substitution in Notes below.
- 2 teaspoons (8g )baking powder
- ½ teaspoon (3g) baking soda
- ½ teaspoon (3g) salt
- 1 ¼ cups (296g) buttermilk — if you do not have buttermilk, see substitution below
- ¼ cup (54g) vegetable oil
- 1 Tablespoon (12g) vanilla extract
- 20 oz crushed pineapple, drained (This comes to about 1 ½ cup drained pineapple.)
Whipped Cream Cheese Frosting
- 16 oz (423g) cream cheese, softened (We used two 8 oz packages, full fat)
- 2 cups (230g) confectioners sugar, measure then sift
- 2 teaspoons (8g) vanilla extract
- 3 cups (696g) heavy whipping cream
Pineapple Whipped Cream Cheese Filling
- 2 cups of the reserved whipped cream cheese frosting
- 8 oz can of crushed pineapple, *drained*
Instructions
- Preheat the oven to 325 degrees, grease and flour three 8×2 inch round pans. We like to line the bottom of the pans with parchment paper as well.
- In a medium bowl, whisk the flour, baking powder, baking soda and salt for 30 seconds. Set aside
- Drain the Crushed Pineapple- We used a strainer for this.
- In another bowl, add the buttermilk, vegetable oil, drained crushed pineapple, and vanilla. Set aside.
- In the bowl of your mixer, add the butter and mix at medium speed until smooth. Gradually add the sugar and continue to mix on medium speed for 3 to 5 minutes until lightened in color and fluffy.
- Add the eggs one at a time, mixing after each addition until the yolks have blended in.
- With the mixer on low speed, alternately add the flour mixture and buttermilk mixture, beginning and ending with the dry ingredients (3 additions of dry ingredients and 2 of liquid). After the last addition, mix just until combined. Be careful not to over-mix.
- Divide the batter between the three prepared 8 inch cake pans.
- Bake at 325 degrees for 28-30 minutes or until a toothpick inserted in the center comes out clean or with just few crumbs attached. Let cool 10 minutes and turn out.
Whipped Cream Cheese Frosting
- Freeze your mixing bowl and beaters 15 minutes before whipping the cream (30 minutes if chilling in the refrigerator.
- Use the whisk attachment for a stand mixer, beaters on your hand mixer. Beat the cream until stiff peaks form. This can happen very quickly so don't walk away from the mixer. You are at the stiff peak stage when you lift the beater and the cream stands straight up forming a peak. Keep in the refrigerator while completing the next step.
- In another bowl combine the cream cheese, powdered sugar and vanilla. Beat until very smooth. Fold this into the whipped cream. Cover and refrigerate.
- Reserve 2 cups of the frosting and set to the side to be combined with pineapple for the filling.
Pineapple Whipped Cream Cheese Filling
- Drain the 8 oz can of Crushed Pineapple- We used a strainer. Save the juice as we will be brushing some of it over the cake layers later.
- We took the two reserved cups of our Whipped Cream Cheese Frosting and combined with the drained, crushed pineapple (adjust amount to your liking). We spread this in between our cake layers as well as on top of the cake (within the top border).
Assembling and Decorating
- Place the first cake layer on cake plate or pedestal. Brush over the top with reserved pineapple juice- I used a pastry brush for this.
- Pipe a dam with frosting about ¼-1/2 inch from the edge using a piping bag (or ziplock) with the tip snipped away. Fill within the dam with the pineapple whipped cream cheese filling.
- Frost the outside of the cake with a thin layer of whipped cream cheese frosting. At this point I chilled the cake for about 15 minutes in the freezer to firm everything up. Then, I applied the second/final coat of frosting, texturing it with my offset spatula.
- Decorate the cake however you like! I added the remaining pineapple filling to the top center of the cake and piped a large shell border around the top and bottom edge using a 1M piping tip.
I screwed up so bad making it and it still was amazing.
Ha! I'm so glad you enjoyed it ;0) Thanks for your review!!
I made a couple substitutions on the cake as far as the buttermilk and cake flour (thank you for that) && my family raved greatly about it!!! Beautiful recipe! I'll use it forever!!!!
So happy to hear it, Juju!
I am dying to try this cake. I only have 2 -8inch or 2- 9 inch pans .Cam I bake it as two cakes and then cut each cake in half?
Hi Mary, yes that would be fine!
Can this be made into a sheet cake? If so, how would the recipe be modified to accommodate a sheet cake?
Hi Charese, you could do a single layer 9x13 with this amount of batter. (Or double if you'd like a two layer sheet cake). I would start peeking in as the 30 minute mark approaches.
If doing a single layer sheet cake, I would spread the filling on top of the cake, leaving room for a border around the edge. Then use the frosting to go around the sides and pipe borders around the top (and also bottom border if you'd like).
my cake layers were soooo thin, I don't know why. my batter seemed curdled and didn't look at all like your pictures. and my cake color was not pale almost white like your was. it was yellow as hell. I beat my butter and sugar till light, I added the baking powder, I don't understand..
Hi Raven- I'm sorry, did you make three 8 inch layers? Our filled & frosted cakes stand at about 4 inches in height and so each layer is usually about 1 1/4 inches. They aren't very thick- but maybe yours were even more thin. If so, I would check that your baking powder and baking soda haven't expired, perhaps over-mixing after adding the flour etc- also too much liquid can cause a cake not to rise properly- maybe the pineapple wasn't quite drained enough? It is difficult to say.
The difference in color could be related to the butter and sometimes even the eggs- there can be a lot of color variation from brand to brand - especially with butter. We often use Land O Lakes which has a more pale color. Yours being more yellow wouldn't indicate a problem though.
The "curdled" look that you describe could be the buttermilk reacting with the other ingredients- it can also happen when the there's a big temperature difference between the ingredients. I have this happen from time to time but it doesn't effect the outcome of the cake.
I hope this helps.
Hi! I want to make your cake recipe for mother's Day, do I need to keep it in the refrigerator?
Hi Everline! Glad that you are making this, yes. This would need to be refrigerated (in an airtight container, under a cake dome, or in a bakery box). However, remove from the refrigerator a few hours before serving to give it time to warm and soften.
I made this cake and turned out well , quick question can I make the frosting in advance?
Hi Sonja, I haven't but I don't see why not. If it loses its volume you can briefly rewhip.
I just made this for my husband on his 73rd bday. He said it was the best cake he ever tasted in 73 years. WOW, It really was delicious. 🎂
Hi Cheryl! Your cake is beautiful, I'm so glad that your husband loved his birthday cake! Thanks so much for your feedback.
I'm wondering how far in advance I can make the frosting and put the cake together? Will the whip cream hold up or do I need to make it day of? I just made the cake layers, but wondering if I should hold off on making the filling in the frosting tomorrow.
Hi
I was looking for this recipe for a 12” Cake Pan Size????Would you be a le to please send me a Ingredients?Ita for a big crowd for Birthdays &Anniversary.Please?!!’
Can this recipe be used for cup cakes? Piping filling in centers?
Hi Evon, yes that should be fine!
would you have a doctored version? or could I just substitute the pineapple cake mix?
sounds delicious and want to try. is there a doctored version? I've looked but no luck. could you substitute pineapple cake mix or should just modify comparing to other doctored recipes you have? for example: add x amount of flour to cake mix?