Mom's Chocolate Cake
We have a new chocolate cake for you! Mom's Chocolate Cake is a delicious, perfectly moist recipe with chocolate whipped cream filling and chocolate buttercream frosting!
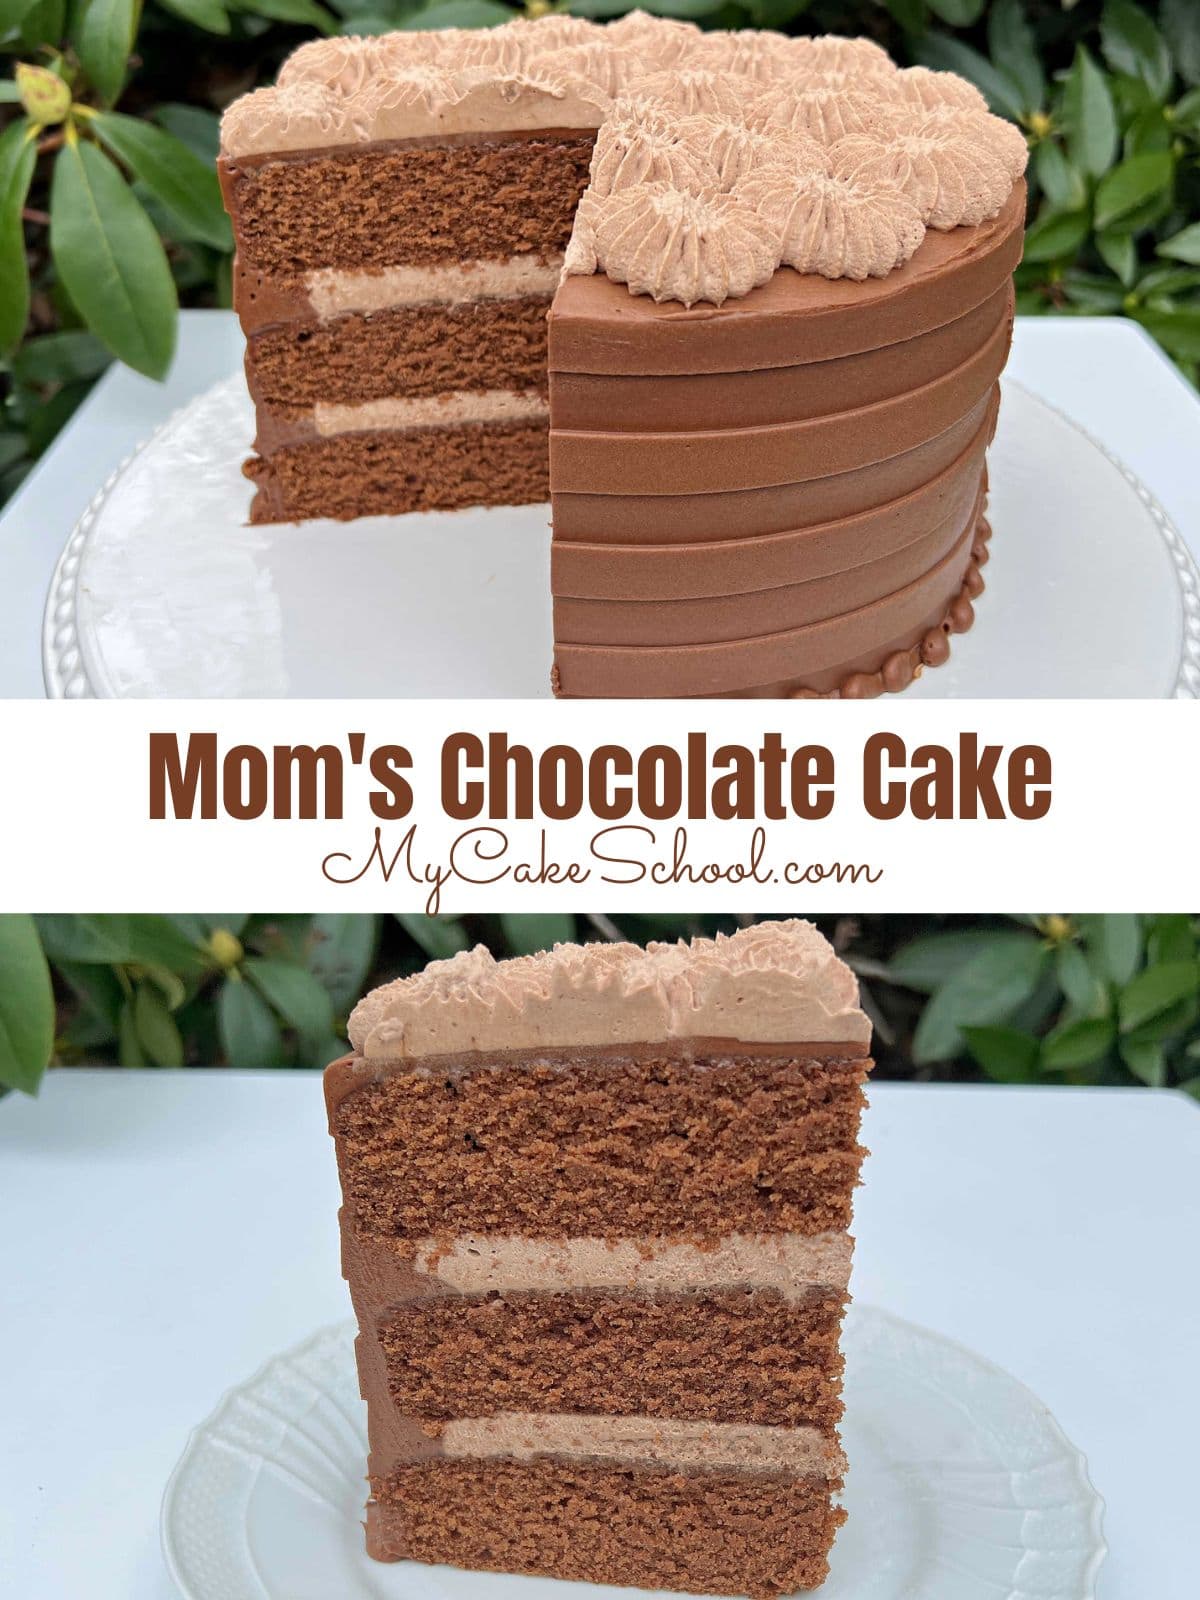
If you love chocolate cake, put this recipe on your list! We've made several chocolate cakes over the years, from Chocolate Sour Cream Pound Cake to Almond Joy Cake, Marble Cake and more.
Today's recipe isn't quite as rich as our Chocolate Sour Cream Cake or Chocolate Cake from Scratch as it uses a bit less cocoa powder, but the flavor is heavenly!
We've paired it with a light and luscious chocolate whipped cream, and an easy, decadent chocolate buttercream.
Table of Contents
How to Make Mom's Chocolate Cake
You can find the full, printable cake recipe further down in this post. Here is a rundown of our steps!
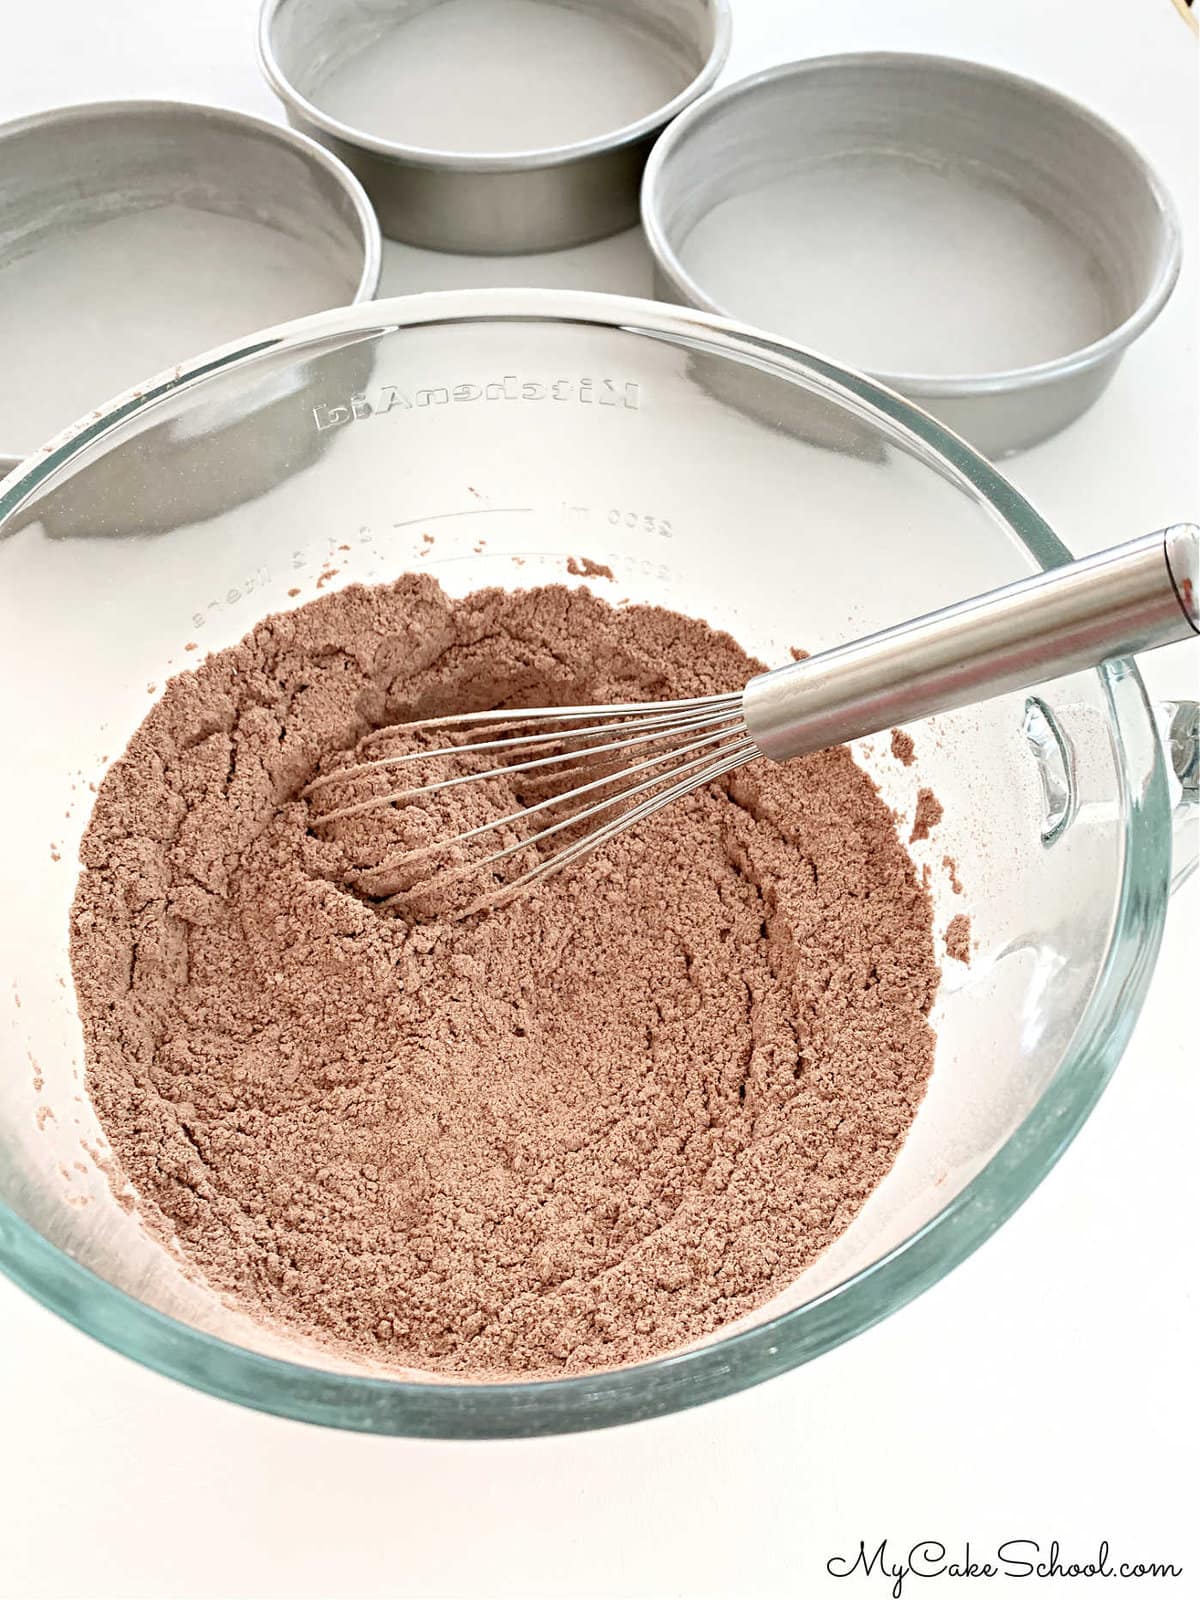
- Prepare Pans & Preheat: Preheat the oven to 325 degrees, grease (with vegetable shortening) and flour three 8x2 inch round pans. We also like to line our pans with circles of parchment paper.
- Flour Mixture: In a medium bowl, whisk the all purpose flour, unsweetened cocoa powder, baking powder, baking soda, and salt. Set aside
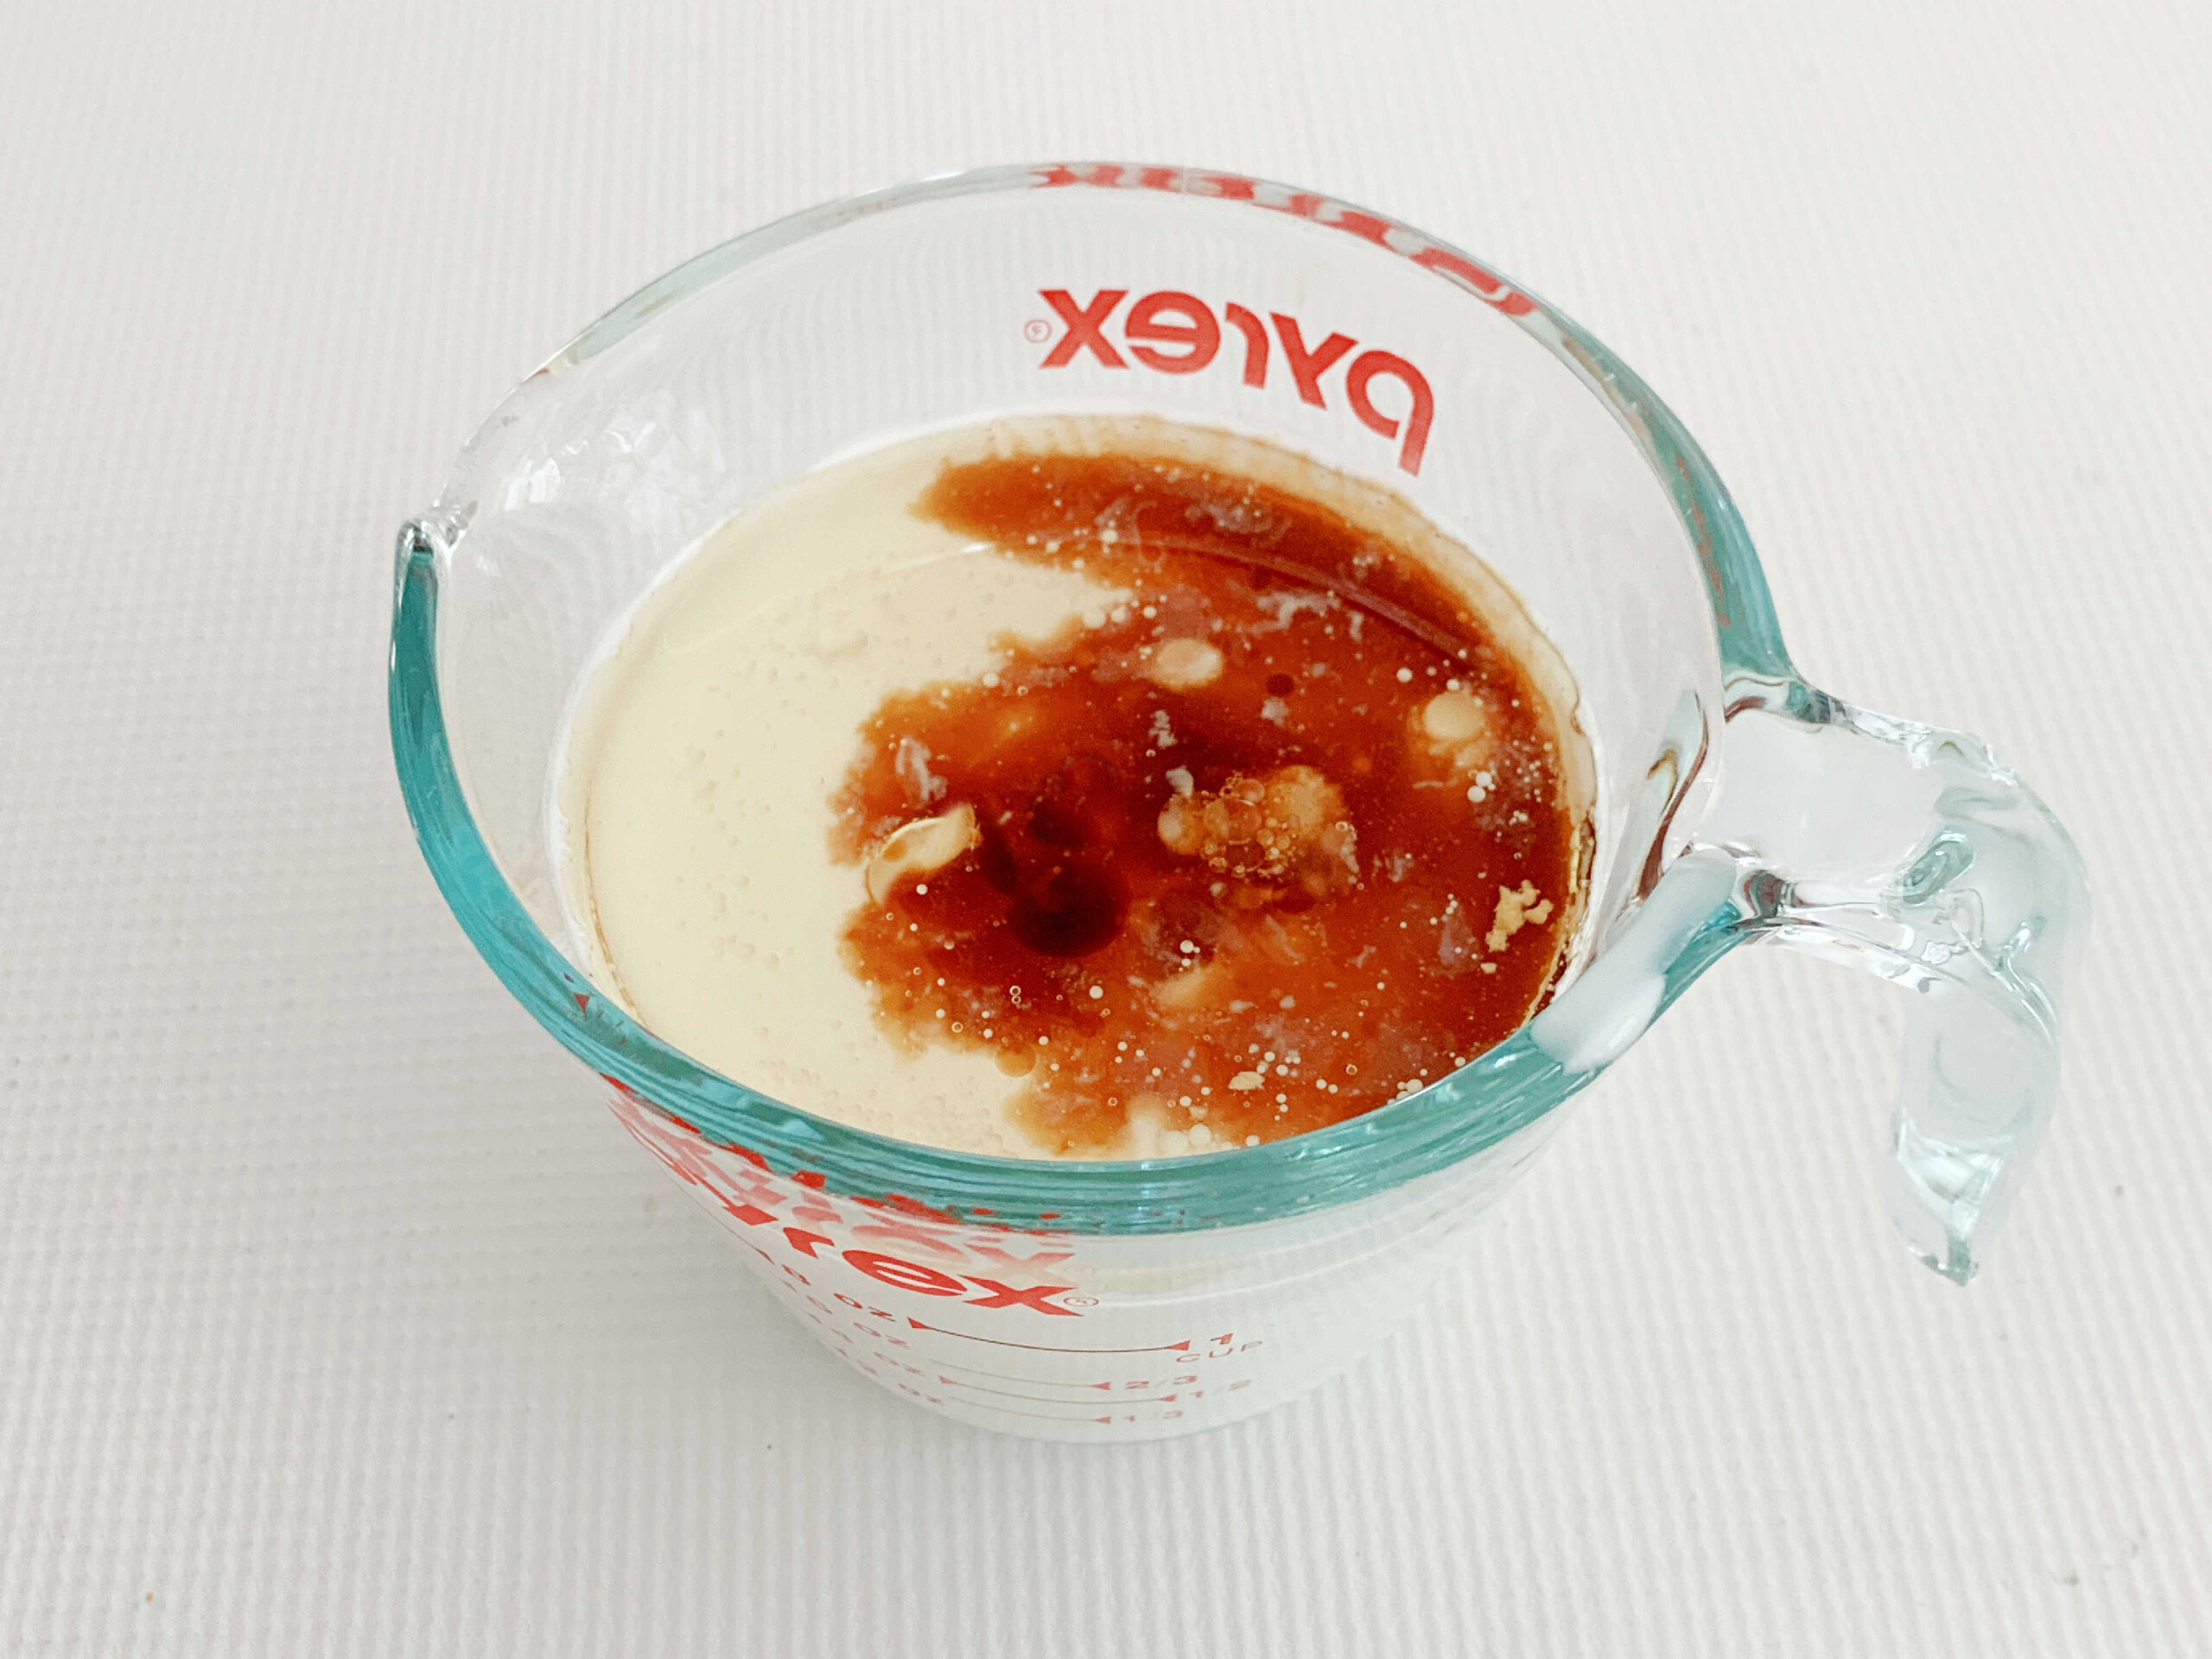
- Buttermilk Mixture: In another bowl, add the buttermilk, oil and vanilla. Set aside.
- Butter and Sugar: In the bowl of your mixer, add the softened unsalted butter and mix at medium speed until smooth. Gradually add the granulated sugar and continue to mix on medium speed 3 to 5 minutes until lightened in color and fluffy.
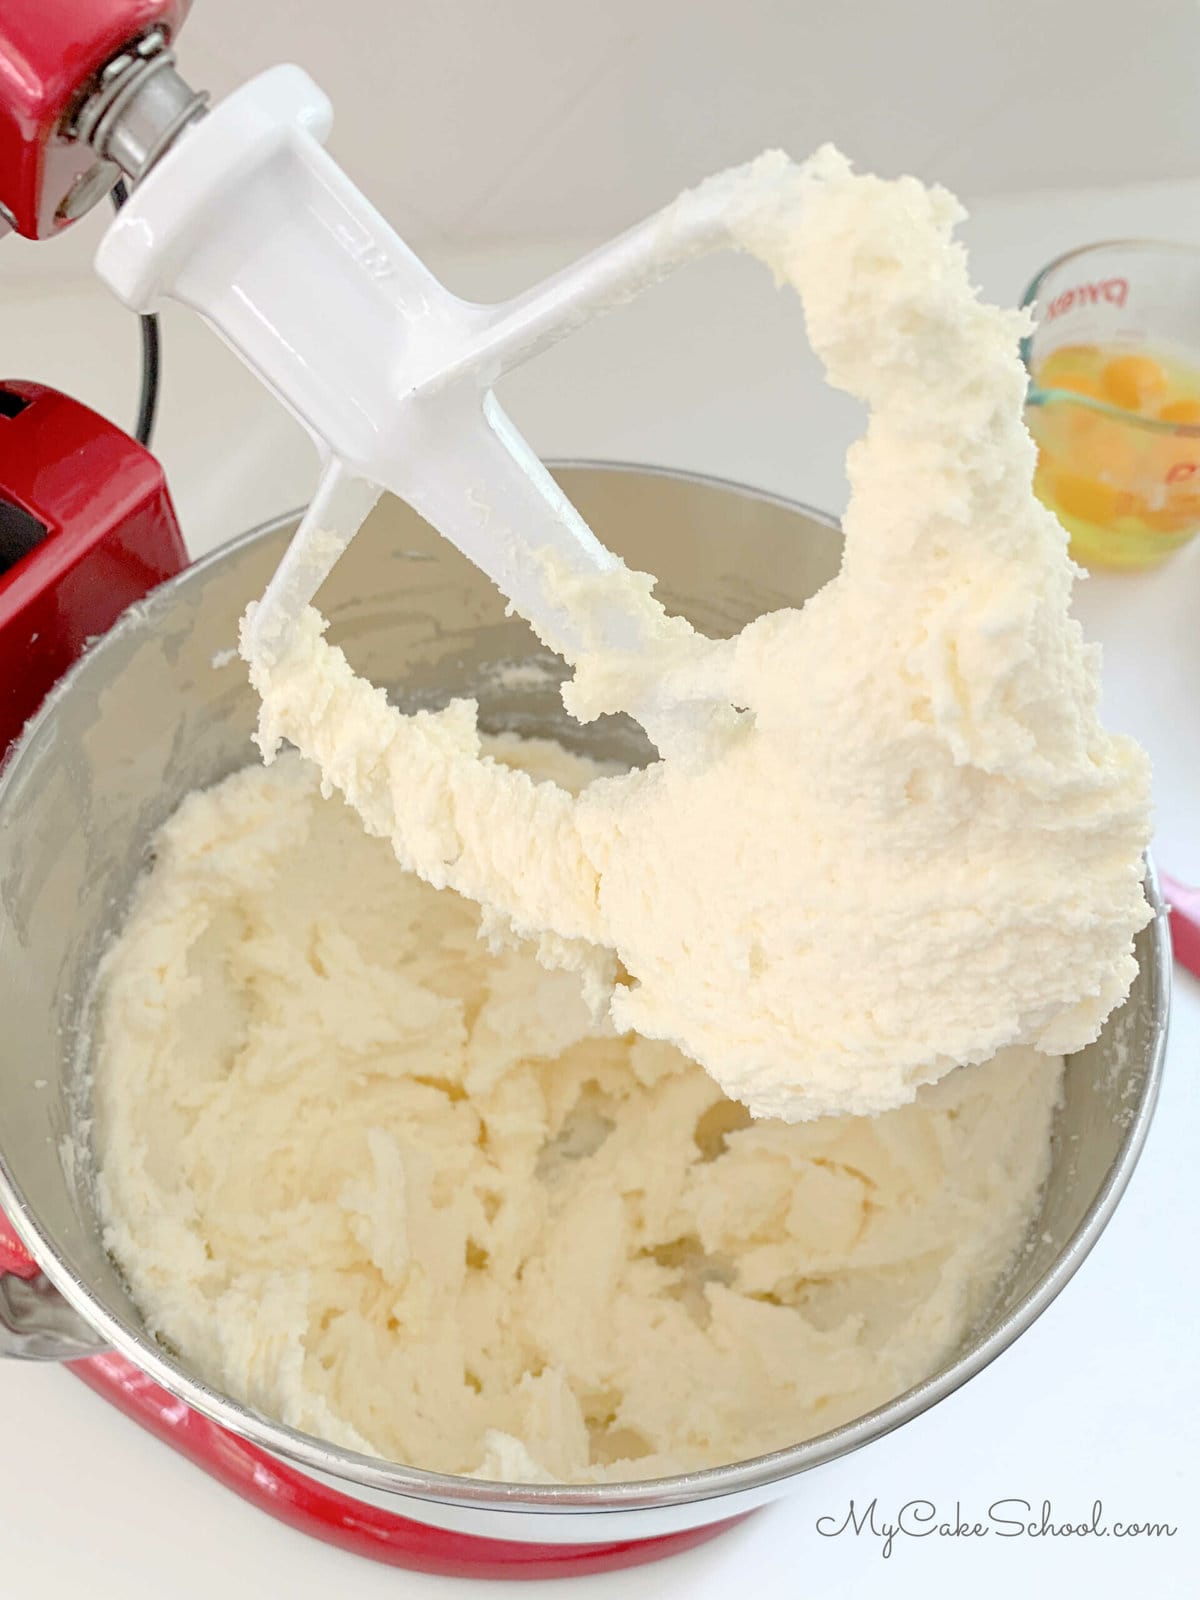
- Eggs: Add the room temperature eggs one at a time, mixing after each one until the yellow of the yolk is blended.
- Flour & Buttermilk Mixtures: With the mixer on low speed, alternately add the flour mixture and buttermilk mixture, beginning and ending with the dry ingredients (3 additions of dry and 2 of wet). Be careful not to over-mix. Mix just until blended.
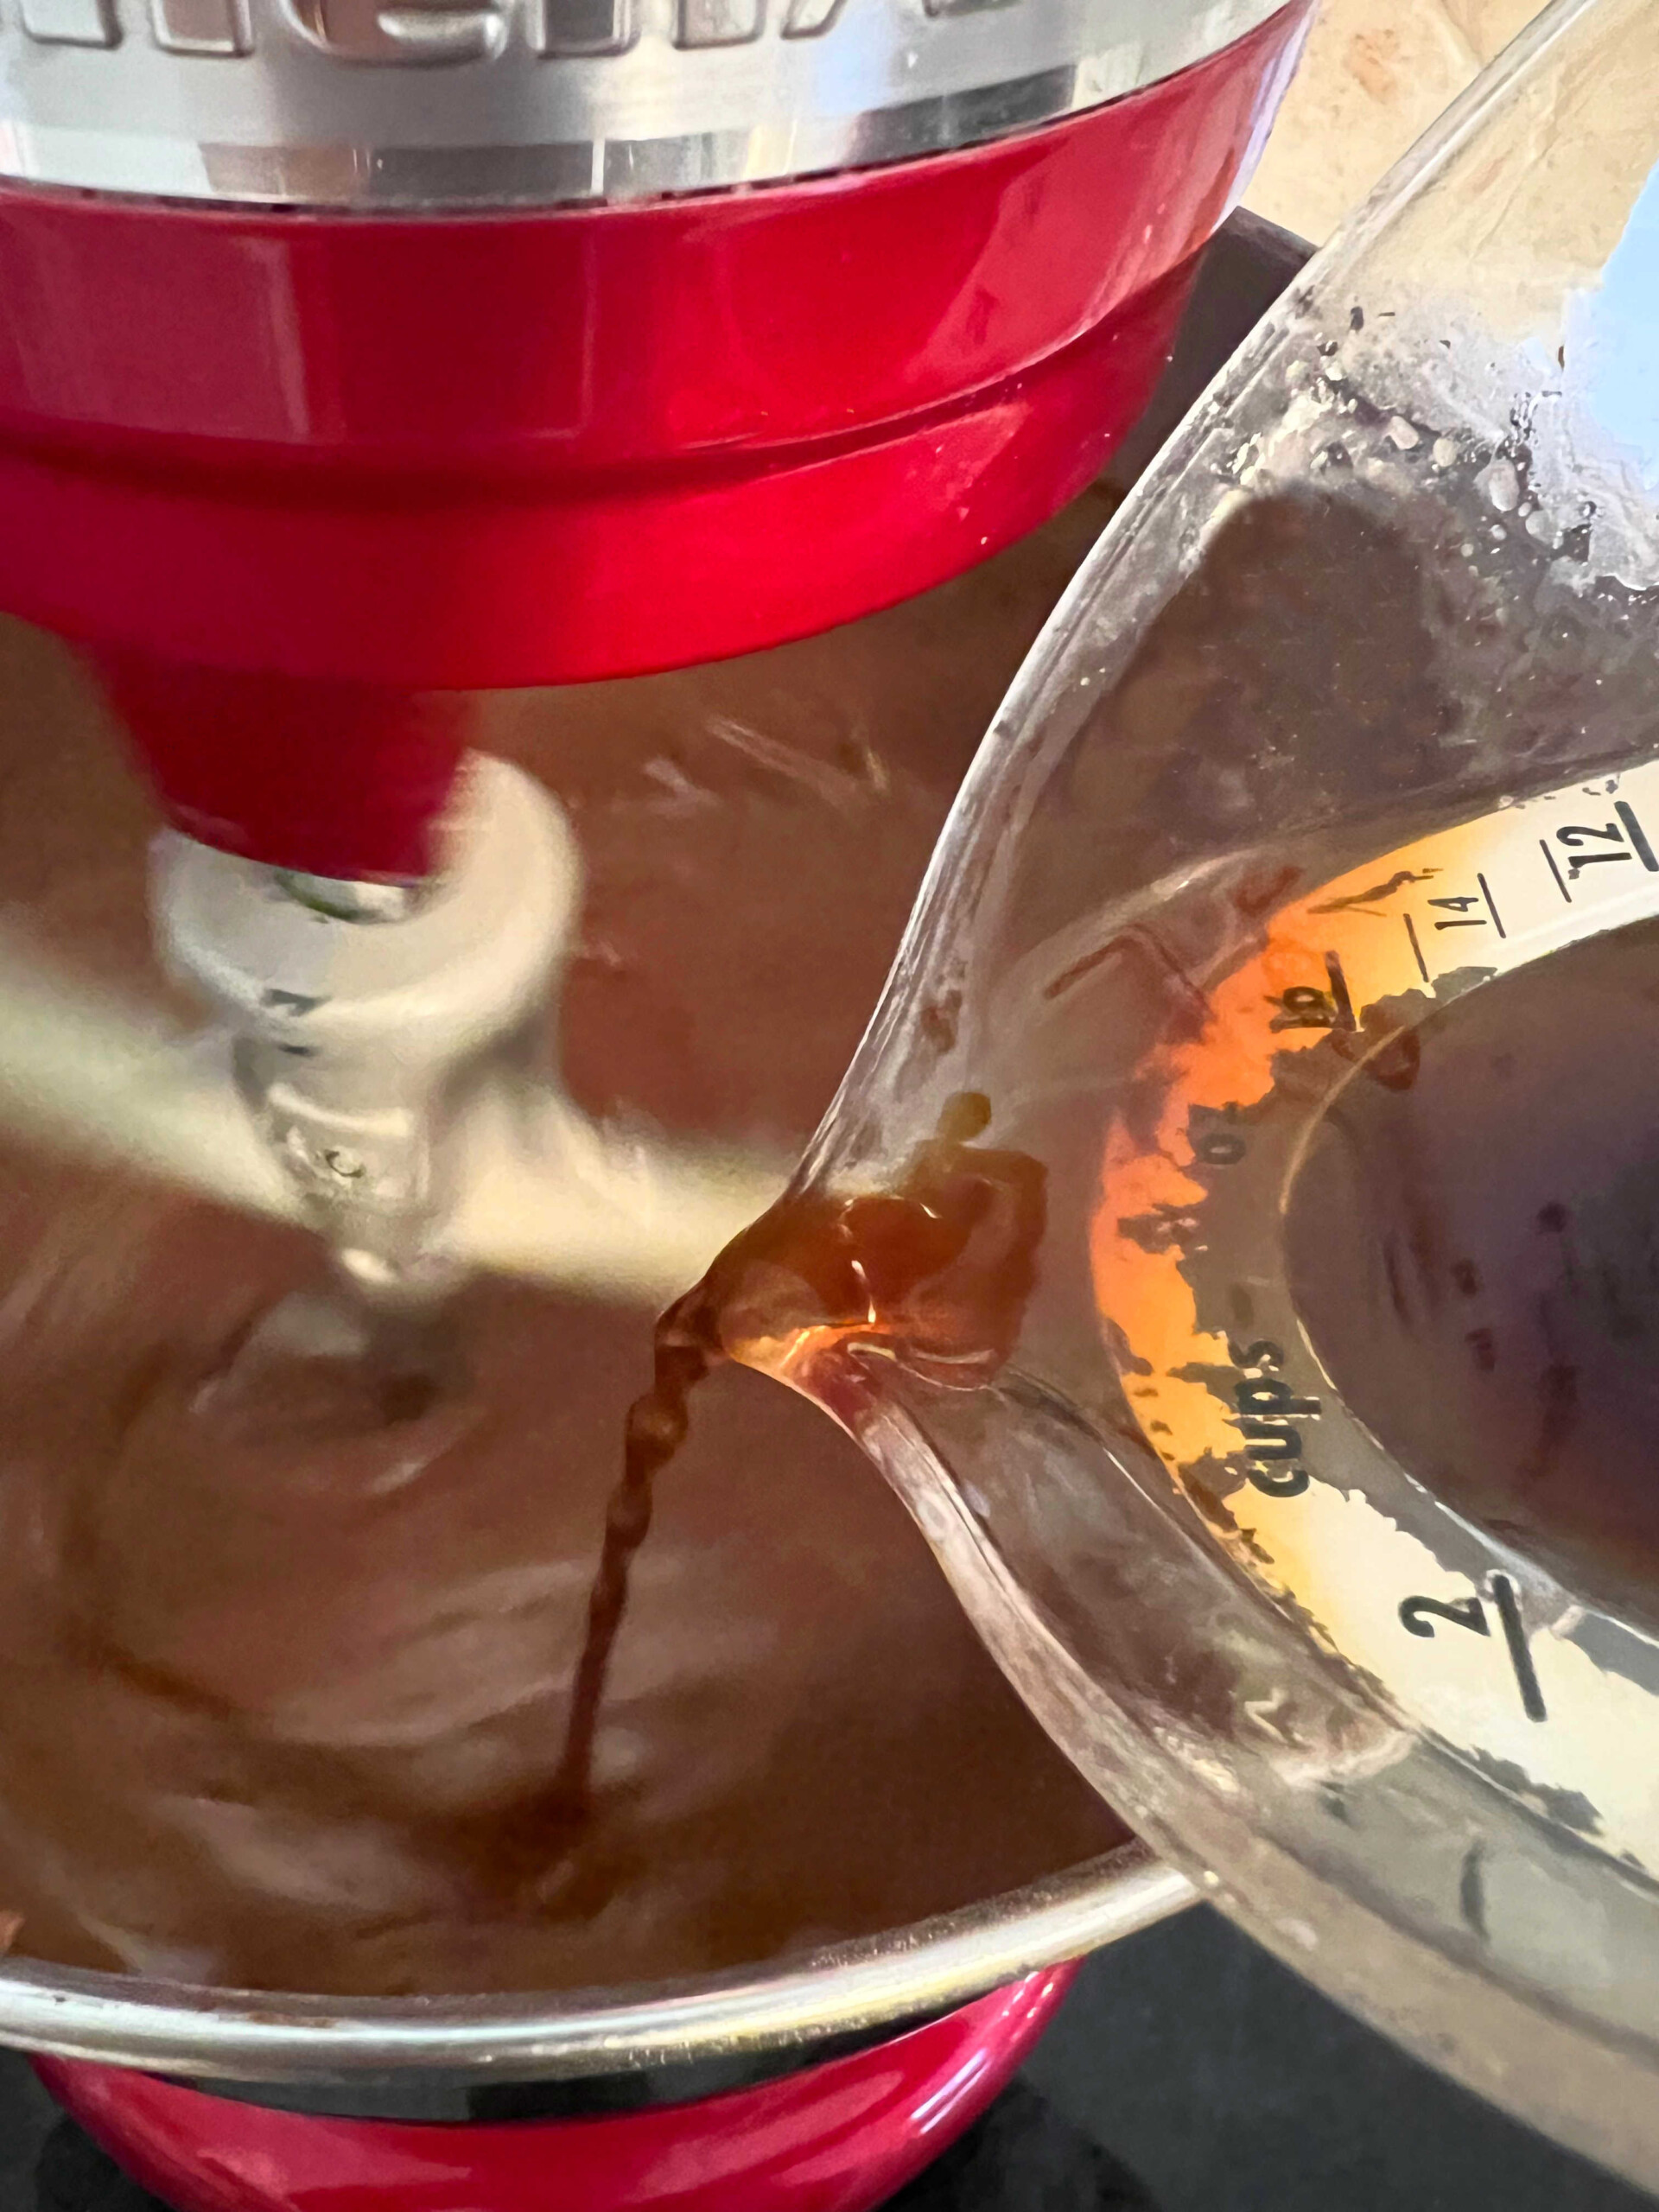
- Adding the Coffee: Continuing at low speed, slowly add the ¾ cup of very hot coffee, mixing 30 seconds to blend.
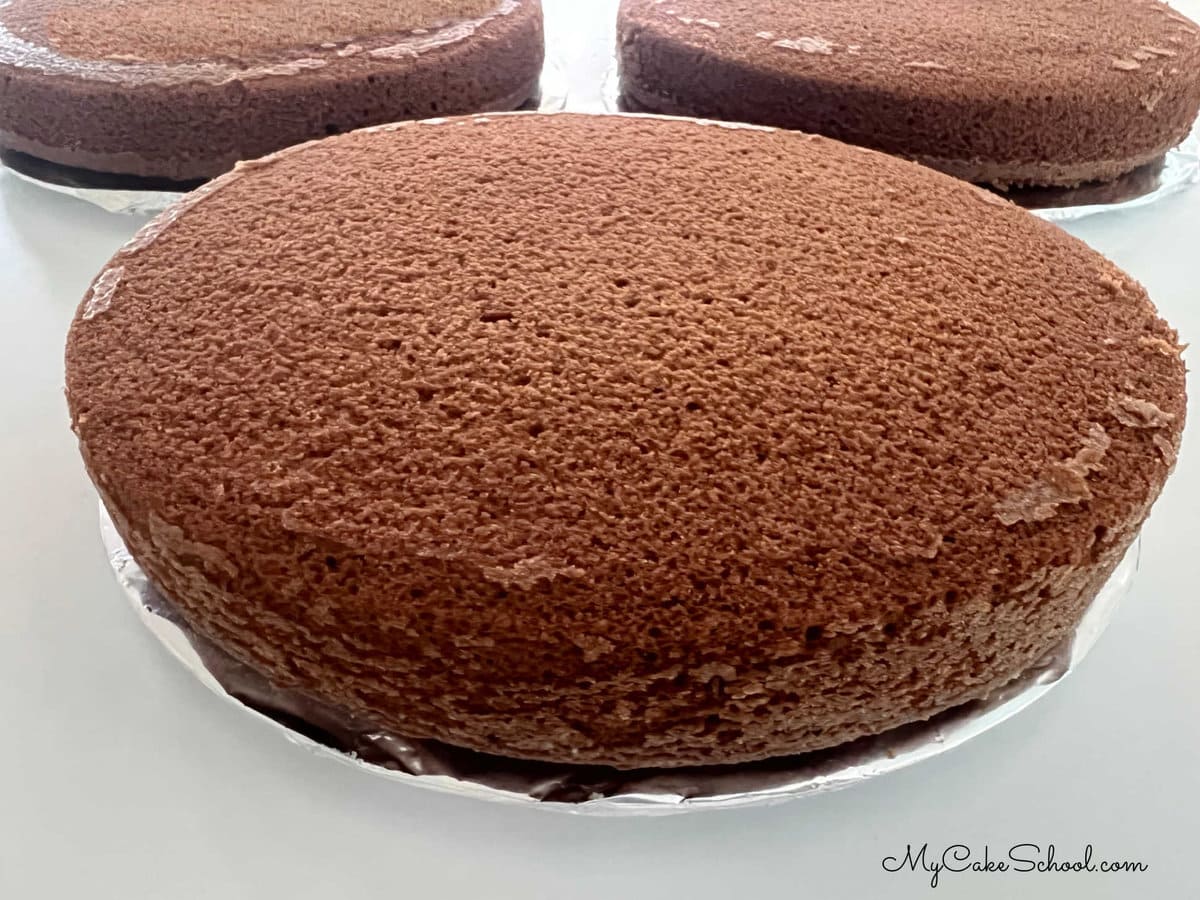
- Time to Bake! Divide the cake batter between the three 8 inch cake pans. Bake at 325 degrees for 25 to 30 minutes or until a toothpick inserted in the center comes out clean or with just a few crumbs attached.
- Cool: Let cool 5 to 10 minutes in their pans on a wire rack before turning out.
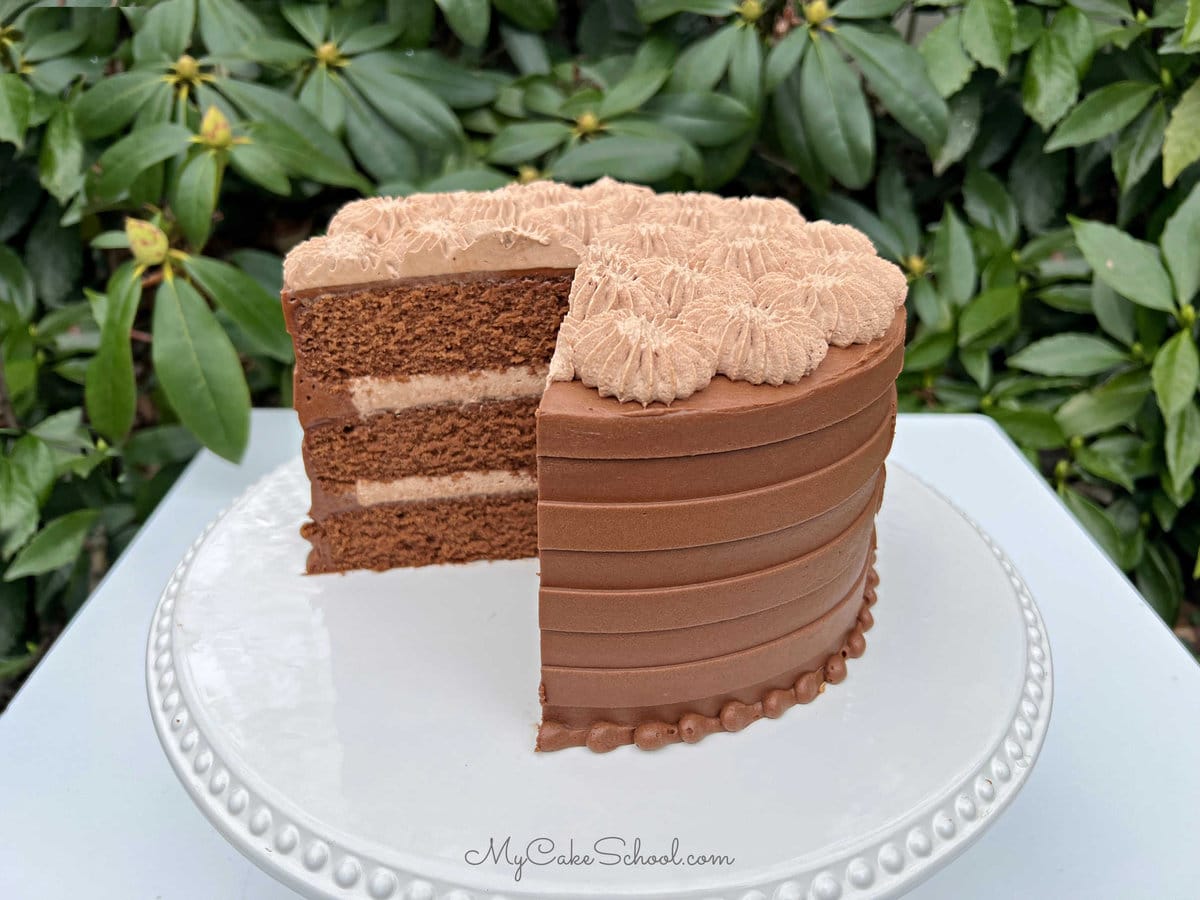
For the Chocolate Whipped Cream Filling
There are a number of fillings that would be great with this chocolate cake, including our easy chocolate mousse filling as used in our Chocolate Mousse Cake, our chocolate buttercream recipe (which we are using as our frosting), peanut butter buttercream, and more.
However, today we decided to go with a light and delicious Chocolate Whipped Cream Filling!
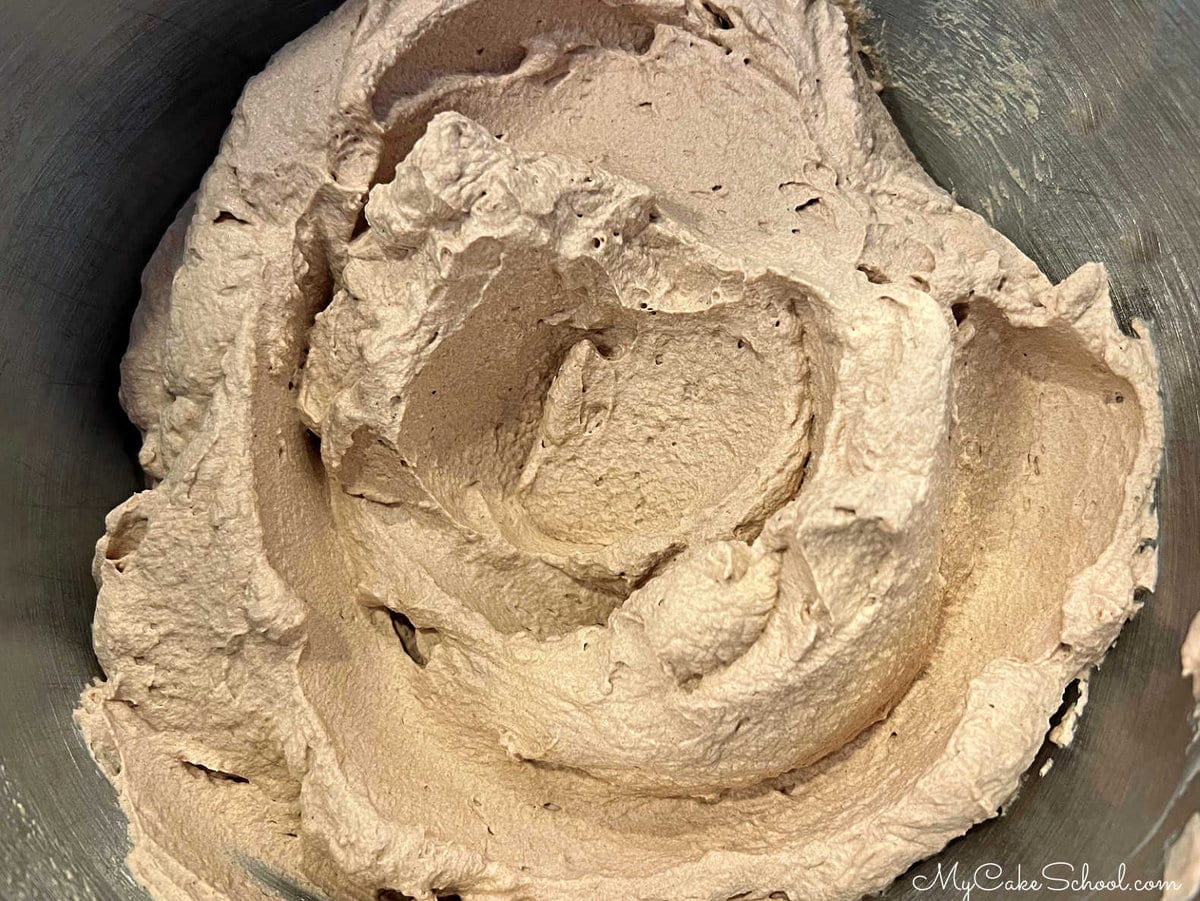
This is a spin on our sweetened whipped cream recipe, but with the addition of cocoa powder. It complements our cake perfectly! We used it as both a cake filling and topping.
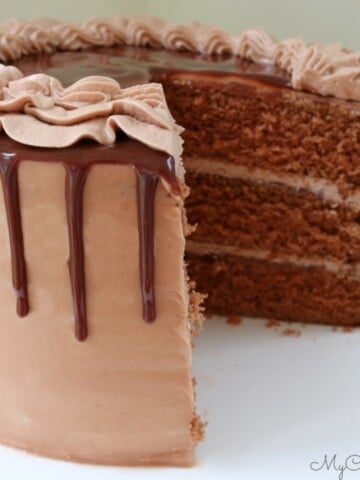
Chocolate Buttercream
This chocolate buttercream recipe is one of our favorites- we've used it on countless cake recipes over the years as both a filling and a frosting!
It is more rich than the chocolate whipped cream, and so if you are looking for a super chocolatey filling, it is a great option.
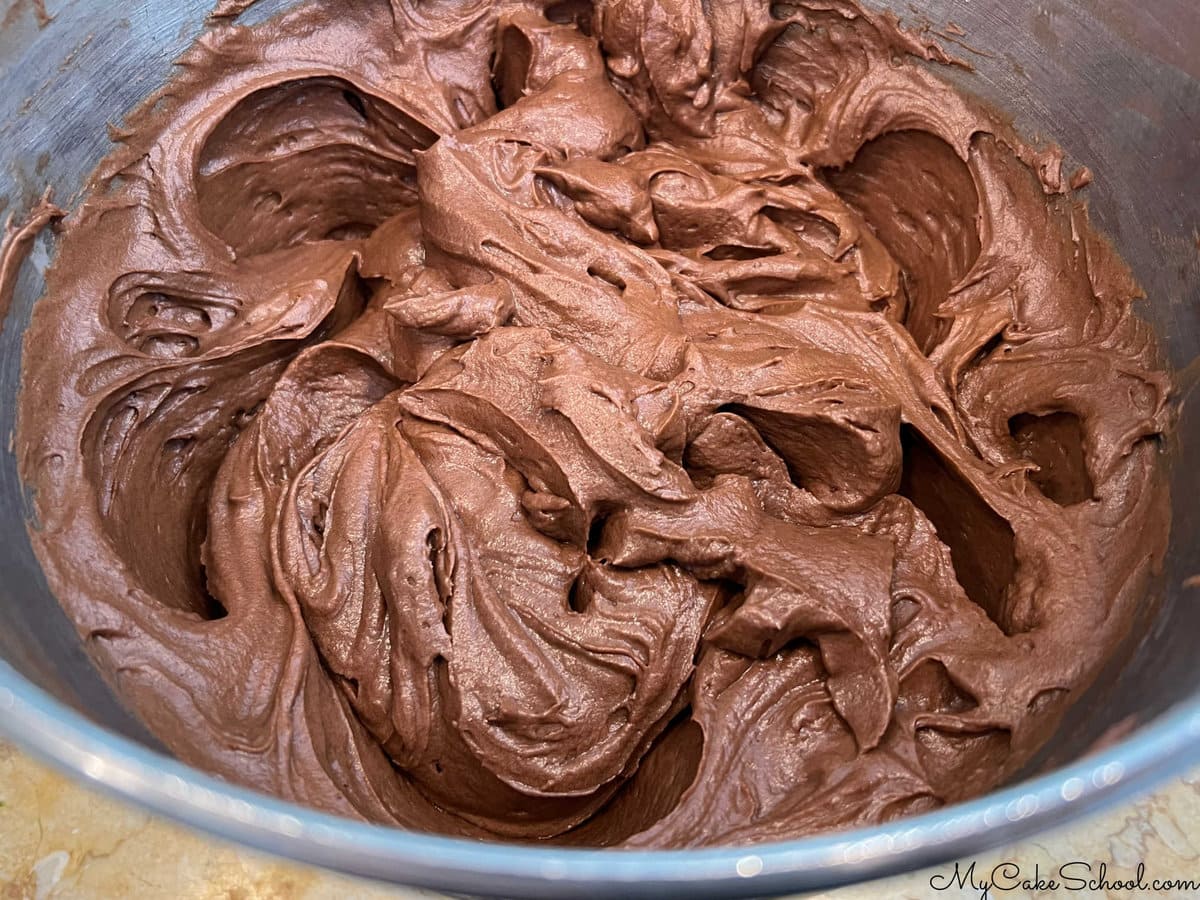
This chocolate frosting comes together in no time. It is a simple combination of butter, powdered sugar, unsweetened cocoa powder, a pinch of salt, a splash of milk, and a bit of vanilla extract.
It pipes perfectly and makes a wonderful filling and frosting for cakes and cupcakes. You cannot go wrong with this recipe!
Assembling the Cake
Once your chocolate cake layers have completely cooled, it is time to assemble the cake!
- Place the first cake layer on cake plate or pedestal.
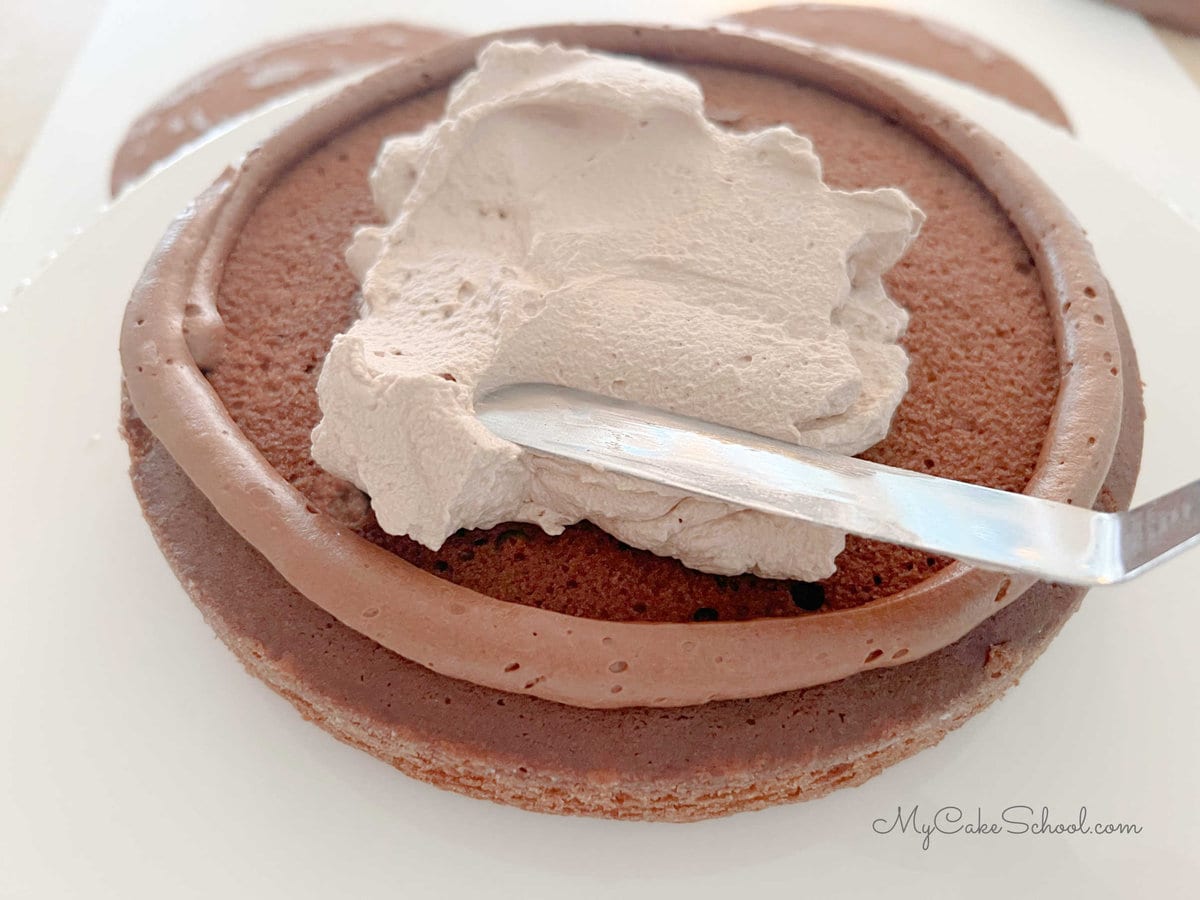
- Next, pipe a dam of chocolate buttercream around the top edge of the cake, about ½-1/4 inch from the edge. (I do this using a disposable piping bag with the tip snipped away. You could also use a ziplock bag with the corner snipped away.)
- Fill inside of the dam with chocolate whipped cream filling.
- Fill in any remaining gaps between cake layers with buttercream.
- Frost the cake. I like to frost a thin (crumb coat) layer first and freeze the cake for 15 minutes before adding the second layer of frosting.
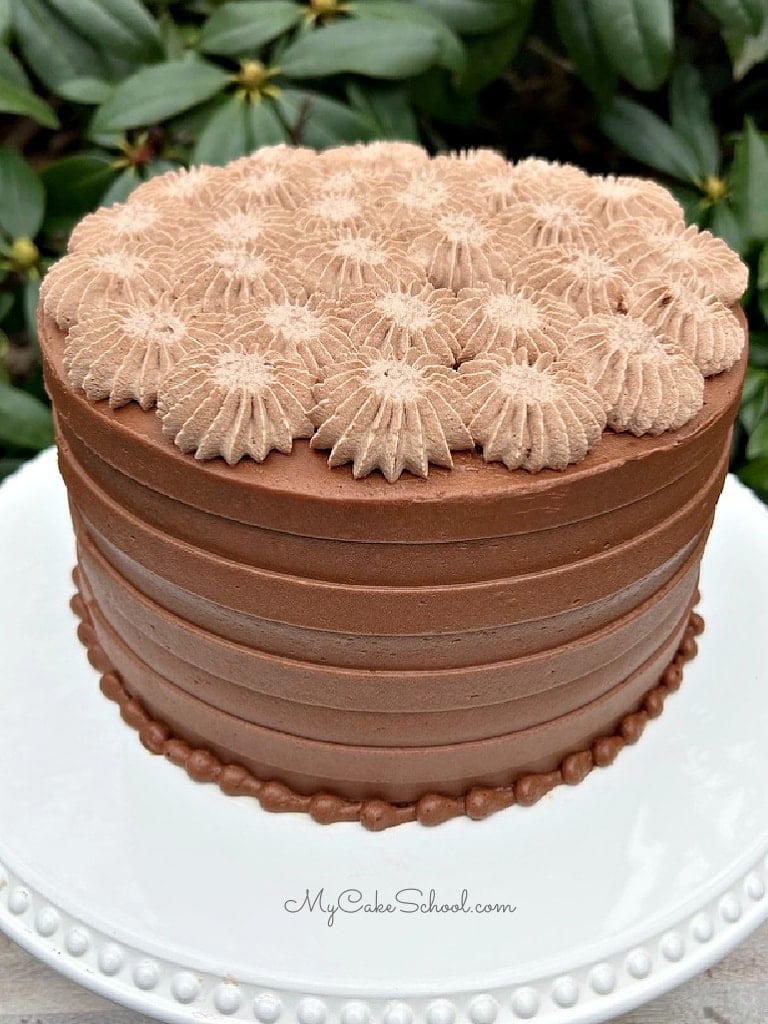
Decorating the Cake
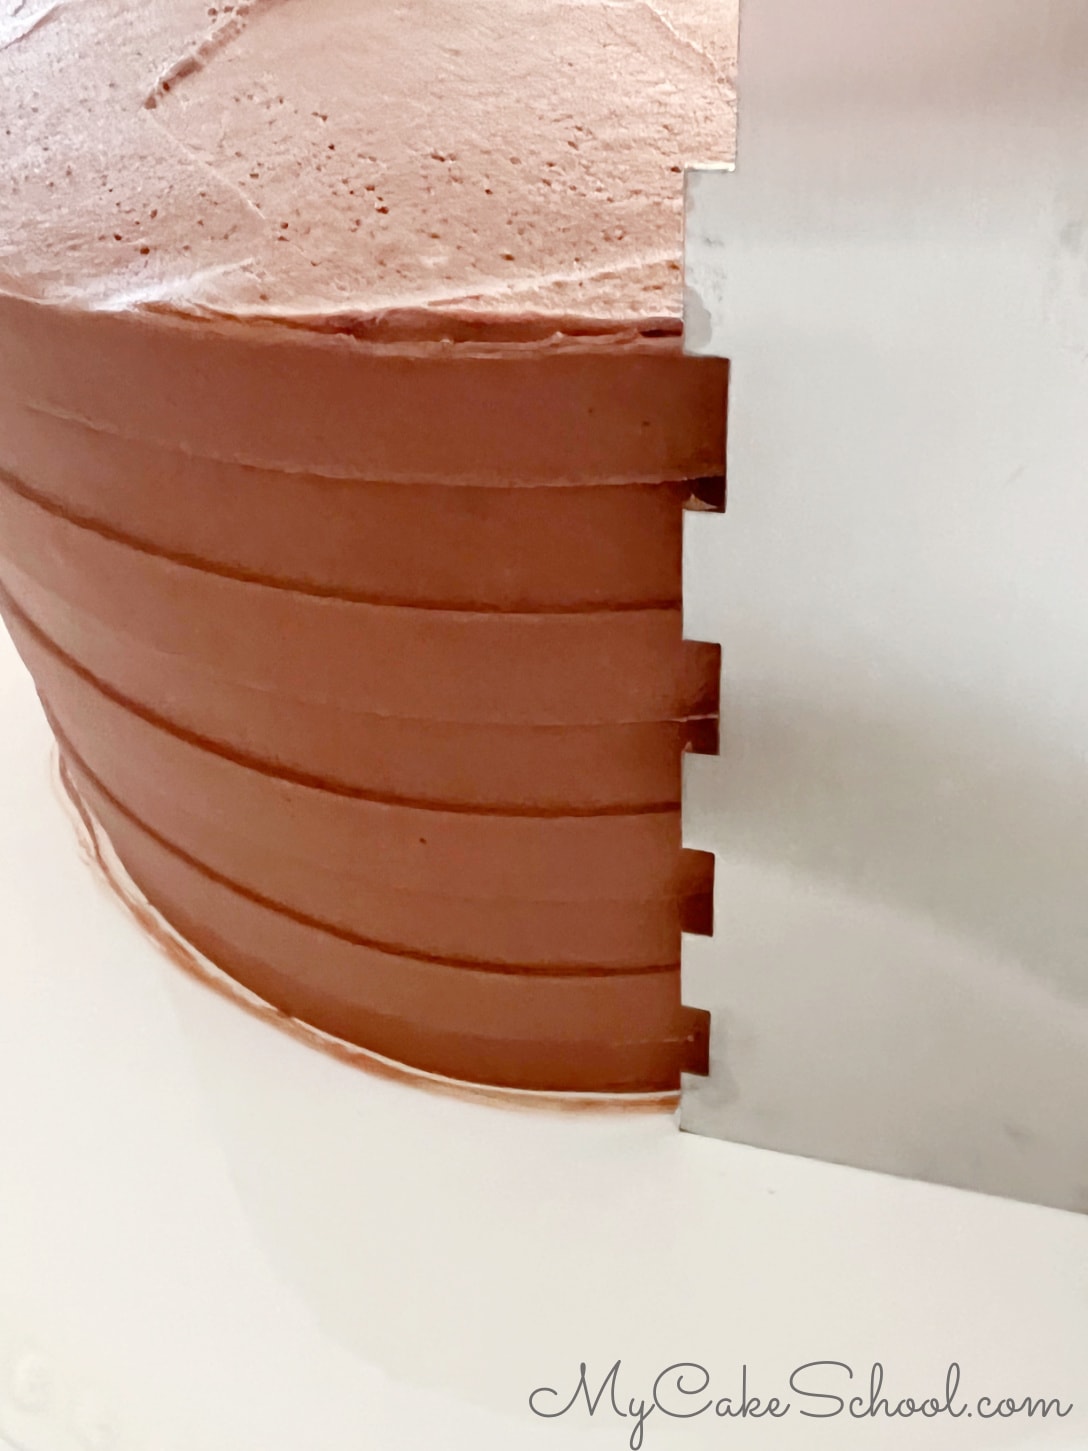
- Decorate the cake however you like! I combed the second layer of chocolate buttercream around the sides of the cake with a metal cake comb. It's helpful to heat the metal comb under hot water just before combing for an extra smooth finish.
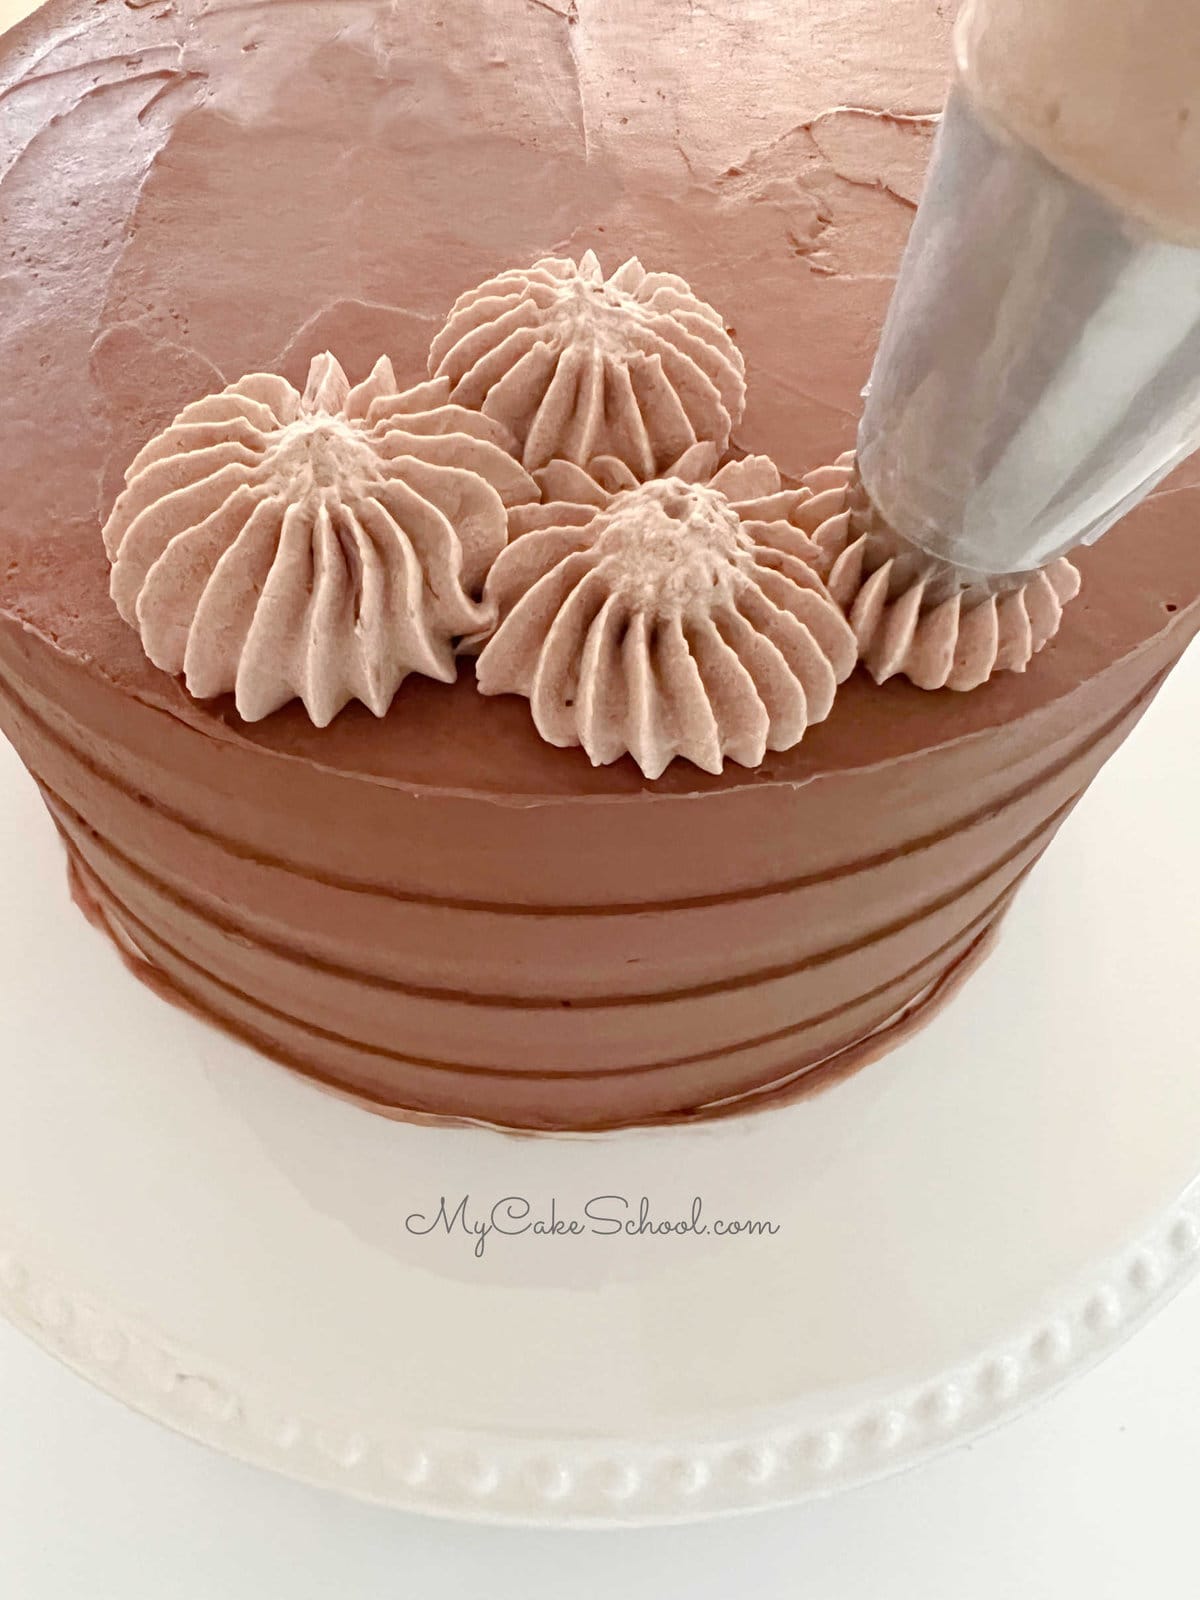
- Then, I piped the remaining chocolate whipped cream using a star french tip (Wilton 8B or similar)
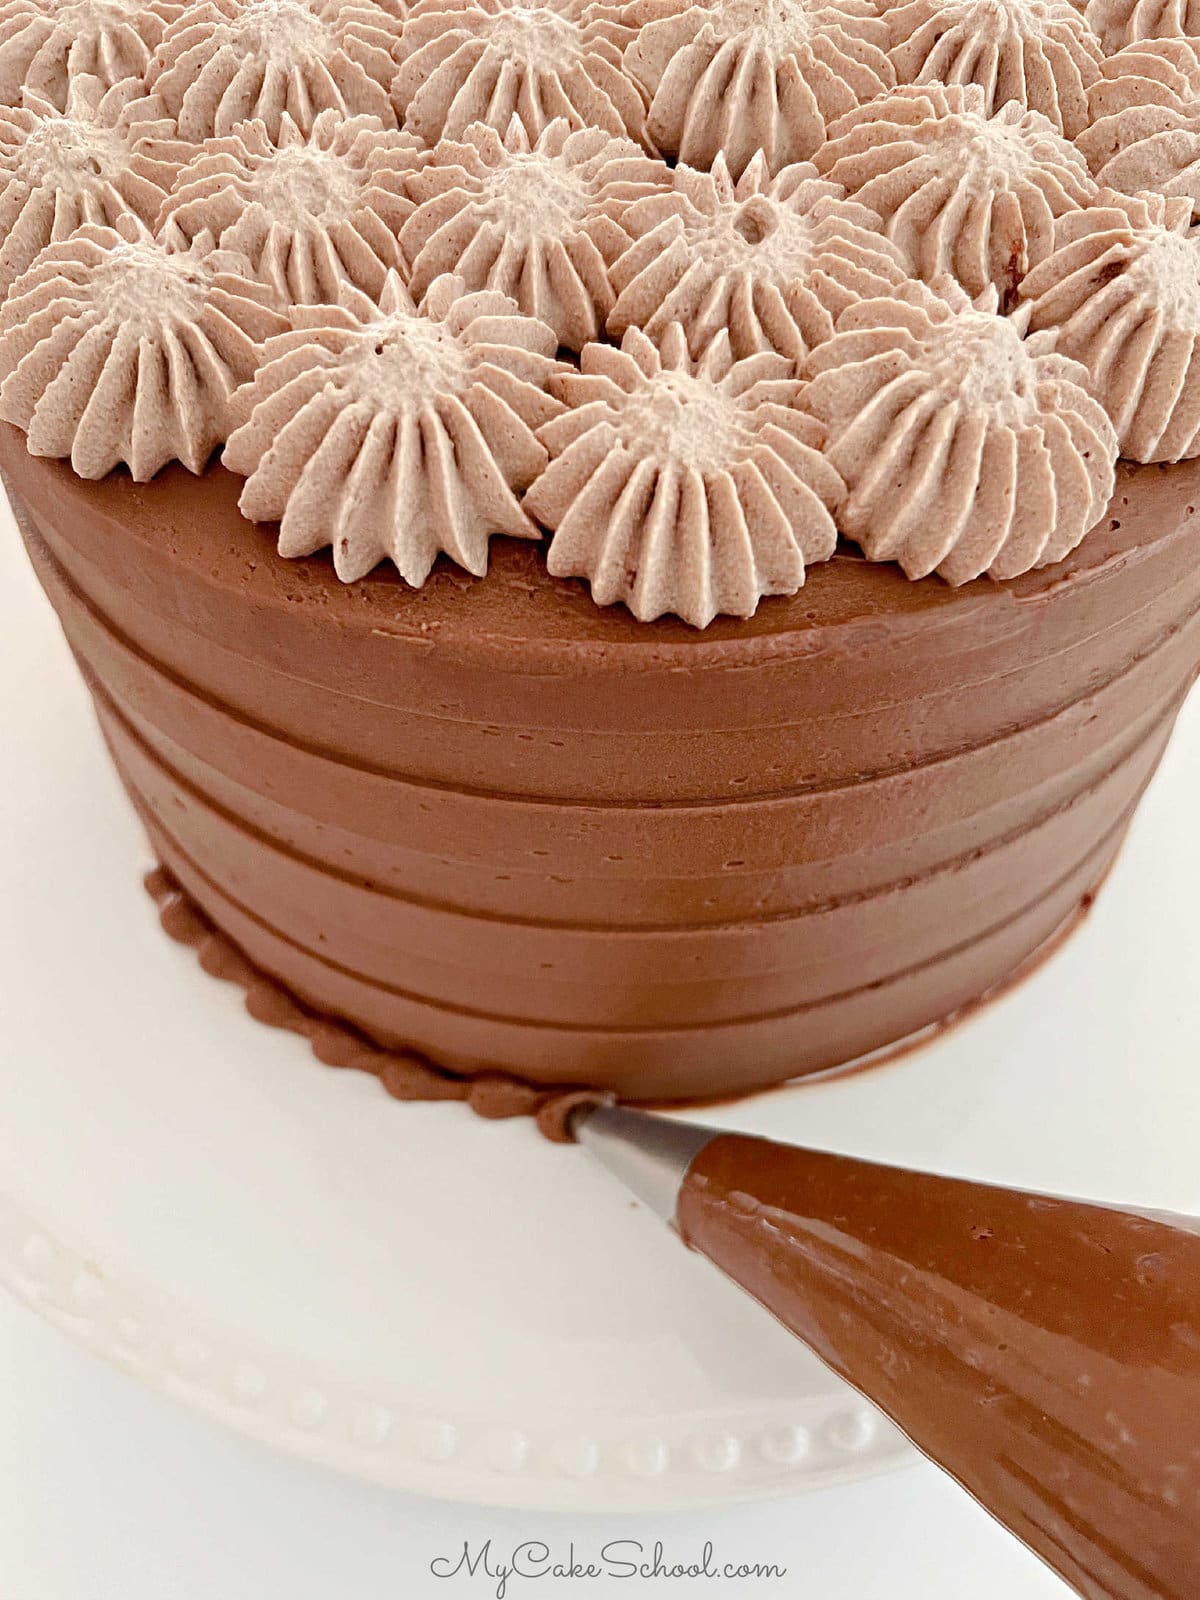
I piped a small buttercream bead border around the base of the cake using a round piping tip 4.
You can learn more about bead borders in our Piping Basics with a Round Piping Tip
I love the look of the contrasting shades of chocolate.
Recipe FAQs
More Chocolate Cakes
Keep this moist chocolate cake in mind for the chocolate lovers in your life! And while you're at it, don't miss our other delicious chocolate cakes. We have made so many over the years!
We'll list a few favorite chocolate cakes below, but make sure to check out our full collection in this post: 50+ of the Best Chocolate Cake Recipes!
Some of our most popular are German Chocolate Cake, Black Forest Cake, Gluten Free Chocolate Cake, and Chocolate Mousse Cake (from cake mix)!
Thanks so much for stopping by! We hope that you enjoy this recipe for Mom's Chocolate Cake.
Make sure to check out our other Cake Recipes as well! We have tons of recipes to share with you, including cake recipes from scratch as well as cake mix recipes!
Also, if you are interested in learning more about cake decorating, make sure to check out our Cake Decorating section as well for hundreds of free tutorials.
Have you made this? We would LOVE for you to leave a ⭐️ rating as well as a comment and photo below! We really appreciate your feedback!
Mom's Chocolate Cake
Equipment
Ingredients
- ¾ cup (70g) Unsweetened Cocoa Powder
- 2 Sticks (226g) unsalted butter, softened
- ¼ cup (50g) vegetable oil
- 2 cups (400g) sugar
- 3 large eggs, room temperature (If in a hurry, place eggs in a bowl of warm water for 5 minutes.)
- 3 cups (375g) All Purpose Flour
- 2 teaspoons (8g) baking powder
- ¼ teaspoon (1g baking soda)
- ¼ teaspoon (1g) salt
- 1 ¼ cup (280g) buttermilk
- 1 teaspoon (4g) vanilla extract
- ¾ cup (168g) Very Hot Coffee
For the Chocolate Whipping Cream
- 2 cups (480g) whipping cream (or heavy cream)
- ¼ cup (25g) unsweetened cocoa powder, sifted
- ¼ cup (29g) powdered sugar
- 1 teaspoon (4g) vanilla extract
For the Chocolate Buttercream
- 2 sticks (226g total) unsalted butter, softened (Do not microwave)
- 6 cups (690g) powdered sugar
- ¾ cup (70g) unsweetened cocoa (measure then sift)
- ⅓ -½ cup (72g) milk (adjust amount for desired consistency)
- 2 teaspoons (8g) vanilla extract 8 grams
- ½ teaspoon (3g) salt
Instructions
For the Cake
- Preheat the oven to 325 degrees, grease (with vegetable shortening) and flour three 8x2 inch round pans. We also like to line the bottom of pans with circles of parchment paper.
- In a medium bowl, add the flour, cocoa powder, baking powder, baking soda, and salt. Whisk to blend and set aside
- In another bowl, add the buttermilk, oil and vanilla. Set aside
- In the bowl of your mixer, add the softened butter and mix at medium speed until smooth. Gradually add the sugar and continue to mix on medium speed 3 to 5 minutes until lightened in color and fluffy.
- Add the eggs one at a time, mixing after each one until the yellow of the yolk is blended.
- With the mixer on low speed, alternately, add the flour mixture and buttermilk mixture, beginning and ending with the dry ingredients (3 additions of dry and 2 of wet). Mix just until blended.
- Continuing at low speed, slowly add the ¾ cup of very hot coffee, mixing until batter is blended and smooth.
- Divide the cake batter between the three 8 inch cake pans. Bake at 325 degrees for 25 to 30 minutes or until a toothpick inserted in the center comes out clean or with just a few crumbs attached. Let cool 5 to 10 minutes and turn out of pan.
For the Chocolate Whipped Cream
- Chill the mixing bowl and beaters/ whisk attachment in the freezer for 10 minutes.
- Pour the whipping cream, powdered sugar, cocoa, and vanilla into the chilled mixing bowl. Using a whisk attachment on a stand mixer, or using a handheld electric mixer, begin beating on low speed, gradually increasing to medium high speed.
- Mix until stiff peaks form (meaning that when you remove the mixer, the whipped cream peak holds its shape.)
For the Chocolate Buttercream Frosting
- Add butter and mix on low to medium speed until smooth. Add vanilla and blend into the butter.
- Add powdered sugar, salt, and cocoa powder.
- Add most of the milk and mix on low speed, increasing to medium as the ingredients become incorporated.
- Continue to mix adding remaining milk as needed. It may take 3-5 minutes to reach the smoothness and consistency you like. It will take longer if using a hand mixer. As you mix, the frosting will become very smooth. You can add additional milk (1 Tablespoon at a time) if the frosting is too thick or additional powdered sugar if too soft.
Assembling the Cake
- Place the first cake layer on cake plate or pedestal. Pipe a dam of chocolate buttercream around the top edge of the cake, about ½-1/4 inch from the edge. I do this using a disposable piping bag with the tip snipped away. You could also use a ziplock bag with the corner snipped away.
- Fill inside of the dam with chocolate whipped cream filling.
- Fill in any remaining gaps between cake layers with buttercream. Frost the cake. I like to frost a thin (crumb coat) layer first and freeze the cake for 15 minutes before adding the second layer of frosting. I combed my cake with a cake comb and then piped the remaining chocolate whipped cream using a star french tip (Wilton 8B or similar)
Looks delish! Pretty too! :-)
Hi Melissa,
Thanks for sharing another recipe. I tried quite a few of your recipes and they are always winners and keepers. I tried the sour cream version of your chocolate cake and that one is definitely a keeper and my go-go recipe for a chocolate cake.
I wanna try your Mom's Chocolate Cake recipe and would like to know whether I can use Cake Flour instead of the AP flour? Please let me know whether I can do it.
Hi Maureen, Thank you for your nice comment on the recipes. Yes, you can substitute cake flour for the AP flour. I hope you will enjoy the cake.