Monster Truck Cake Video
Today, we're going to show you how to make a 3D monster truck cake! Keep this cake design in mind for birthday cakes for the truck lovers in your life!
We have had A LOT of requests for car cakes, truck cakes, and MONSTER truck cakes. We are so happy that we finally have a video for this!
Table of Contents
Alternative to the Platform or our Truck Cake
This video starts with Mom (BeBe) building the platform for the monster truck cake. Don't let this step scare you from making this cake design!
However, if you'd prefer not to take a trip to the hardware store, an easy alternative is to cover a block of styrofoam with black fondant (or a black plastic tablecloth) to give the illusion of space beneath the cake. I would use melted candy melts to glue the styrofoam to the cake base (or even "real" glue).
Basic Cake Notes/Details
There's nothing like actually fully viewing the video tutorial to understand all of our steps in creating the monster truck cake. However, here is a simplified look at our process!
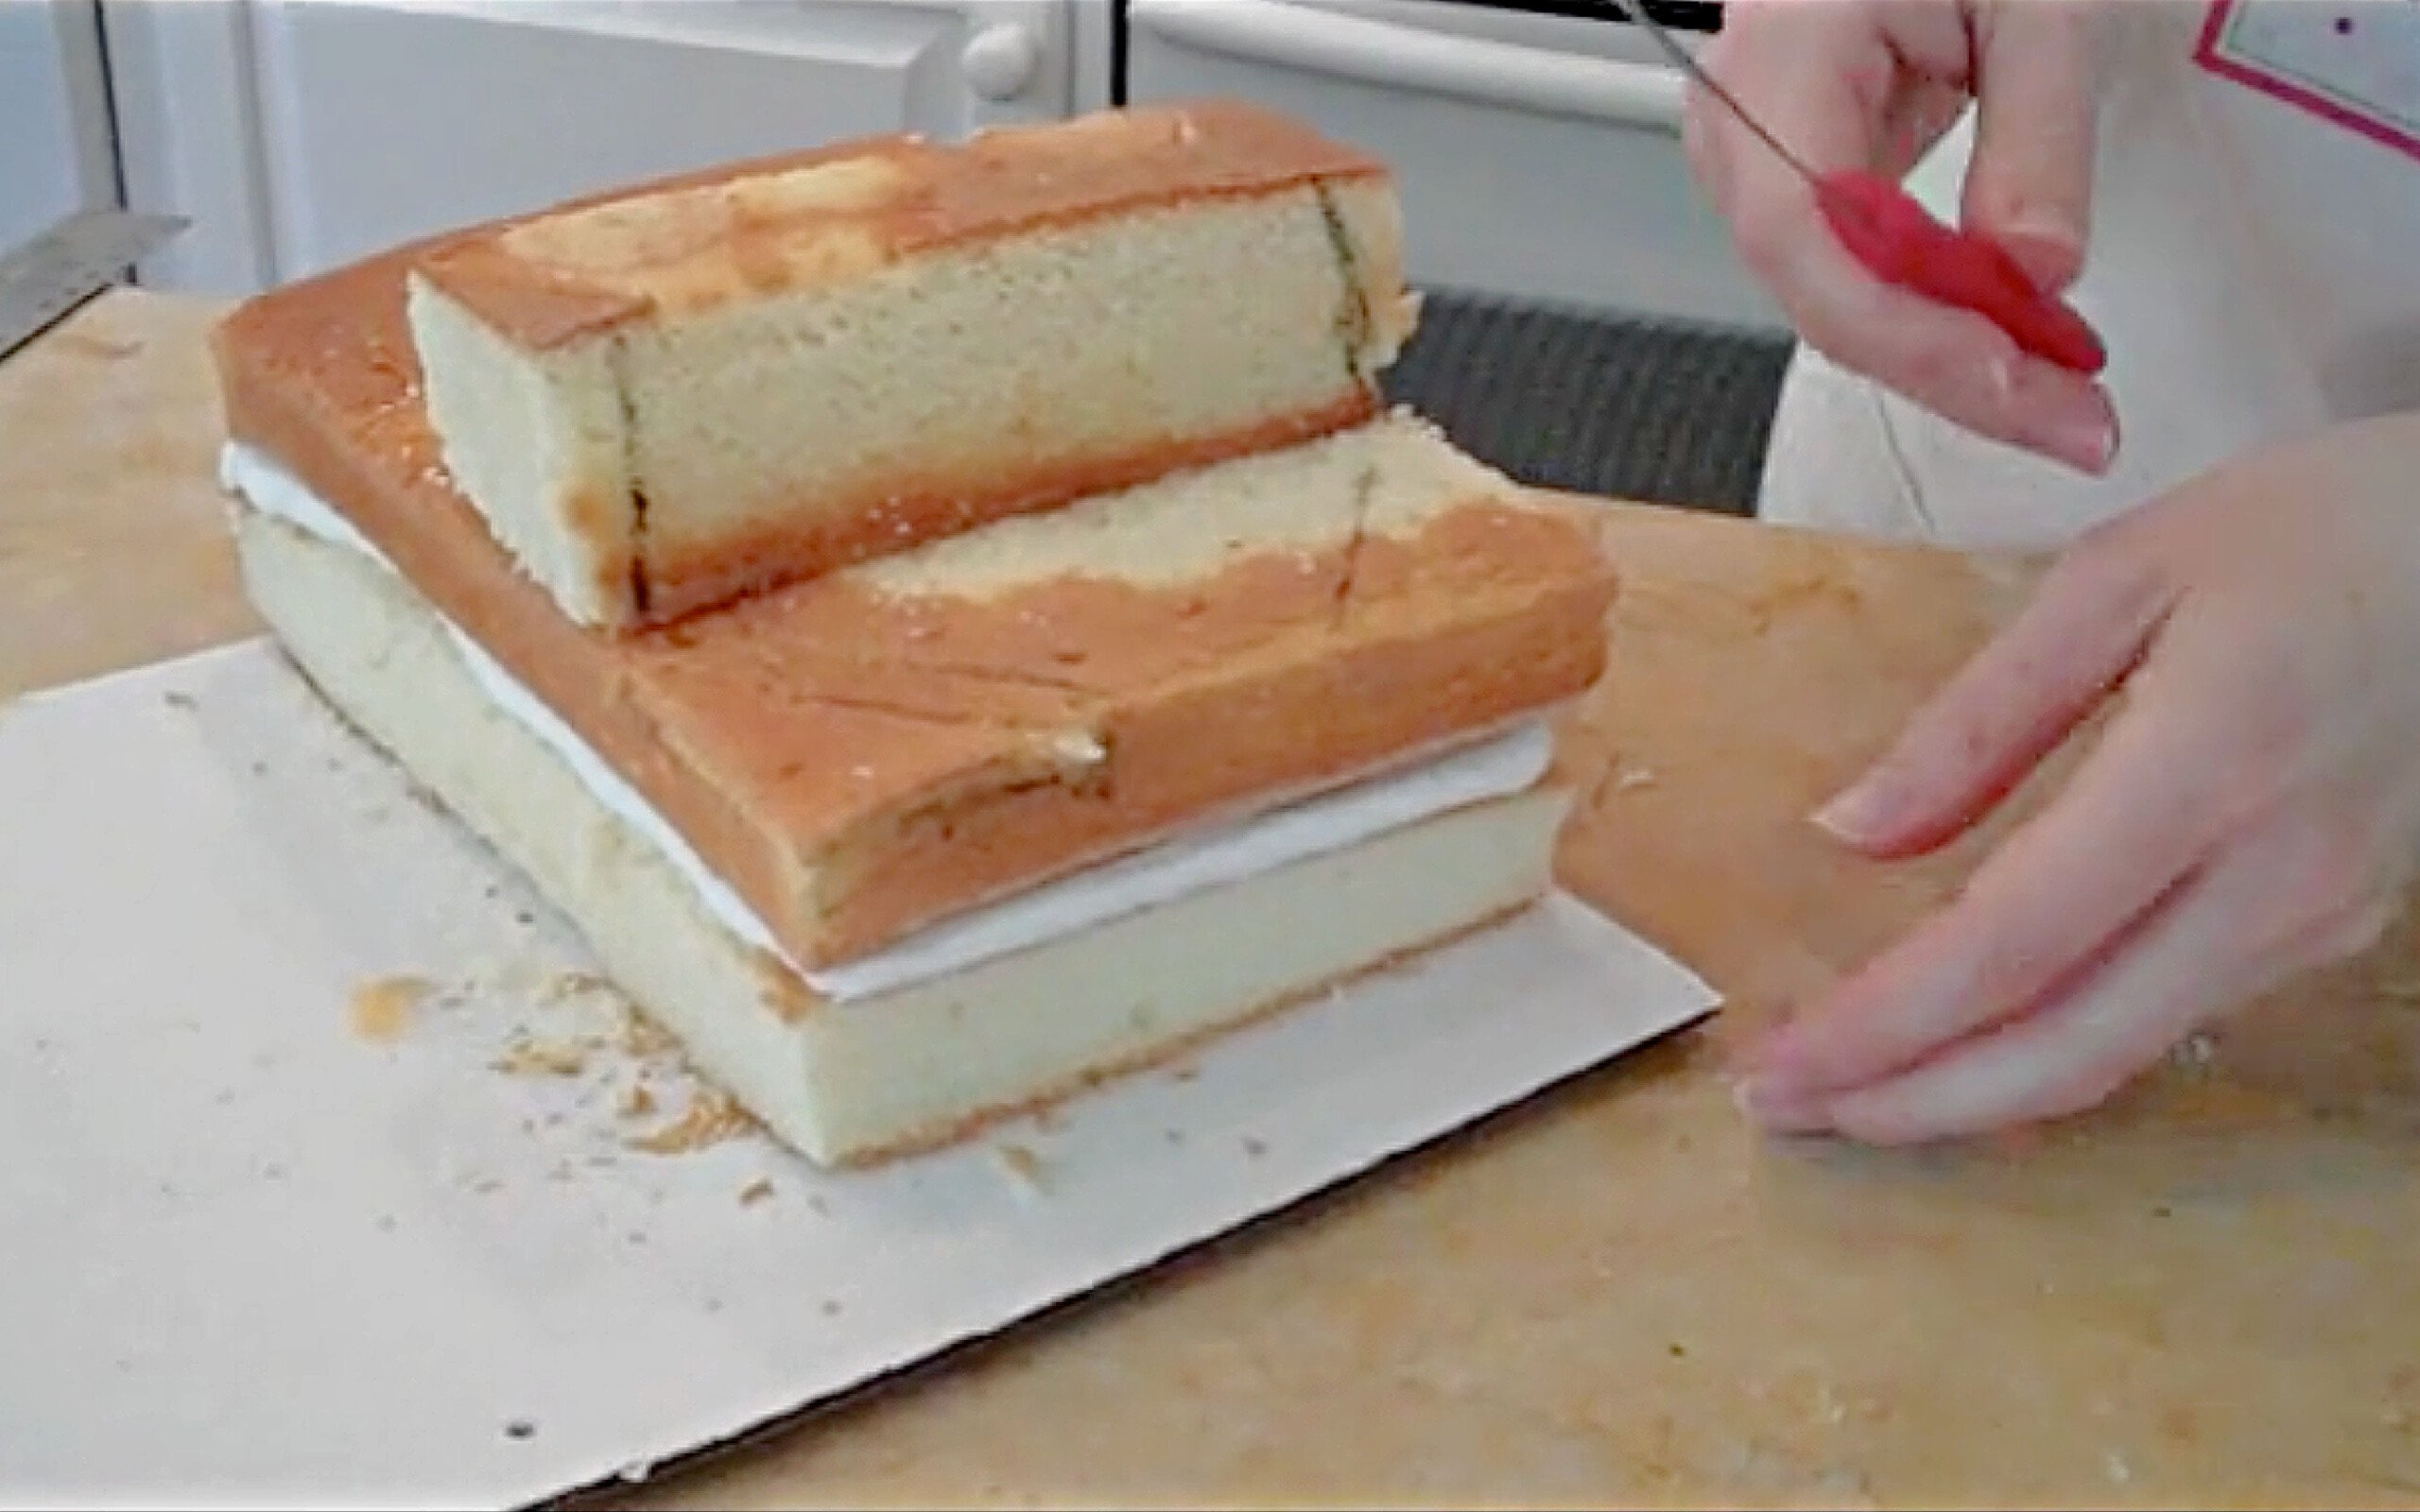
For today's cake, we used a single 9x13 cake layer and a loaf pan (White Almond Sour Cream recipe). Make sure that the cakes have fully cooled before decorating. I you are baking in advance, you may even prefer to wrap (plastic wrap & foil) and freeze the cake layers until you are ready to assemble.
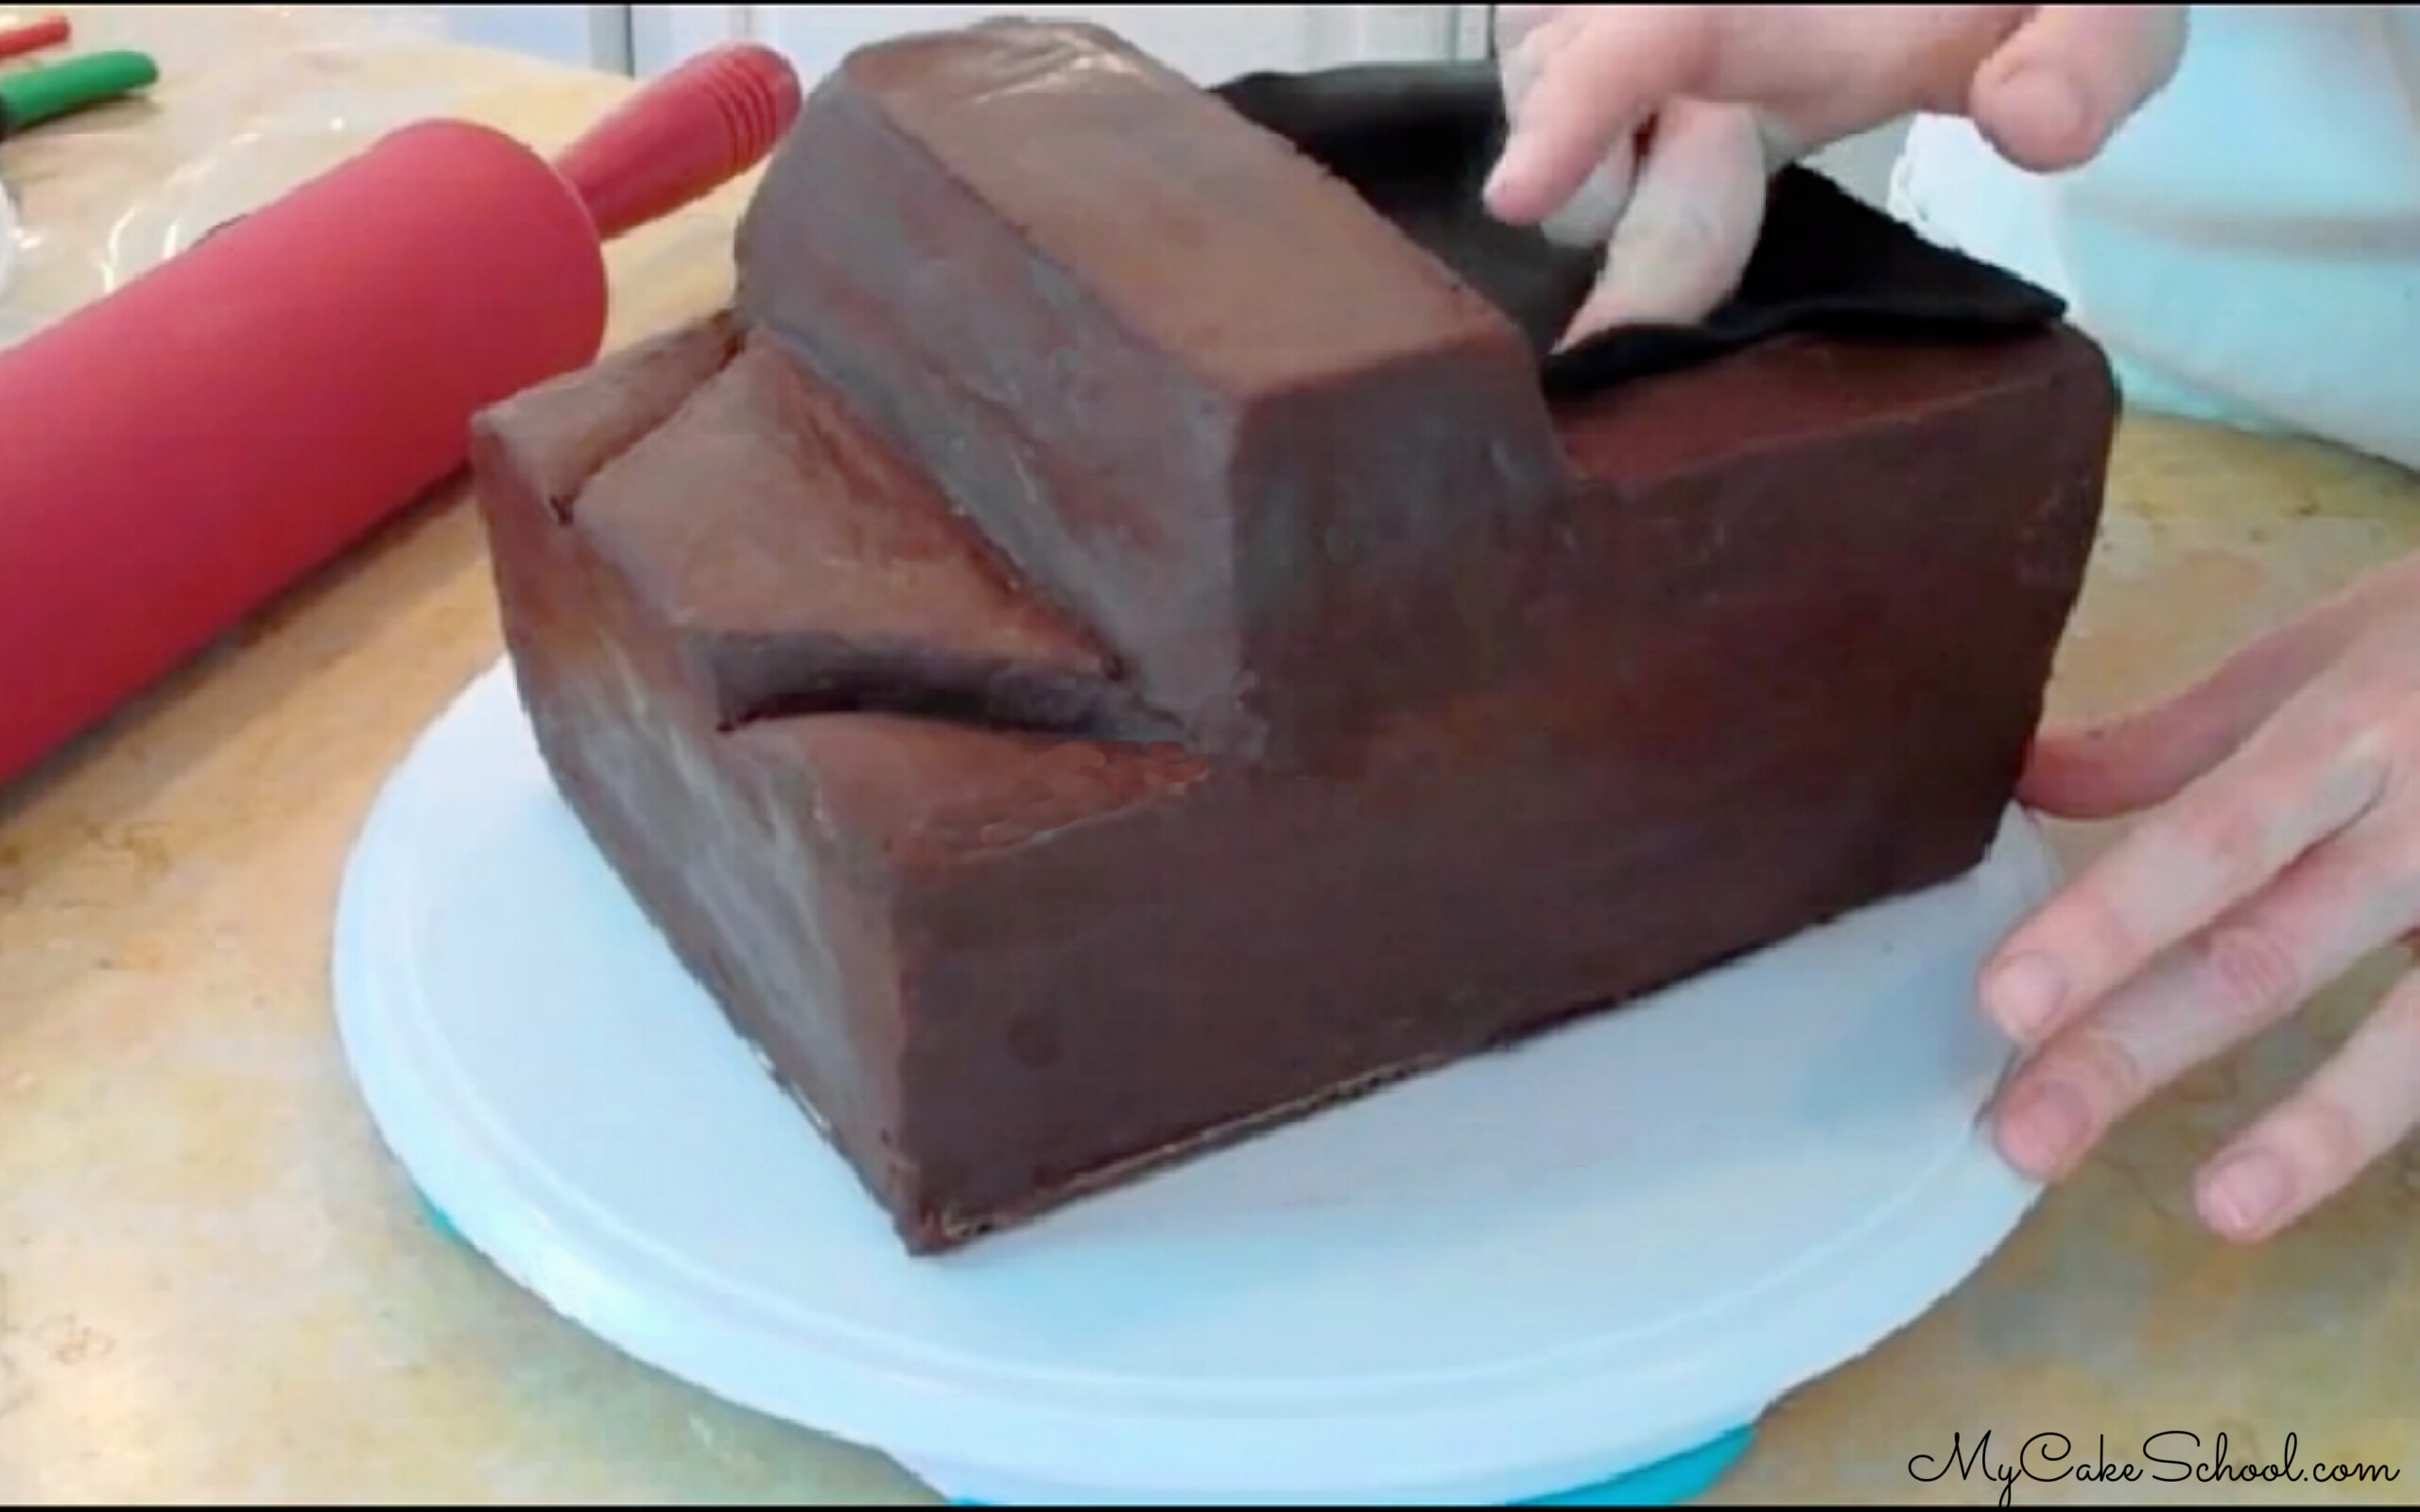
Next, split the 9x13 in half, dam & fill with buttercream and stack. (It's on it's own cake board). Then, trim down loaf cake to form the cab of the truck.
Carve away pieces of cake to form the hood.
Add scrap pieces of the loaf cake to form the bed of the truck (*optional--you could just keep it flat)
Ganache over everything using our simple spreadable ganache and an offset spatula. (This is a 2:1 ratio by weight of semi-sweet or dark chocolate to heavy cream.) Chill to firm everything up before covering with fondant.
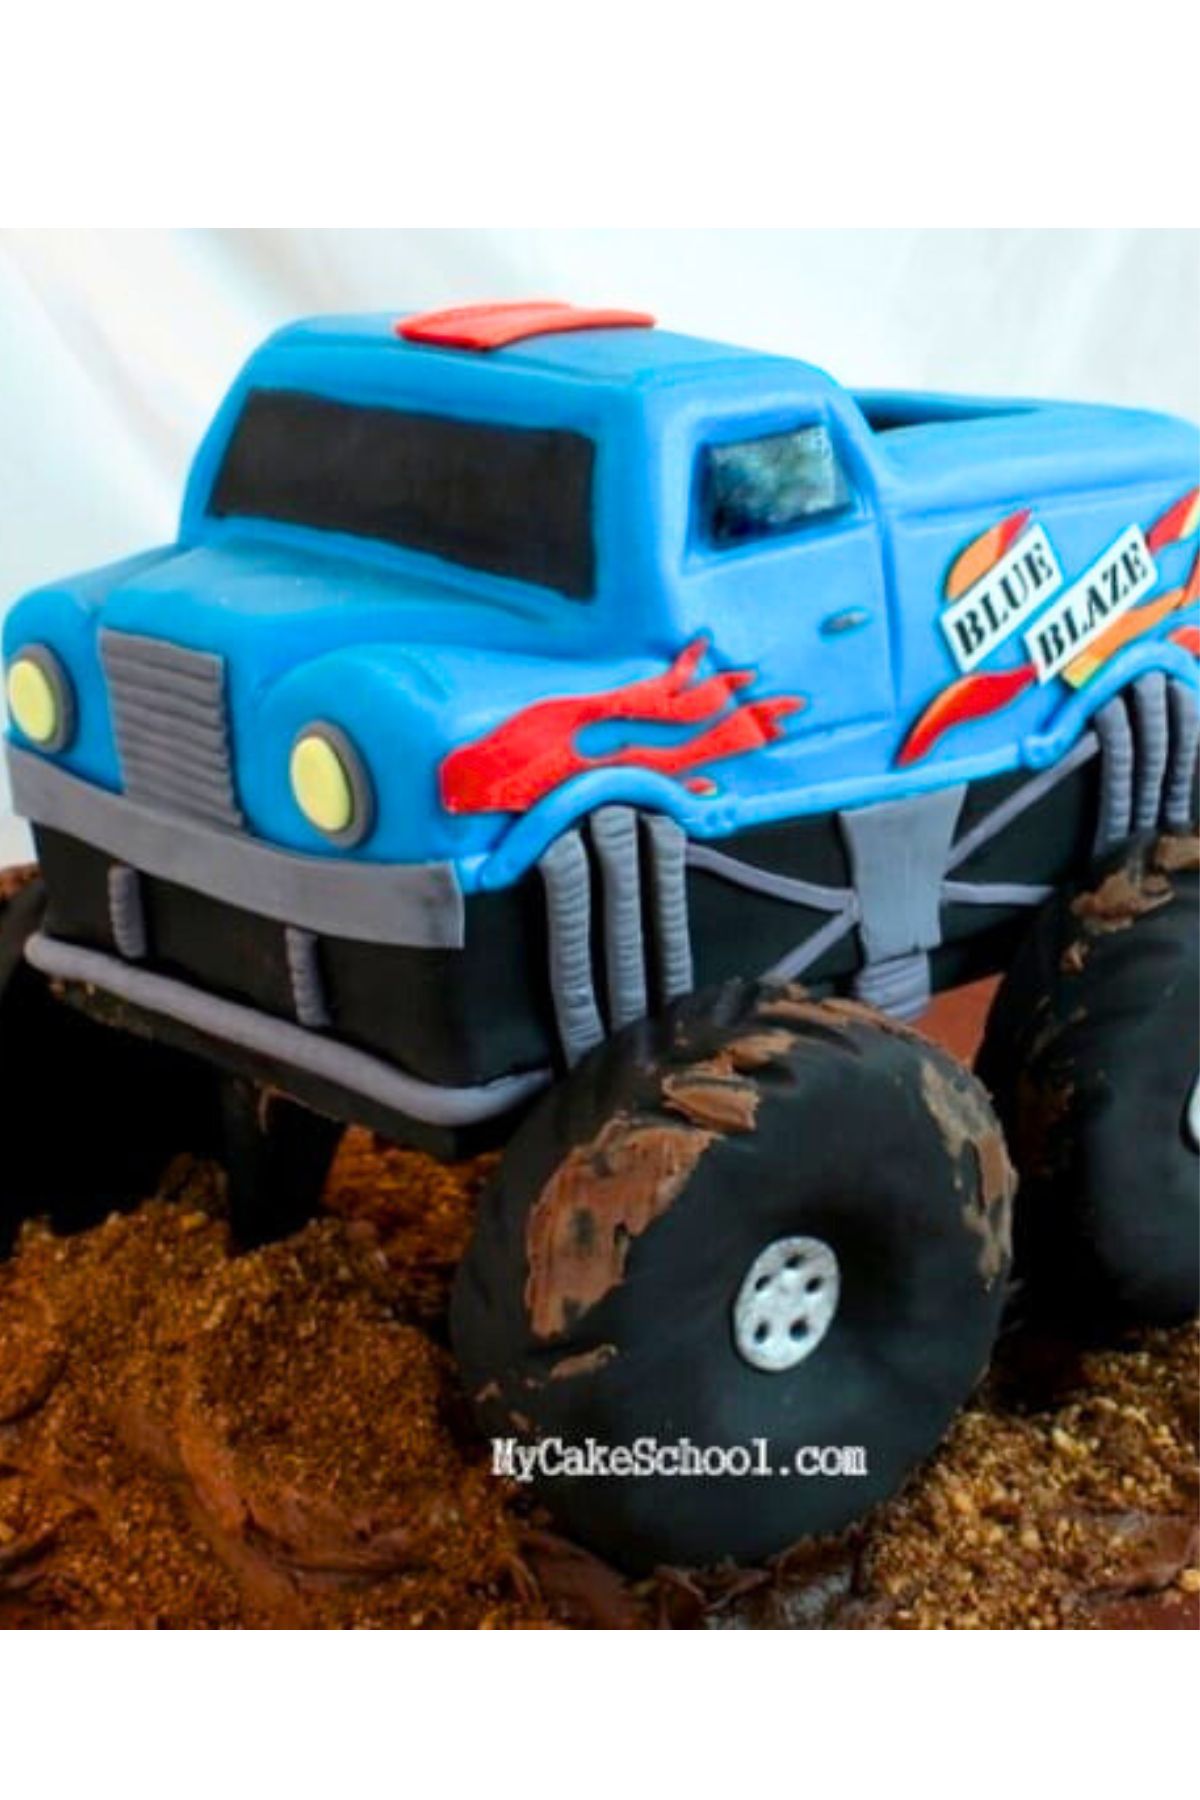
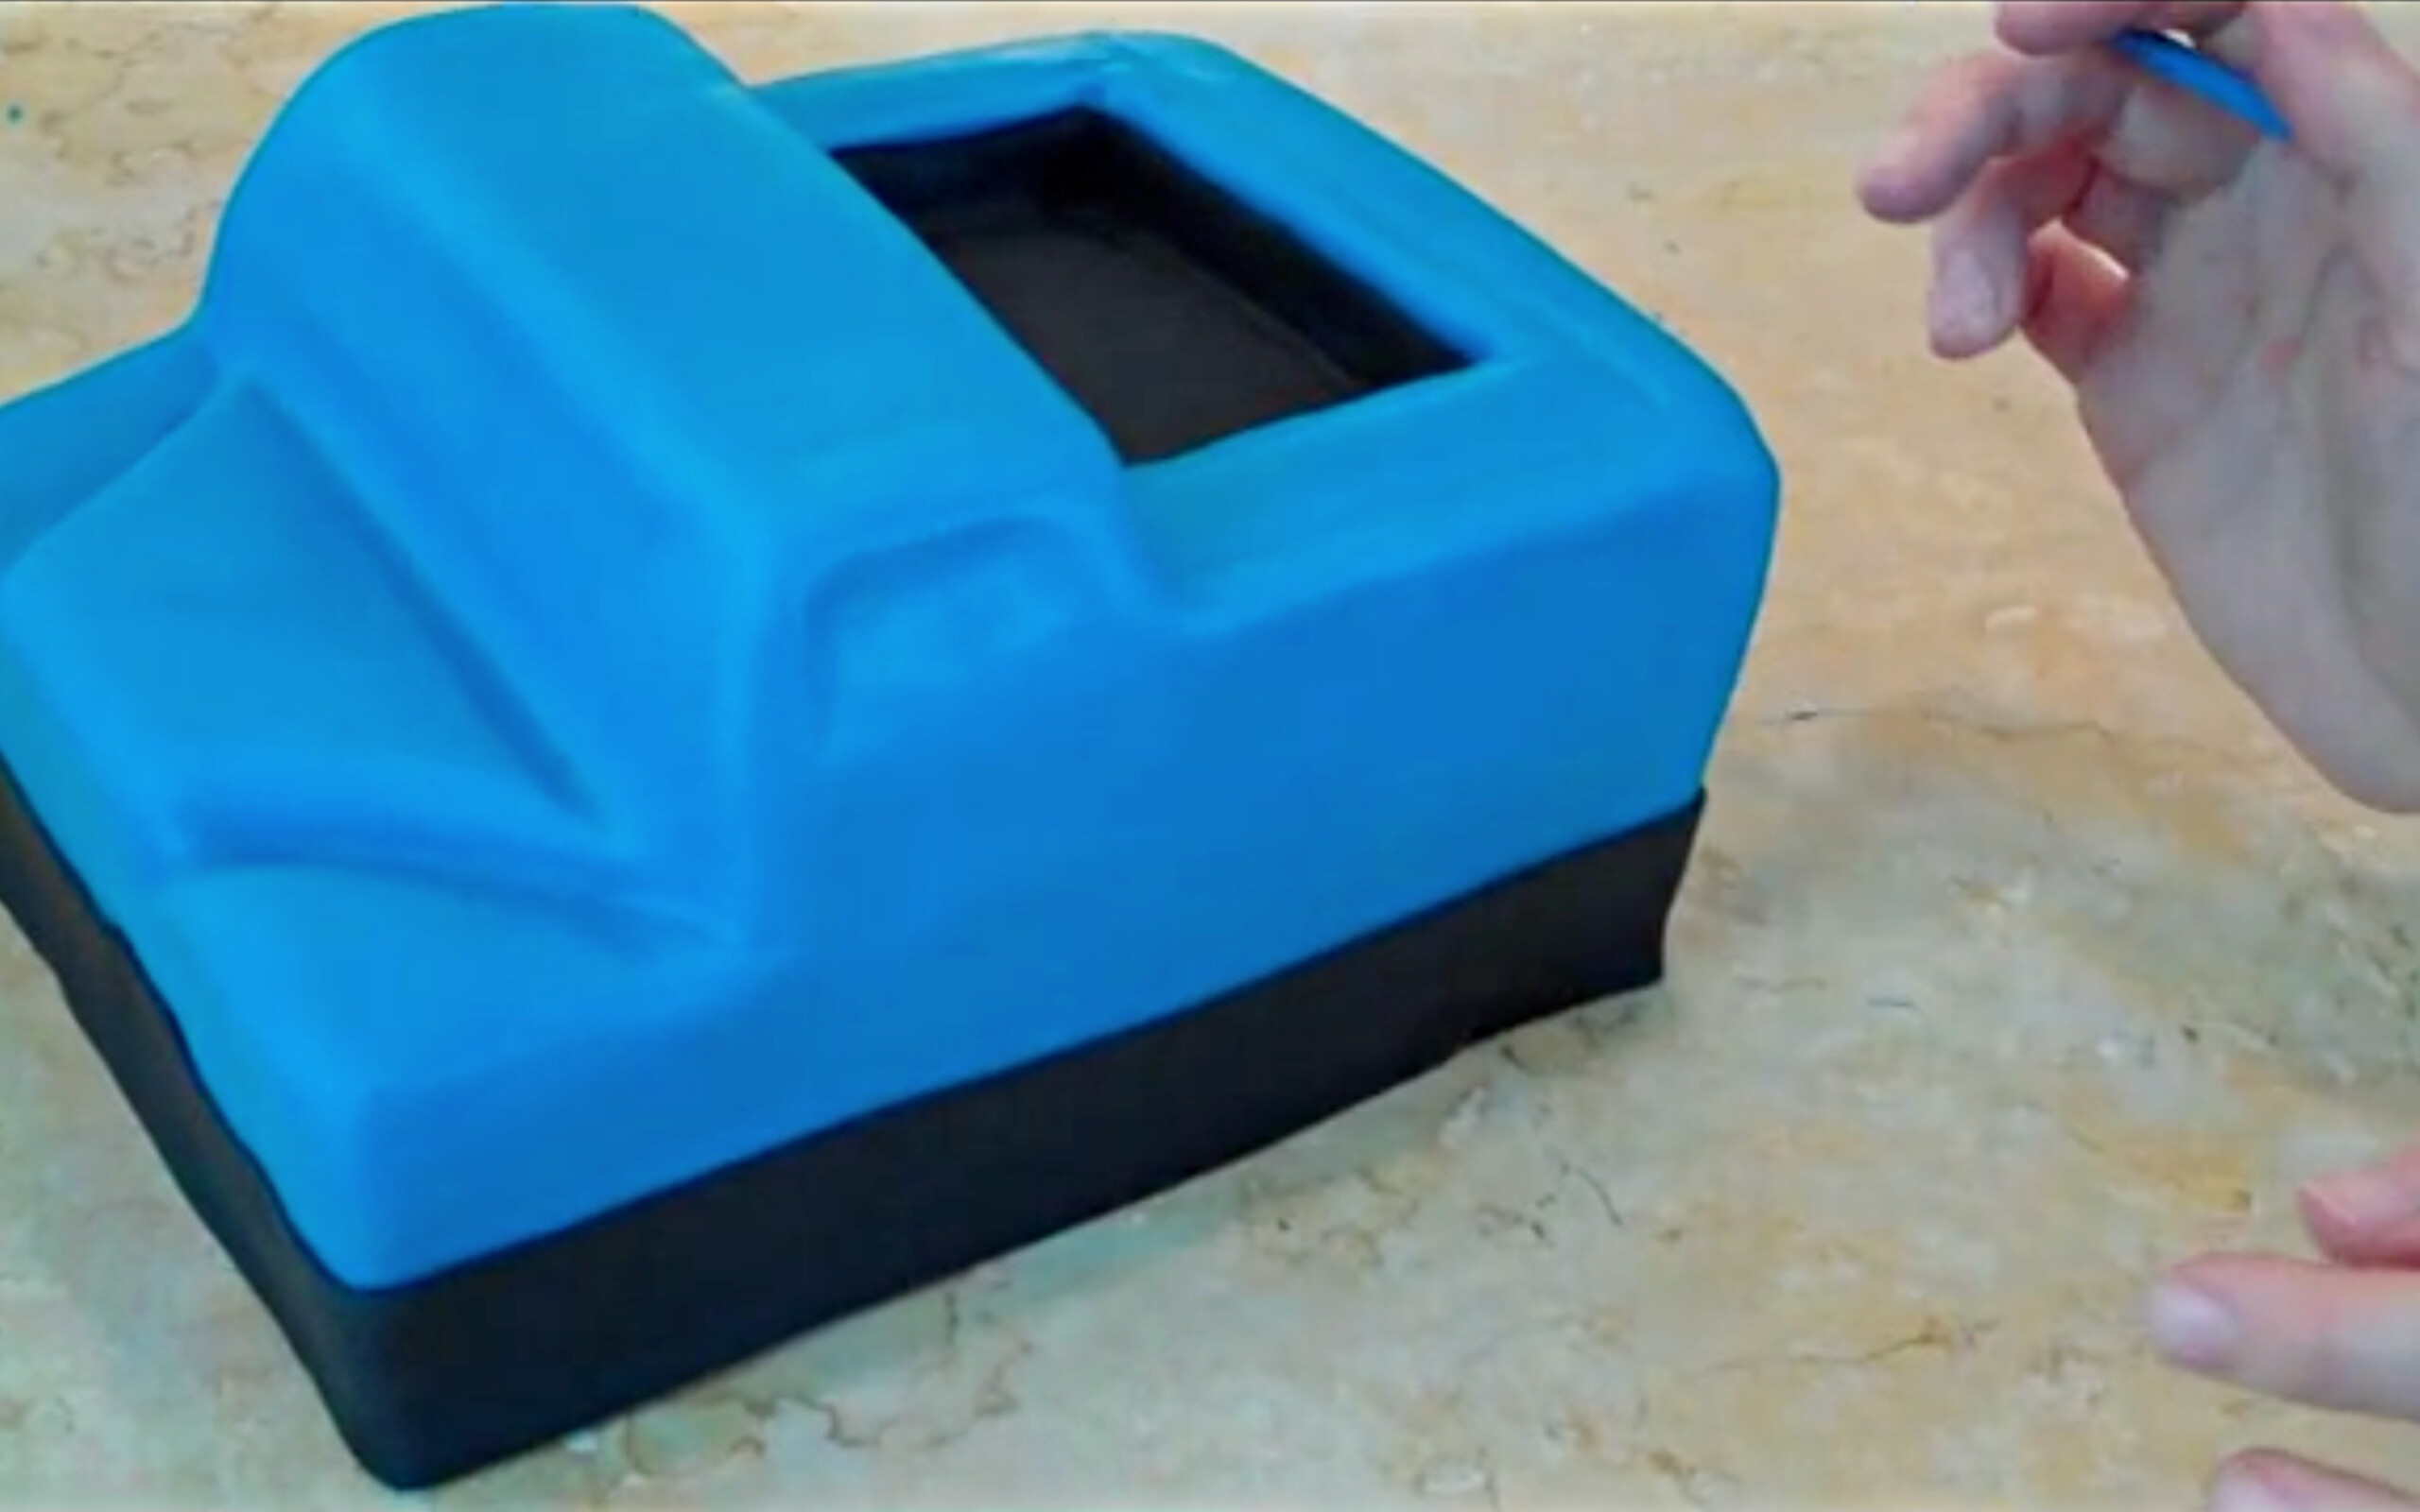
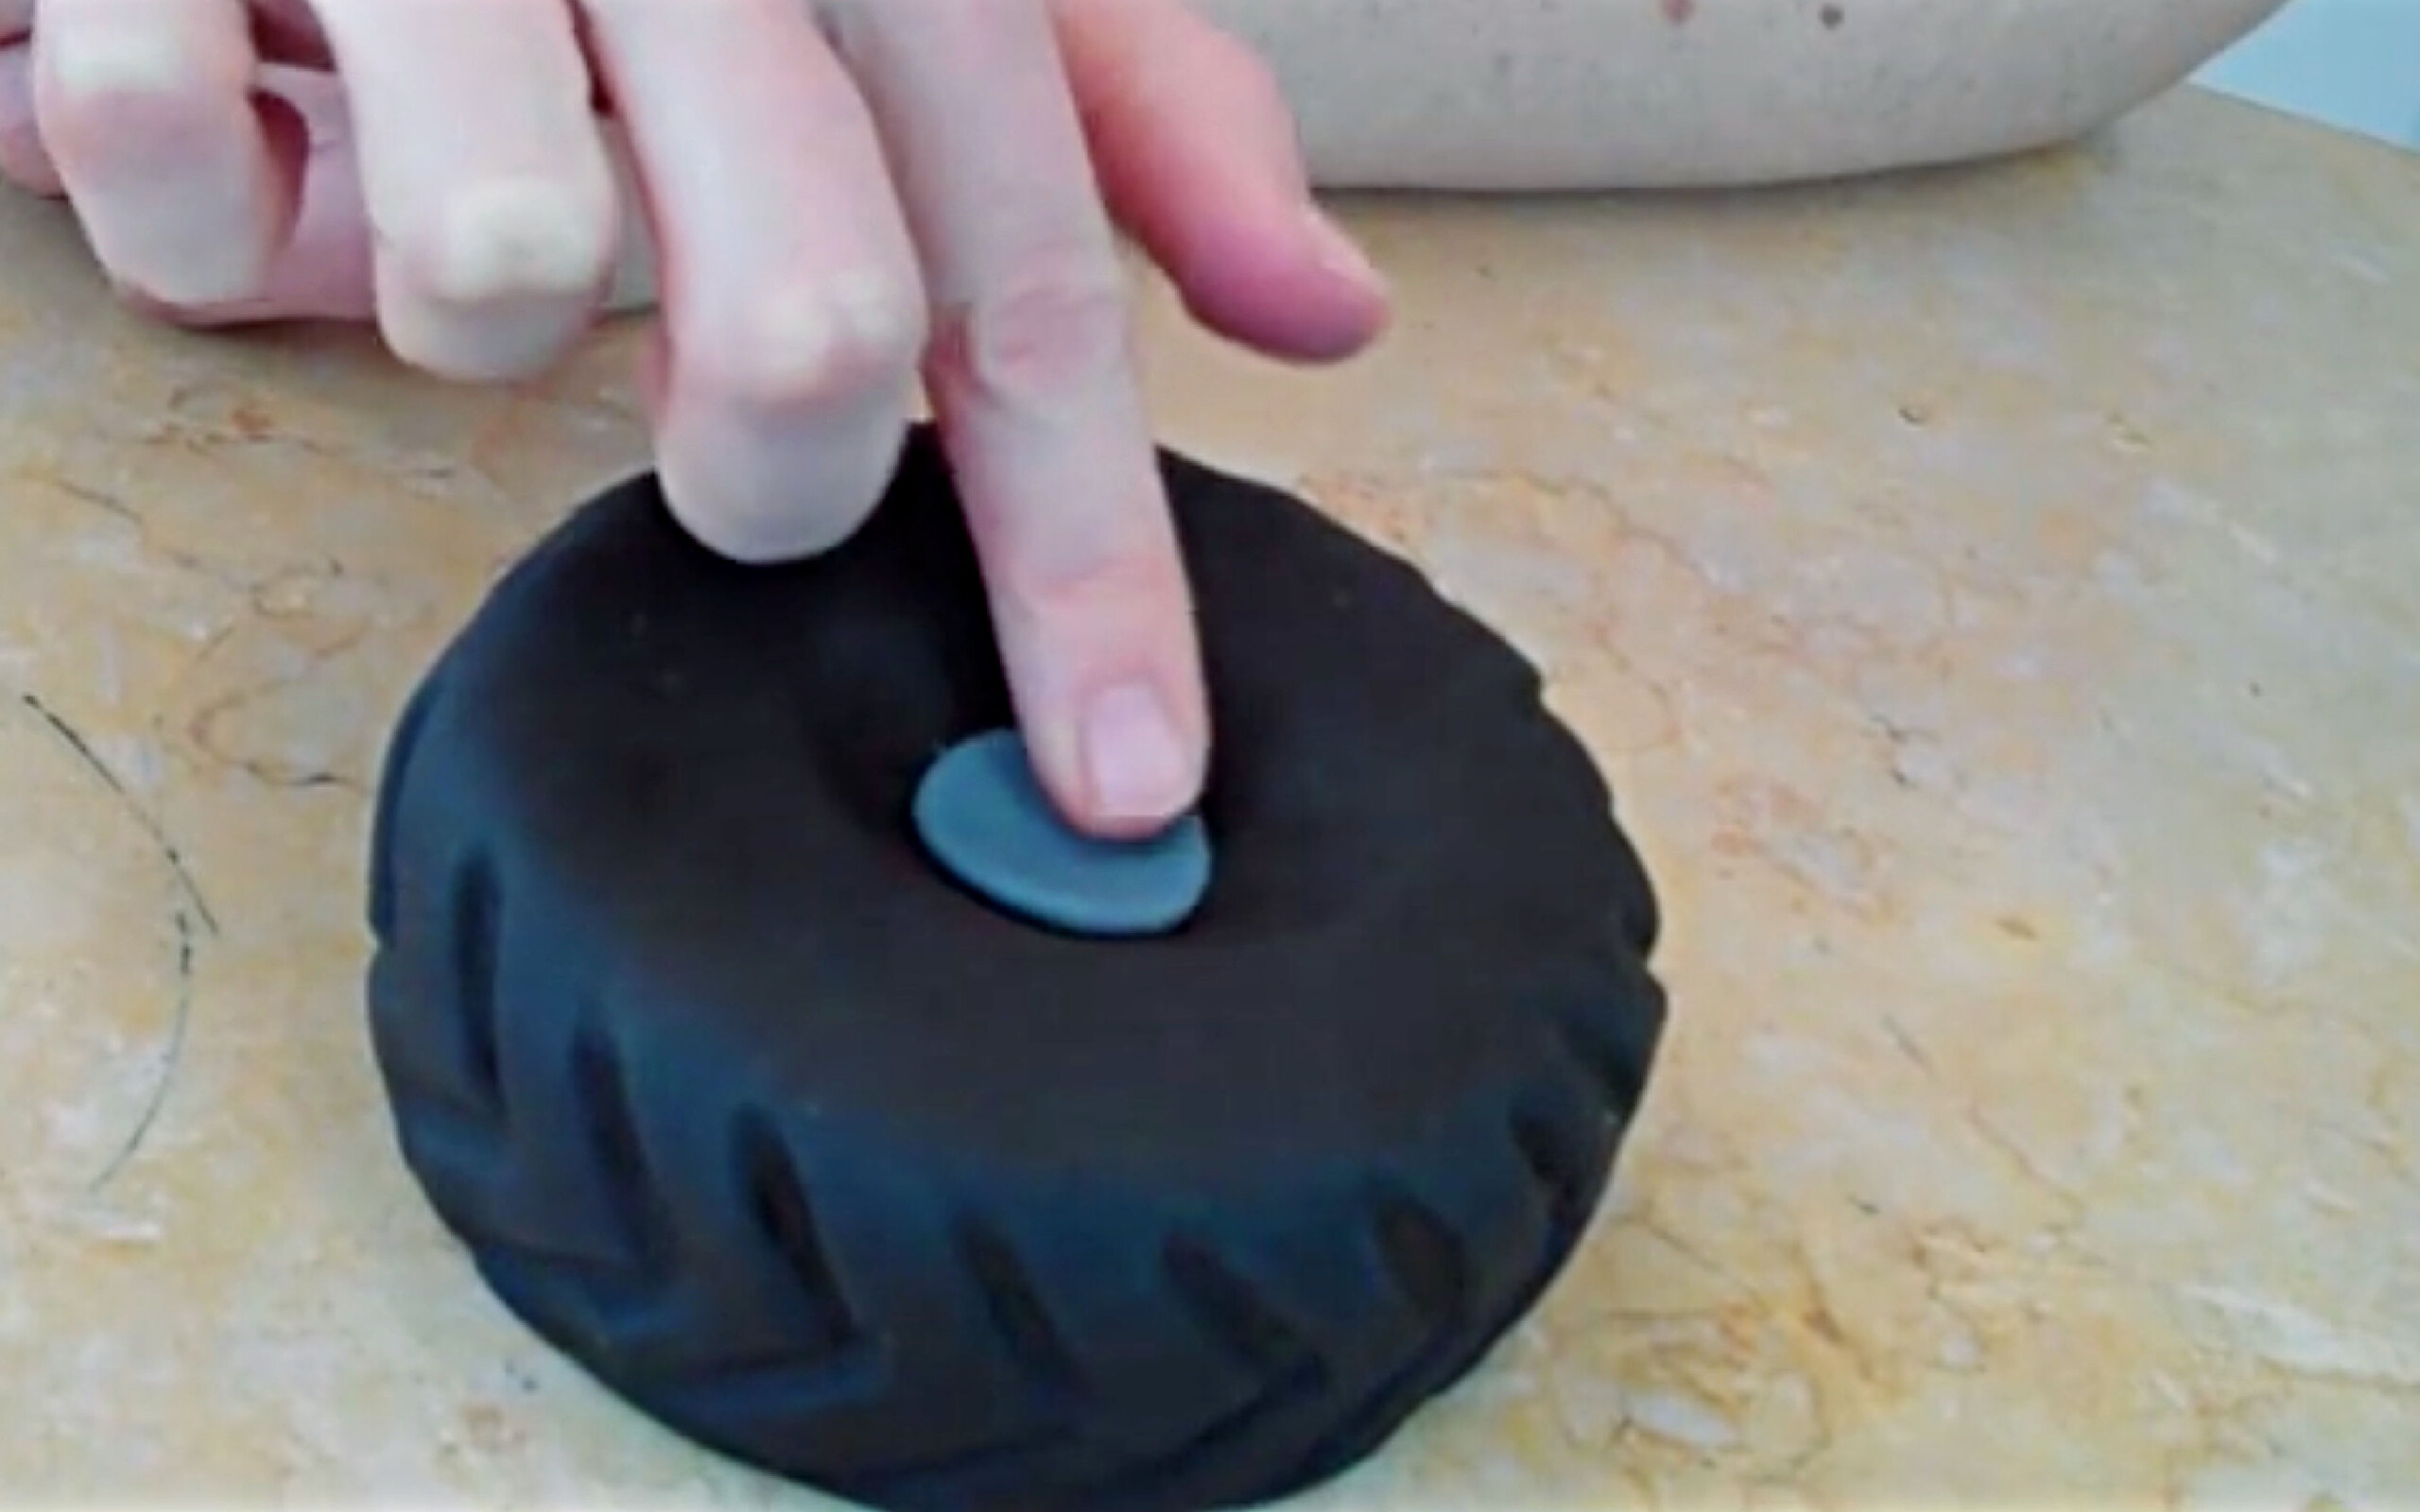
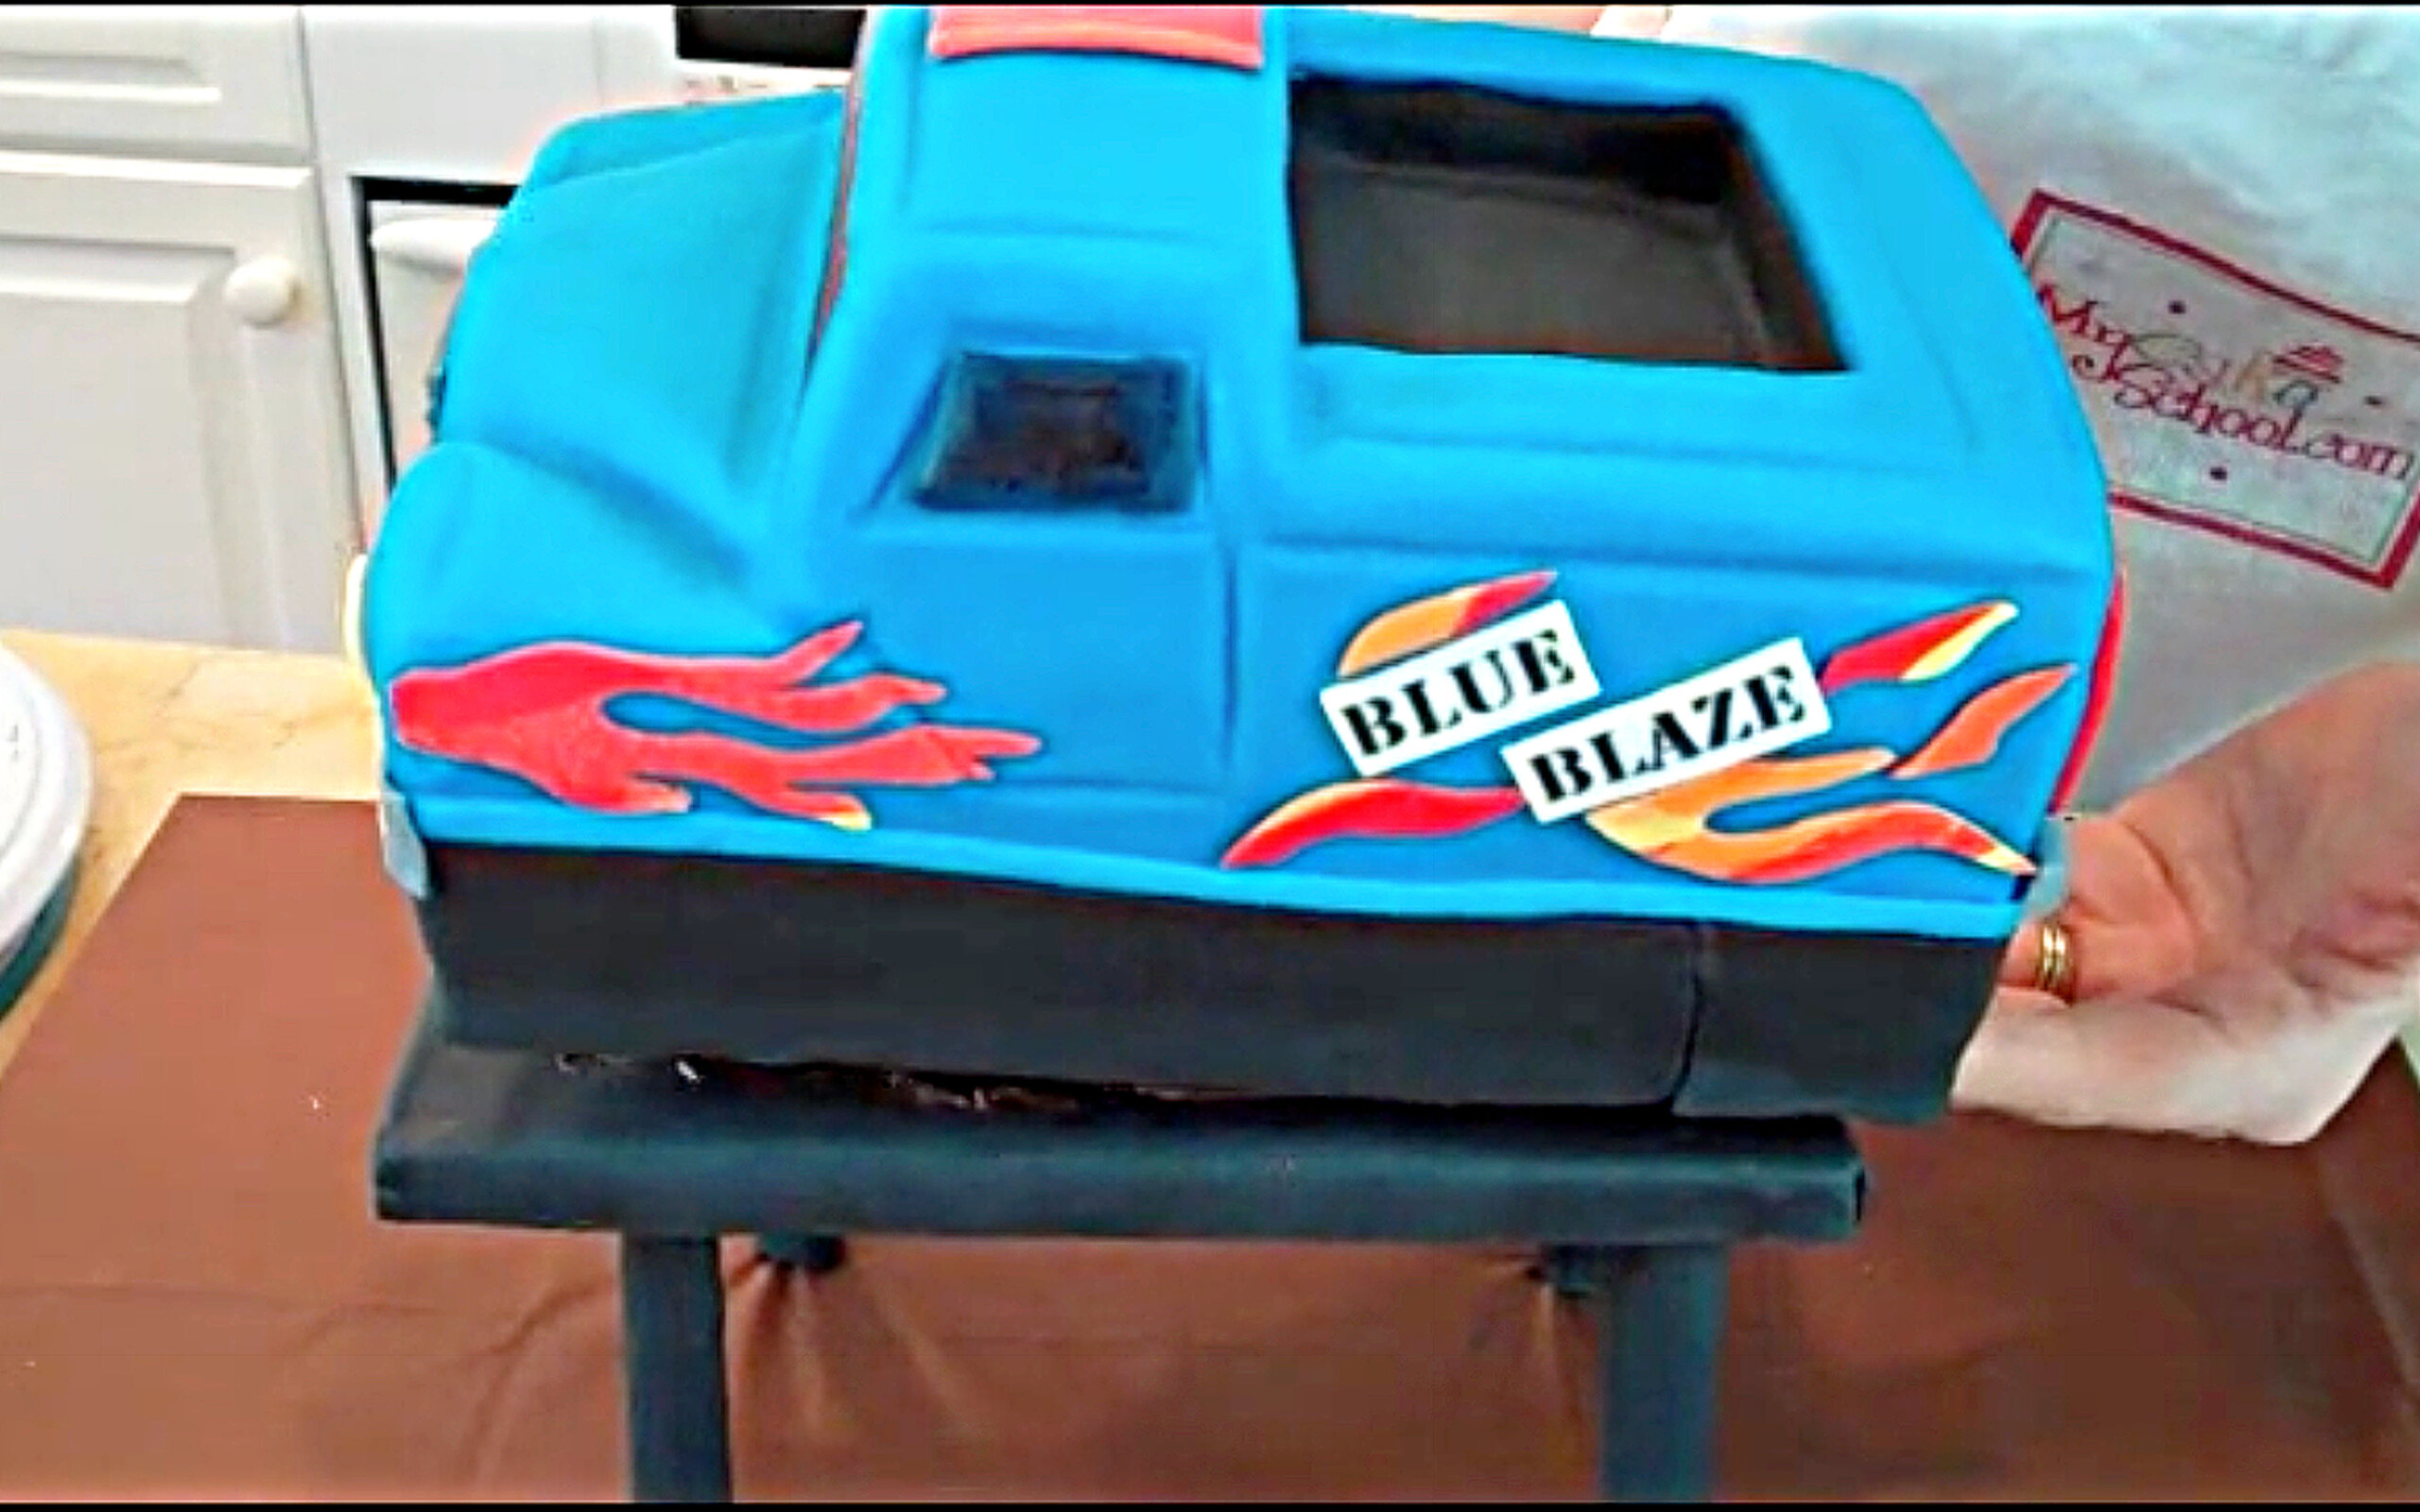
Cover the monster truck with blue fondant. Layer on accents.
Here's a look at our fondant-covered rice cereal treat tires!
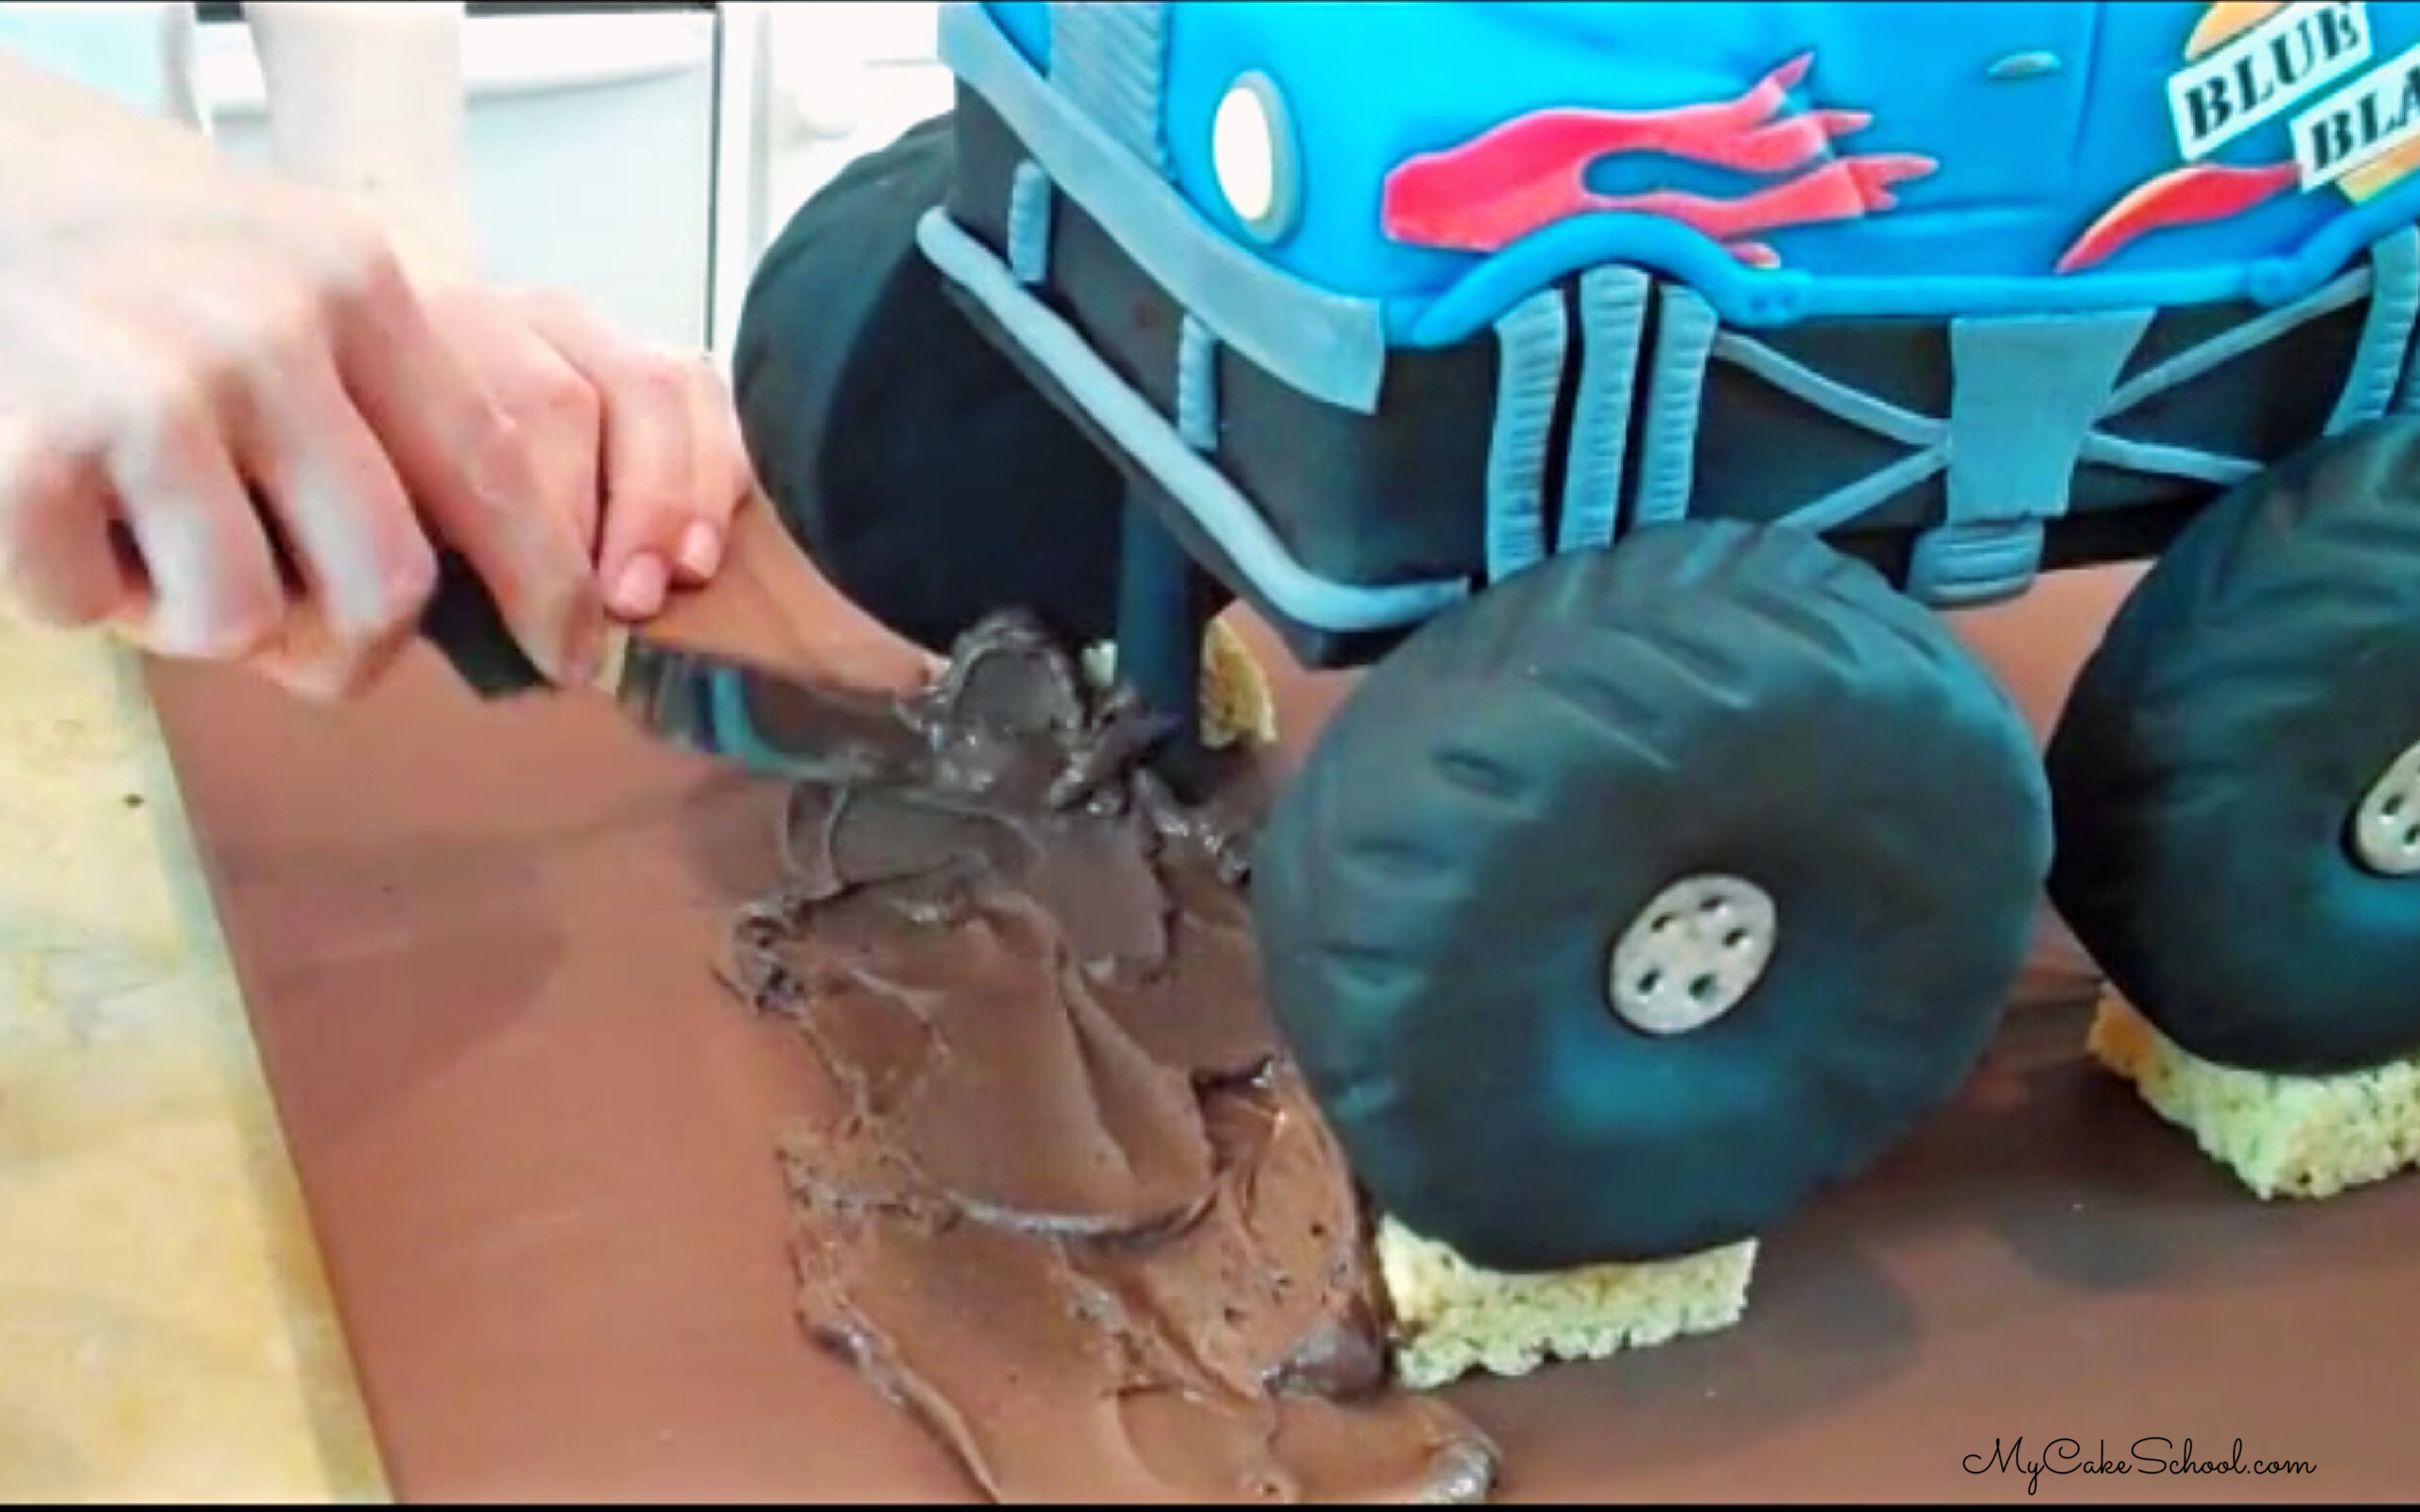
Add the cake to the platform (we "glued" it with melted chocolate).
Add the tires, and use frosting "mud" to cover anything that needs to be hidden, and to make it more realistic! ;0)
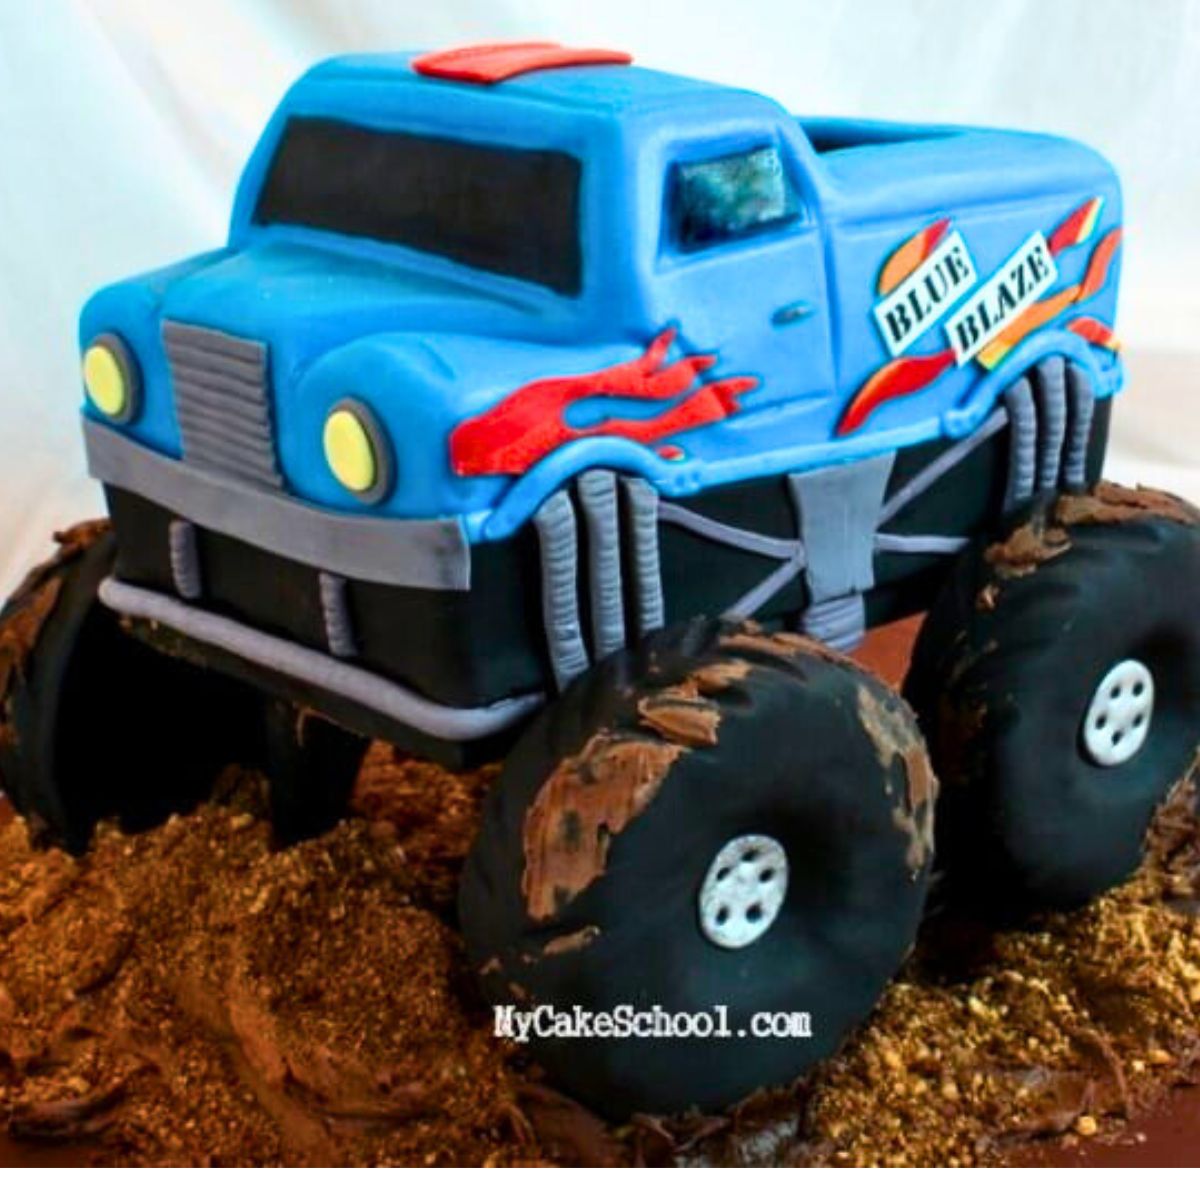
Here's our finished Monster Truck Cake! Enjoy the video!
Cake Recipes
So many cake recipes would work great with this monster truck cake, whether cake recipes from scratch or cake mix recipes.
Some of our favorites, aside from our doctored cake mix WASC Cake used in today's recipe, is our chocolate cake from scratch, orange cake, almond cake, and marble cake!
Our easy lemon cake and easy marble cake mix recipe are great options also!
More Birthday Cakes
In addition to today's Monster Truck Cake, we have many more Birthday Cake Ideas to share with you! Some of our favorites are our Cars and Trucks Cake, Shark Cake, Jungle Cake, Farm Cake, and Snake Cake!

Have you made this? We would LOVE for you to leave a ⭐️ rating as well as a comment and photo below! We really appreciate your feedback!

Monster Truck Cake
Ingredients
- 9x13 cake layer o your choosing
- Loaf cake -Ours is 8 ⅜" x 4 ⅜" use whatever you have- you can carve it down as needed.
- cake cardboard or foam core which you'll later cut to the size of the cake
- Ganache We used a 2:1 ratio of chocolate to cream--simple spreadable ganache
- Fondant- I used Duff's pre-colored blue fondant to cover the truck. Black pre-colored Satin Ice fondant for strip around base of cake. Grey fondant for bumper grill and misc accents. Yellow fondant for lights. Yellow, Orange and Red for flames.
- Rice Cereal Treats- You could make your own Rice Krispies Treats but we used premade for our tires. We used 6 of the 22 gram RKTs per tire! Then at the end of the video we used 4 more pieces to boost our tires a little higher.
- Chocolate Royal Icing & crushed chocolate and/or honey graham cookies--*Optional--this is what I used for MUD and dirt. Chocolate Buttercream would work as well!
- Frosting Sheet/Edible image printer--OPTIONAL-- I printed off the truck's name.
- FMM Multi Ribbon Cutter- Optional -- I use this for easily cutting uniform strips of fondant.
- Miscellaneous Tylose powder optional, I like to knead a little into decorative fondant pieces, Sugar Glue (aka tylose glue) or your "glue" of choice, X-acto or other sharp knife, "The Mat"-optional.
- vodka or lemon extract for painting, misc paintbrushes (optional), toothpicks, coloring gels of your choice for fondant accents
For the Wooden Platform (See our post for alternative)
- We made a sturdy wooden platform to create the space beneath the cake. An easier alternative would be to cover a styrofoam block with black fondant or a black plastic tablecloth to create the illusion of space.
- 1 18"x20" wooden board that is ½ inch thick Covered the top with a brown plastic tablecloth
- 6 6"x8" wooden board
- hand drill
- 4 6x1" screws
- Wooden dowel, ½ inch thick and cut into 4" sections. They will cut for you at home improvement store. (*later we wished these were 3 ½" to better fit the size of our tires. Ideally, the top of the tires will be slightly taller than your platform.
Instructions
- Once these cakes have completely cooled, you can begin assembling. *You may find it easier to bake, wrap, and freeze your cake layers in advance. Then, partially thaw and assemble.
- This is the simplified version of our steps. See video to fully understand our process.
- Split the 9x13 cake in half. Then, dam & fill the cake with buttercream and stack. (It's on it's own cake board)
- Next, trim down loaf cake to form the cab of the truck.
- Carve away pieces of cake to form the hood.
- Add scrap pieces of the loaf cake to form the bed of the truck (*optional--you could just keep it flat)
- Ganache over everything using our simple spreadable ganache (a 2:1 ratio of dark chocolate or semi-sweet chocolate to cream). Chill for 15 minutes in the freezer or longer in the refrigerator to firm everything up.
- Then, cover the ganached cake with blue fondant
- Layer on accents, add the monster truck cake to wooden structure, using melted chocolate as glue. Add the tires, remaining details, and frosting "mud" to hide anything that needs to be hidden!
oh, i use canned coconut milk as a sub for the cream in the ganache, due to my grandson's allergies, and it works just great! :)
Hi Lynn- I'm so glad that you made this (and another this weekend)! It must have been adorable with the legos in back. ;0) Thanks so much for your feedback and I'm glad to know that the canned coconut works well in place of cream! We would love to see photos sometime, thanks for your post!
I am so excited to get to use this video. My grandson ask for a monster cake crashing into a brick wall and a dinosaur driving. I saw the dinosaur in another and that would be cute. Suggestion on how to have the dino driving? Also, when buying Duff's blue fondant, how much do I buy. Does his fondant taste good. My grandson loves marshmallow fondant, but not the store bought.
Hi Melissa,
What do you think of doing this cake in modeling chocolate instead of fondant? Would it work as well?
Hi paintmycake~ I rarely use modeling chocolate to cover my cakes-- We have a tutorial for a modeling chocolate wrap...but that's about it. Since I started working with Liz Marek fondant a couple of years ago, I liked the taste & elasticity of it so much that I stopped looking for new alternatives.
I like Modeling chocolate more for accents than to cover cakes. It has a nice flavor but is more sensitive to heat and doesn't have the stretch that fondant has. The sensitivity to heat is a bonus when you have a seam or imperfection that you can simply rub away with the heat of your hand. The downside is that in the summertime, a hot kitchen or outdoor event can make things a bit more difficult. Handling it too much can also heat the modeling chocolate too much, causing excessive softening & oiliness. (If this happens you can just allow to cool or even pop in the fridge). - It's also more likely to tear than fondant because it doesn't have the elasticity.
My vote would be either fondant or a combination of modeling chocolate and fondant. You could use maybe a 60/40 proportion of fondant to modeling chocolate. This would give you a happy medium. (Test the proportion in a sample size to make sure you are happy with it) ;0) - Hope this helps!
What size board and cake would you recommend for 40 servings? Also I'm trying to make it look like the monster truck is going on dirt with one tire to give it a gravity defying illusion. Any tips on how I would go about doing this? Love your videos by the way!!
Hi Katie, This monster truck cake using a 9 x 13 pan will feed 25 to 28 with 1 x 3 inch slices. I think you should be able to serve 40 using a 11 x 15 size pan. Just follow Melissa video making adjustments where needed since your pan is larger. Our wooden cake board is 18 x 20, you could make yours this size also or larger depending on how much mud (chocolate frosting) you want to add to the board. We have not tried a gravity deifying truck so I cannot not say for sure how that will work. If you do not want to construct the wooden platform you could cover a styrofoam block in black fondant or black plastic and the truck on several cake boards will rest on that. This is a very time consuming cake so anything that you can do in advance such as wheels, decals, baking in advance will be very helpful. If this is for a customer, please factor in all the extras as well as time when charging. Hope all goes well.
Hello Melissa! Where can i get the chocolate royal icing recipe that you used in this tutorial? I couldn't located under recipes. TIA
Hi Maria! Thanks for your comment. I had forgotten that we used chocolate royal icing in this video and deleted the recipe from our recipes section back when we removed our old cookie decorating video tutorial. Ack! Anyway, SugarBelle's chocolate royal icing recipe would have been the one that we referred to--here is a link!:
The part 1 of the video stops playing at 2:59. I replayed twice from the beginning but can't get 2:59.
I had problems with the bag video too, the sound ceased after sometime and didn't come back on.
Hi Jamila- I'm sorry that you are having issues! I am able to play the video as usual past the 2:59 mark on my computer but I've made an update that may help you. If you continue to have inconsistent viewing issues, it could be a sign that something on your computer/device needs an update. This may be a browser update, or an update to your adobe flash player. Please e-mail us at info@Mycakeschool.com if you continue to have issues and so we can get a bit more info about your trouble. Thanks!!
Thank you so much for the inspiration! I made this for my nephew’s 3rd birthday and it was a hit!