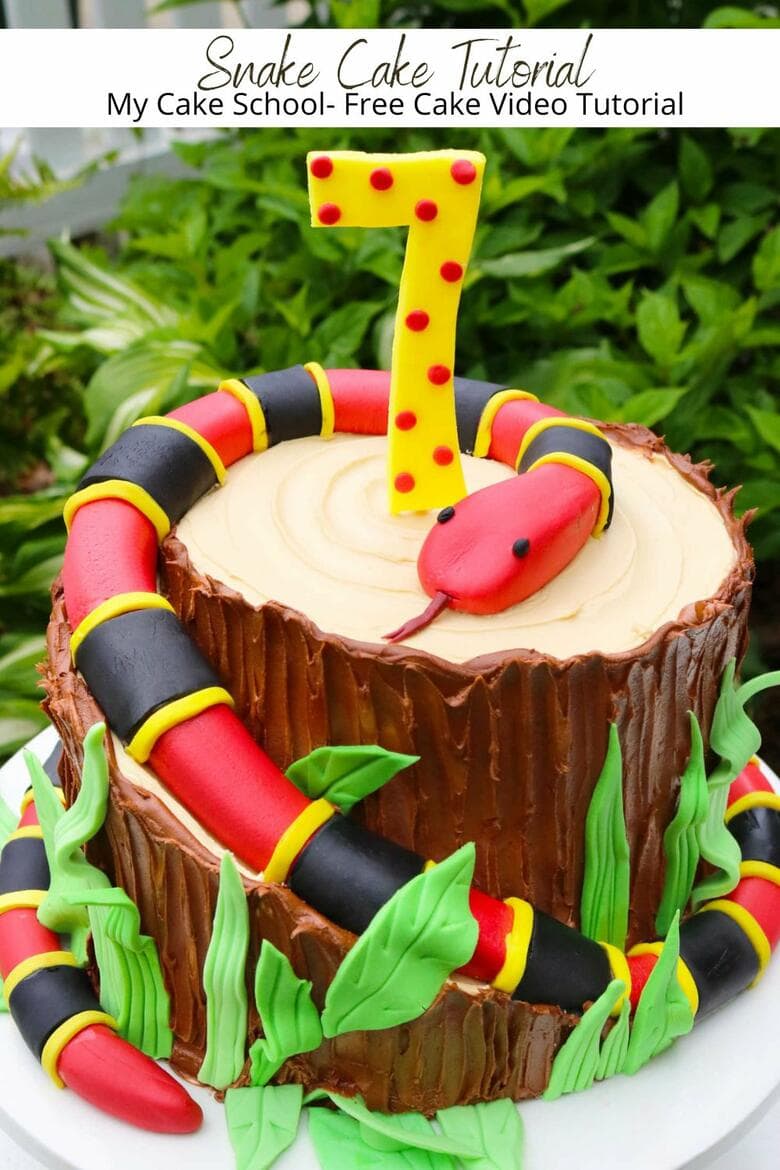
Snake Cake
Today I'm going to show you how to make a Snake Cake! This colorful birthday cake idea features a fondant snake wrapped around a spiral cake tier.
If you love snakes and reptiles, or have friends or family that do, they are going to love this fun cake design!
A couple of people have expressed concern that the snake on our cake is a coral snake which is venomous (although the fondant kind won't bite) ;0) Change up the colors however you like and have fun with it!
Spiral Cake Design
We loved creating this colorful snake cake, complete with a carved tree stump! The spiral tier allowed us to easily wind our snake around the "tree stump" with plenty of support.
Over the years, we've made a few cake designs using a carved spiral tier- it's a great technique to have in your cake decorating bag of tricks for all sorts of themes.
We've made a sledding snowman cake, a train cake with a spiral tier, and cars & trucks cake using a spiral cake design also.
Spiral cake tier designs are so unique and interesting (and it is easier than it looks to create)!
Details
Change the colors however you like to make it your own!
I chose this snake because I liked the bright, colorful pattern but please adjust to your liking!
Whether you depict the patterns of an actual snake or a make believe polka dotted snake, it's going to be a fun one. Enjoy!
Materials
For our carved tier, we used a four layer 8 inch cake frosted with Fluffy Vanilla Buttercream.
Coloring Gels: Americolor Ivory, Americolor Chocolate Brown (I used these shades on the tree stump), Wilton Leaf Green, Super Red + a touch of black kneaded in (snake), Yellow & Black (we actually use pre-colored fondant for our yellow & black), and black
Fondant for the snake (about 550g)
Gum paste or Fondant & Tylose Powder- I used fondant with a good amount of tylose powder kneaded into it for the "7". You could also use gum paste. Same for the leaves- I used fondant with a little tylose powder kneaded into it.
Offset Spatula- I used a small tapered offset spatula to texture the frosting, and a rounded offset spatula for the spiral on top of the stump - of course, improvise with what you have for a similar look!
Cake Board (Cake is on a cake cardboard)
Food coloring pen
Disposable piping bags
Lollipop stick
Edible/food safe glue of choice. I used tylose glue which is created by combining tylose powder with a little warm water. It eventually dissolves creating a gel-like consistency.
Notes
Spiral Cake Tier Details
Make sure your snake isn't too wide for your carved ledge, I didn't mention that ;0)
It's helpful to carve the spiral tier when the cake layers are partially frozen.
My ledge/slope for the spiral cake is 1 ¼ inches wide, I marked my knife with a food coloring pen at 1 ¼ inches from the tip of the knife so that I would know how far to push the knife into the cake when carving the slope.
Dry Times for Gum Paste & Fondant Details
I dried my leaves overnight before using so that they would have time to firm up.
I dried the number cake topper 24 hours before. My yellow fondant had a good amount of tylose powder kneaded into it so that it took on the consistency of gum paste. It dried more quickly and stronger due to the tylose.
Gum paste is also a good choice for stand-up number cake toppers. If you are new to making toppers like this, allow a couple of days for the topper to dry as dry times can vary (due to fondant/gum paste brand, humidity, etc.)
Adding the Snake
As I show in the video, the snake was so long that I found it easier to apply it in shorter segments (knowing that I could hide the seams with leaves).
Either way, I highly recommend chilling the buttercream frosted tier until firm-- (about 15-20 minutes in the freezer) before applying the snake to the cake in case you need to make adjustments, etc.

More Animal Cake Designs
We have many more fun animal cake designs for you to choose from! Some of our favorites are our 3D fluffy Puppy Cake, farm cake, jungle cake, and shark cake tutorials.
Adorable! Love It!
Thanks for the inspiration and instruction! SO cute!
Oh it came out amazing! Love the colors! :0)
Very cool! Love it!
Where is the video link?!
Hi Beth, the video is under the heading Spiral Cake and Spiral Cake Tier Tutorial. Click on the arrow within the picture to begin the tutorial. We would love to see a photo of your completed cake.
I can’t find the link either.
Hi Barbara- I've just re-embedded the video. It was still appearing for me as well but if you have an ad blocker, it may have prevented you from seeing it.
I've just replaced the old one with a new (ad-free) video at the bottom of the post. Let us know if you still have trouble!
It looks like a deadly coral snake, which has the second strongest venom after the black mamba.
"Red and yellow, kill a fellow, Red and black, venom lack" -- is the rhyme that helps people distinguish between a deadly, venomous coral snake and a non-venonous snake with similar stripes.
Hi;
I'm wondering why you use Fluffy Vanilla Buttercream as opposed to "regular" buttercream
Hi Shirley! I just happened to use that recipe on the day we made it. We love our classic vanilla buttercream (no shortening) recipe also. Just go with your favorite!
Hi;
I've been going through your instructions for your snake cake. I'm wondering; when you say to freeze the cake before carving - is the cake frozen as individual cakes or frozen with the four levels and icing in between all at once as one cake. Thanks
Hi Shirley, we often freeze our cake layers individually after baking them anyway (in plastic wrap followed by foil). But we've found that when creating a carved design, this is especially helpful because the layers are less fragile. It is an optional step.
So, I often move the layers from the freezer to the kitchen counter, you can allow to thaw for a few minutes if you would like, then go ahead and fill the and assemble the cake as usual while the chilled layers are still firm.
The layers by that point should be easy to carve, but firm enough that they are less fragile and crumbly. If they are too firm, just wait a few minutes more before carving.
Thank you so much for all your quick responses and help. I really appreciate it.
hi. beautiful work.. :) may I ask where can I get recipe for the cake and the cream...I have never made a good cake . thank you
Thank you so much for the great tutorial & inspiration for my nephews birthday cake! How did you get your buttercream such a dark brown? Just with Americolor food coloring? The Wilton brown just wouldn’t darken up as much! Thanks again!
Hi Katie! Your cake looks amazing!! For your question about the shade of brown, I probably used Americolor Chocolate Brown but I really like yours just as it is, it turned out perfect!
woah love the texture on your snake and also the whorls on your tree stump. where did you find that texture for the fondant, and how do you make the whorls on the stump?
This cake and tutorial is amazing. I copied it for my son's birthday and the instructions were so well explained and simple that our cake turned out perfectly. Thank you! We look forward to making more of your cakes.
Hi Sally! I'm so happy to see your cake- it looks awesome! So glad that you enjoyed the tutorial, thanks so much for your feedback ;0)
Thanks so much for this wonderful tutorial. My son loved his cake
Oh yay! It looks fantastic, so glad that you made it ;0)