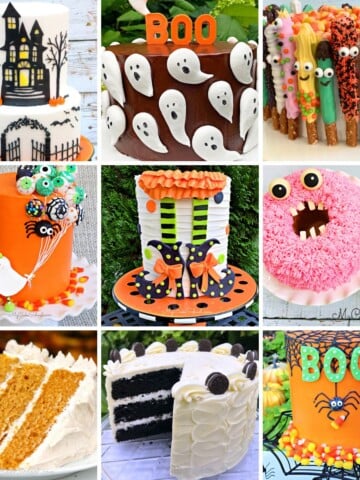
Halloween Cupcakes Tutorial
In this step by step tutorial for Halloween Cupcakes, I'm going to share oodles of cute, festive, and EASY Halloween designs that would be perfect for any Halloween party!

We're sharing all of the fun and creepy details for creating spiders, eyeballs, bones, ghosts, bats, and more!
Kids will not only love devouring these Halloween cupcakes, but they will love helping to create them too!
Whether you choose just one of these simple & spooky cupcake designs or many, they are sure to be a hit. Enjoy!
Table of Contents
How to Make Cute and Easy Halloween Cupcakes
First, I melted some good old white candy coating (candy melts, chocolate bark, etc.) Using a tip 3, I piped various decorations onto a parchment lined cookie sheet.
I sprinkled over the melted letters with with disco dust. **Update: I would opt for sanding sugar or sprinkles of your choice. I don't use disco dust for edible decorations anymore.
You can place the chocolate letters in the refrigerator for just a few minutes to firm them up quickly!

I wanted my "BOO!" to be an even deeper purple (the disco dust just didn't stick enough the first time around) --So I brushed lightly with piping gel and then dusted on a thicker coat of sparkles!
(*update: years ago when I made this tutorial, disco dust was commonly used on edible decorations. Now, it's just recommended for non-edible decorations. Just go with colorful sanding sugar, sprinkles, etc. instead!)

Fun Chocolate Spider Cupcakes and More!
I continued my preparations by melting some black candy coating (I used black candy melts) and piped on more fun shapes.

Bats, spiders, and then I used what was left of the polka dotted chocolate transfer sheet that I used in my last blog post :0) --
This time, after the chocolate had almost set on the transfer sheet, I pressed a circle cookie cutter into the chocolate.
Then I chilled my tray of fun in the refrigerator for just a few minutes and released my newly dotted circles (...and spiders and bats).

Chocolate decorations never disappoint! I love the added drama and height!
I applied these fun designs to my cupcakes which were frosted with our Classic Vanilla Buttercream Frosting. Use your buttercream frosting of choice! I tinted the buttercream yellow, orange, and black for today's designs.

Let's do a few close-ups!.......
Bones, bones, bones!!!!

A glamorous chocolate BOO!

EEK! The only kind of spider that is acceptable to me is a chocolate spider! (But I'm still a little creeped out!)


Bats love cupcakes too...
Now for some other fun designs---
Easy Eyeball Cupcakes!
I always love decorating with DOTS--they are smooshable, rollable, and as I found out today, they are fabulous for eyeball making :0) -- These "ghost Dots" are in a fun spooky pale green...but use whatever color you like (even icing would be fine) --
I sliced a little bit off of a DOT, and the smooshed the rest using the end of my rolling pin into a flattish circle.

I used a food coloring pen in blue to create some details...and I made the pupil with a dot of black buttercream.
The white icing was piped on using a tip 12 and I smoothed it a little with a Viva paper towel (optional).

I brushed on the tiniest bit of light corn syrup just here and there on the eye, to up the gross factor just a little bit. I piped the veins in red buttercream using a tip 3.
Easy Spider and Ghost Cupcakes
Here are a couple of lovable spider cupcake and ghost cupcake designs. The ghost is white buttercream piped with a Wilton tip 12, and accented with black buttercream using a tip 3.

The spider's body is piped on using a tip 12 also, with legs piped using a tip 3. (A junior mint would work well for the body too!) :0)
*If you love spider themes at Halloween, check out these spider cakes: Giant Halloween Spider Cake, Cute Chocolate Spiders Cake, and Halloween Spider Cake!
We have a cute Ghost Meringues Cake as well!
Funny Monster Cupcakes!
I can't have a party without a friendly monster. I think that this is Shrek's cousin. His teeth are my favorite! :0)
His gums are made using a fruit Tootsie Roll (cherry flavored)--and then the teeth are sliced candy melts (but any kind of white chocolate would work well--or even marshmallows!)

The eyes are some white candies from my local candy shop, but Sixlets or even icing eyes would work well also. The nose is the DOTS candy from earlier. :0) That's it!
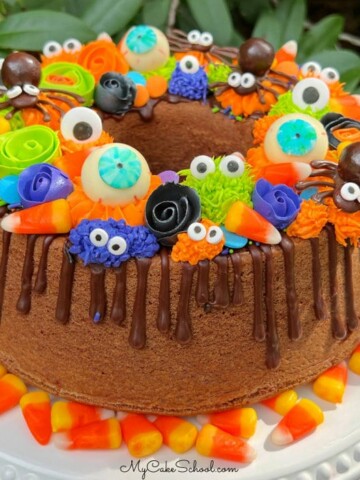
We also have some fun monster themed cakes as well, like our Monster Bundt Cakes and Monster Meringues Cake!
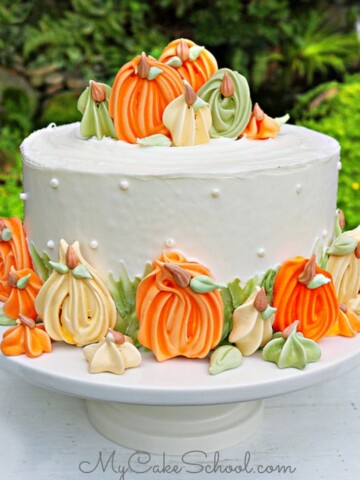
Cute Buttercream Pumpkin Cupcakes
Finally, let's bring in some pumpkins!
I used two different piping tips, just to show you that this design can work whether you are using a giant round tip, or a medium sized tip 12. (This is an orange crusting buttercream.)

I smoothed down my swirls with a Viva paper towel (optional), and then I created lines with a toothpick. The stems are a broken chocolate covered pretzel.

I finished with a sprinkling of orange sanding sugar. (I had to brush on just the teeny tiniest bit of water onto my crusted buttercream so that the sugar would stick.) My leaves are green buttercream piped on with a tip 3.
I just love these sweet cupcakes! We also have a fun Pumpkin Meringues Cake Tutorial as well!

Our Platter of Finished Halloween Cupcakes
That's it! I hope that one of these spookalicious designs winds up on your party table this Halloween (or make some just for fun!) -- If you try it, let me know how it goes!

More Halloween Cakes!
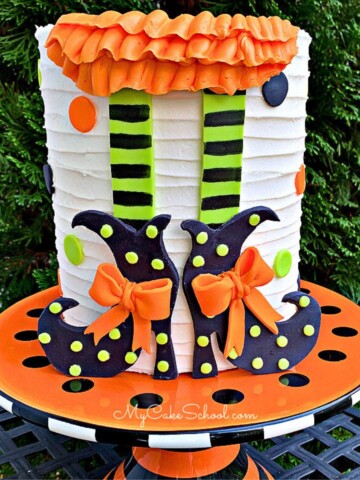
We have so many more Halloween Themed Cakes to share with you! Some of our favorites are our Haunted House Cake, Witch Shoes Cake and Ghost with Balloons Cake!
Cupcake Recipes
If you are looking for cupcake recipes for your Halloween Cupcakes, we have several! Some of our favorites are Pumpkin Cupcakes, Snickerdoodle Cupcakes, easy Oreo Cupcakes, and Chocolate Cupcakes!
Check out our full listing in our Cupcake Recipes section!
These are sooooo cute!!!!!!!!!!!
Very cute and simple..thanks
Too cute Melissa!!
Once again,a fantastic job,Melissa. Great ideas! Just wish I could do it as easily as you make it look...practice,practice....thanks!
We are throwing a Halloween party for my two year old this year (her and my first), these will be the absolute most amazing touch!!!
Fantastic!!!!!!!!!
Now to work some halloween cupcake send you pic :)
Love these! Great Job!! Thanks for the ideas. I am making Halloween Pumpkins for Cupcakes.
These cupcakes are great!! I featured them on my blog :) http://everything-underthemoon.blogspot.com/2011/10/hmm-thats-pinteresting-no2.html
You make it look so simple!! Can't wait to try them!
what an amazing great idea...
You have the cutest ideas.