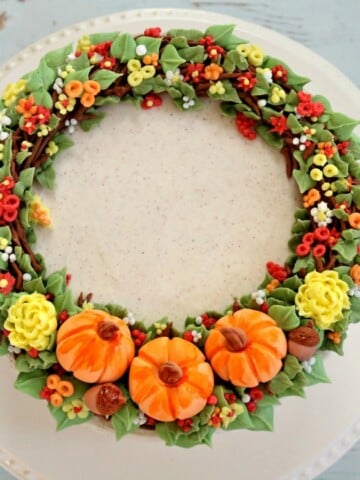
Pumpkin Meringues Cake Tutorial
In today's Pumpkin Meringues Cake tutorial, we'll show you how to create beautiful pumpkin meringues for decorating. This would make a PERFECT fall birthday cake, Thanksgiving cake, and more!

Meringues are such a fun cake decorating medium! We love the unique dimension that these sweet, piped decorations add to cakes and cupcakes.
Table of Contents
A Note About Humidity and Meringues
Meringues can be effected by humidity.
For best results, try to avoid whipping up a batch of meringue on very rainy or humid days as the moisture in the air can be absorbed by the delicate egg white & sugar mixture, preventing it from whipping up properly.
Also, after baking, the meringues may soften slightly in humid conditions.
How to Make Easy Meringues
We've used this simple recipe for meringues for several of our cakes! You can find the full, printable recipe further down in this post, but here is a quick rundown of our steps!
- For these meringues, you'll want to use the lowest rack of your oven, and preheat to 175 degrees F
- Line a baking sheet with parchment paper.
- Make sure that your mixing bowl & whisk attachment/beaters are completely clean & free of grease so that the egg whites whip up properly. (Metal or glass bowls are best).
- In your mixing bowl, beat the egg whites & salt at medium-high speed (using whisk attachment) until foamy and soft peaks form (about 50 seconds).
- Next, gradually add the super fine sugar and vanilla while mixing at medium speed. Follow with the powdered sugar (reduce speed as needed to prevent a cloud of powdered sugar!). Return to medium high speed until stiff peaks form.
- To tint the meringue, spoon it into smaller bowls and gently fold a different color into each.
- Pipe the pumpkin shapes onto a parchment-lined cookie sheet. We piped a few leaves also.
- Bake for 2 hours (lower rack of the oven) or until meringues are dry and easily moved. Turn oven off but leave the pan in the oven for an additional hour to cool.


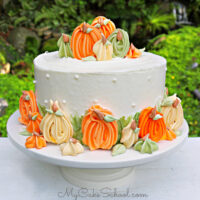
Decorating the Pumpkin Meringues Cake
We frosted our 8 inch cake with our classic vanilla buttercream frosting. You can decorate however you like- I gave my frosting around the sides of a the cake a smooth finish by rotating the cake on a turntable as I smoothed with a bench scraper.
You can even chill the frosted cake in the freezer for 15 minutes to firm up the frosting before going over it with a hot metal bench scraper for an extra smooth finish. (We refer to this as the Hot Knife Method of Smoothing Buttercream).
For the top of the cake, I created a spiral in the frosting using a small offset spatula. I started in the middle and gradually spiraled outward as I rotated the cake on the turntable (as demonstrated in the video).
Around the sides of the cake, I used a little buttercream to attach the pumpkins to the frosted cake. For the pumpkins on top, I just pressed them in.
Crusting Buttercream
We prefer to use meringues as a decoration on cakes that have been frosted with a crusting buttercream (or fondant) rather than a non-crusting frosting.
Our Classic Vanilla Buttercream (as well as our Fluffy Vanilla Buttercream) are crusting buttercream frostings. We had no issues with the meringues softening once placed on the cake.
If you are using a non-crusting frosting, the meringues may be more likely to absorb more moisture and possibly soften.
Test Run! If you're unsure, spread a little frosting on a plate and place a pumpkin meringue on top--see if it becomes soft over time. When in doubt, you can simply place the decorations on closer to the time of the event.

Alternative Design for our Pumpkin Cake
If you are in a time crunch or would prefer to use buttercream only, this design can easily be created in buttercream.
I do love the dimension and look of meringues but buttercream pumpkins are very pretty also. If you go this route, simply pipe your buttercream pumpkins (again using large star piping tips) directly onto the cake.
You would not be able to have the stand-up pumpkins on top as we did with the meringues, but you could still pipe a buttercream border or accents using large star tips to create cute, "squatty" buttercream pumpkins and leaves!
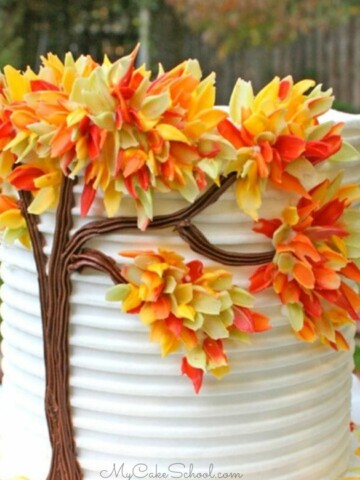
More Cakes featuring Meringues
Aside from today's Pumpkin Meringues Cake, we have a few more designs that feature meringues! Here are a few favorites: Beautiful Meringue Roses Cake, Monster Meringues Cake, Valentine Meringue Hearts Cake, and Ghost Meringues Cake!
Looking for more Fall Cakes?
If you're searching for more fall cake designs or fall cake recipes, don't miss our collection of Favorite Fall and Thanksgiving Cake Designs and Fall Cake Recipes!
Some of our most popular fall cake recipes are Pumpkin Spice Cake, Carrot Cake Recipe, Gingerbread Cake, and Apple Spice Cake.
Have you made this? We would LOVE for you to leave a ⭐️ rating as well as a comment and photo below! We really appreciate your feedback!
Pumpkin Meringues Cake Tutorial
Equipment
Ingredients
For the Meringues
- 4 egg whites
- Pinch of salt we used popcorn salt because it is finer
- ¾ cup super fine sugar (If you do not have this you can make your own by processing granulated sugar in a food processor or bullet blender.)
- ½ teaspoon (2g) clear vanilla (real vanilla will change the color)
- 1 cup powdered sugar sifted
Other Tools
- Piping Tips: We used a 1M large star- 2D is a good option also, star tip 16 (or any small star or round tip) for stems.
- Disposable Piping Bags
- Coloring Gels: We used Americolor Orange Avocado Green, Leaf Green, Ivory, Chocolate Brown
- Parchment Paper
- Cookie Sheet
Instructions
- You'll want to use the lowest rack position in your oven. Preheat to 175 degrees F
- Line baking sheet with parchment paper.
- It is very important that your mixing bowl & whisk attachment/beaters are completely clean & free of grease so that the egg whites whip up properly.
- In your mixing bowl, beat the egg whites & salt at medium-high speed (using whisk attachment) until foamy and soft peaks form (about 50 seconds).
- Gradually add the super fine sugar and vanilla while mixing at medium speed. Follow with the powdered sugar (reduce speed as needed to prevent a cloud of powdered sugar!). Return to medium high speed until stiff peaks form. ***See Notes section below
- To tint the meringue, spoon it into smaller bowls and gently fold a different color into each.
- Pipe the pumpkin shapes onto a parchment-lined cookie sheet. We piped a few leaves also.
- Bake for 2 hours (lower rack of the oven) or until meringues are dry and easily moved. Turn oven off but leave the pan in the oven for an additional hour to cool.
- Once they are completely cooled, store in an airtight container away from strong lighting or sunlight. Light could cause the colored meringues to fade.
That looks awesome. I love the idea and the colour combination. Really perfect for a fall cake! :-)
What cake did you use for the actual cake when creating the Pumpkin Meringue Decorations? I realize that numerous cakes could be used but there are cakes which taste better with specific types of frostings or decorations. For example I can't quite see meringue decorations used on a deep dark chocolate cake. Some may like it and it isn't awful, but it wouldn't be my first choice. What cake or cakes do you use with the meringue decorations and specifically what cake is shown with the Pumpkin Meringue Tutorial?
Hi Pamela, the meringues are vanilla flavored and sweet--I would actually use them on any kind of cake. This cake was likely our Pumpkin Spice Cake.
While I like the flavor of meringues, I think of them more as edible decorations-- much like we use candy coating decorations, etc. I love the dimension that they add to cakes.