Chocolate Nutella Cake
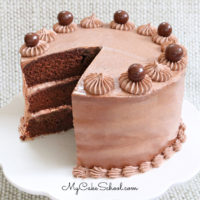
We have fallen in love with this decadent Chocolate Nutella Cake recipe! A filling of Nutella and Nutella Buttercream is sandwiched between moist, rich cake layers for a dessert that is as flavorful as it is impressive.
As much as we love popular go-to combinations like our Oreo Cake, Peanut Butter & Chocolate Cake, Almond Joy Cake, or Mint Chocolate Chip Cake, today's flavorful cake feels extra special and unique.

Table of Contents
How to Make a Chocolate Nutella Cake
The wonderful Nutella flavor in today's recipe comes from the filling and frosting.
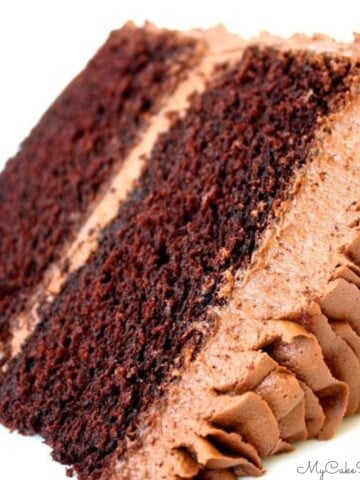
The rich chocolate cake layers are based on our go-to scratch Chocolate Cake recipe, which uses the reverse creaming method of mixing. (The ingredients are added in a different order than you may be used to.)
The result is a velvety soft, rich chocolate cake. The hot coffee which is poured into the cake batter in the final stage of mixing makes for an even more decadent cake, as the heat develops the cocoa even further.
You can find the full, printable cake recipe at the bottom of this post. Make sure that the cake layers have cooled completely before filling and frosting the cake.
Recipe FAQs
Assembling the Nutella Cake
This is a three layer (eight inch) cake which means two layers filling- hooray! I love three layer cakes for this reason. Another layer of filling means another layer of flavor.
For today's cake, we have the perfect balance of hazelnut and chocolate. So good!
First, you'll place the first cake layer onto your pedestal or cake base of choice. Then, spread the layer with Nutella, stopping about ¼ inch from the edge all the way around.
I didn't spread the Nutella extremely thick, but enough to ensure that the flavor would come through. Maybe about ⅛inch thickness or so.

I followed that with a layer of our Nutella Buttercream Frosting. Then placed the middle chocolate cake layer on top and repeated the filling. Finally, I topped it all off with our last chocolate cake layer.

Frosting the Cake
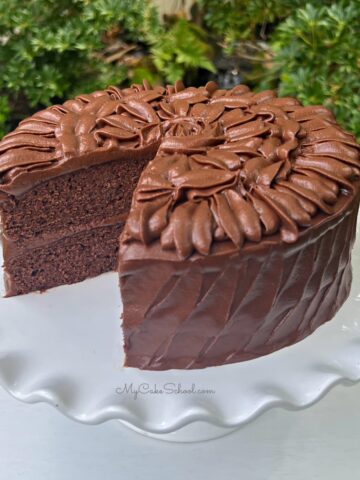
Decorate the cake however you like! This frosting is very easy to work with.
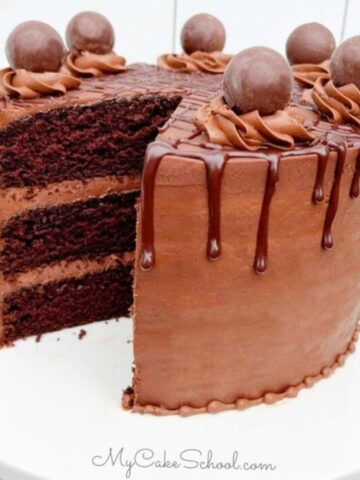
I frosted the sides and top of the cake with our Hazelnut buttercream using a small offset spatula. I first filled in any gaps between the cake layers with frosting, then crumb coated the cake with a thin layer of frosting, and followed up with the final coat. (We often freeze the cake for 15 minutes to firm everything up after the crumb coat, before applying the final coat of frosting.)
I used the hot knife method of smoothing for creating a smooth finish around the sides. This involves chilling the frosted cake, then going back over it with a hot metal bench scraper or spatula. Add a bit of fresh buttercream here and there as needed before gliding over it. This method can sometimes give the frosting a bit of a marbled look but we like it ;0)
I used an 8B piping tip to add stars around the top of the cake, and placed chocolate covered hazelnuts on top of every other one to finish things off.

More Chocolate Cakes
If you love chocolate cakes, we have so many more recipes for you to try! Some of our favorites are our Chocolate Sour Cream Cake, German Chocolate Cake, easy Brownie Cake, and Chocolate Velvet Cake.
Thanks so much for stopping by! Don't miss our full collection of cake recipes and free cake decorating tutorials! You'll find hundreds of cake recipes from scratch, cake mix recipes, and more.
We also have tons tutorials for birthday cake ideas, baby shower cakes, elegant cakes, and more.
Have you made this? We would LOVE for you to leave a ⭐️ rating as well as a comment and photo below! We really appreciate your feedback!
Chocolate Nutella Cake
Ingredients
- 2 cups white sugar (400g)
- 2 ¾ cup all-purpose flour (322g)
- 1 cup unsweetened cocoa (lightly spoon into cup then sift) (82g)
- 2 teaspoons baking soda (10g)
- ½ teaspoon baking powder (2g)
- ½ teaspoon 2g salt (2g)
- 2 sticks unsalted butter, softened (226g)I cut the butter into 1 inch pieces onto waxed paper leaving on the countertop for 8 to 10 minutes it will still be quite cool when adding to the dry ingredients. If it becomes too soft, just refrigerate a few minutes
- ¼ cup vegetable oil (54g)
- 4 large eggs at room temperature (If in a hurry, place the eggs in a bowl of warm water.)
- 1 cup milk (220g)
- 1 teaspoon vanilla extract (4g)
- 1 cup hot coffee, it can be instant or brewed (220g)
For the Hazelnut Buttercream Frosting
- 2 sticks unsalted butter, slightly softened (226g)
- 1 cup Nutella Spread to make the buttercream {We bought a 26.5oz Jar so that we had additional Nutella for spreading on the layers} (280g)
- 1 teaspoon salt
- 4 cups powdered sugar (460g)
- 3 to 4 Tablespoons milk, more if needed to reach the consistency you like (45g-60g)
- 2 teaspoons 8g vanilla extract
Decoration
- Chocolate covered hazelnuts for the top of the cake
- 6B Piping Tip or your french tip/large star tip of choice for decorative accents.
Instructions
For the Chocolate Cake
- Preheat oven to 350 degrees
- Grease and flour three 8 inch cake pans
- In a mixing bowl, add the dry ingredients: sugar, flour, cocoa, baking soda, baking powder, and salt. Whisk for 1 minute to blend.
- Add softened butter a few pieces at a time while the mixer is on low speed. Mix until the dry ingredients look like coarse sand and the dry ingredients are moistened. Scrape the bottom and sides of the bowl.
- In a separate bowl whisk the eggs, milk , oil and vanilla until blended.
- Method is important when using the Reverse Creaming Method. With the mixer on low speed, SLOWLY add approximately ½ of the egg mixture to the dry ingredients. Increase the speed to medium and mix for 1 ½ minutes at medium speed. Don't mix above medium speed. Scrape the bottom and sides of bowl. Add the remaining egg mixture in 2 pourings, beating for 20 seconds after each pour. Scrape the sides and bottom of bowl.
- Slowly add the cup of hot coffee and mix another 30 seconds until blended. The batter will be very runny. Don't worry!
- Pour into 3 prepared 8" pans and bake at 350 degrees for 25 to 30 minutes or until the center of the cake springs back to the touch and a toothpick comes out clean.
- Cool the cakes 10 minutes on a rack and then turn out of the pans.
- *Yields approx 9 cups of batter.
- Making cupcakes? Check out our Classic Chocolate Cupcake Recipe (conventional method of mixing for fluffier cupcakes).
For the Nutella Buttercream Frosting
- In the bowl of your mixer add the butter and salt, mix on medium speed until it is softened and smooth. Add the Nutella, mix until blended.
- Gradually add the powdered sugar alternately with the milk. Add vanilla and mix on medium speed 4 to 5 minutes until smooth.
- Makes almost 5 cups frosting
Assembly of Cake
- Place the first layer of cake on a pedestal or cake base.
- Spread with Nutella, taking it to about ¼ inch from the edge of the layer. (I spread the Nutella to about a ⅛ inch thickness. Adjust to your liking, although if you want a thick layer of Nutella, you should pipe a dam of buttercream around it.
- Follow with a layer of Nutella Buttercream. Add the second layer of cake followed by more Nutella spread and Nutella Buttercream.
- Top it off with the third cake layer.
- Fill in any gaps between the layers with frosting and frost the cake. We used a 6B french tip to create stars around the top edge of the cake which we topped with chocolate covered hazelnuts.
Delish! :-) Definitely going to make this for my beautiful DIL's Birthday! :-) She eats Nutella with a spoon LOL! :-)
Thank you so much Melissa for sharing this wonderful recipe. It is a great addition to the holiday feast ??
Can I substitute the butter for high ratio shortening so I can have a crusting buttercream frosting?
Hi, We have never tried that substitution but I think it would work if you can work out how much high ratio shortening to use.
Hi.. absolutely nice recipes.. my daughter love Nutella and I want to try.. thank you so much for the recipes.. only 1 question, can I divide the ingredient in half and bake in 2 6” cake pan? And if so, how Long do I have to bake? Thanks
Hi Phoebe, This recipe makes approximately 9 cups batter. You can divide the recipe in half
putting 2 cups batter in each of the 6 inch by 2 inch deep pans. You will have a small amount of batter left over. Bake at 350 degrees for 25 to 30 minutes or until a toothpick inserted into the center comes out clean or with just a few crumbs attached. If you are not familiar with the reverse creaming method that is used with this recipe, you may want to watch the video link below.
https://www.mycakeschool.com/?s=reverse+creaming
1 cup (220) hot coffee, it can be instant or brewed
Is this fluid ounces?
Kind regards Evadne
Hi Evadne, Yes, you can use instant or brewed coffee. One cup of 8 fluid ounces or 220 gram weight. Hope you enjoy the recipe
This is what perfection and my dream look like. I’m sure this cake is HEAVEN. I’m thinking of making this next weekend. Gonna follow your recipe precisely. Though I’d like to replace white sugar by brown sugar. The task isn’t very hard, so I hope I’ll handle it. All of your useful recommendations will help me a lot.
Thank you for this treasure. My day wasn’t a total loss. I really appreciate all of your hard work and effort. Keep it up!
p.s. I’d be so grateful if you’d share with me a few similar recipes for chocolate cakes. Can I find more of them on your blog?
p.p.s. Thank you for “little history lesson”. Learned so much new info.
Hello! Thanks for another great recipe! I’ve just baked mine but I’m not sure whether I should keep it in the fridge or on the countertop... I did put it in the fridge and the buttercream almost froze... Will it go bad if I leave it on the countertop for a few days?
Hi Mihaelia, Your cake looks wonderful, thanks for posting a picture. You do not need to refrigerate, it will be fine on your countertop. We think the cake is best eaten by the 3 day. The buttercream can begin to have an "off" taste after that. It will last longer if refrigerated. For best flavor take out at least 2 hours before serving.
Fantastic!!! It’s the best chocolate cake I’ve ever made!!! Thank you!!!