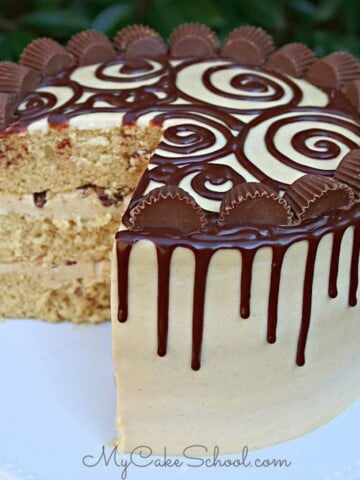
Peanut Butter Cake
We're SO happy to share this moist scratch Peanut Butter Cake recipe with you. If you love peanut butter desserts, you are going to love this cake.

We've had a Peanut Butter & Chocolate Cake on our site for years, but for the true Peanut Butter fans, we needed a layer cake with even more Peanut Butter goodness.
For this recipe, peanut butter plays a starring role, but we couldn't resist adding a bit of chocolate too! We love the additional drama of a chocolate drip.

Table of Contents
How to Make a Peanut Butter Layer Cake
You can find the full, printable cake recipe for this peanut butter cake at the bottom of this post. Here is a quick rundown of our steps!
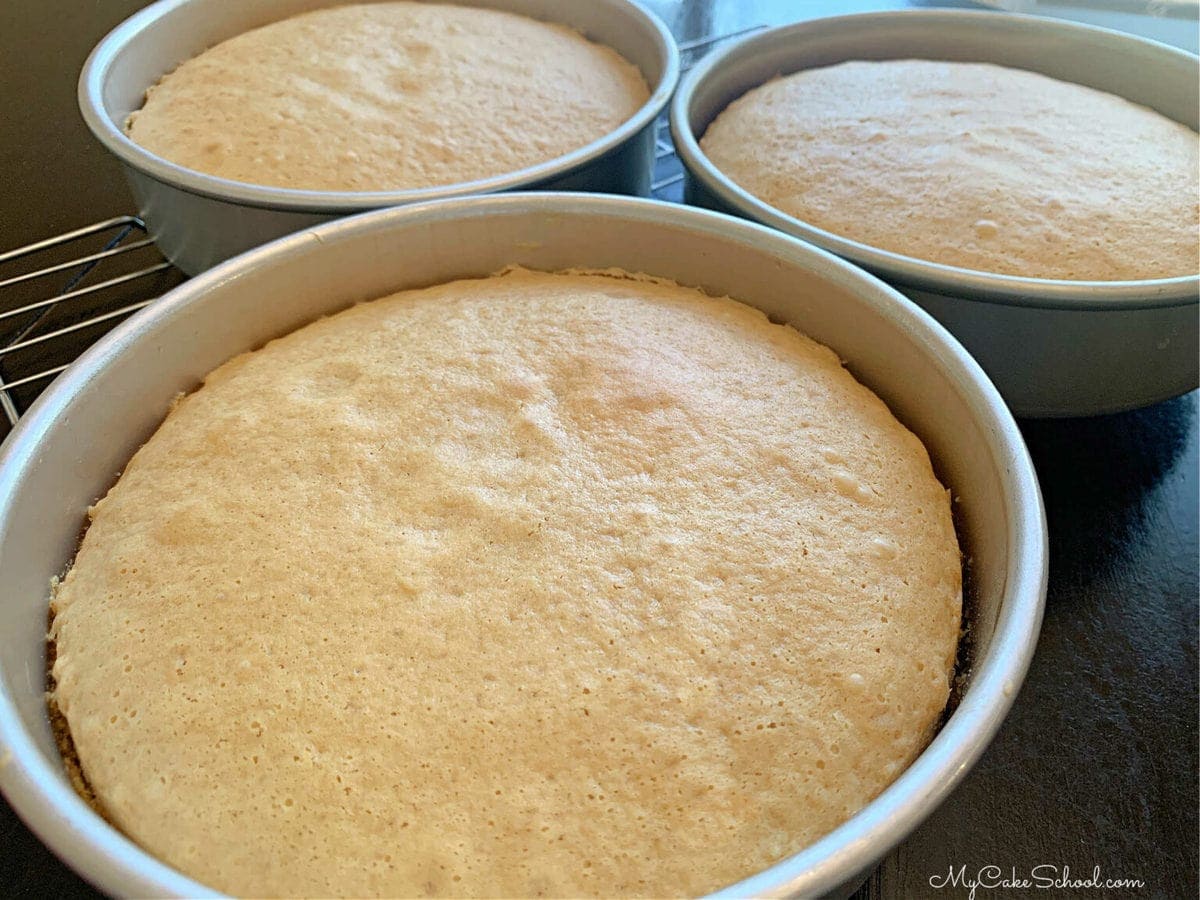
- Preheat the oven to 350 degrees F. Grease and flour three 8 inch round cake pans. We like to place a circle of parchment paper or wax paper in the bottom of each pan.
- In a medium bowl add the cake flour, baking powder, baking soda and salt. Whisk at least 30 second to blend.
- In a medium bowl add the milk and sour cream, whisk to blend the sour cream into the milk. Set aside.
- In the bowl of your mixer, beat the butter on medium speed until softened and smooth. Slowly add the white and brown sugar and beat at medium speed for 3-5 minutes. It will lighten in color and be fluffy.
- Add the peanut butter, vegetable oil and vanilla extract and mix until blended into the butter sugar mixture.
- Add the eggs one at a time, mixing after each until the yellow of the yolk is blended in.
- With the mixer on low speed, add the dry ingredients alternately with the wet ingredients, beginning and ending with the dry ingredients (3 additions of dry and 2 of wet). Mix just until blended.
Bake at 350 degrees for 25 to 30 minutes. As with any cake recipe, baking times can vary. The cake is ready when it springs back when lightly touched, or a toothpick can be inserted and removed with just a few crumbs (or no crumbs) attached.
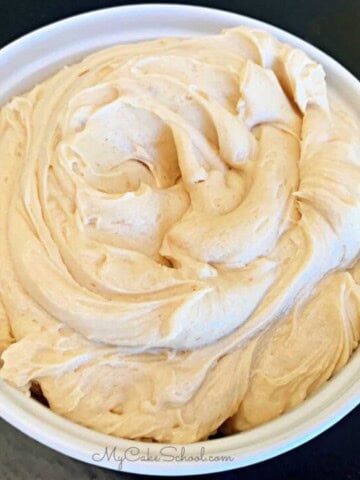
Peanut Butter Frosting
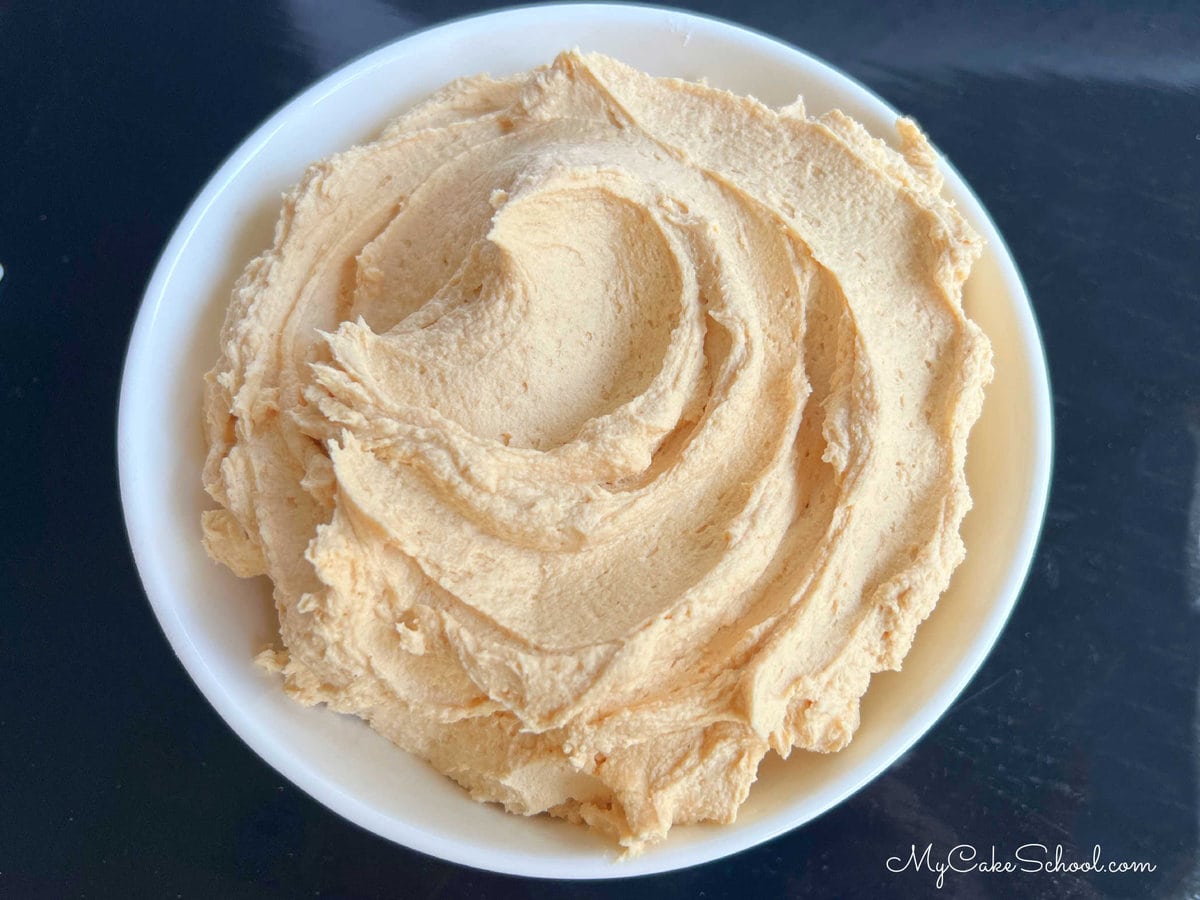
We frosted the cake with a simple peanut butter buttercream frosting that is SO delicious. It makes a great filling or frosting, and it pipes great too!
This is a simple combination of softened butter, peanut butter, confectioners' sugar, vanilla extract, a splash of milk and a pinch of salt.
For the best consistency of frosting, we recommend using Creamy brands of peanut butter (like Jif, etc.) rather than all natural peanut butter that have a consistency that is more runny.
Assembling the Peanut Butter Cake
Once the peanut butter cake layers have cooled, it is time to frost the cake!
Place the first cake layer on the cake pedestal or cake board and spread with a layer of peanut butter frosting. Repeat for the second cake layer and top with the third.
Fill in any gaps between the cake layers with additional frosting and then apply a thin coat of frosting to the top of the cake and around the sides. This is the "crumb coat".
At this point, I like to chill my crumb coated cakes in the freezer for 15 minutes (or longer in the refrigerator) to firm everything up before the final coat of peanut butter frosting.
Decorating the Cake
After frosting the chilled cake, I rotated it on a turntable while gliding over the frosting with a metal bench scraper (that had been heated with hot water). This "hot knife method of frosting" results in a smooth finish.
I then used a medium sized star tip (21) to pipe stacked shell borders around the base of the cake. (See our tutorial on Buttercream Piping with Star Tips for details!)
Next, I chilled the cake just until the frosting was firm (about 15 minutes) and applied the ganache drip,.

How to Apply a Ganache Drip:
Our ganache drip consists of a 1:1 ratio of chocolate to heavy cream.
Once prepared according to our instructions below, we loaded the ganache into a disposable piping bag, snipped the tip away, and applied the ganache around the edge of our chilled peanut butter cake.
We then spread the remaining ganache over the top of the cake, connecting the border of drips that we just created. This seems like a backwards way of applying a drip, but actually piping the drip in this way gives us the most control.
If you'd rather, you could also just spread ganache over the top of a chilled cake and allow the ganache to spill over the edge in some places. It won't be as symmetrical, but is still a great look!
Finally, we added stars around the top of the peanut butter cake using a french tip. (Any large star tip is good- we used a Wilton 6B). Then, we added oversized chocolate chips in the center of each star.
Consistency of the Ganache drip
This 1:1 consistency chocolate to cream will give your ganache a fluid quality although it will still thicken as it sits out. It's best to have the cake ready to go before making the drip.

If your ganache sets up too much, you can microwave it for just a few seconds at a time until ready. It should flow easily from your piping bag, but it should not be very warm when applying to the cake.
If you'd like to sneak even more chocolate into your cake, you can also use this ganache in the filling, along with the peanut butter buttercream!
*For a quick and helpful tutorial on creating and applying a Ganache Drip, don't miss our free tutorial!: How to Make a Ganache Drip.

More Peanut Butter Cakes to Try!
We've made lots of cakes with peanut butter over the years! Here are just a few of our favorites.
- Peanut Butter & Chocolate Cake (Chocolate Cake with Peanut Butter Frosting)
- Peanut Butter Pound Cake with Chocolate Glaze
- Peanut Butter and Chocolate Cake (Doctored Cake Mix- Chocolate Cake with Peanut Butter Frosting)
- Peanut Butter Cake Mix Recipe
- Peanut Butter Cream Cheese Frosting
- Peanut Butter Chocolate Chip Pound Cake
- Banana Chocolate Chip Cake with Peanut Butter Frosting- Such a fun, delicious combination!
Thanks so much for stopping by! We hope that you enjoy this peanut butter cake recipe. Don't miss our full collection of Cake Recipes, which includes cake recipes from scratch as well as cake mix reicpes!
We also have hundreds of cake decorating tutorials to share with you! You'll find everything from how to make a cake to how to frost a cake, baby shower cake ideas, themed birthday cake ideas, and so many more.
Have you made this? We would LOVE for you to leave a ⭐️ rating as well as a comment and photo below! We really appreciate your feedback!
Peanut Butter Cake with Ganache Drip
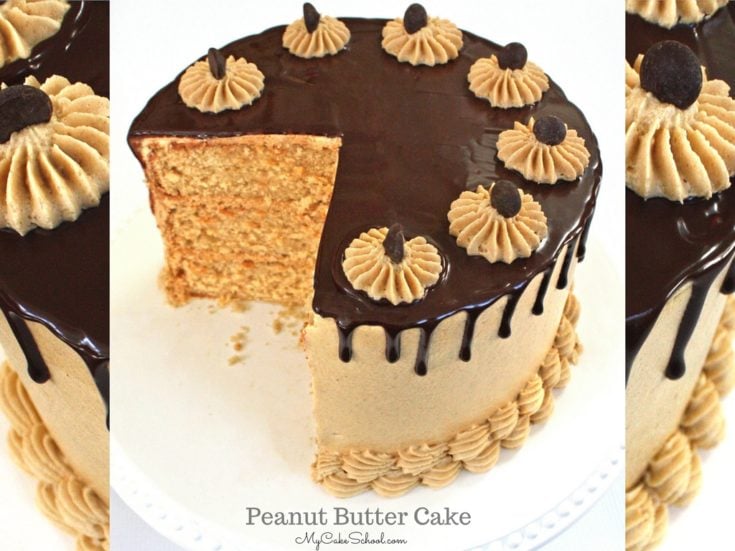
You will love this moist peanut butter layer cake recipe! Frosted with our creamy peanut butter buttercream and a decadent ganache drip, this cake is sure to please any crowd!
Ingredients
For the Peanut Butter Cake Layers
- 1 ½ sticks (170g) unsalted butter, slightly softened
- 1 ½ cups (300g) white sugar
- 1 cup packed (217g) light brown sugar
- 1 cup (255g) creamy peanut butter (Do not use all natural or reduced fat)
- 2 teaspoons (15g) vegetable oil
- 2 teaspoons (8g) vanilla extract
- 3 large eggs (if cold, the eggs can be placed in a bowl with very warm water for a few minutes)
- 3 cups (342g) cake flour **(if you do not have cake flour see substitution below)
- 3 teaspoons (12g) baking powder
- ½ teaspoon (3g) baking soda
- ½ teaspoon (3g) salt
- 1 cup (242g) sour cream
- 1 cup (242g) milk
- ** You can make your own cake flour: For each cup of flour in a recipe, remove 2 Tablespoons of all purpose flour (plain in the UK) and replace with 2 Tablespoons of cornstarch. For this recipe, measure out 3 cups all purpose flour, remove 6 Tablespoons flour and replace with 6 Tablespoons cornstarch. Whisk to blend.
For the Peanut Butter Buttercream
- 2 sticks (226g) unsalted butter, slightly softened
- 1 cup (255g) creamy peanut butter ( do not use natural or reduced fat or it will not have the right consistency for spreading)
- 4 cups (460g) powdered sugar
- ¼ cup (60g) milk plus 2 Tablespoon - more if needed to reach the consistency you like
- 2 teaspoon (8g) vanilla extract
Ganache Drip
- 6 oz (171g) Chocolate (Semi-sweet or Dark) We used Ghirardelli
- 6 oz (171g) Heavy Cream
Instructions
For the Peanut Butter Cake Layers
- Preheat the oven to 350 degrees. Grease and flour three 8 inch round cake pans. Place a circle of parchment paper or wax paper in the bottom of each pan.
- In a medium bowl add the cake flour, baking powder, baking soda and salt. Whisk at least 30 second to blend.
- In a medium bowl add the milk and sour cream, whisk to blend the sour cream into the milk. Set aside.
- In the bowl of your mixer, beat the butter on medium speed until softened and smooth. Slowly add the white and brown sugar and beat at medium speed for 3-5 minutes. It will lighten in color and be fluffy.
- Add the peanut butter, oil and vanilla extract and mix until blended into the butter sugar mixture.
- Add the eggs one at a time, mixing after each until the yellow of the yolk is blended in.
- Add the dry ingredients alternately with the wet ingredients, beginning and ending with the dry ingredients (3 additions of dry and 2 of wet). Mix at medium speed until just blended in. Do not over mix or mix above medium speed.
Bake at 350 degrees for 25 to 30 minutes. Be sure to check for doneness with a toothpick inserted in the center of the cake. It is done when the toothpick comes out clean or with just a few crumbs attached. Let cool in the pan 10 minutes then turn out. Makes 8 cups batter
Works well for cupcakes, the cupcakes will have a very slight dome
For The Peanut Butter Buttercream Frosting
- In the bowl of your mixer add the butter and mix on medium speed until the butter is softened and smooth. Add the peanut butter and mix until blended.
- Gradually add the powdered sugar alternately with the milk. Add vanilla. Mix on medium speed 4 to 5 minutes until smooth.
For the Ganache Drip
- Place your chocolate into a microwave safe bowl.
- Pour heavy cream over the chocolate and place in the microwave for 1 minute.
- Remove and let sit for 1 minute to soften. Stir, then microwave in 10 second intervals until the chips are nearly melted. Then allow to sit for 1 minute more, stir until it takes on a silky smooth consistency.
*Microwave times may vary. If you are making a smaller amount of ganache, you will reduce the microwave time. If your chocolate hasn't melted after time recommended in the instructions, simply microwave in small 5-10 second increments until it has nearly completely melted. Let sit one minute, then stir until smooth.
Recommended Products
As an Amazon Associate and member of other affiliate programs, I earn from qualifying purchases.


You don't have to answer my last question. Sorry!!
Hi Fiona, It does not take very long to thaw cake layers. You can fill and frost the cake when it is only partially thawed if you like. A cold cake will take much longer to crust (crusting - when you touch a frosted cake and nothing comes off on your finger) If you want the buttercream to crust quickly, wait until the layers are fully thawed.
Okay, thanks!
Made this cake for a friend that just Loves Peanut Butter anything. It was her birthday. She LOVED it ! With thoughts of would jelly taste good in the middle? Just a thought.
Thanks Margie! I'm so glad that she liked it! Jelly sounds like a fun idea too ;0)
delicious peanut butter cake. In fact, it is the best I've ever tasted. Thanks for the recipes you create and share
Hi Tracy! I'm so glad that you enjoyed it!! Thanks for your feedback.
Can I substitute buttermilk for the regular milk (still using the sour cream)? Do I need to change the baking powder or baking soda amounts? Thank you in advance.
Hi Cheryl, I have not tried substituting buttermilk for the milk in the recipe so I cannot be positive of the outcome. I hope you will enjoy the recipe.