How to Make a Cake
Today, I'm going to show you how to make a cake! If you are new to making or decorating cakes, this video is a great place to start.
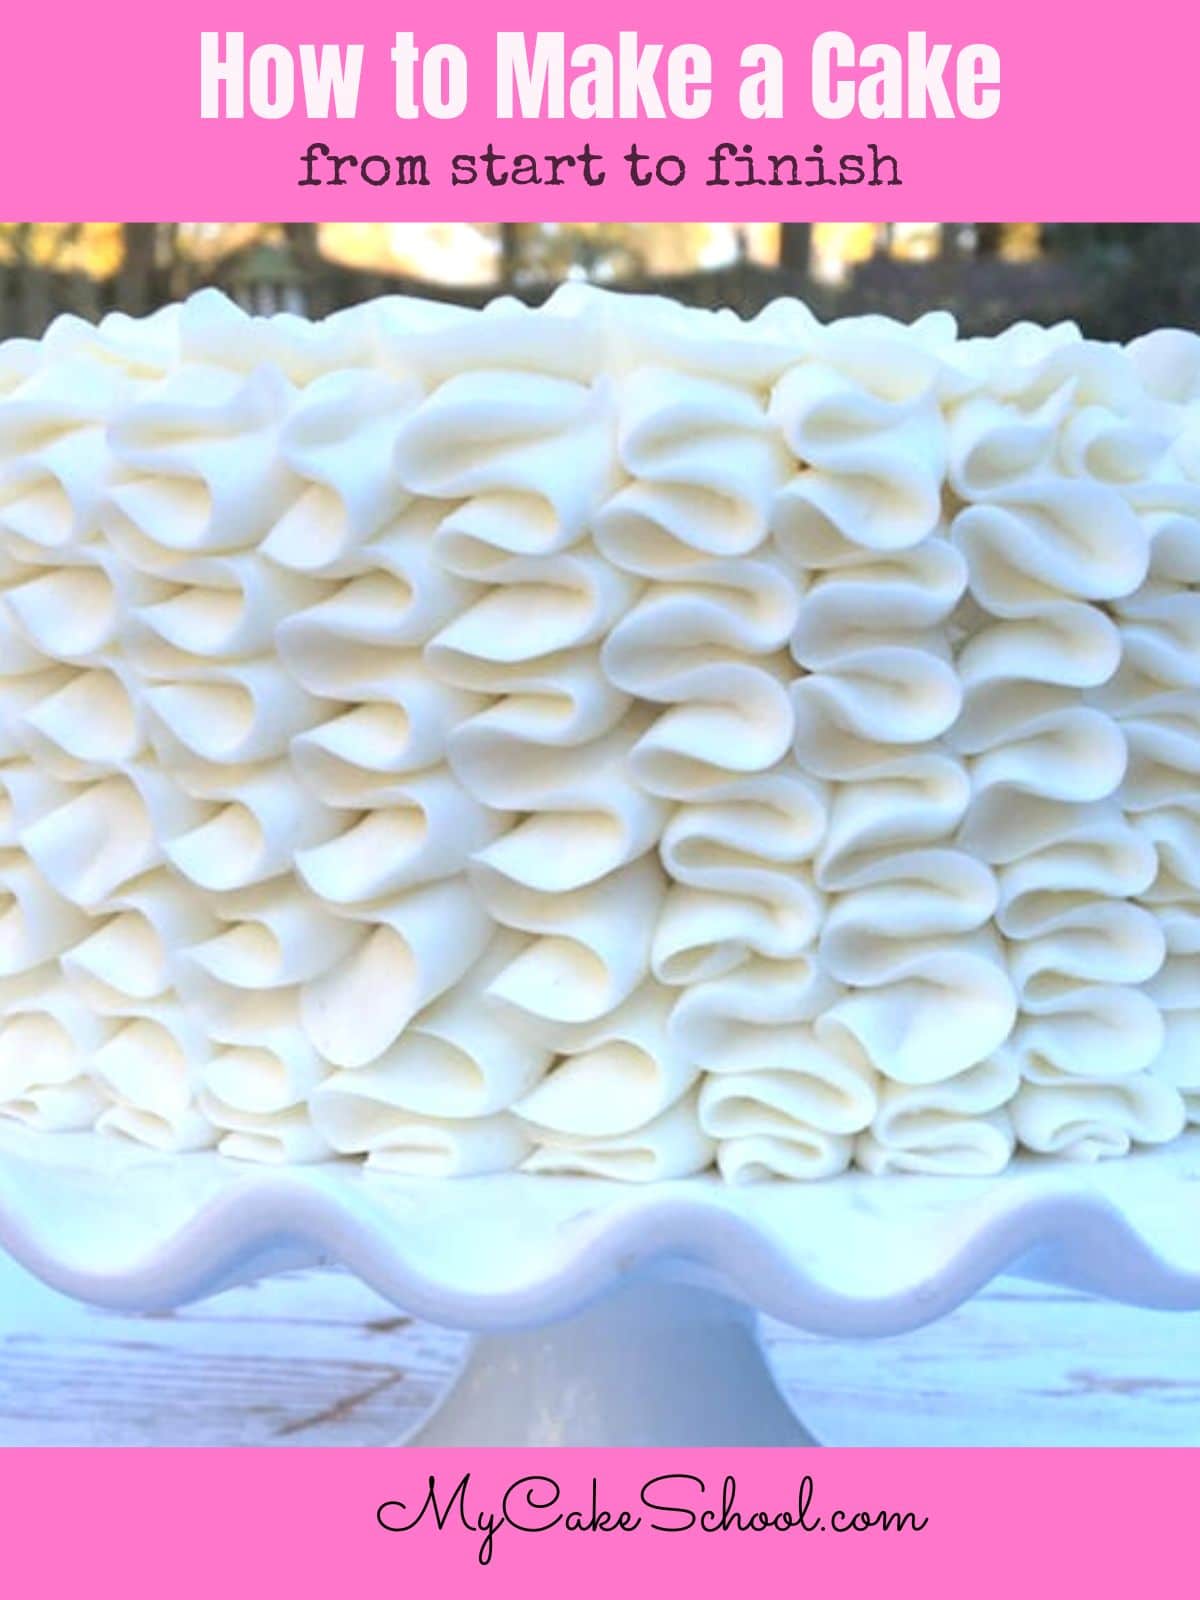
Table of Contents
What You Will Learn
In this video, we'll show you how to successfully mix & bake a cake, how to wrap and freeze cake layers, trim cake layers, & settle the cake.
Then, I'll show you how to apply the crumb coat & pipe a simple ruffled buttercream design.
We'll show you key baking and cake decorating tips and tricks that will help you to become a better baker and cake decorator!
You can apply most of these methods to any cake that you are preparing. Have fun experimenting!
Part One: Mix, Bake, Freeze
Part Two: Settle, Crumb Coat, Decorate
Materials: How to Make a Cake
We used this White Almond Sour Cream Cake Recipe (which uses the conventional creaming method)
Buttercream (our classic vanilla buttercream and fluffy vanilla buttercream are both good options)
Cake Pans (Today, we used two 8 inch cake pans)
Digital Scale (optional but helpful)
Wilton 104 piping tip
Cardboard cake circle
Recipe FAQs
Thanks for Stopping By!
Thanks so much for stopping by, we hope that you enjoyed the video! Now that you know how to make a cake, we hope you'll have fun experimenting with different recipes, cake designs, and more!
Don't miss our huge collection of hundreds of cake recipes and free cake decorating tutorials! You'll find everything from birthday cake recipes to birthday cake design ideas, baby shower cakes, and more.
We have lots of cake recipes from scratch as well as cake mix recipes!
Some of our most popular cake recipes are White Velvet Cake, Carrot Cake, Lemon Cake, and Strawberry Cake!
Great video. Thank you. I have a silly question. After filling and settling the cake if you have a bulge, do you cut away the excess frosting and proceed with the crumb coat?
This video is such a nice one to add to your library of techniques. Alady, Carolyn Duvall Lawrence, who has done cake decorating for years, shared a great tip with me. Instead of taking the cake layers out of the pan to wrap, she just leaves them right in the pan and wraps in layers of saran wrap. I have found this to be a real time saver. I don't have to worry about misshapen layers because the pan protects them until they are completely frozen. When they have come out of the freezer, I can just trim the top portion of the cake level with the pan. The only down side to this method, is that you need multiple pans.
Very interesting videos. Informative. Being a strictly GF girl for many years this is certainly very different from the way I do things. But I now clearly understand why people struggle with GF Baking. :) Great videos very clear and easy to understand. I'm sure they will help a lot of people. Two thumbs up from the GF Gal. :)
Great tutorial. Thanks for the tips. My last cake turned out like a wet sponge. Now I know why!
Thank you all so much for your comments!!
@Queridam- Yes, if you notice anything that needs to be smoothed or trimmed away after the settling process, you'll want to take care of it before crumb coating and frosting the cake.
Never say you can't teach a old dog new tricks. I've been baking for years, and although most of this is familiar, I learned a couple of handy tips I never knew before. Definitely going to use on my next cake. I should mention my cakes don't dome as I use flower nails in my pans and place my pan on a pizza stone. Seems to distribute the heat preventing the dome. I also saw a tip on letting your batter "rest" in the pan on the counter for up to 20-30 minutes before popping into the oven. Although sceptical, I tried it...and it worked!!
Thanks Melissa for a great video..concise and informative.
?
A question Melissa. Forgot to ask in my last post. I noticed you didn't dowel your cake with either bubble straws or wooden cake dowels. I always dowel my cakes, especially if I'm transporting them.
Hi June- thanks for your comments! - We should have mentioned that we like to use rose nails too for cakes that are 10" and up to help distribute the heat. Interesting tip to place the pan on a pizza stone & also letting the batter rest. We usually don't have much of a dome with our scratch cakes anyway, but for the doctored mixes, I'll have to give that a try sometime!
Also, for doweling, I only find it necessary to dowel/add straws when working with stacked or double barrel cakes. I do like to chill my cakes until firm though before traveling. Thanks for bringing up the point of transporting -forgot to mention it!! ;0)
99.99% of the time I bake from scratch...and as you say, don't get much doming. Different story for doctored cake mixes. Last couple of cakes I baked, 8" x 3" skipped the rose nails, just used the pizza stone....works a charm. I should say, if I have a cake just for family 2: 8 x 1 1/2" I don't bother to dowel...as you say, only stacked cakes. Don't understand the science of letting the batter rest before baking....but it seems to work...
Great videos! So helpful to see the whole process. I have a question on the logistics of the oven positioning. When baking two cake pans at the same time, is it necessary to rotate the pans mid way through baking? Also, what is the best placement of the pans and are two cake pans the maximum number of pans you would suggest to bake at once?
Hi Samira, When I am baking two cake pans I don't rotate the pans. I can bake three 8 inch round on the top rack of my oven. With some recipes all three are done at once, but sometimes I need to take out the back two pans and bake the front one a bit longer. I don't rotate those either. The rule of thumb is to have air space between each pan and the pans should not touch the sides of the oven. If you happen to have a convection oven you would be able to bake on both racks.
Love the video and all the tips. I just have a question about the recipe for the White Almond Sour Cream Cake that was posted with the video. Is there any almond flavoring added to the cake? I didn't see any almond flavoring listed with the recipe.