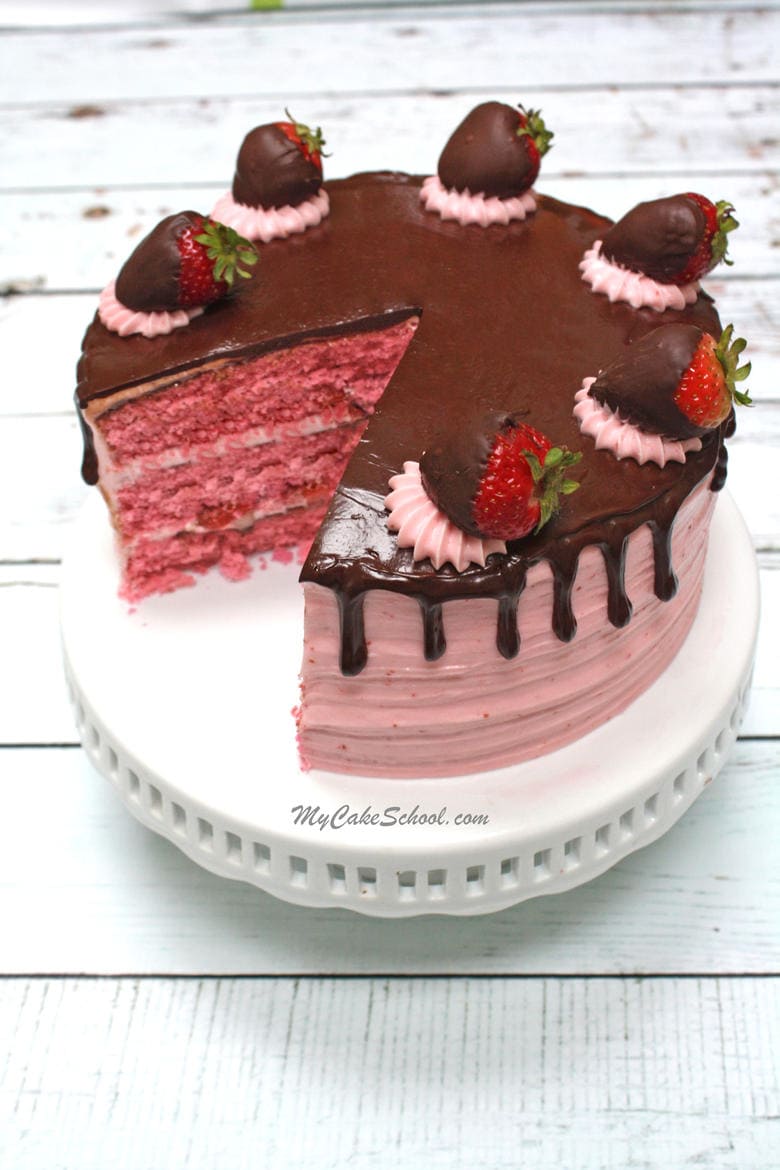
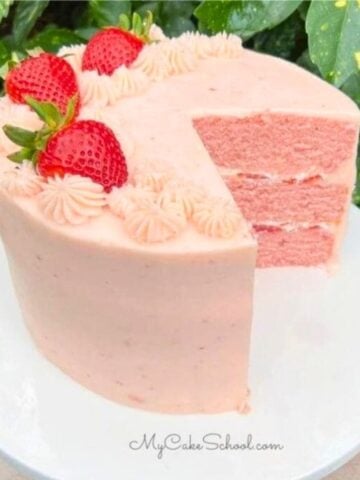
Chocolate Covered Strawberry Cake
If you love chocolate covered strawberries, this Chocolate Covered Strawberry Cake is for you! This scratch layer cake is every bit as delicious as it sounds, and it's so pretty too!

Table of Contents
Why we Love It
- Delicious combination and pretty presentation with chocolate covered strawberries!
- Moist, tender cake and wonderful strawberry flavor
- Dramatic ganache drip
- You can use any of your favorite strawberry cakes for the layers of this recipe. We have several favorites, from our strawberry cake mix recipe to homemade strawberry cake , to strawberry sour cream cake and more!
Mixing Method
Today, we chose our scratch strawberry cake recipe for the strawberry layers. The only change is that in our original post, we use the reverse creaming method of mixing. Today, for this cake, we are using the traditional creaming method (which more of you would be familiar with!)
Strawberry is the leading flavor in this cake recipe, but the chocolate flavor is unmistakable. They go perfectly together!
How to Make a Chocolate Covered Strawberry Cake
- First, Preheat the oven to 350 degrees F and prepare three 8 inch pans. (Grease, flour, or your method of choice.) We also like to add circles of parchment paper!
- In a medium bowl add the flour, baking powder and salt, whisk to blend and set aside.
- In the bowl of your electric mixer (and with a paddle attachment if using a stand mixer), add the softened, unsalted butter. Mix until smooth. Slowly add the sugar and mix on medium speed 4 to 5 minutes.
- Add the vegetable oil and blend
- Add the room temperature eggs one at a time, mixing after each until the yellow of yolk has blended.
- Add the vanilla and strawberry extract, blend.
- Alternately, add the flour mixture and the strawberry puree, beginning and ending with the flour mixture (3 additions of flour and 2 of strawberry puree)
- Add 2 to 3 drops AmeriColor pink coloring or your pink coloring of choice (optional but you will have a prettier shade of pink for your cake!)
- Pour cake batter into prepared pans and bake for 25 to 30 minutes or until a toothpick inserted into the center comes out clean or with just a few crumbs attached.
- Allow the strawberry cake layers to cool in the pans, on a cooling rack for 5-10 minutes before turning out.
For the Filling
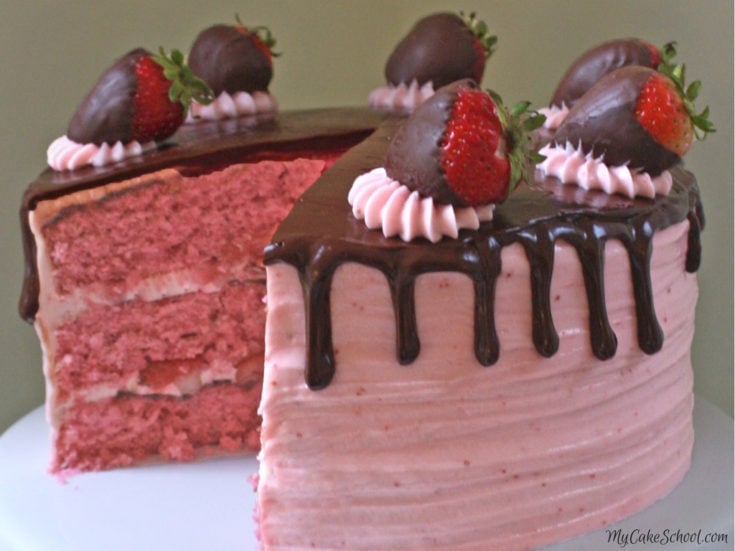
Our cake layers are filled with a thin layer of ganache, luscious strawberry buttercream, and freshly sliced strawberries! There are all sorts of great options for fillings and frostings (including homemade whipped cream with strawberries, chocolate cream cheese frosting, and strawberry whipped cream cheese filling.)
Today, for our ganache drip and filling, we used a 1:1 ratio of chocolate to cream. This is a great consistency for drips and thin glazes, as we explain in our Easy Ganache Drip post.
We've used this simple, microwaveable ganache recipe for several of our cakes now, including Oreo Cake, Peanut Butter Cake Chocolate Truffle Cake, and Mint Chocolate Chip Cake!
Assembling the Cake
Once the strawberry cake layers have cooled, it is time to decorate the cake!
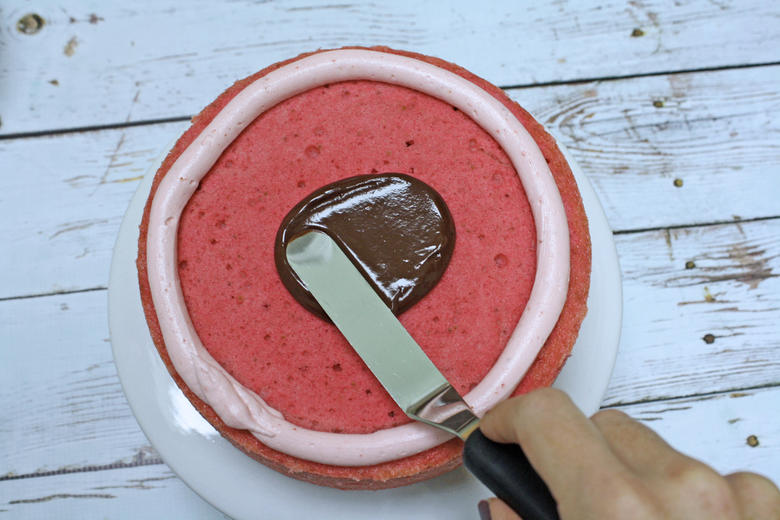
If using a fruit filling or soft filling like we did (our sliced strawberries), it is a really good idea to pipe a dam of buttercream. First, I piped a buttercream dam about ¼-1/2 inch from the edge of the cake. This keeps everything contained as you stack the cake layers.
Next, I then filled it with a thin layer of ganache.
Then, I piped additional strawberry buttercream on top, and gently smoothed over it with my spatula. (Another great option would be whipped cream).
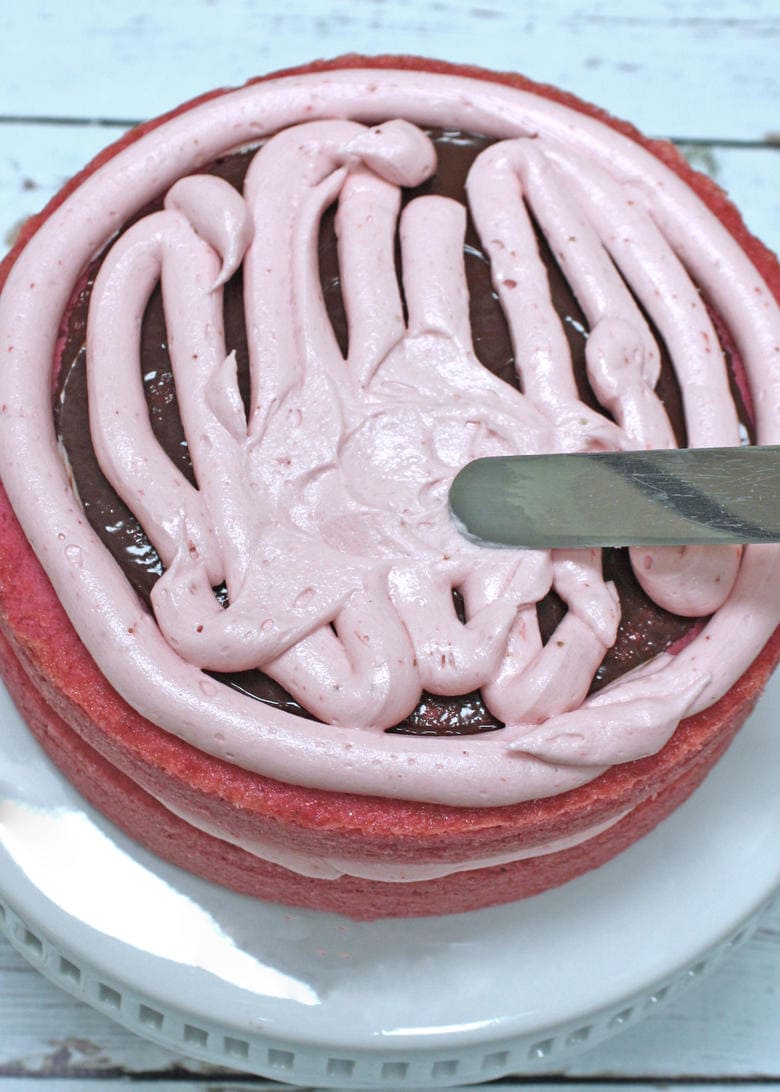
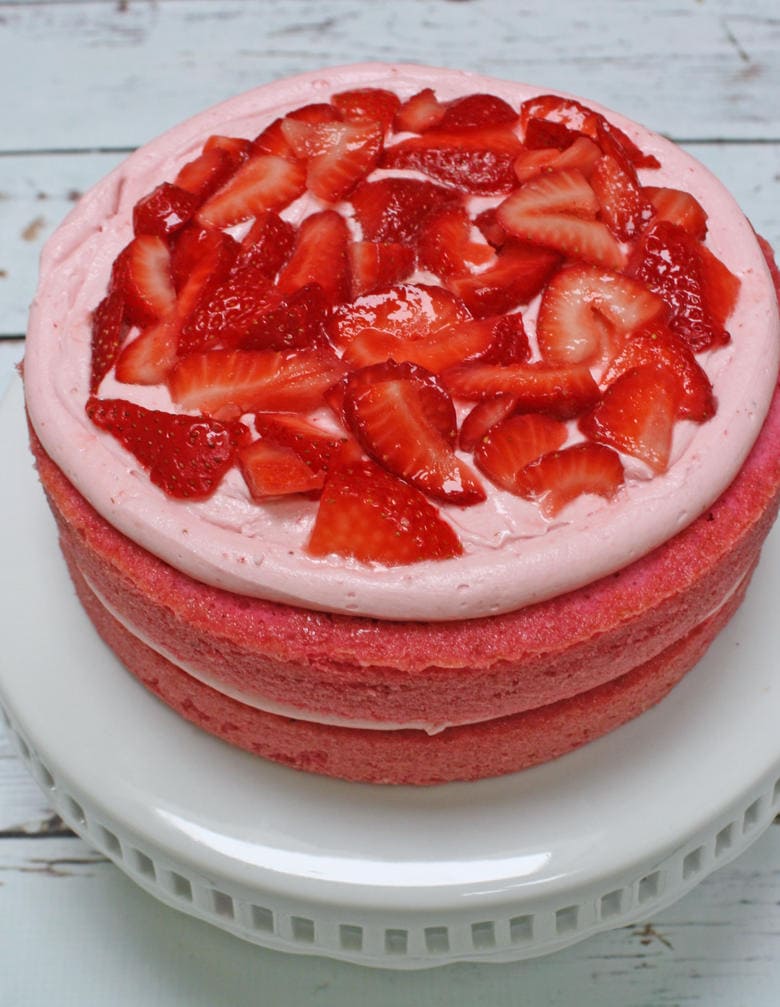
Now for the fresh strawberry slices! I arranged thinly sliced strawberries on top of the strawberry buttercream. This gives us an additional strawberry flavor boost!
We did these steps for the first cake layer, the second cake layer, and the topped with the third.
After adding the third cake layer, fill in any gaps between the cake layers with buttercream. (I do this with the same piping bag that I used for my dam.)
Next, frost the cake with a very thin layer of strawberry buttercream. This is the crumb coat.
At this point, I always like to freeze the cake for 15 minutes (or longer in the refrigerator). This way, I can firm everything up before continuing with the final coat of frosting.
Decorating the Chocolate Covered Strawberry Cake
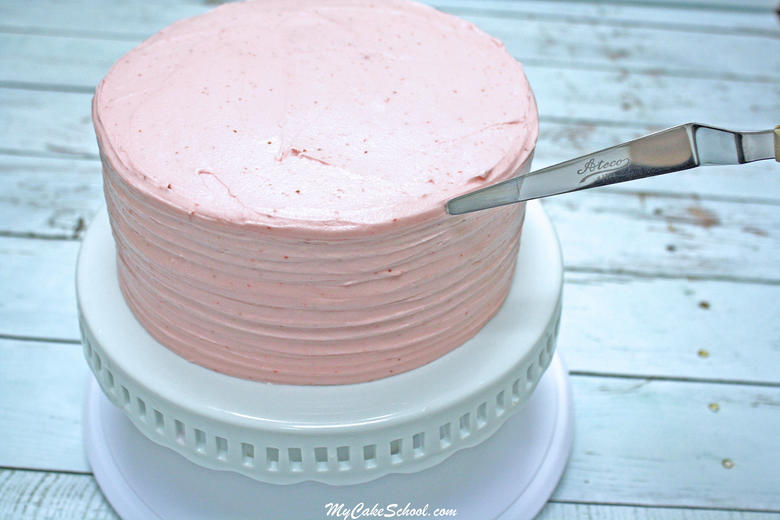
Finally, I applied a second layer of frosting to the cake and added a ridged buttercream effect by rotating the cake on a turntable while adding slight pressure to the frosting.
*If using this method, just do very light texturing so that the ganache drips can still easily flow down.
How to Apply a Ganache Drip to the Cake
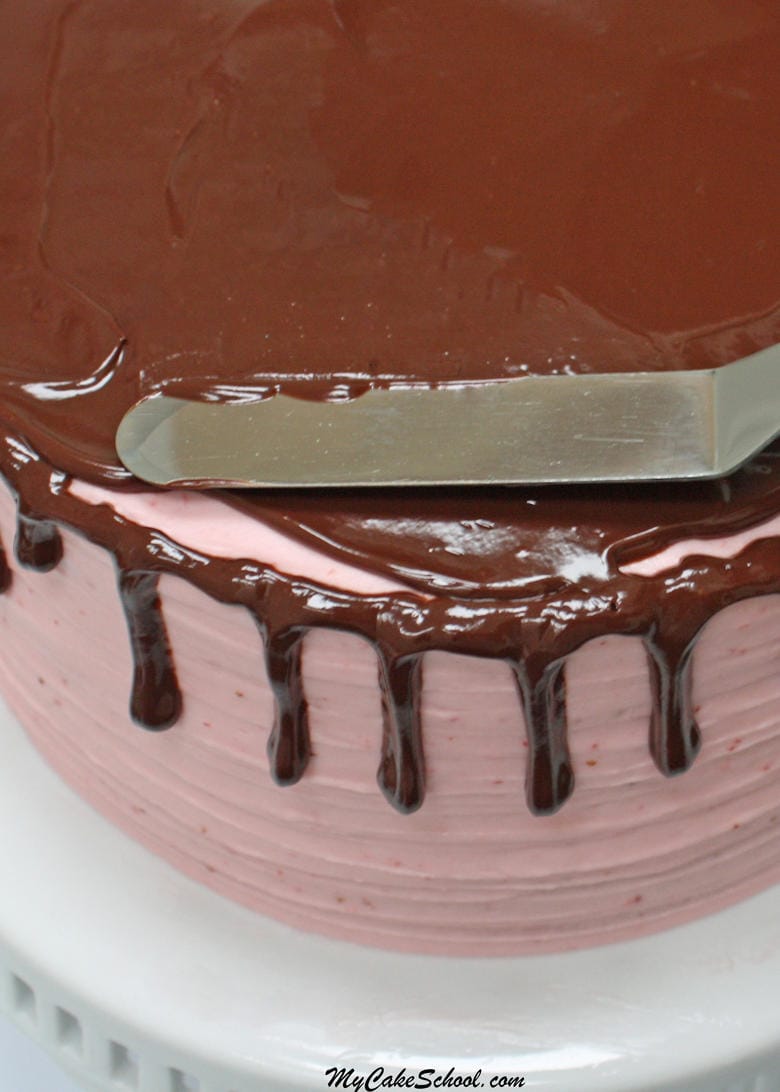
- Next, I loaded a disposable piping bag with ganache, snipped away the tip, and piped around the top edge of the cake, letting the drips flow out of the bag.
- Then, I applied ganache over the top of the cake, carefully spreading until it met up with the drip around the edges.
- Doing the ganache drip this way allows you to have a very uniform drip all the way around, which I love! However, if you'd prefer a less uniform look with wider drips of chocolate ganache, you could add ganache to the top of the cake and let it spill over the sides here and there as you spread it with a spatula. We used this technique in our Boston Cream Pie cake recipe!
- I always like to pipe my chocolate drips on a chilled cake. This slows the drip down a bit as you pipe!
*For a video demonstration on applying a ganache drip, check out our Ganache Drip Recipe post!
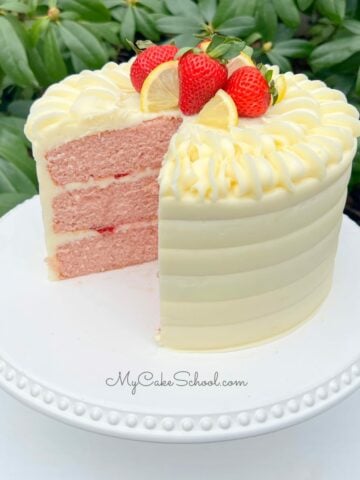
We finished things off our cake by piping stars of strawberry buttercream around the top edge of the cake with an Ateco 863, and topped with chocolate covered strawberries!
Chocolate Covered Strawberries: For dipping the strawberries on top, we used melted chocolate with no cream added. This ensured that the chocolate would be nice and firm at warmer temperatures.

More Strawberry Recipes
If you love strawberry cakes and fillings, don't miss our collection of favorite Strawberry Cakes, Fillings, and Frostings!
Some of our favorites are Strawberry Cake from Cake Mix, Strawberry Lemonade Cake, and Homemade Strawberry Cake.
For fillings, we love sliced, fresh strawberries with homemade whipped cream or our cooked strawberry filling!

FAQs
Enjoy the Recipe
Thanks so much for stopping by! Don't miss our full collection of Cake Recipes, including more cake recipes from scratch as well as our favorite cake mix recipes!
Have you made this? We would LOVE for you to leave a ⭐️ rating as well as a comment and photo below! We really appreciate your feedback!
Chocolate Covered Strawberry Cake
This moist and delicious homemade Chocolate Covered Strawberry Cake recipe is a crowd pleaser!
Ingredients
FOR THE CAKE:
- 1 ½ cups (340g) strawberry puree — I used frozen strawberries that were slightly sweetened, you could also use fresh
- 3 cups (342g) cake flour **If you do not have cake flour see note below.
- 1 Tablespoon plus 1 teaspoon (14g) baking powder
- 1 teaspoon (6g) salt
- 1 stick (113g) unsalted butter
- 1 ¾ cup (350g) sugar
- 4 large eggs
- ¼ cup (50g) vegetable oil
- 1 teaspoon (4g) vanilla
- 2 teaspoons (8g) strawberry extract
- 3 to 4 drops (or more) AmeriColor Deep Pink or pink coloring of your choice (optional but will give you a prettier pink cake)
FOR THE GANACHE
- 6 oz (171g) Chocolate (Semi-sweet or Dark) We used Ghirardelli
- 6 oz (171g) Heavy Cream
FOR THE DIPPING CHOCOLATE
- 4 oz (112g) melted chocolate
For the Strawberry Buttercream
- 2 sticks (226g) unsalted butter, slightly softened
- 6 cups (690g) powdered sugar
- ½ teaspoon (3g) salt (optional) this will cut the sweetness (popcorn salt will dissolve more quickly)
- ¼ cup plus 1 Tablespoon pureed strawberries, add more to reach your desired spreading consistency (this is probably about 3-5 pureed strawberries as sizes vary)
- 1 teaspoon (4g) strawberry extract (optional) use if the buttercream needs more strawberry flavor
MISC. STRAWBERRY FILLING AND GARNISH
- 12 strawberries for filling as well as for dipping into chocolate as decoration.
Instructions
- Preheat the oven to 350 degrees
- Grease and flour three 8 x 2 inch round pans - I recommend using a circle of wax or parchment paper in the bottom of each pan. Cakes with fruit are more likely to stick.
- In a medium bowl add the flour, baking powder and salt, whisk to blend and set aside.
- In the bowl of your mixer, add the butter and mix until softened and smooth. Slowly add the sugar and mix on medium speed 4 to 5 minutes.
- Add the oil and blend
- Add the eggs one at a time and mix until the yellow of each egg is blended in.
- Add the vanilla and strawberry extract, blend.
- Alternately, add the flour mixture and the strawberry puree, beginning and ending with the flour mixture (3 additions of flour and 2 of strawberry puree)
- Add 2 to 3 drops AmeriColor pink coloring or your pink coloring of choice (optional but you will have a prettier shade of pink for your cake!)
- Pour cake batter into prepared pans and bake for 25 to 30 minutes or until a toothpick inserted into the center comes out clean or with just a few crumbs attached. Check at 25 minutes.
INSTRUCTIONS FOR THE GANACHE
- Place your chocolate into a microwave safe bowl.
- Pour heavy cream over the chocolate and place in the microwave for 1 minute. (Times may vary, see our note below).
- Remove and stir. Microwave for 30 seconds more and when the chocolate has melted almost completely, allow it to sit for 1 minute more before stirring. Stir until you've reached a silky smooth consistency.
- *Microwave times may vary. If you are making a smaller amount of ganache, you will reduce the microwave time. If your chocolate hasn't melted after the 1 ½ minutes recommended in the instructions, simply microwave in small 10-15 second increments until it has nearly completely melted. Let sit one minute, then stir until smooth.
INSTRUCTIONS FOR STRAWBERRY BUTTERCREAM
- Cream the softened butter until smooth.
- Gradually add the powdered sugar and pureed strawberries beating at medium speed until blended.
- Continue mixing on medium speed another 3 to 4 minutes, scraping the sides of the bowl occasionally
- Slow down the mixer to very slow (#2 on a KitchenAid) and mixing another 1 to 2 minutes. This will eliminate air pockets. The buttercream will become very smooth.
- If the buttercream is too thin add more powdered sugar, if too thick add more puree or a bit of milk.
- Makes 4 to 4 ½ cups
CHOCOLATE COVERED STRAWBERRIES
- We melted four oz. of chocolate in the microwave in 10-20 second increments until fully melted. We washed, dried, and dipped the strawberries into the chocolate and placed on a sheet of waxed paper until the chocolate was firm. (If you are in a hurry, you can chill in the refrigerator for a few minutes to firm up the chocolate.)
ASSEMBLY INSTRUCTIONS
- For this cake, I piped a dam of strawberry buttercream around the edge of the bottom layer of cake (the dam was piped about ½ inch from the edge of the cake.)
- Next, I spread the layer with a thin coating of ganache, and then piped on a buttercream filling which I spread with my spatula.
- I then added a layer of thinly sliced strawberries on top of the buttercream.
- Next, I added my middle cake layer and repeated these steps.
- I topped with the top layer of cake and frosted the cake with a coating of strawberry frosting.
- I filled a disposable piping bag (tip snipped away) with ganache and drizzled around the edge of the cake. I then covered the top of the cake with ganache as well as spread with my spatula.
- I topped with strawberry buttercream stars spaced around the edge of the cake, (Ateco 863) and then topped each with a chocolate covered strawberry.
Notes
NO CAKE FLOUR? HERE IS A SUBSTITUTION:
*If using all purpose flour (plain in UK) you can use the following substitution: for each cup of flour in the recipe, remove 2 Tablespoons flour and replace with 2 Tablespoons cornstarch. For this recipe measure out 3 cups all purpose flour, remove 6 Tablespoons and replace with 6 Tablespoons cornstarch, whisk to blend.
I made this cake and it turned out wonderful. I used 70% cacao chocolate, but wasn’t sure it that was too bitter. It blended well with the strawberry flavor. I can truly say “Nailed It” with this recipe. Thanks for sharing.
Hi Karen! You did a beautiful job, thanks so much for your feedback. So glad that you enjoyed the cake!
Made this, it was great!!
Beautiful job! Thanks so much for sharing, glad you enjoyed it!
Best strawberry frosting I have ever tasted. Didn't have strawberry extract (just learning that this actually exists), so I subbed a tablespoon of strawberry jam and it still turned out fantastic. Great strawberry flavor. Whole cake was amazing and the family all loved it!
My cake was heavy and very dry. Why do you think that was? I was careful to follow recipe 😀