Banana Pudding Cake Recipe
As someone who loves both banana pudding & banana cake recipes, I couldn't be more excited about this delicious Banana Pudding Cake!
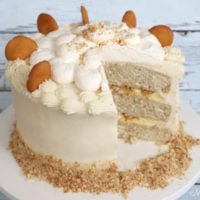
In this recipe, moist banana cake layers are filled with vanilla cream, sliced bananas, and vanilla wafers, frosted with cream cheese frosting, and topped with whipped cream. It is such a flavorful, beautiful, cake!

Table of Contents
Why we Love It
There are so many reasons to love this amazing Banana Pudding Cake from scratch. Here are just a few:
- All of the favorite flavors of Banana Pudding: Vanilla wafers, vanilla cream (pudding) filling, sliced bananas, and whipped cream. (Check out our easy Banana Pudding Cupcakes as well!)
- Ultra moist banana cake layers
- Makes a wonderful birthday cake recipe, potluck cake, or dessert for family and friends.
How to Make a Banana Pudding Cake
*You can find our full, printable Banana Pudding Cake recipe further down in this post. Here is a quick rundown of our steps!
- Preheat the oven to 350 degrees F. Grease and flour three 8 inch pans. We also like to line the bottoms with circles of parchment paper.
- Blending the Dry Ingredients: In the mixing bowl, add the dry ingredients, sugar, flour, baking soda, baking powder, & salt. Turn on the electric mixer (we used a stand mixer) and blend for 30 seconds to incorporate.
- Add the softened butter to the dry ingredients and mix on low speed until the dry ingredients are moistened. Scrape the bottom and sides of the bowl
- In a separate bowl, slice and mash the bananas, add lemon juice, eggs, 2 teaspoons vanilla extract and buttermilk. Lightly mix these ingredients with a fork to blend
- Time to add the wet ingredients! Slowly add the banana/buttermilk mixture to the dry ingredients beating on medium speed for 1 minute, scrape the bottom and sides of the bowl and mix another minute.
- Divide Batter between the pans. Pour the cake batter into the prepared cake pans and bake at 350 degrees for 25-30 minutes or until the cake springs back to the touch and a toothpick comes out clean.
- Cool the freshly baked cake layers in their pans on a wire rack for about ten minutes and then turn out.

Easy Vanilla Cream Filling
Our vanilla cream filling is based on a "mock mousse" recipe that we love, and it couldn't be easier to make. Instant vanilla pudding is combined with heavy cream and whipped into a delightfully light and creamy filling. It comes together in minutes!
This vanilla cream filling recipe is so easy to make and PERFECT for this recipe, as it really brings in the flavor and luscious consistency of banana pudding that we love so much.
(You have also seen this filling in the form of Easy Chocolate Mousse and Orange Cream Filling, as well as the Lemon Cream Filling in our Lemon Cream Cake!)
Assembling the Banana Pudding Cake
Now for the fun part!
- When it's time to assemble the banana pudding cake, prepare your vanilla cream (from vanilla pudding mix and heavy cream), cream cheese frosting, crushed Nilla Wafers, and banana slices.
- Pipe a dam of cream cheese frosting about ¼-1/2 inch from the edge of the cake layer and fill with the vanilla cream.

- Next, we layered on crushed Vanilla Wafers followed by thinly sliced ripe bananas. Just as with banana pudding, the crushed cookies will absorb moisture from the creamy pudding and soften.

- Repeat the steps above for the second cake layer, topping with vanilla cream, Vanilla Wafers, and fresh banana slices.
- Then, add the third banana cake layer and fill any remaining gaps between the layers with cream cheese frosting.

How to Decorate a Banana Pudding Cake
- After frosting our moist cake tier with cream cheese frosting, I piped a double shell border using a piping tip 21. Instead of a traditional bottom border, I used crushed vanilla wafers.
- (You can see our free Star Piping Tip Piping Video Tutorial for more details on shell borders!)

- Next, I whipped up some sweetened homemade whipped cream and piped it onto the top of the cake, using a disposable piping bag with the tip snipped away. (In a pinch you could use a whipped topping like Cool Whip, but I love the homemade whipped cream- plus it is super easy!)
- We added a sprinkling of vanilla wafer crumbs to the top, and pushed cookies into the top border.
That's all there is to it! I'm telling you, this banana pudding cake is legendary. This entire cake will disappear in no time at all!

Recipe FAQs
More Banana Cakes
If you just can't get enough banana deliciousness in your file of dessert recipes, you MUST try these other favorites from our site.
Some are banana cakes while other recipes have banana in combination with other flavors.
Some of our favorites are: Hummingbird Cake, Banana Split Cake, and Banana Cake with Cream Cheese Frosting! We have a wonderful recipe for banana cupcakes as well.
If you prefer the convenience of banana bundt cakes or pound cakes, we have a great Easy Banana Bundt Cake from cake mix, scratch Banana Nut Cake, as well as a delicious scratch Banana Pound Cake!

Thanks so much for stopping by! Don't miss our full collection of Cake Recipes, including our favorite cake recipes from scratch as well as cake mix recipes!
Also, if you are interested in learning to make pretty cakes, we have hundreds of cake decorating tutorials on our site as well! Have fun scrolling through, and enjoy the Banana Pudding Cake!
Finally, if you're in the mood or a very Easy Banana Pudding dessert, check out this Easy Banana Pudding by Whisk and Canvas- a family favorite!
Enjoy the Recipe
Have you made this? We would LOVE for you to leave a ⭐️ rating as well as a comment and photo below! We really appreciate your feedback!
Banana Pudding Cake Recipe
Ingredients
For the Banana Cake
- 2 cups granulated sugar (400g)
- 3 cups cake flour (342g)
- 1 tablespoon baking powder (12g)
- ½ teaspoon baking soda (3g)
- ½ teaspoon salt (3g)
- 12 tablespoons unsalted butter, softened (170g)
- 1 1 /2 cup mashed bananas (about 3 medium bananas) (277g)
- 2 teaspoons lemon juice
- 2 teaspoons vanilla extract (8g)
- 3 large eggs
- 1 ½ cups buttermilk (363g)
For the Cream Cheese Frosting
- 2 sticks sticks unsalted butter, softened (226g)
- 16 oz cream cheese, softened (We used two 8 oz packages, full fat)
- ½ teaspoon salt 2g optional
- 2 teaspoons vanilla extract (8g)
- 6 to 6 ½ cups powdered sugar (690g to 747g)
For the Vanilla Cream Filling
- 1 small box instant Vanilla pudding 3.9 oz/96g We used Jello- Brand
- 2 cup heavy cream or whipping cream (stir in a little more if recipe is too thick) (464g)
For the Sweetened Whipped Cream (top of cake)
- 1 cup heavy cream (240g)
- ¼ cup powdered sugar (29g)
- 1 teaspoon vanilla (4g)
Vanilla Wafers and Sliced Bananas for Filling
- 1 box Vanilla Wafers we used about 20 coarsely crushed cookies in filling, plus additional for crumb border and cookies around the top. Adjust to your liking
- Thinly sliced bananas we used two in the filling- adjust to your liking
Instructions
For the Banana Cake
- Preheat the oven to 350 degrees, Grease/spray & flour three 8 inch pans and line with parchment circles
- In the mixing bowl, add the dry ingredients, sugar, flour, baking soda, baking powder, & salt. Turn on the mixer and blend for 30 seconds to incorporate ingredients
- Add the softened butter to the dry ingredients and mix on low speed until the dry ingredients are moistened. Scrape the bottom and sides of the bowl
- In a separate bowl, slice and mash the bananas, add lemon juice, eggs, 2 teaspoons vanilla and buttermilk. Lightly mix these ingredients with a fork to blend
- Slowly add the banana/buttermilk mixture to the dry ingredients beating on medium speed for 1 minute, scrape the bottom and sides of the bowl and beat another minute.
- Pour batter into the prepared pans and bake at 350 degrees for 25-30 minutes or until the cake springs back to the touch and a toothpick comes out clean.
- Cool the cakes 10 minutes on the rack and then turn out.
- Recipe makes 8 cups of batter.
For the Vanilla Cream Filling
- Combine the pudding mix and heavy cream in a mixing bowl. I prefer to mix with a hand held mixer, but a whisk is just fine too. If using a mixer, start on low speed until well combined. Then, switch to high speed and whip the pudding until thick and fluffy. If mousse is too thick, mix in small amounts of heavy cream to reach desired consistency.
- If mixing by hand, simply whisk rapidly for a couple of minutes or until mixture is nice and thick.
- Refrigerate until ready to use. Cakes with this filling should be chilled until close to serving time.
For the Cream Cheese Frosting
- Cut the softened butter into slices and add to the bowl of your mixer. Beat on low to medium speed until the butter is softened and smooth.
- Cut the softened cream cheese into pieces and add to the butter, beating at low to medium speed until incorporated. If you are using a hand mixer you may need to soften the cream cheese a bit more.
- Add the vanilla. Gradually add the powdered sugar beating on low speed until blended. Cover the bowl with a towel to keep down the cloud of powdered sugar.
- Increase mixing speed and beat until fluffy. Don't over beat or it will become too soft. If it becomes too soft, just refrigerate a short while to firm it up a bit.
- This frosting will pipe best if used while still chilled. You can make it in advance, refrigerate and when ready to use let it soften slightly (do not microwave) and remix.
For the Sweetened Whipped Cream
- Chill the mixing bowl and beaters/ whisk attachment in the freezer for 10 minutes. Pour the whipping cream, powdered sugar and vanilla into the chilled mixing bowl, begin beating on low speed gradually increasing to medium high speed. The cream begins to thicken (approx. 1 ½ minutes) and soft peaks form….peaks that slightly bend over. Watch closely as this happens quickly. Do not over beat or it will turn into butter.
Assembly of Cake
- Pipe a dam of cream cheese frosting about ½ inch from the edge of the cake layers. Fill in with vanilla cream.
- Layer on crushed vanilla wafer cookies and thinly sliced bananas. Repeat for next layer, then top with remaining layer.
- Frost cake with cream cheese frosting. Add border (We did a double shell border with a tip 21), add dollops of whipped cream (we piped on with a large round tip), and top with a sprinkling of crushed vanilla wafers.
- Cake should be refrigerated. However, for best flavor and texture, remove from the refrigerator a couple of hours before serving to allow cake to warm and soften.
Hi Oaks, For generous size servings, it will serve 14. If you are cutting party size servings there will be more but smaller servings. Below is a link to a baking times and serving chart
Hello I am making this beautiful cake soon and would like to know does the cake flour need to be sifted?
Hi Dee, I do not sift the flour. When the flour and other dry ingredients are in a bowl, I whisk for at least 30 seconds. This blends the ingredients as well as adding air into the flour. Hope you will enjoy the recipe.
Hi Sara, We suggest making the cake in advance because there are many steps to the recipe. Baking in advance and freezing the layers just helps to speed things up on the day of assembly. If freezing layers, cool in the pans 5 to 10 minutes, turn each layer onto a cake board, then wrap each layer individually with plastic wrap and then in aluminum foil. You can freeze up to a month of wrapped air tight. I would not freeze in the cake pans. Click on the link below for Melissa's 2 part video on Making a Cake from Start to Finish.
Can i use all purpose flour instead of cake flour?
Hi Erika, If you do not have cake flour, use this substitution. Measure out 3 cups of all purpose flour, remove 6 Tablespoons and replace with 6 Tablespoons of cornstarch (corn flour in the UK). Whisk to blend and proceed with the recipe.
I made this cake for someone and she was well pleased. I had leftover pudding, cookies, bananas and that heavenly whipped cream so I layered it up for my family and I to enjoy. Next time I have to make a cake for us as well. Thank you for this recipe!
Catherine, Your cake looks amazing!! Thank you for your nice comments on the recipe.
So any suggestions on how to adjust the recipe to make it a 2 layer 13X9 sheet cake?
Hi Monti, First, double the cake recipe. The recipe makes 8 cups of batter so you will need to make it twice unless your mixer can hold 16 cups of batter. Let the baked cakes cool for 10 minutes before turning out onto a cake board. This cake will be heavy so I would tape 3 cake boards together for strength or it could bend when carrying the cake. I think 1 recipe of the filling will be enough. You can make this in advance and refrigerate. I think you should increase the the cream cheese frosting recipe by 1/2 so you will be sure to have enough. I hope all goes well.
My question before making this cake is, are the instructions correct? I'm used a the crabbing method where the dry ingredients are added last.
Hi Cintia, If you wish, you can make this recipe using the traditional mixing method. If you re-write the method, if would be best to count the ingredients as it is do easy to leave something out. This recipe using the Reverse Creaming Method. If you have never used this method, it would be a good idea to watch Melissa's video on this method, click on the link below to watch.
https://www.mycakeschool.com/?s=reverse+creaming+method