Witch Hats Cake
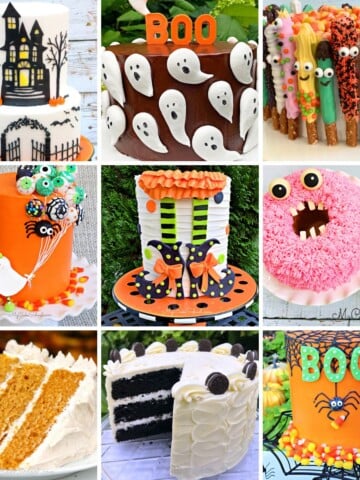
We have the cutest witch hat themed cake tutorial for you to add to your list of Halloween Cake Ideas!
This adorable and festive cake design is perfect for Halloween gatherings, and is suitable for any level of cake decorating

In this Halloween cake tutorial, you'll learn to create CUTE witch hats from candy melts, and also how to top things off with a 3D witch hat cake topper made from an ice cream cone & fondant!
Table of Contents
How to Make a Witch Hat Cake Topper and Cake Design
First, we started off by drawing witch hats on to a sheet of paper for our template. If you are comfortable with freehand piping, you may want to skip this step. We placed our template onto a cookie sheet and beneath a sheet of waxed paper.

Next, I filled a disposable piping bag (with the tip snipped away) with melted pre-colored black candy melts. (I used Wilton.)
I piped over the hats on my template. *Although I only used three witch hats for my cake, I went ahead and piped several. I like to have choices ;0) Remember to pipe these hats fairly thick. Very thinly piped designs are more fragile.
After you've finished piping, place the tray into the freezer for about 5-10 minutes or until firm. Then, flip them over so that the smooth side is facing up.

Here's where the fun begins! You can see here that I've piped more melted chocolate designs onto and around my hats. I did this for more of a raised effect to my decorations, but next time, I think I'll stick to buttercream accents-- it's just simpler ;0) -
Any additional piping that you do with melted candy melts will need to be chilled once again.
Remember, you cannot tint white chocolate or candy melts with your fondant & frosting coloring gels-- it has to be done with candy coloring. This is why pre-colored candy melts are a popular choice.

Here I am adding some fun details. The spider web is piped with my crusting vanilla buttercream (using a piping tip 2). I also experimented with gluing sprinkles & chocolate accents onto the hats--this can be done with a bit of buttercream or clear piping gel.

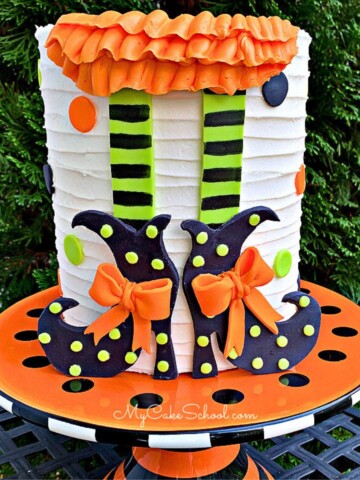
By the time I had finished decorating my hats, I needed to chill them for a few minutes in the refrigerator (freezer is fine too). Then, using dots of buttercream as my glue, I attached them to our buttercream-frosted 8" cake. (We frosted our cake with our crusting "fluffy vanilla buttercream" recipe from the Recipes section, and tinted with Americolor Orange.
After placing our hats, I decided to outline them with white buttercream, using a Wilton piping tip 2. (Any small round tip is fine!)

For the Witch Hat Cake Topper
Now for our witch hat topper! I greased a sugar cone with a light coating of vegetable shortening (piping gel is fine too) and wrapped it in rolled black fondant. (My fondant was rolled to approximately ⅛" thickness)


I trimmed away the excess on the bottom and in back (leaving a seam). The excess fondant on top allowed for a nice little bend. I also created a few additional impressions/wrinkles in the hat by hand. **If you don't have an ice cream cone handy, but you DO have rice cereal treats, you could shape them into a cone shape and follow the same process.

For the brim of our witch hat, I cut out a round(ish) shape shape and placed the hat on top. You can secure with piping gel if needed. I also wrapped a piece of decorative ribbon around the base, securing with piping gel.

Then, I added a bow (attached with piping gel) and sparkled our hat with a little silver hologram pixie dust.

And that's all there is to it!
Using a piping tip 1, I piped a little spider climbing down from the center hat. ;0)
We hope you enjoyed our cute little Witch Hat Themed Cake tutorial.
You could recreate our witch hats cake design exactly or make it your own by using your favorite parts of the cake decorations. Come back again soon!

More Halloween Cakes
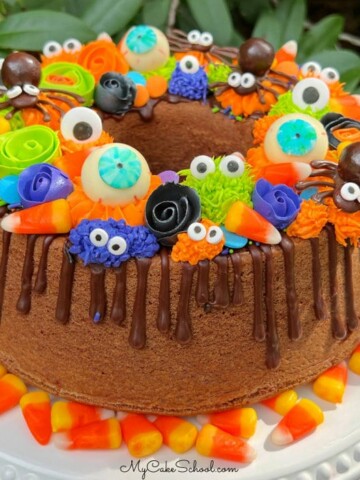
We've made so many Halloween cake designs over the years! Some of our most popular are our Witch Shoes Cake, Haunted House Cake, and Monster Bundt Cakes!
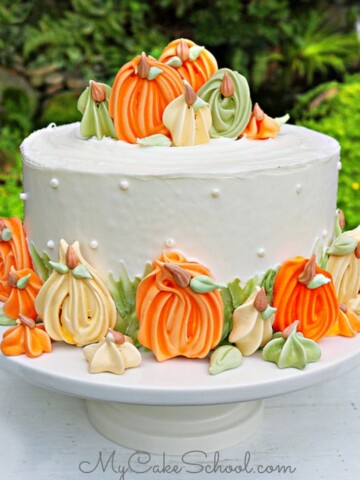
Fall Cake Recipes
If you're looking for cake recipes to make for fall and Halloween, we have lots in our Cake Recipes section (including cake recipes from scratch as well as cake mix recipes!)
Some of our favorites are Pumpkin Cake, Spice Cake, Apple Spice Cake (from cake mix) and Carrot Cake are just a few favorites. (Plus, Chocolate Cake, Orange Cake, and Vanilla Cake are year-round favorites too!)
Have you made this? We would LOVE for you to leave a ⭐️ rating as well as a comment and photo below! We really appreciate your feedback!
Fabulous! I love it! :)
Love all the Halloween ideas.
So stinkin' cute!!!
What a cool idea. Thanks a ton
Such a cute idea !
Adorable!!!
This is simply tooooo cute!!! I love your sweet ideas you come up with!!!!
Where do you find black candy melts?
Our black candy melts were Wilton