Chocolate Almond Cake
We are happy to share this delicious Chocolate Almond Cake with you- it is so decadent and flavorful!
For this recipe we are using one of our favorite chocolate cake recipes- our Chocolate Sour Cream Cake- with the addition of almond flavoring. It is perfectly moist and rich with wonderful chocolate and almond flavor.
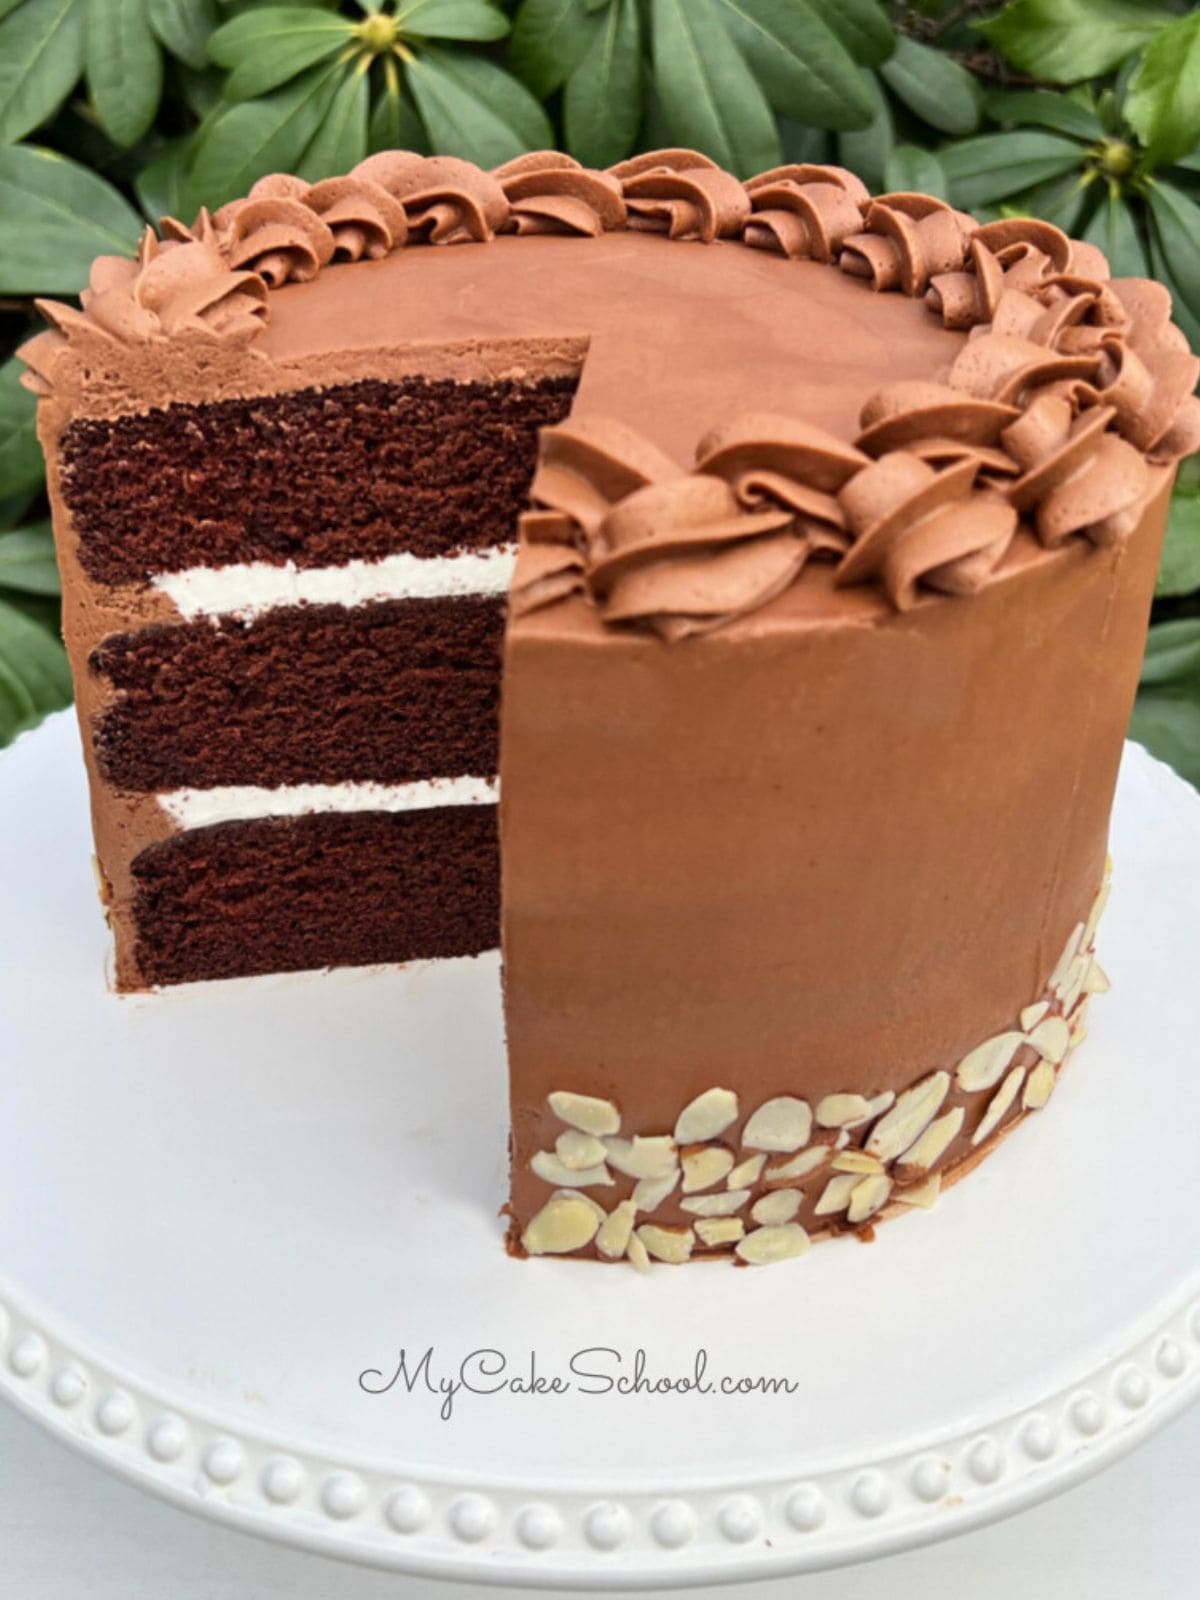
We filled the cake with an almond whipped cream filling, and frosted with an easy and delicious chocolate almond buttercream frosting.
Table of Contents
Reverse Creaming Method
This delicious recipe calls for the Reverse Creaming Method of mixing. This means that the order that the ingredients are added in may be slightly different than what you are used to.
Generally speaking, there is no creaming of butter and sugar, but rather the butter is mixed into the dry ingredients to create a "sandy" mixture. The wet ingredients/egg mixture is then added. In today's recipe, hot coffee is added at the end as well.
The end result is a lovely, velvety soft cake! (Other popular cakes that use this method are our scratch chocolate cake, yellow cake from scratch, orange dreamsicle cake, and marble cake.)
How to Make Chocolate Almond Cake
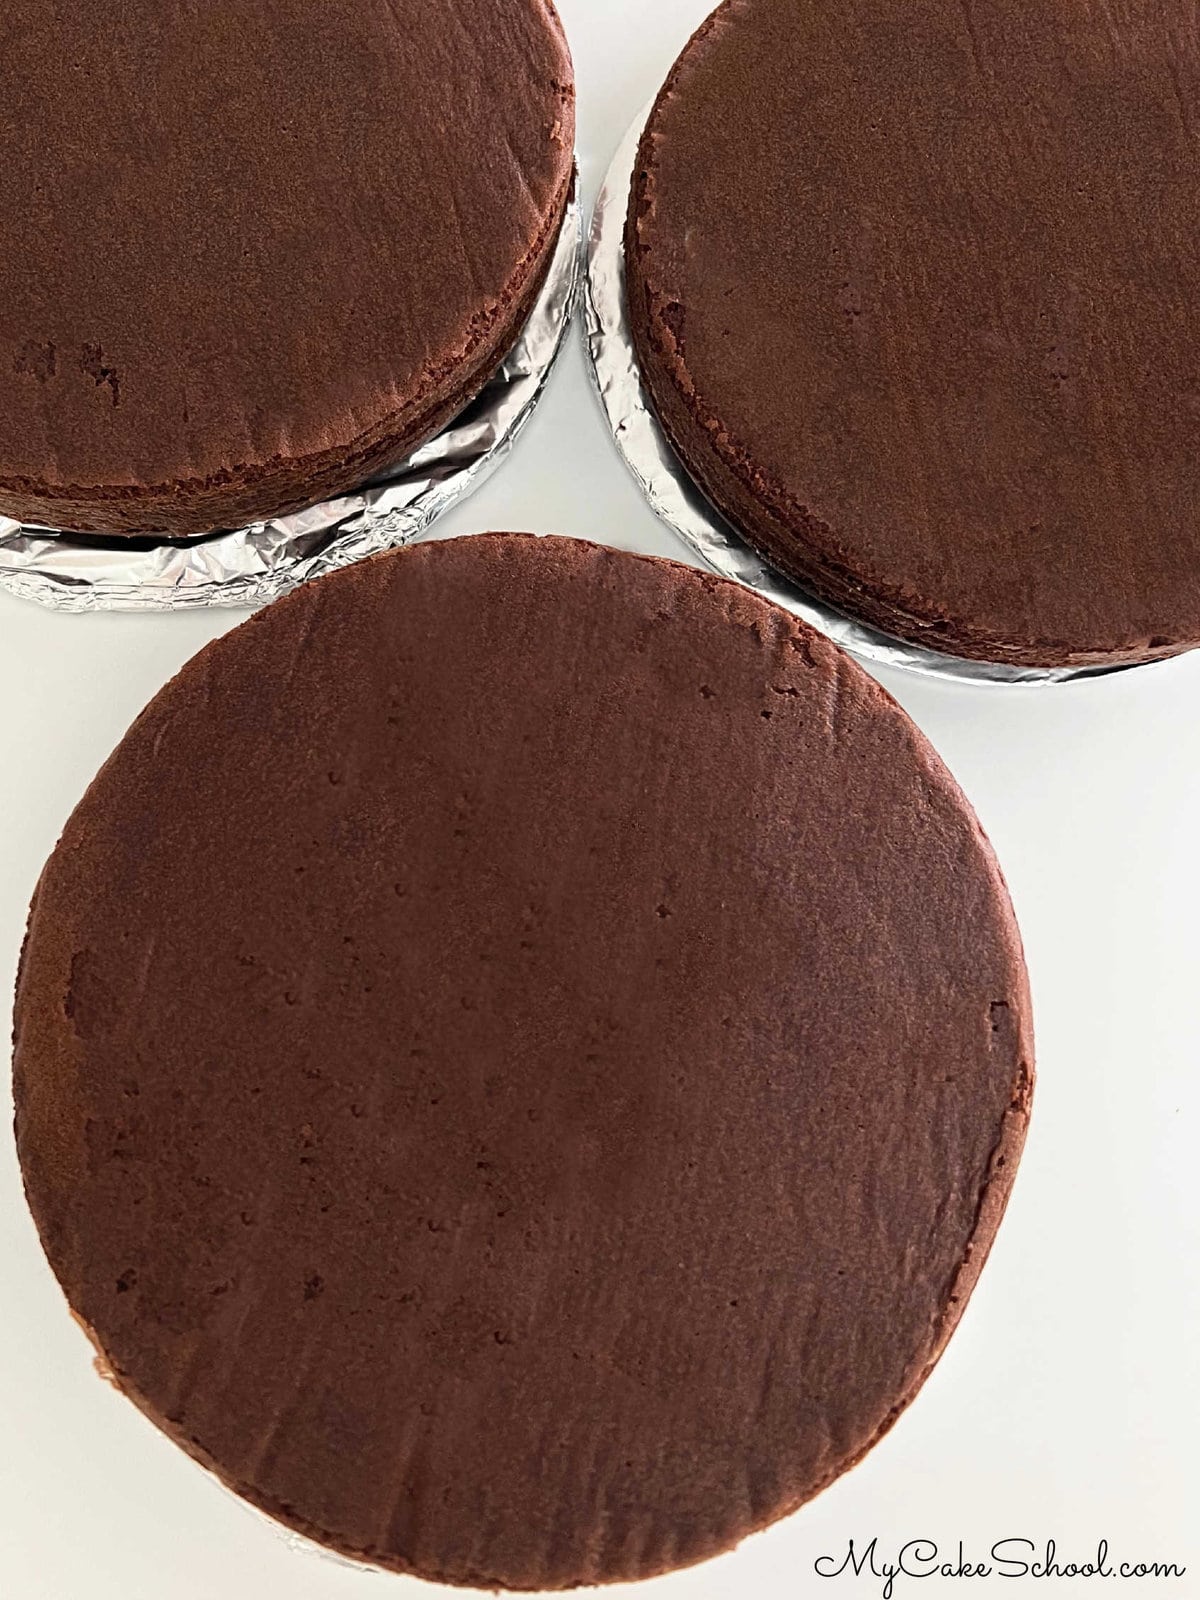
- Preheat & Prepare: Preheat oven to 325 degrees. Grease and flour three 9 inch pans.
- Dry Ingredients: Add dry ingredients to the bowl of your mixer and mix for one minute to blend (sugar, flour, cocoa, baking soda, baking powder, and salt)
- Butter: Add butter a few slices at a time and mix until it reaches a crumbly, sandy texture. Be careful not to over-mix beyond "sandy" consistency.
- Wet Ingredients(minus the coffee): In another bowl, combine sour cream, eggs, milk, and almond extract. Using a fork, mix together. This is all of your wet ingredients except for the coffee, it will be added to the batter later.
- Mixing: Set a timer for 1 ½ minutes and SLOWLY add half of your egg mixture to your butter/flour mixture while mixing. Start mixer on low speed then increase to medium for the remainder of the 1 ½ minutes. Do Not Mix Above Medium Speed.
- Stop mixer, scrape the sides and bottom of bowl, and add half of the remaining egg mixture. Mix on medium speed for 20 seconds.
- Stop mixer, scrape down the sides if necessary, and add the last of the egg mixture. Mix for 20 more seconds on medium speed.
- Coffee: Slowly add HOT coffee and mixing for 30 seconds to blend. Batter will be runny but that is okay!
- Fill the Pans: This recipe makes about 9 ½ cups of batter. Pour into 3 prepared 9" pans and bake at 325 degrees for 25 to 30 minutes or until the center of the cake springs back to the touch and a toothpick comes out clean.
- Cool the Layers: Cool the cake layers in the pans on a wire rack for 10 minutes before turning out.
Recipe FAQs

Almond Whipped Cream Filling
We thought about using our Chocolate Almond Buttercream for our filling as well, but we opted instead for a variation of our sweetened whipped cream recipe!
This Almond Whipped Cream filling is a simple combination of whipping cream (or heavy cream), almond extract, and powdered sugar.
The result is a soft, light filling with a touch of sweetness that gives us a wonderful boost of almond flavor. This would be great with our Almond Cake as well!
Chocolate Almond Buttercream Frosting
Our Chocolate Almond Buttercream is based on my favorite chocolate buttercream recipe.
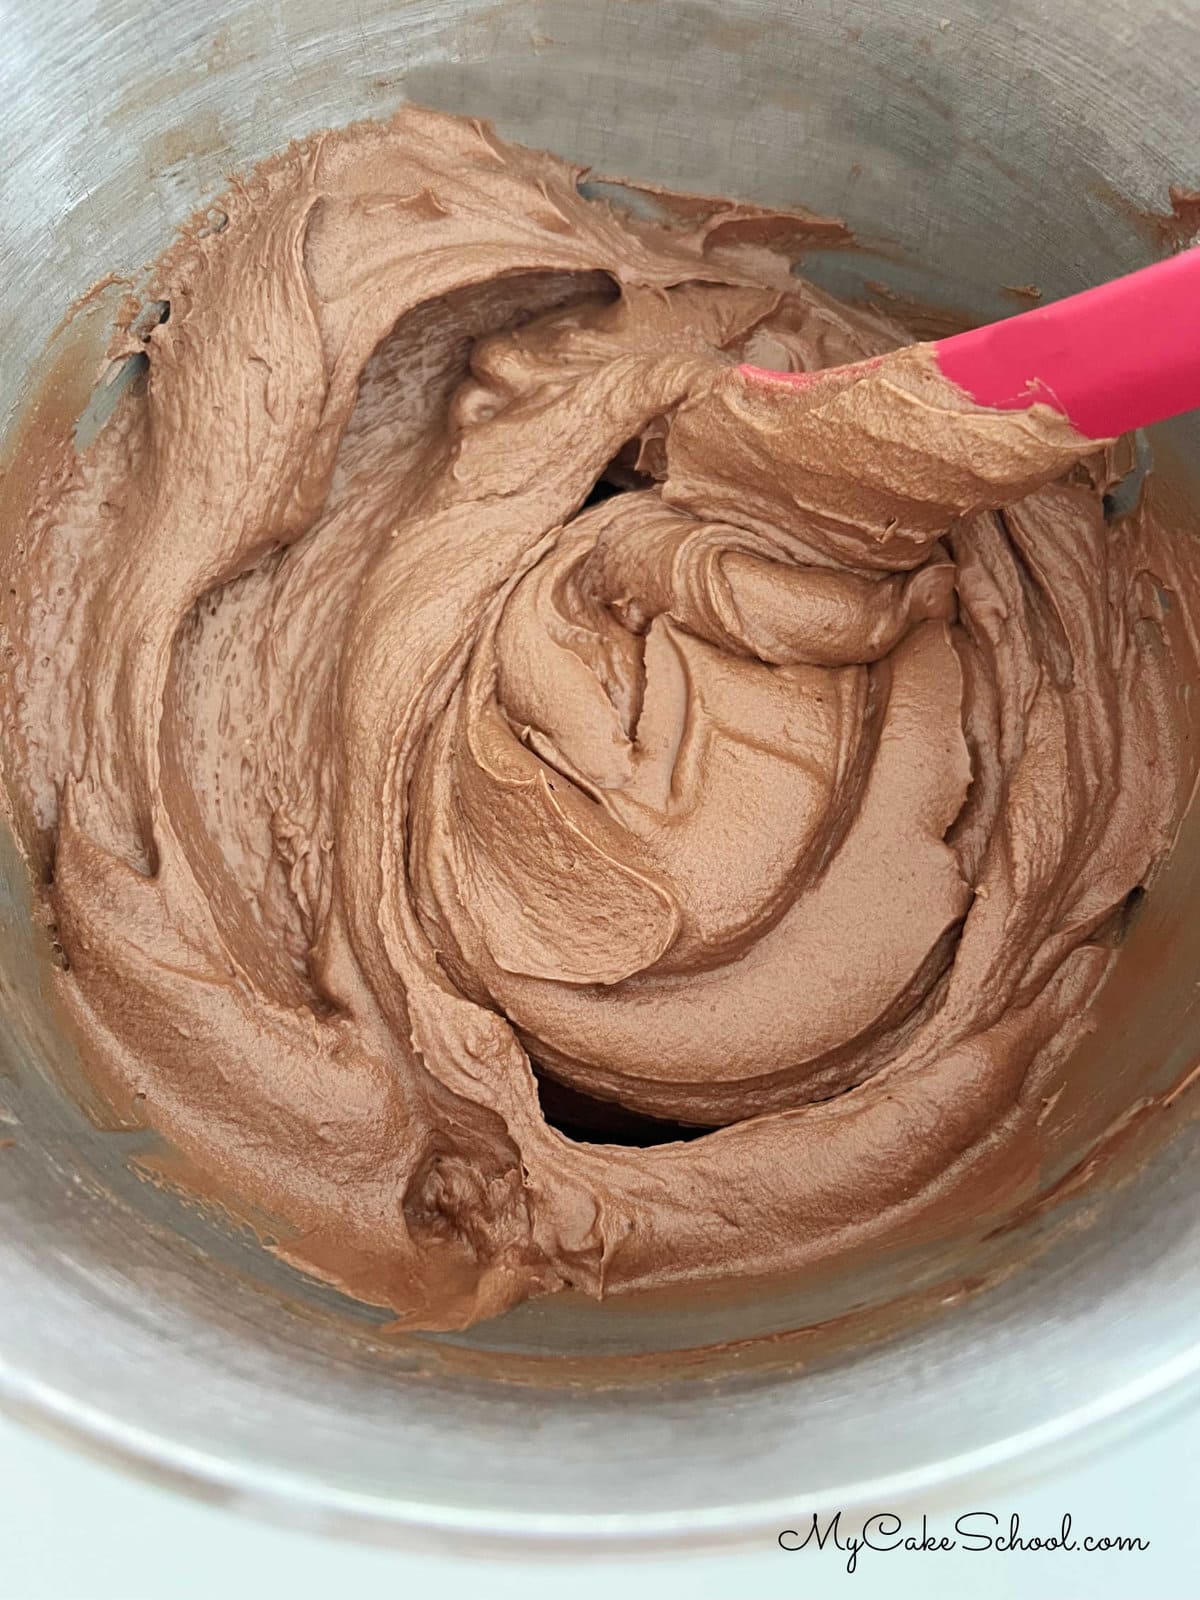
This is an "American Buttercream" recipe, meaning it is a combination of softened butter, confectioners sugar, milk, a pinch of salt and flavoring (almond extract) as well as cocoa powder for a rich, chocolate flavor.
You will love how easy this chocolate almond frosting is to make as well as how easy it is to work with. It covers the cake beautifully and pipes perfectly too!
Consistency of Frosting: As always, if the frosting is too soft, add a bit of powdered sugar-- if it is too thick, add a bit more milk to reach the consistency that you are looking for. You can also add a bit more almond extract if you would like!
Assembling the Cake
- Before assembling the cake, make sure that the cake layers are room temperature or chilled. If they are warm, the filling and frosting will melt.
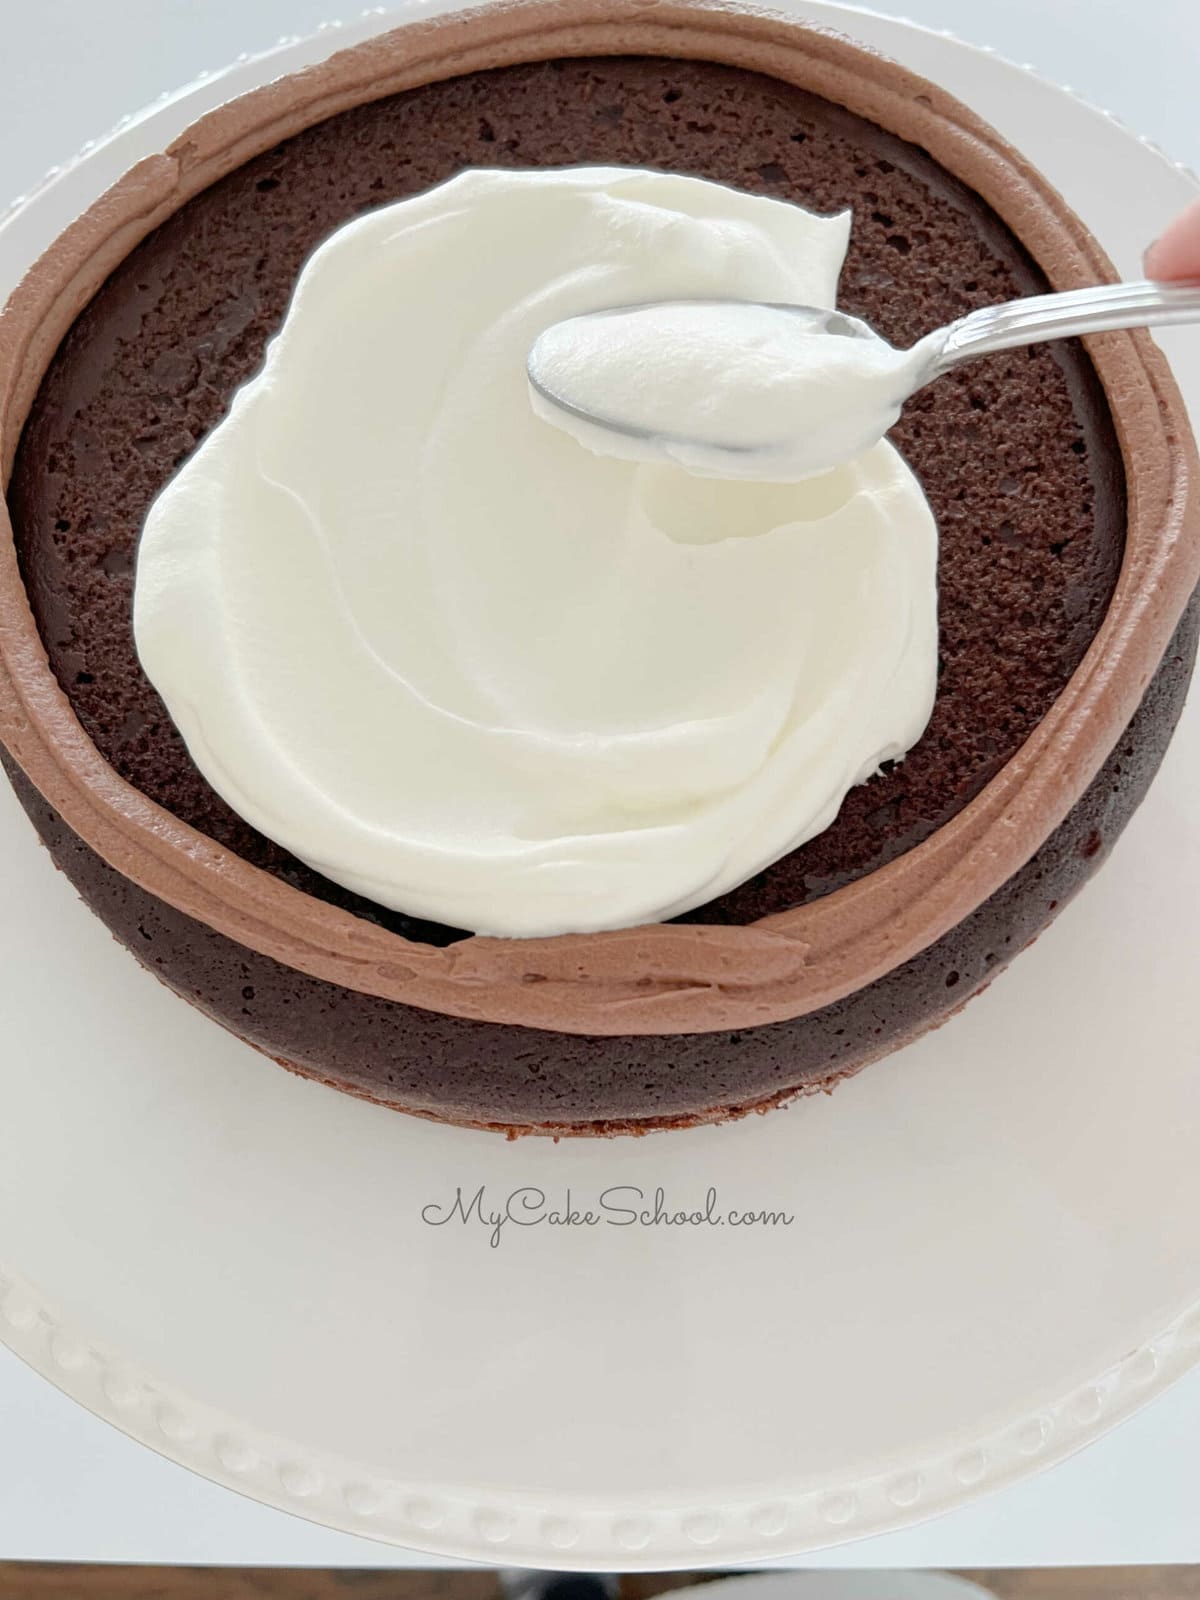
- Place the first chocolate almond cake layer onto the cake base or pedestal.
- Pipe a dam of chocolate buttercream around the top of the cake, about ½-1/4 inch from the edge. We do this using a disposable piping bag with the tip snipped away. (You can also use a ziplock bag with the corner snipped away).
- Next, spread a layer of the Almond Whipped Cream filling within the dam.
- Add the second cake layer and repeat the steps. Top with the third cake layer and fill in any gaps between the layers with additional frosting.
- Gently press down on the top cake layer once or twice to help it settle a bit before frosting.
Frosting the Cake
Now it's time to frost the cake!
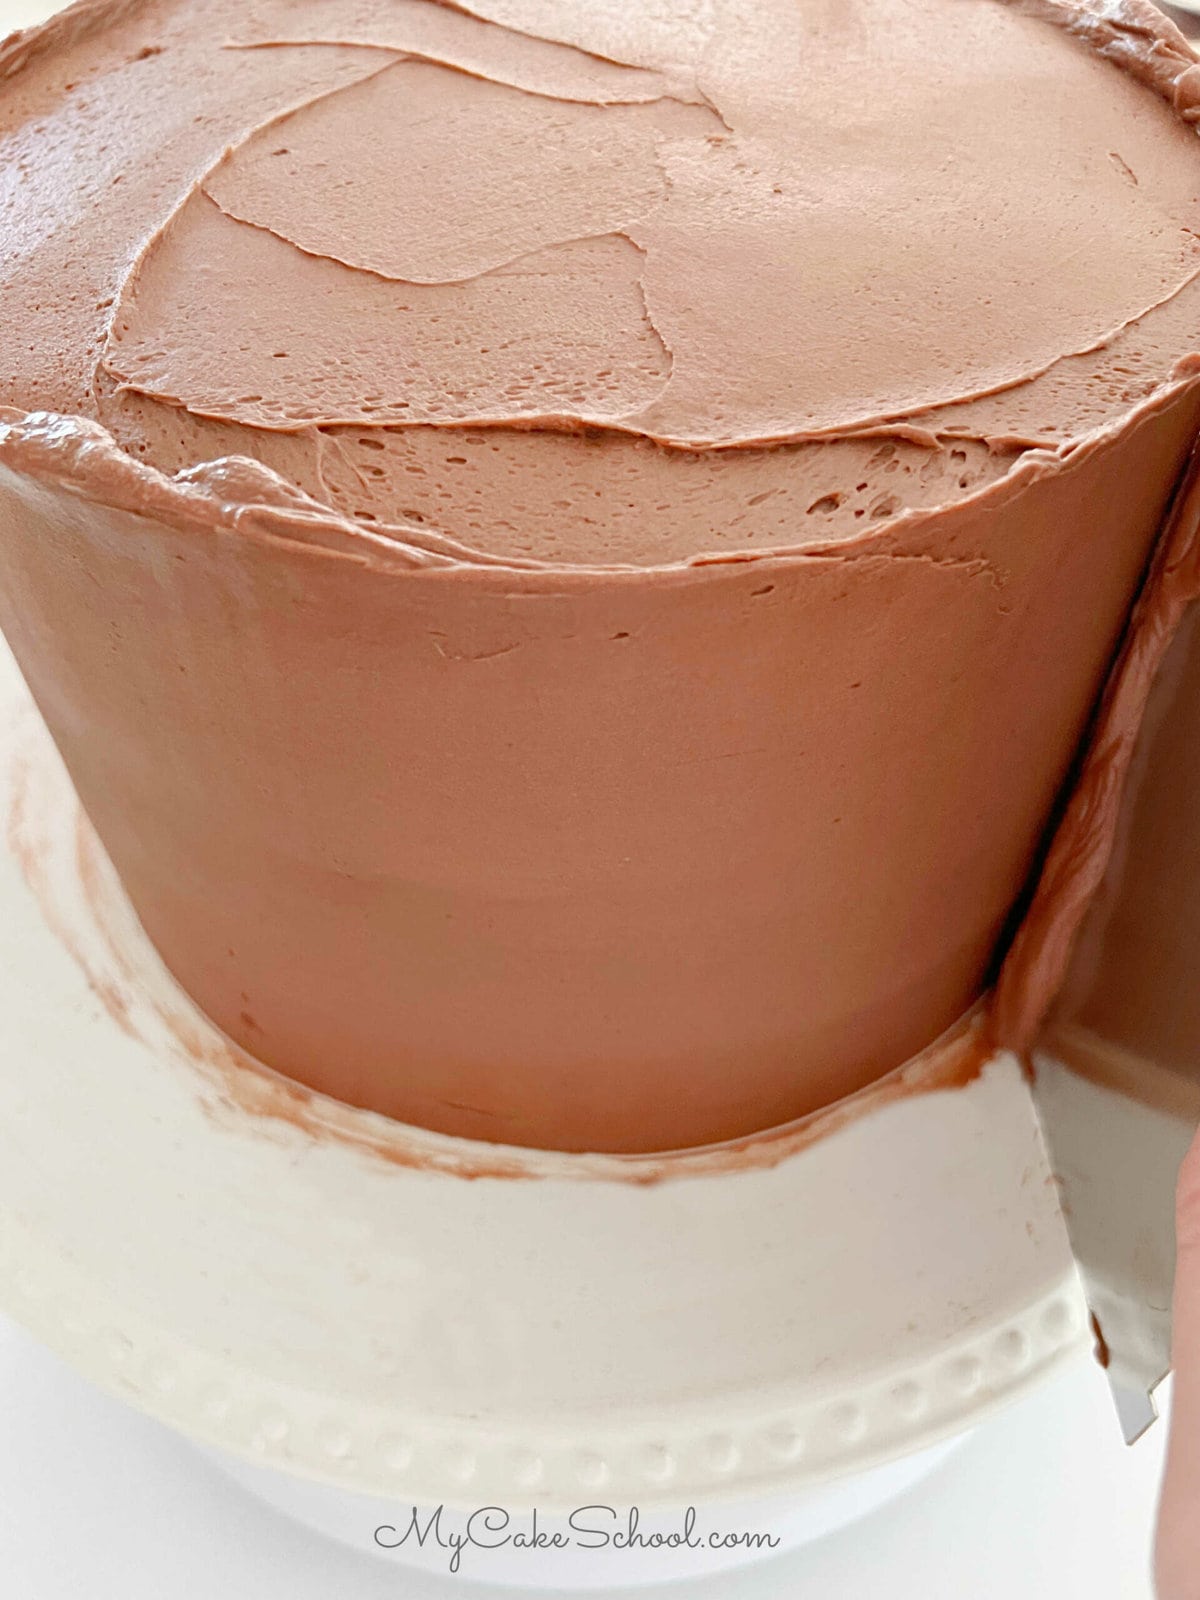
First, frost the cake with a thin layer of chocolate almond buttercream. After this "crumb coating" step, we like to freeze the cake for 10-15 minutes (or longer in the refrigerator) to firm everything up.
Next, add the second layer of frosting to the chilled cake. I smoothed around the sides of my cake using a metal bench scraper. Heating the bench scraper with water first will give you an extra smooth finish. (This is known as the hot knife method of smoothing buttercream.)
Decorating the Cake
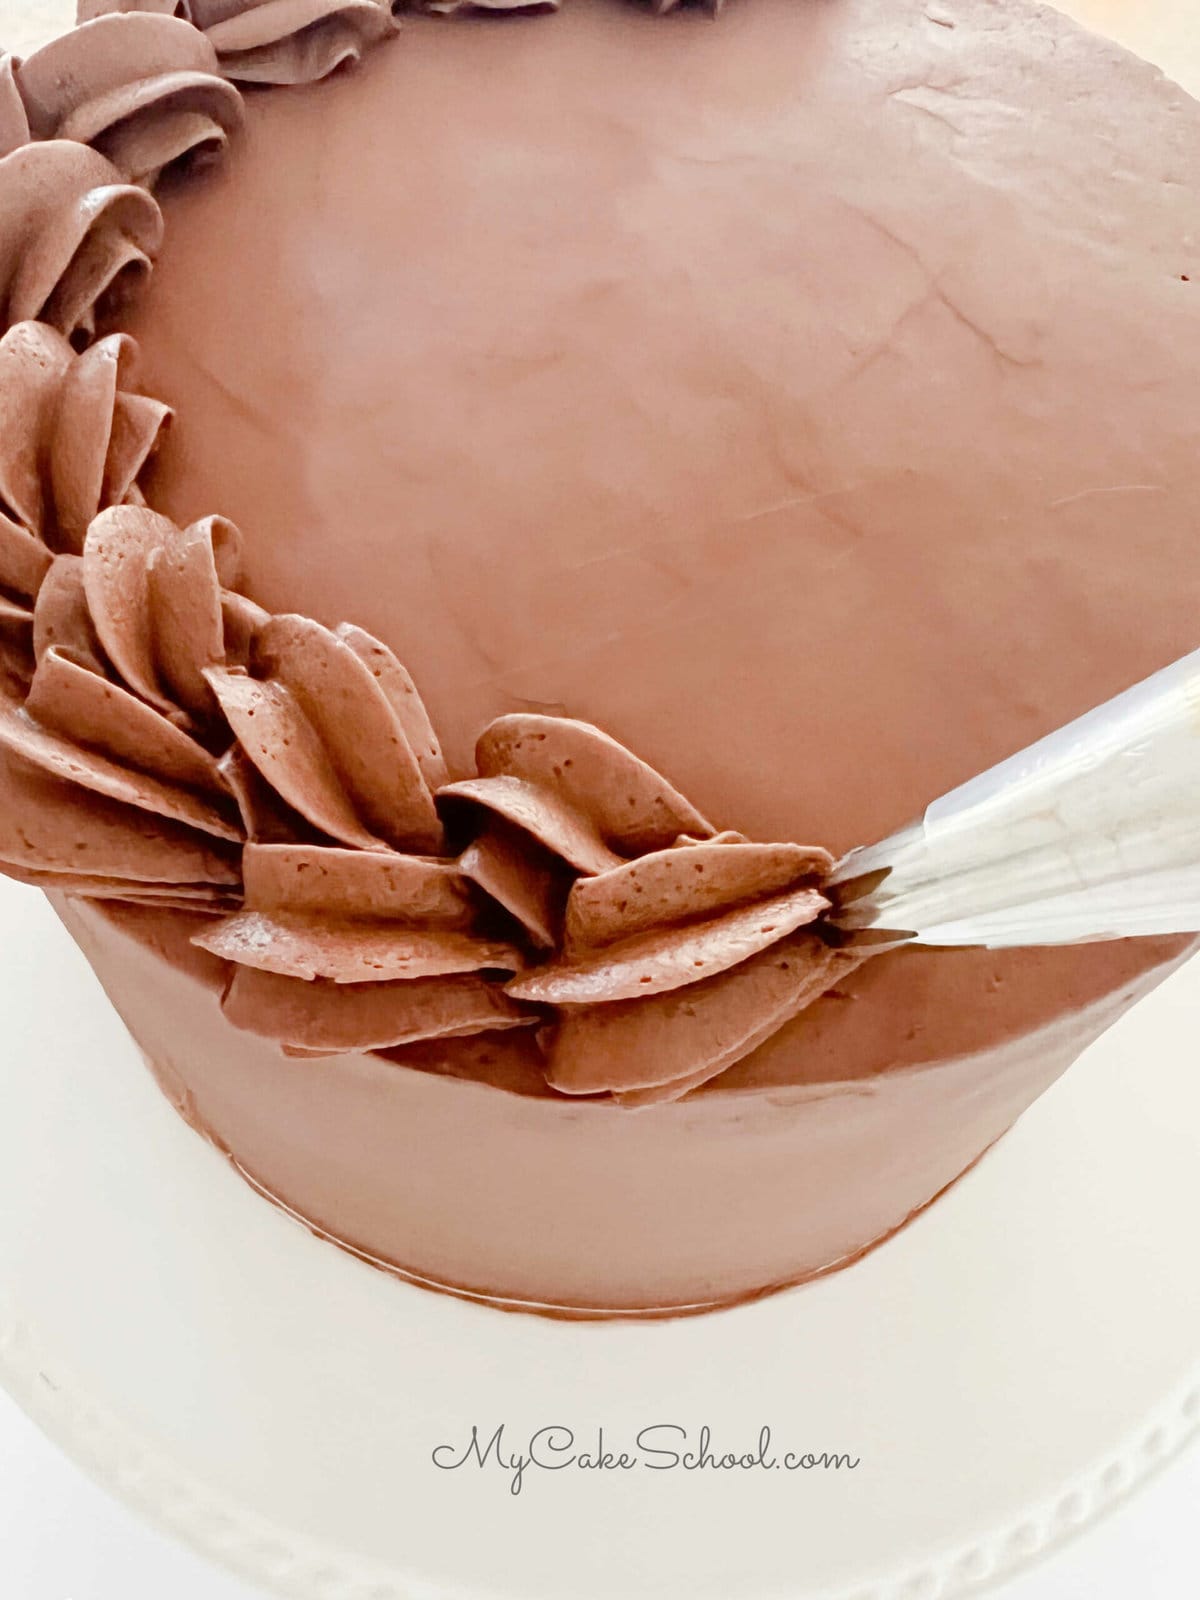
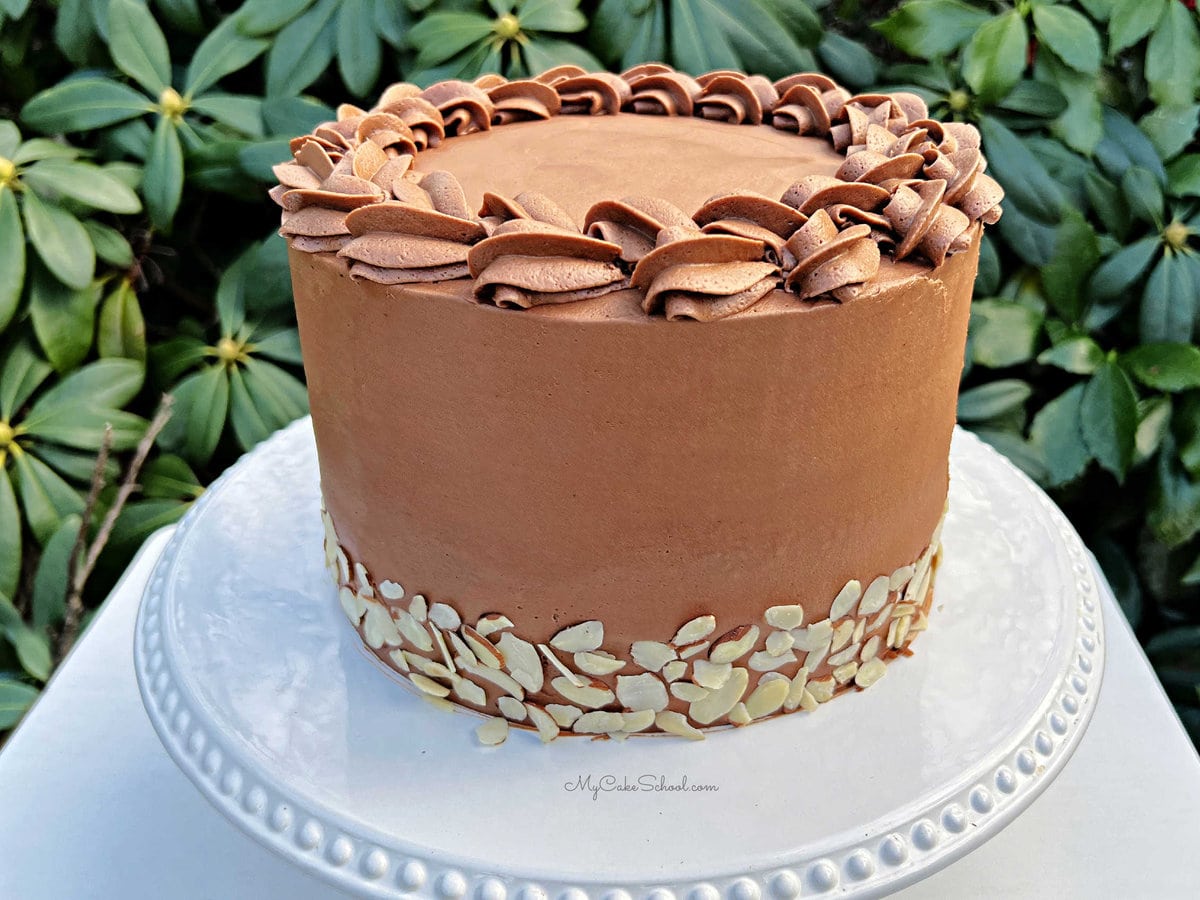
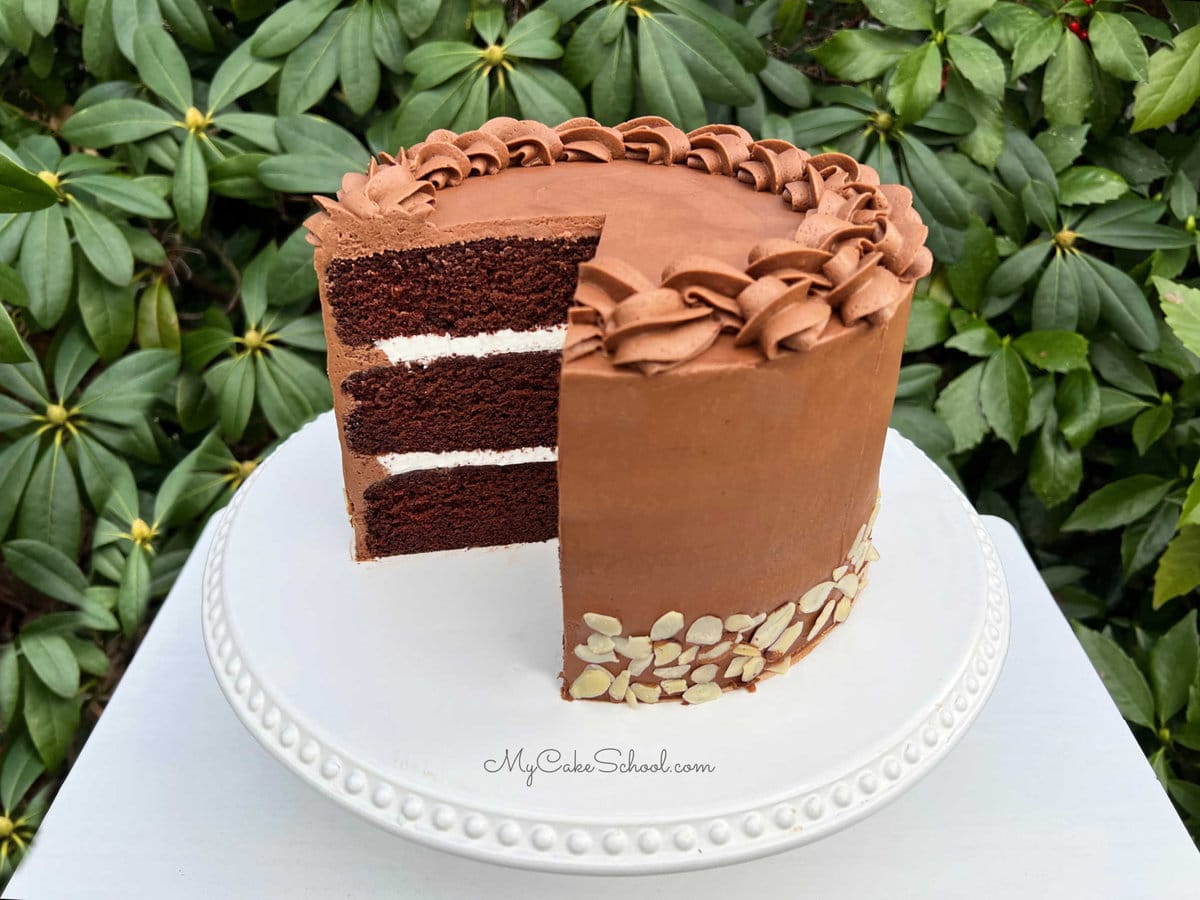
I topped the cake with a braided border using a large star 1M piping tip.
(You can learn more about piping star tip borders in this free tutorial: Star Tip Borders Tutorial- Part One)
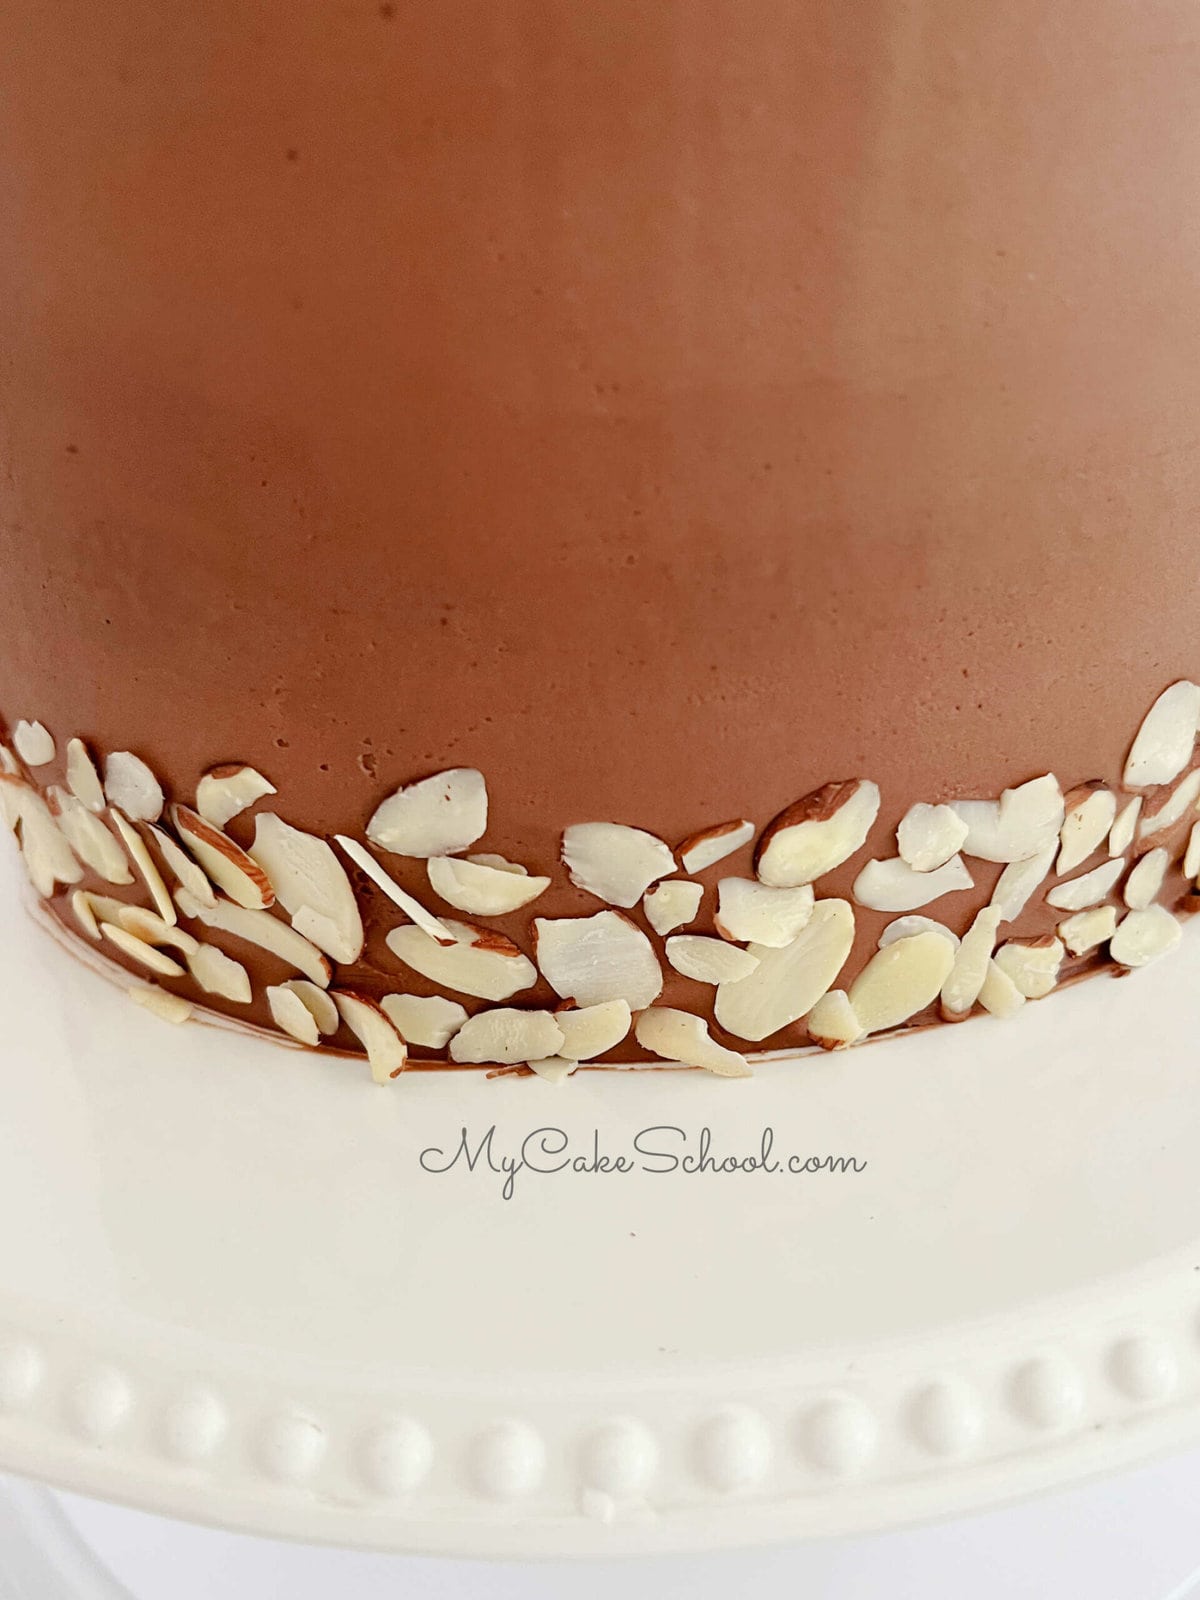
We pressed sliced almonds around the base of the cake for additional decoration.
And here is our finished cake! Don't you just want to dive right in and grab a slice?
Refrigeration and Serving Tips
Because of the whipped cream filling, this cake does need to be refrigerated.
However, for best taste and texture, it is always best to remove the cake from the refrigerator a couple of hours before serving. This will allow the cake and frosting to soften.
*If you would like to use a less perishable filling, you can skip the whipped cream and use the Chocolate Almond Buttercream Frosting as a filling instead. ;0)
More Cakes
If you love Chocolate Cakes, we have so many more to share with you! We'll link to a few favorites below, but you can scroll through our entire roundup here: 50+ of the Best Chocolate Cakes! We're sharing a few of our favorites below.
Also, for the almond lovers, we have a great Almond Cake from scratch, Almond Cream Cake, Almond Cupcakes and Almond Pound Cake!
Enjoy the Recipe!
Have you made this? We would LOVE for you to leave a ⭐️ rating as well as a comment and photo below! We really appreciate your feedback!
Chocolate Almond Cake
Equipment
Ingredients
- 2 cups (400g) granulated sugar
- 2 ¾ cups (322g) All Purpose Flour
- 1 cup (82g) unsweetened cocoa powder (not Dutch processed)
- 2 teaspoons (10g) Baking Soda
- ½ teaspoon (2g) Baking Powder
- ½ teaspoon (2g) Salt
- 1 stick + 5 Tablespoons 185g Unsalted Butter (You should be able to make a fingerprint when you press the butter. If it becomes too soft, just refrigerate for a few minutes.)
- 1 cup (242g) Sour Cream
- 1 cup (220g) Milk
- 4 eggs room temperature (If in a hurry, you can place the eggs in a bowl of warm water for 5 minutes.)
- 3 teaspoons (12g) almond extract (We used McCormick)
- 1 cup (220g) Hot Coffee
Almond Whipped Cream Filling
- 1 cup (240g) Heavy Cream
- ¼ (29g) cup Powdered Sugar
- 1 (4g) teaspoon Almond Extract
Chocolate Almond Frosting
- 3 sticks 339g unsalted butter, softened (do not soften butter in the microwave)
- 8 cups (920g) confectioners sugar Adjust amount to your liking.
- 1 cup (82g) unsweetened cocoa powder, sifted (measure then sift)
- ¾ (180g) Milk, plus additional by the tablespoon as needed.
- 1-2 teaspoons (6g) Almond Extract Start with ½ teaspoon and increase to your liking. (We use 2 teaspoons.)
- 1 teaspoon (6g) Salt
Decoration
- Sliced Almonds
Instructions
- For the Cake
- Preheat oven to 325 degrees. Grease and flour three 9 inch pans. This recipe uses the Reverse Creaming Method of Mixing.
- Add dry ingredients to the bowl of your mixer and mix for one minute to blend (sugar, flour, cocoa, baking soda, baking powder, and salt)
- Add butter a few slices at a time and mix until it reaches a crumbly, sandy texture. Be careful not to over-mix beyond "sandy" consistency.
- In another bowl, combine sour cream, eggs, milk, and almond extract. Using a fork, mix together. This is all of your wet ingredients except for the coffee, it will be added to the batter later.
- Set a timer for 1 ½ minutes and SLOWLY add half of your egg mixture to your butter/flour mixture while mixing. Start mixer on low speed then increase to medium for the remainder of the 1 ½ minutes. Do Not Mix Above Medium Speed.
- Stop mixer, scrape the sides and bottom of bowl, and add half of the remaining egg mixture. Mix on medium speed for 20 seconds.
- Stop mixer, scrape down the sides if necessary, and add the last of the egg mixture. Mix for 20 more seconds on medium speed.
- Slowly add HOT coffee and mixing for 30 seconds to blend. Batter will be runny but that is okay!
- This recipe makes about 9 ½ cups of batter. Pour into 3 prepared 9" pans and bake at 325 degrees for 25 to 30 minutes or until the center of the cake springs back to the touch and a toothpick comes out clean.
- Cool the cake layers in the pans on a wire rack for 10 minutes before turning out.
Almond Whipped Cream Filling
- Chill the mixing bowl and beaters/ whisk attachment in the freezer for 10 minutes.
- Pour the whipping cream, powdered sugar and vanilla into the chilled mixing bowl, begin beating on low speed gradually increasing to medium high speed.
- The cream begins to thicken (approx. 1 ½ minutes). We like to mix until it can hold a peak when the mixer is removed from the bowl.
Chocolate Almond Buttercream
- Add butter and mix on low to medium speed until smooth. Add almond extract and blend into the butter. Add powdered sugar, salt, and cocoa powder.
- Add most of the milk. Begin mixing at low speed so you won't have a cloud of powdered sugar in your kitchen.
- Continue to mix adding remaining milk as needed. It may take 5 to 6 minutes to reach the smoothness and consistency you like. It will take longer if using a hand mixer. As you mix the frosting will become very smooth. You can add additional milk (1 Tablespoon at a time) if the frosting is too thick or additional powdered sugar if too soft.
Assembly of Cake
- Pipe a dam of chocolate buttercream around the edge of the cake layer-- about ½ inch from the edge. I do this using a disposable piping bag with the tip snipped away. (You could also do this using a ziplock bag with one corner snipped away.)
- Spread a layer of the almond whipped cream filling onto the top of the cake layer within the dam. Top with the second cake layer and repeat. Top with the third cake layer.
- Fill in any gaps between the layers with additional frosting. Frost the cake as usual. We like to do a thin (crumb coat) before chilling in the freezer for 10-15 minutes (or longer in the refrigerator) to firm things up for the final coat of frosting.
- We smoothed around the sides of the cake with a metal bench scraper and added a braided shell border around the top of the cake using large star 2M piping tip. We then pressed sliced almonds around the base of the cake. You may find this step easiest to do when the cake is chilled and frosting is firmer. Decorate however you like- enjoy the recipe!
Beautiful! Sounds delish too :-)
beautiful cake. instructions were explicit. not only did it look beautiful, it tasted great. usually I get one or the other.
This cake looks beautiful! I only tried the frosting, which I paired with a different cake, and just wanted to mention, for anyone who might find this helpful, that the almond flavor in the frosting itself was overpowering to my palate. I ended up making a much larger batch to "dilute" the almond flavor. In the future, I would probably start by adding 1/4 -1/2 tsp almond extract and then adjusting to taste.
Hi Della! Thanks for your feedback, I'll make a note in the recipe- ;0) I love almond and so maybe am less sensitive to it in the frosting. It is definitely more mild in the cake itself ;0) Hope you enjoy it!
This cake is divine! Followed recipe exactly. I love almond so I used the amounts listed. Wow. So delicious. Thank you for this recipe!
This cake was so moist and delicious! It didn’t last a day!
Hi Ginni! Thanks so much for your feedback. What a gorgeous cake!