Chocolate Buttermilk Cake
This Chocolate Buttermilk Cake is amazingly moist and perfectly fluffy!
It has just the right amount of chocolate without being overly rich. In other words, it is the perfect chocolate cake!

We've filled the layers with whipped cream and frosted with a flavorful chocolate buttercream, but this chocolate buttermilk cake would be perfect with so many fillings and frostings!
Definitely put this scratch chocolate layer cake recipe on your "must bake" list as soon as possible, I promise it'll become an instant go-to recipe for family and friends!
Table of Contents
What Does Buttermilk do for Cake Recipes?
The acidity that buttermilk adds to cake batter helps to make cakes even more tender by breaking down the tough strands of gluten. It also adds a subtle tanginess. Many of our cake recipes, including our Lemon Buttermilk Cake, have either buttermilk or sour cream for this reason!
What Fillings and Frostings Pair Well with Chocolate Buttermilk Cake?
So many! Here are a few of our favorites:
Sweetened Whipped Cream Frosting
Chocolate Cream Cheese Frosting
Chocolate "Mock" Mousse Filling
How to Make Chocolate Buttermilk Cake
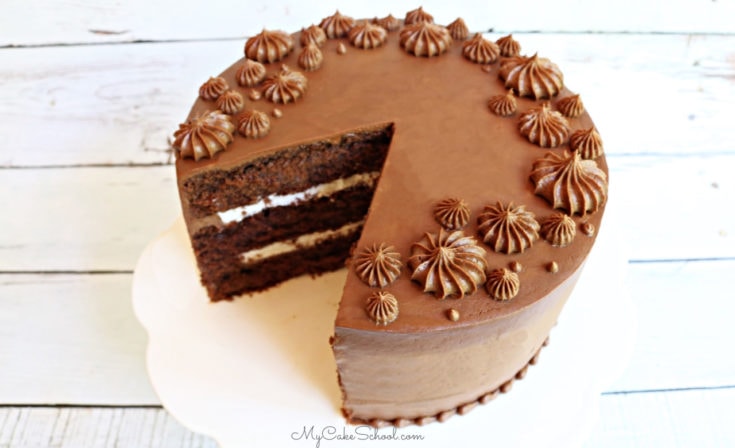
This moist Chocolate Buttermilk Cake makes three fluffy eight inch layers. This recipe uses the traditional creaming method (rather than Reverse Creaming) method of mixing.
Making the Cake Layers
- In a medium bowl, whisk the flour, cocoa, baking powder, and baking soda. Set aside
- In another bowl, add the buttermilk, oil and vanilla. Set aside
- In the bowl of your mixer, add the softened butter and mix at medium speed until smooth. Gradually add the sugar and continue to mix on medium speed 3 to 5 minutes until lightened in color and fluffy.
- Add the eggs one at a time, mixing until the yellow of the yolk is blended.
- With the mixer on low speed, alternately add the cake flour mixture and buttermilk mixture, beginning and ending with the dry ingredients (3 additions of dry and 2 of wet). After the last addition, mix just until blended.
- Bake at 350 degrees for 25 to 30 minutes or until a toothpick inserted in the center comes out clean or with just a few crumbs attached. Let cool 5 to 10 minutes and turn out of pan.

Can the Cake Layers be Frozen?
Yes! Make life easier by baking in advance. After removing the cake pans from the oven, I allow them to cool on the cooling rack for about 5 minutes before flipping them out of their pans and wrapping them individually in plastic wrap, then foil.
You can use wrapped cardboard cake circles beneath the layers for more stability if you'd like. Then, I place the wrapped cake layers in the freezer. They will stay fresh for up to three months! *We find that wrapping the cake layers while still slightly warm makes them even more moist!
To thaw, remove from the freezer and allow to thaw, still wrapped, on the kitchen counter. After 30-45 minutes, you can remove the wrapping and thaw to desired amount for decorating.
Assembling the Cake
Today, we are using a homemade whipped cream filling and chocolate buttercream frosting.
When using soft cake fillings, it's a good idea to pipe a dam of frosting around the edge of the cake layer (about ¼ inch-½ inch from the edge) and then fill. This helps to keep the filling contained when it's time to stack the layers.
In the photo below, I piped a dam of buttercream using a round tip 12 (but you can also just snip the tip from a disposable piping bag.

Fill in with luscious whipped cream!

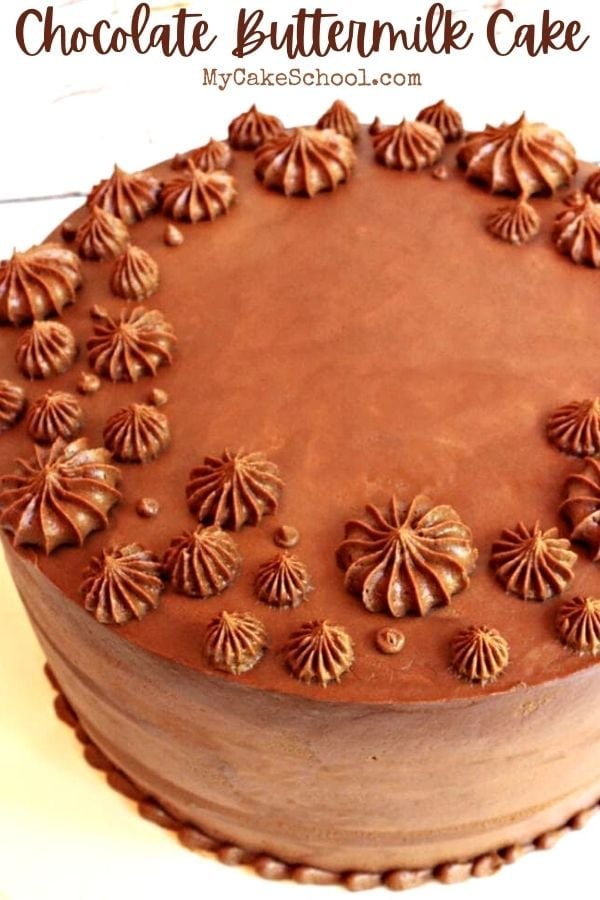
After filling the cake layers, I frosted with our chocolate buttercream recipe and then decorated using a Wilton 8B french tip. I varied the pressure to get the different sizes of stars.
I also filled in here and there small dots piped from a tip 3 and added a small bead border around the base.
Frosting The Cake with a Smooth Finish
When I'm going for a smooth look, I like to frost the cake on a turntable and then smooth the frosting with a bench scraper. This is a great place to start.
Then, I freeze the frosted cake for about 10-15 minutes or until the frosting is firm so that I can go back and fine-tune with a hot small angled spatula (heated with very hot water). We go over this technique in our tutorial for the hot knife method of smoothing buttercream.

Other Favorite Chocolate Cakes
In addition to today's delicious Chocolate Buttermilk Cake, we have many other chocolate cakes that belong on your "must-bake list"!
Devil's Food Cake from Scratch
Chocolate Sour Cream Cake from Scratch
Chocolate Cheesecake Cake (which also uses this buttermilk chocolate cake recipe)!
You can find our roundup of favorite chocolate desserts here!: A Collection of the BEST Chocolate Cakes, Frostings, and More!
Have you made this? We would LOVE for you to leave a ⭐️ rating as well as a comment and photo below! We really appreciate your feedback!
Chocolate Buttermilk Cake
This Buttermilk Chocolate Cake is so moist, tender, and has wonderful chocolate flavor.
Ingredients
For the Chocolate Buttermilk Cake
- 1 ½ sticks (170g) unsalted butter, softened ( do not microwave)
- 2 cups (400g) sugar
- 3 large eggs, room temperature - putting cold eggs in a bowl of very warm water will warm them quickly
- 2 cups (228g) cake flour-- for substitution see Notes below
- ¾ cups (69g) unsweetened cocoa powder (not Dutch processed cocoa (measure then sift)
- ½ teaspoons (2g) baking powder
- 1 ½ teaspoon (7g) baking soda
- 1 ½ cups (355g) buttermilk ( if you do not have buttermilk, see Note below)
- 2 teaspoons (8 g) vanilla
- ½ cup (104g) vegetable oil (I use canola oil)
Whipped Cream Filling
- 1 cup (240g) heavy cream
- ¼ (29g) cup powdered sugar
- 1 (4g) teaspoon vanilla
Chocolate Buttercream Frosting
- 3 sticks (339g) unsalted butter, softened (do not soften butter in the microwave)
- 9 cups powdered sugar (icing sugar in UK) (1034g) more if needed. ** For cupcakes, I like to use 8 c. (920g) for a softer frosting
- 1 ½ cups unsweetened cocoa (124 grams) (not Dutch processed, measure then sift
- ½ cup milk (121 grams) more if needed to reach the spreading consistency you like
- 2 teaspoons vanilla (8 grams)
Instructions
For the Chocolate Buttermilk Cake
- Preheat the oven to 350 degrees, grease and flour three 8x2 inch round pans
- In a medium bowl, whisk the flour, cocoa, baking powder, and baking soda. Set aside
- In another bowl, add the buttermilk, oil and vanilla. Set aside
- In the bowl of your mixer, add the softened butter and mix at medium speed until smooth. Gradually add the sugar and continue to mix on medium speed 3 to 5 minutes until lightened in color and fluffy.
- Add the eggs one at a time, mixing until the yellow of the yolk disappears.
- With the mixer on low speed, alternately add the cake flour mixture and buttermilk mixture, beginning and ending with the dry ingredients (3 additions of dry and 2 of wet). After the last addition of dry ingredients, mix batter just until blended.
- Bake at 350 degrees for 25 to 30 minutes or until a toothpick inserted in the center comes out clean or with just a few crumbs attached. Let cool 5 to 10 minutes and turn out of pan.
For the Sweetened Whipped Cream Filling
- Chill the mixing bowl and beaters/ whisk attachment in the freezer for 10 minutes.
- Pour the whipping cream, powdered sugar and vanilla into the chilled mixing bowl, begin beating on low speed gradually increasing to medium high speed.
- The cream begins to thicken (approx. 1 ½ minutes) and soft peaks form....peaks that slightly bend over. Watch closely as this happens quickly. Do not over beat.
- Use immediately as the whipped cream will gradually begin to deflate over time.
For the Chocolate Buttercream Frosting
- Add softened butter and mix for one minute on medium speed. Add vanilla and blend into the butter. Add powdered sugar and cocoa powder.
- Add most of the milk. Begin beating at low speed so you won't have a cloud of powdered sugar in your kitchen. Beat at medium speed 1 minute. Reduce speed to low and beat an additional two to three minutes, adding remaining milk as needed. (Recipe can be doubled or halved.)
This recipe makes approximately 6 cups of frosting.
Notes
1. Substitution for cake flour-- measure out 2 cups all purpose flour,
remove ¼ cup and replace with ¼ cup cornstarch. Whisk to blend
2. Buttermilk Substitution-- Use a measuring cup for liquid, add 1 Tablespoon plus 2 teaspoons lemon juice or vinegar then fill with milk to the 1 ½ cup mark, stir. Wait 5 minutes and it is ready to use.
3. This recipe also works well for cupcakes. Bake standard size cupcakes at 350 degrees for 18 to 20 minutes. Remove from muffin tin onto a cooling rack immediately after baking.
Firstly, thank you for some amazing recipes,I think I must have made most of your cakes by now.
I’ve made the chocolate buttermilk cake a few times and the flavour is superb, however I find that it has a tendency to shrink in from the sides of the pans. I understand that all cakes will do this slightly as an indication that they are baked. The last time I made it there was a slight ridge around the edge even though I had baked the layers at the same temp as before. Would appreciate any advice on what I might be doing wrong. Thank you
Hi, I don’t have three cake pans, can I just put all mixtures in one pan.
Hi Tiffany, This recipe makes approximately 7 cups of batter. What size pan are you using? Is it a bundt pan? If it is, don't fill too full, leave at least a 1 1/4 inch space at the top of the pan.
Hi Rosie, If there is a slight ridge at the top of your cake layers, it could happen if you are using dark colored pans rather than aluminum ones. If you only have dark, you can reduce the oven temperature by 25 degrees and bake the layers a bit longer. Also, it could be that your oven is heating a little hotter than it should. You can check this with an oven thermometer. They are inexpensive and can often be found at the grocery stores. Even if you have a ridge it sometimes just peels off or softens after the cake is frosted and does not cause a problem.
Hi, I'm planning on making a chocolate birthday cake and pairing it with your vanilla buttercream recipe and simple spreadable ganache recipe (whipped) as a filling. Not sure what the difference is taste wise between the two, but would you recommend I use your Chocolate Buttermilk recipe or Chocolate Sour Cream recipe to pair with? Thank you in advance!
Hi Prisca, I think both recipes are very good. The Chocolate Buttermilk recipe as less cocoa (3/4 cup) and the Chocolate Sour Cream recipe has 1 cup cocoa. The Chocolate Sour Cream recipe uses the Reverse Creaming Method of mixing. If you are not familiar with this method you might like to watch Melissa's video, link below.
https://www.mycakeschool.com/reverse-creaming-method-of-mixing-a-cake-video-tutorial/
Hi, I’ve just made this cake, although it tasted fine it was extremely difficult to cut as the texture was crumbly. Any ideas what could have caused this. Thanks
Rosie, I had trouble with my buttermilk cake as well. It is extremely crumbly and when I tried to put the second layer on top of the first layer, it broke into three pieces. As I was icing the cake, the sides were crumbling apart. Does anyone have any idea what may have caused this? I think the cake is delicious......but it looks terrible. LOL!
@Rosie- I'm sorry that you had this problem! I'm not sure what could have caused this.
@Penny- I'm sorry that you had trouble assembling your cake. I wonder if they still could have been slightly warm? The easiest and safest way to assemble a cake is to have each layer on their own cake board and then just slide (or flip) each layer onto the cake one by one so that they are fully supported as they go onto the cake.
Another good option is to work with partially frozen cake layers. I like to freeze my cake layers individually anyway by wrapping them in plastic wrap followed by foil while each layer is on it's own foil-wrapped cake board. I talk about this some in my post.
In your case, when it's time to assemble the cake, just let it thaw partially before unwrapping so that the cake layers are still firm. They are so much less fragile this way for assembling as well as applying the crumb coat.
Also, when applying your frosting, if it seems to be tearing your cake, the frosting likely is a bit too thick- just add a touch more liquid.
After applying the first thin coat (crumb coat), chill in the freezer for about 10 minutes to firm it up before going in with the second coat. The freezer is your friend when cakes are misbehaving and you need to firm things up in order to finish decorating ;0) - Hope this helps!
Melissa, thank you so much - these are all amazing solutions! The cake is delicious, so I'll try it again using your methods. After the cake had completely cooled, I tried to frost it and didn't want to have to freeze it, but I realize now that I probably should have stuck it in the freezer! I agree that my frosting may have been a tad bit too thick. Thanks for all of your expert tips. I hope to become a wonderful baker under your tutelage!
I want to make this cake in three 8" square pans. How much would I need to increase the cake recipe so that I get the same thickness in the cake layers as the round cake layers? Thanks.
Hi Rachel, increasing the recipe by half should give you something similar.
Thank you so much!
I’m starting this cake and realize 170 grams is over 3 sticks if butter! So is it 170 grams or 1.5 sticks?
Hi Eileen- One stick of butter is 113g, and so 170g is correct for 1 1/2 sticks of butter. I hope that you enjoy the recipe!
Hi! you said that this makes 7 cups of batter for 3 8-inch pans. how many cups of batter would i need for 3 6-inch pans? Thank you!
Can this cake be baked in a 9 x 13 clear glass pan? If so, are there any alterations that need to be made?