Buttercream Reindeer Cake- Free Video Tutorial
Hi everyone! With Christmas just around the corner, we wanted to create a fun and easy cake to share- and this buttercream Reindeer Cake design is sure to bring smiles!

This cake was inspired by the super cute chocolate brownie and chocolate pie designs that I've seen on Pinterest- but I wanted to see if I could recreate the idea in cake form!
With the help of some cookie sticks (thick lollipop sticks) I was able to easily create nice, even triangles of buttercream to represent our 8 tiny reindeer- plus Rudolph! ;0) We hope that you enjoy this quick little cake video.
If you give this cake a try, we would love for you to leave a photo or comment below!
Table of Contents
What Cake and Frosting Recipes Work Well for this Design?
Whether you're craving a scratch Chocolate Layer Cake, Homemade Red Velvet Cake, Vanilla Buttermilk Cake, or something else, you'll find all sorts of ideas in our Recipes section! Any of our cake recipes would work well for this design. Our cake is frosted with Classic Vanilla Buttercream.

How to Make an Easy Reindeer Cake
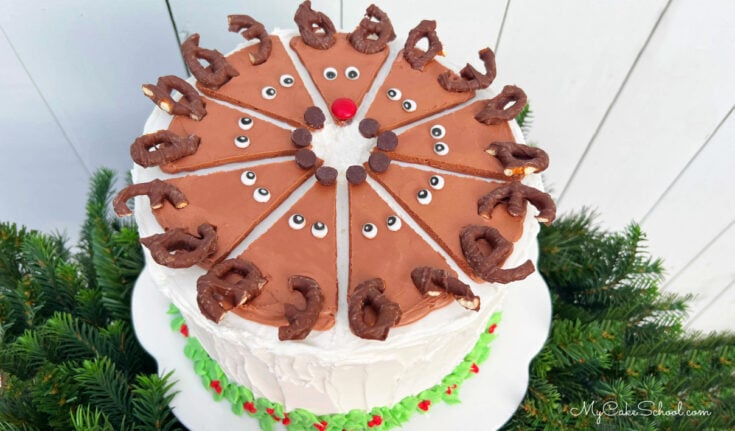
This is such a fun reindeer cake for Christmas parties! You can find the full, printable how-to card further down in this post.
- Chill the Cake: Chill your frosted cake in the freezer for about 10 minutes to firm up the frosting (or longer in the refrigerator if you don't have the freezer space).
- Place the Cookie Sticks: Arrange 9 cookie sticks on top of the firm frosting, spacing them out to create the 9 triangular shapes for the reindeer. Once they appear evenly spaced, gently press them down into the chilled frosting. (Not deep into the frosting, but enough to anchor them in place.)
- Brown Frosting: Fill a disposable piping bag with vanilla buttercream tinted brown. Snip the tip away to create a medium sized hole and pipe on the brown, filling in each triangle.
- Smoothing: Gently spread the brown frosting to smooth as best you can without pushing on the cookie sticks.
- Chill & Remove Sticks: Chill the cake in the freezer for about 10 minutes to firm up the frosting. Quickly go over any remaining spots on the chilled buttercream that need smoothing using a heated spatula (run under hot water and dry). Then, carefully pull up and remove the cookie sticks to reveal the 9 triangles.
- Eyes & Noses: Add the reindeer eyes (mine were cut from thinly rolled fondant that set for a few minutes before cutting with a round tip 12 and black food coloring pen details). Add noses.
- Antlers: Break chocolate covered pretzels in half and use for antlers.
- Sides of Cake: I added texture around the sides of the cake with an offset spatula and added a garland border using a piping tip 352 and buttercream holly berries using a tip 3.
More Christmas Cakes to Try
Looking for more Christmas Cake designs? We have so many! Here are just a few favorites from our free cake tutorial section as well as our member cake tutorial section:
Easy Christmas Tree Sheet Cake- Free Cake Video
Loopy Christmas Bow Cake - Member Tutorial
Reindeer Cupcakes- Free Cupcake Video
Gingerbread House Cake- Member Tutorial
You can find our full roundup of favorite Christmas Cakes Here: Favorite Christmas and Winter Cake Designs
Buttercream Reindeer Cake- Free Video Tutorial
This sweet and simple Buttercream Reindeer Cake is sure to bring smiles! It's such a fun cake for Christmas parties!
Materials
- *We decorated an 8 inch cake frosted with Classic Vanilla Buttercream. This design can be adjusted for any size of cake (although for smaller cakes you'll likely need to reduce the number of reindeer)!
- Classic Vanilla Buttercream
- White Fondant & Black Food Coloring Pen for Eyes (or use google eye sprinkles)
- Chocolate Pretzels
- Red M&M or other Red Candy (or buttercream!)
- Chocolate Chips (or Chocolate M&Ms, or buttercream)
- Piping Tips: 352 Leaf Tip, Tip 3 (Round tip for holly berries)
- Offset spatula: I used a small offset spatula for frosting the cake and adding texture.
- Cookie Sticks- These are thick lollipop sticks. Thinner sticks should work also but I wanted a slightly wider separation between reindeer
- Coloring Gels: I used Americolor Chocolate Brown, Super Red, Wilton Leaf Green
Instructions
- Chill your frosted cake in the freezer for about 10 minutes to firm up the frosting (or longer in the refrigerator if you don't have the freezer space).
- Arrange 9 cookie sticks on top of the firm frosting, spacing them out to create the 9 triangular shapes for the reindeer. Once they appear evenly spaced, gently press them down into the chilled frosting. (Not deep into the frosting, but enough to anchor them in place.)
- Fill a disposable piping bag with vanilla buttercream tinted brown. Snip the tip away to create a medium sized hole and pipe on the brown, filling in each triangle.
- Gently spread the brown frosting to smooth as best you can without pushing on the cookie sticks.
- Chill the cake in the freezer for about 10 minutes to firm up the frosting. Quickly go over any remaining spots on the chilled buttercream that need smoothing using a heated spatula (run under hot water and dry). Then, carefully pull up and remove the cookie sticks to reveal the 9 triangles.
- Add the reindeer eyes (mine were cut from thinly rolled fondant that set for a few minutes before cutting with a round tip 12 and black food coloring pen details). Add noses.
- Break chocolate covered pretzels in half and use for antlers.
- I added texture around the sides of the cake with an offset spatula and added a garland border using a piping tip 352 and buttercream holly berries using a tip 3.
Adorable!!