My Cake School

Cake Tutorials & Recipes

  • Facebook
  • Instagram
  • Pinterest
  • RSS
  • Twitter
Login
  • home
  • Videos
    • The Basics
    • Buttercream Techniques
    • Carved/3D
    • Chocolate Techniques
    • Cupcake, Cake Pop, etc. Methods
    • Gum Paste & Fondant
    • Themes and Occasions
    • See All Videos
  • Shop
    • Miscellaneous Cake Decorating Supplies
    • Kitchen Appliances
    • Chocolate and Candy Making
    • Fondant and Gum Paste
    • Piping Tips
    • Molds, Mats, Embossers, and Cutters
    • Cookbooks
    • Dusts and Sprays
    • Pantry Items
    • Bakeware and Tools
    • Sprinkles and Candy
  • Free Tutorials
  • forums
  • recipes
    • Cakes and Cupcakes
    • Fillings
    • Fondant/Gumpaste
    • Frostings and Glazes
    • Miscellaneous
  • contact
  • join

Fish Cupcake Cake!~A Blog Tutorial

April 30, 2012 By Melissa D. 55 Comments

4.0K shares
  • Share
  • Tweet

Today I’m going to show you how to make a fun & simple pull-apart fish cupcake cake design! This cute and colorful cake is the PERFECT centerpiece for summertime or beach themed parties. All that you need are cupcakes and one small round cake layer!
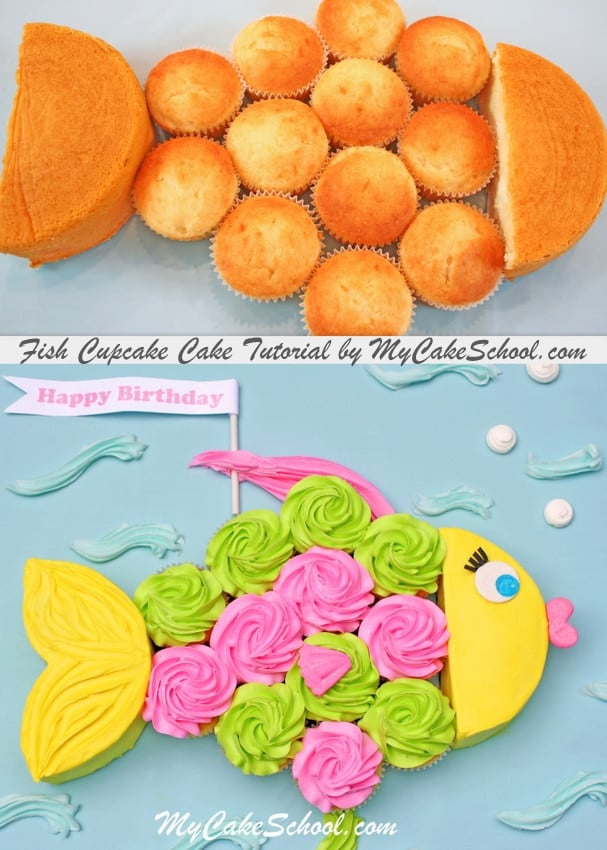
Let me show you how to make this sweet fish cake:

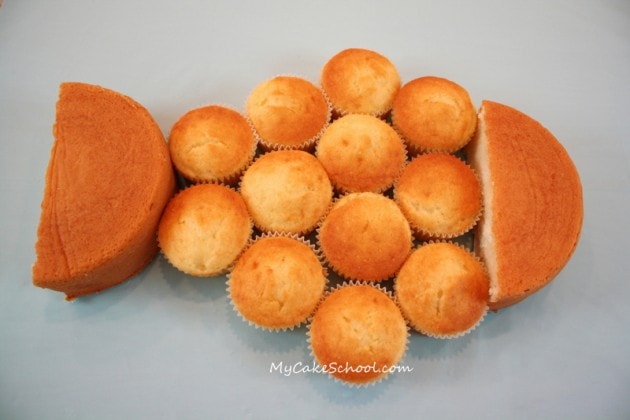
First, I started with one fat 6″ layer (about 2″ thick) and 12 cupcakes.  My 6″ cake layer is on it’s own cardboard cake circle, and I split it into two parts (with one side being a little larger than the other).

I nestled each row of cupcakes into the row next to it, so that the spaces in between the cupcakes could be kept to a minimum.
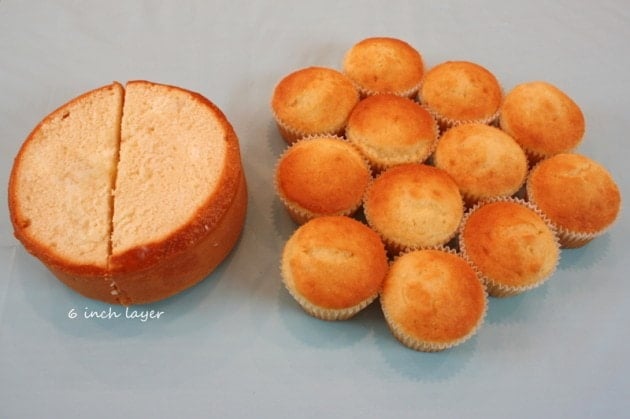
Fish Cupcake Cake Tutorial by MyCakeSchool.com! Perfect for pool or beach themed parties!

Here’s the rough idea of Miss Fish.  The part of the 6″ cake that will become the tail is a little larger than the other half (which will be the face).

Both parts of my 6″ cake are on a cake circle cut down to size.  This makes moving them around easier (especially later after they’ve been frosted).

Fish Cupcake Cake Tutorial by MyCakeSchool.com! Perfect for pool or beach themed parties!

Using a serrated knife, I cut a little notch from the “tail end” of the cake to give it a better shape.  Doing this exposed a little bit of my cardboard cake circle, which I then snipped away with scissors.
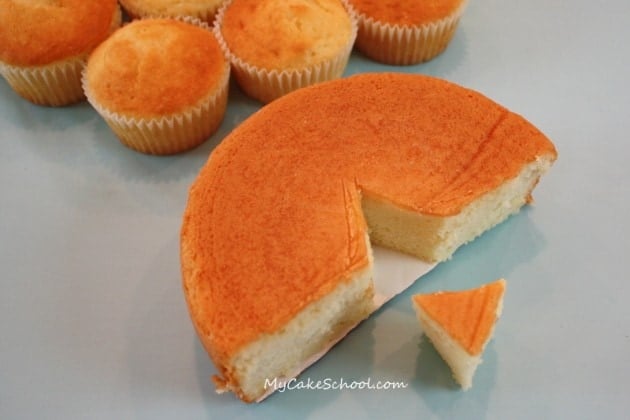
Fish Cupcake Cake Tutorial by MyCakeSchool.com! Perfect for pool or beach themed parties!

Time to frost our fish head and tail!  First, the tail.  I frosted it with a crusting buttercream (tinted Lemon Yellow) and then used my small tapered spatula to make ridges.

After frosting, I moved the small cake to the refrigerator to chill and firm up (so that moving it to the final board won’t be as difficult later.)

*You can use any vanilla buttercream that you’d like. We used our Classic Vanilla Buttercream recipe but our Fluffy Vanilla Buttercream recipe would be a great choice also!
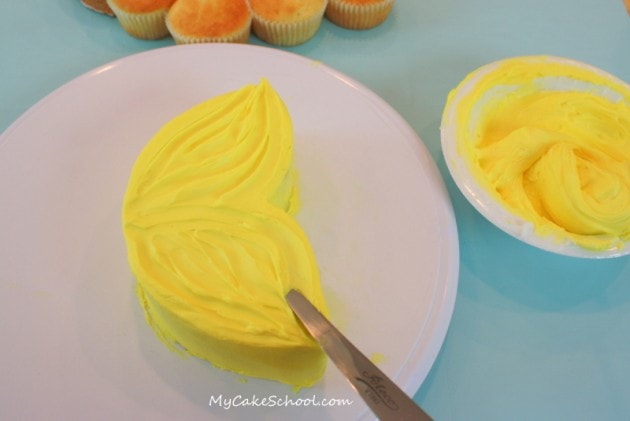
 

Fish Cupcake Cake Tutorial by MyCakeSchool.com! Perfect for pool or beach themed parties!

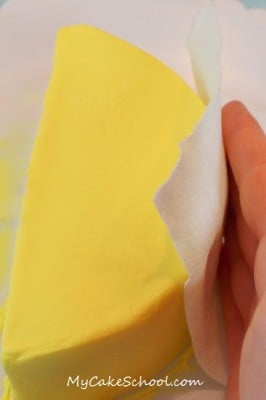
Next, I frosted the fishy head with the same yellow vanilla buttercream.  I waited a few minutes for the frosting to crust, and then smoothed over it with a Viva brand paper towel.

(This is known as the Viva Paper Towel method of smoothing. Simply let your frosting crust, and then smooth over using a Viva brand paper towel or any brand of paper towel or napkin that has minimal impressions or quilting.)

Of course, this is an optional step–you can frost and smooth however you’d like! The hot knife method is another great option which involves chilling the frosted cake until firm and then using a hot spatula to iron out any imperfections.

Fish Cupcake Cake Tutorial by MyCakeSchool.com! Perfect for pool or beach themed parties!
After chilling the head of the fish, I moved it to my final cake board and began filling in with the colorful cupcake body.  My cupcakes are swirled with buttercream (tinted Americolor Electric Green and Deep Pink) using a 2D large closed star tip.

For these basic swirls, simply do a basic outline the cupcake and then end in the center, pulling the piping tip up and to the side.

To secure the head to the cake board, I spread the bottom of the cake cardboard that the head is resting on with a little buttercream.  For the cupcakes, I added a small dot of buttercream to the bottom of the cupcakes that make up the outer edge of the fish, to secure them to the board.
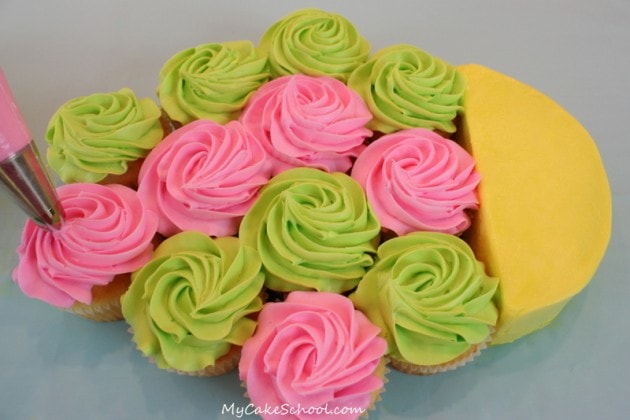
Another option is to frost the entire “fish cupcake body” all as one large cake.  This is the typical approach to a cupcake cake.  I think that piping the cupcakes individually makes for a really fun and unique look though!

Fish Cupcake Cake Tutorial by MyCakeSchool.com! Perfect for pool or beach themed parties!

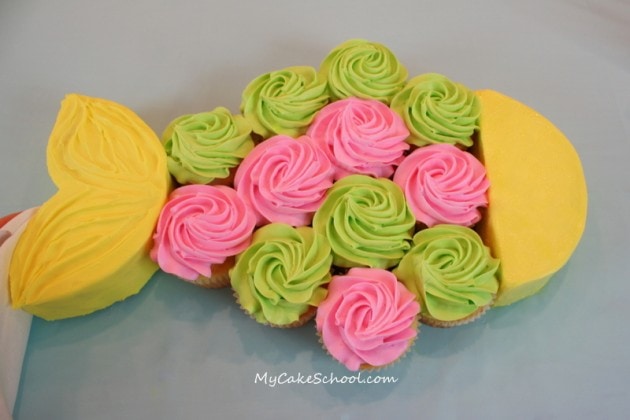
Next, I removed the fishy tail from the fridge, spread a bit of buttercream on the bottom of the cake cardboard that the tail is sitting on, and “glued” it to my board right next to the cupcake body.

In the photo, you can see that I’m gently pushing the cake tail close to the cupcake body–I’m using my paper towel to prevent fingerprints!
Fish Cupcake Cake Tutorial by MyCakeSchool.com! Perfect for pool or beach themed parties!

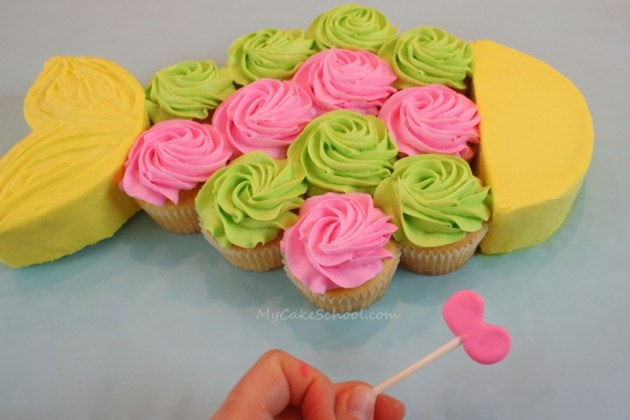
Now it’s time to bring our fish to life!  First, I made some funny fish lips from fondant (I kneaded in a little tylose to firm it up more quickly).

I wanted to keep these funny fish lips lightweight, but thick enough in the middle for me to insert a lollipop stick anchor.  It dried for about an hour and was ready to go…but to be on the safe side, go ahead and make it a day or two in advance.

 If you want to skip the fondant, just pipe on some buttercream lips with a Wilton tip 12 or other medium to large size piping tip.
Fish Cupcake Cake Tutorial by MyCakeSchool.com! Perfect for pool or beach themed parties!

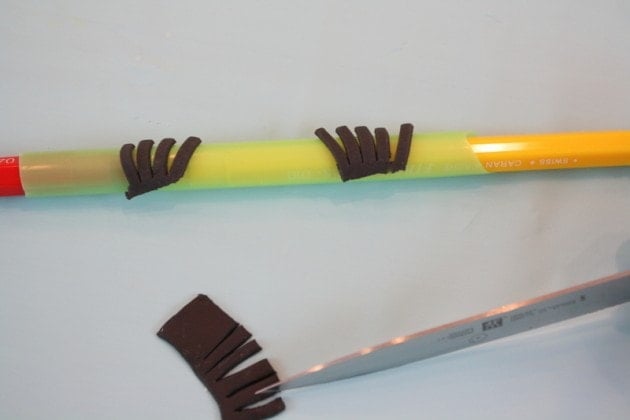
My fish cake is going to be a bit glamorous with nice, long eyelashes!  I made more than I needed just in case there were any breakage issues.

You can see below that I cut a strip of black fondant (with a little tylose powder kneaded into it for a faster dry time) and fringed it with a knife to create the eyelashes.  I dried them over a bubble tea straw, but any number of rounded forms would work.

After about an hour, the eyelashes held their shape nicely…(but again, dry times can vary depending on the humidity in your kitchen, etc. It’s always best to allow 1-2 days  or at least several hours for gum paste pieces to dry!) —

Fish Cupcake Cake Tutorial by MyCakeSchool.com! Perfect for pool or beach themed parties!

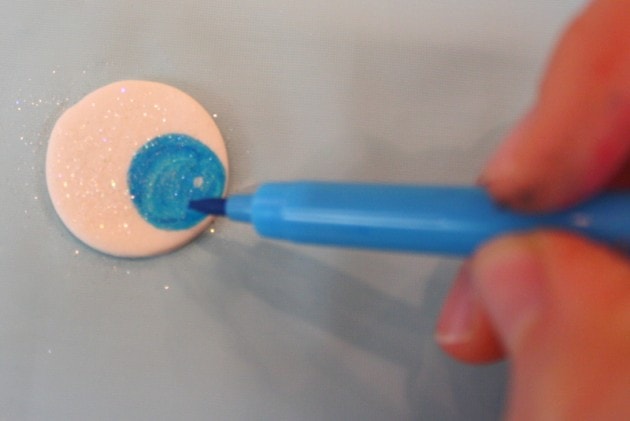
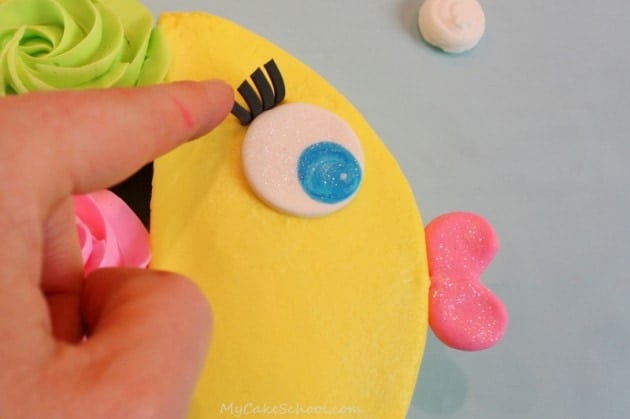
Next, I gave our fish a big blue eye using a circle of white fondant and a blue food coloring pen.  I also gave it a little sparkle with some white disco dust ;0)
Fish Cupcake Cake Tutorial by MyCakeSchool.com! Perfect for pool or beach themed parties!

Now, we’re ready to put everything together!  I pushed in the anchor for the lips (and gave them a little sparkle of white disco dust).  Then, I placed on her eye and pushed in the curled eyelashes!
Fish Cupcake Cake Tutorial by MyCakeSchool.com! Perfect for pool or beach themed parties!

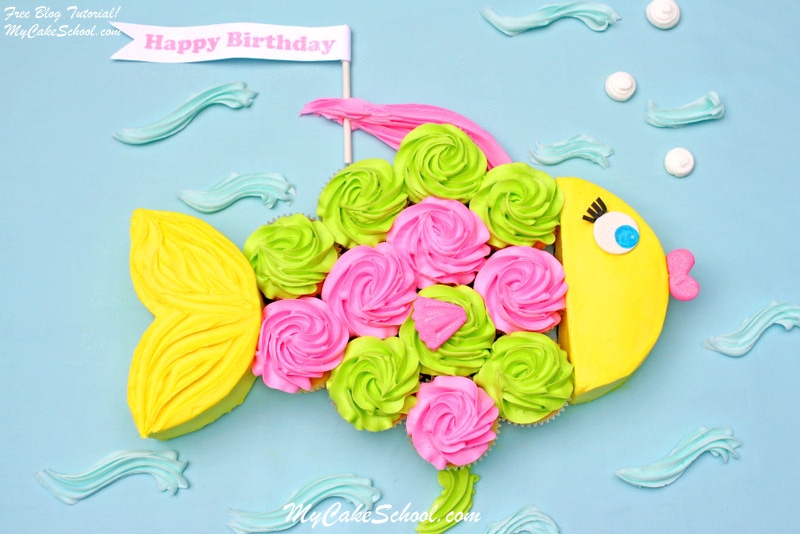
I added a few final touches to tie everything together.  Using a 2D tip, I added waves of blue buttercream, and I also added fish fins on top and bottom as well as a little fondant fin.

The air bubbles are piped in buttercream with a Wilton tip 12 (medium round tip).  The birthday sign is made from white cardstock and simply wrapped around a lollipop (cookie) stick.

Ta da!  So much cuteness! This sweet fish cupcake cake is swimming to a party near you!


Fish Cupcake Cake Tutorial by MyCakeSchool.com! Perfect for pool or beach themed parties!

Thanks for stopping by the blog today!  If you’d like to see some more fun and beachy ideas for cupcakes, visit our blog post on how to make a school of lollipop fish cupcake toppers or our crabby cupcakes!  You can find them HERE.  See you next time!

CUTE Fish Cupcake-Cake Tutorial by MyCakeSchool.com!


**Our full collection of our favorite cake and frosting recipes can be round in our Recipes Section! Also, there are so many more fun free tutorials in our Free Tutorials Section! Make sure to hop over and check them out! Thanks for stopping by!

Related posts:

  1. Beach Cupcake Tutorial~ A Free Blog Tutorial
  2. The Very Hungry Caterpillar–Pull-Apart Cupcake Cake Tutorial!
  3. Tie Dye Fun!- Cake Decorating Blog Tutorial
  4. Owl Cupcake Tutorial
  5. Wild About YOU~ A Cupcake Tutorial

Filed Under: Animals/Animal Print, Blog Tutorials, Buttercream Techniques, Cupcake, Cake Pop, etc. Methods, Kids, Seasonal & Holiday, Summer, Themes and Occasions Tagged With: beach, Beach Cake, Beach Cupcakes, cupcake cake, fish, Fish cake

« Cherry Blossom Cake~Cake Decorating Video Tutorial
Sweet Turtle Cake Topper- Free Cake Tutorial »

Comments

  1. Lynda Walters April 30, 2012 at 11:36 pm

    That is amazing and so simple, my daughter will love this. Thank you for sharing it :)

    Reply
  2. Stacy Brown May 1, 2012 at 12:03 am

    This is soooo cute… I love the design. You are such a talent!!! I will definitely be making this!

    Reply
  3. Apolline May 1, 2012 at 12:05 am

    This is gorgeous, I love it…thank you!

    Reply
  4. jill May 1, 2012 at 1:41 am

    fantastic

    Reply
  5. Sadia Wasim May 1, 2012 at 4:32 am

    Too cute!!

    Reply
  6. Xiomara May 1, 2012 at 7:11 am

    Awesome…thanks for sharing!!!!

    Reply
  7. Cherish Cordova May 1, 2012 at 9:30 am

    I love it! My daughters pre-k class just started a chapter on ocean & beaches to finish up the school year….this is perfect…..I’m making this! Thanks so much!

    Reply
  8. trisha May 1, 2012 at 3:22 pm

    perfect as always!!! YUM! Love the colors you chose as well.

    Reply
  9. Nancy Rivera May 1, 2012 at 5:10 pm

    Very very nice!

    Reply
  10. Bunny Roberts May 1, 2012 at 6:16 pm

    Really Cute cake, and a great idea. Thank You for sharing this.

    Reply
  11. Dianne Crossley May 1, 2012 at 10:19 pm

    I love it. Thank you :)

    Reply
  12. fathima May 2, 2012 at 12:31 am

    It so cute u guys hav lovely ideas

    Reply
  13. Carla Branco May 2, 2012 at 2:38 am

    So pretty and easy. Amazing

    Reply
  14. Mariela May 2, 2012 at 3:29 am

    It’s beautifull. Congratulation!!!

    Reply
  15. Imane May 2, 2012 at 7:19 am

    Very beautiful, nice way to wake up…. Thank you for sharing. Yummmmmm.

    Reply
  16. Angelica Alvarez May 2, 2012 at 10:33 am

    So cute! I cant wait to try this when we take our beach vacation in July!

    Reply
  17. Lisa May 2, 2012 at 12:37 pm

    This is adorable!!

    Reply
  18. Brenda May 2, 2012 at 1:43 pm

    I love the creativity … combining cupcakes and a cake!

    Reply
  19. Rachel May 2, 2012 at 8:24 pm

    Adorable – I have a few people who love to fish and can see myself making this!

    Reply
  20. Carmen Santana May 2, 2012 at 9:25 pm

    this is so beatiful, thank.

    Reply
  21. Anita Barron May 2, 2012 at 10:36 pm

    I love this idea; you have so much talent!!!!

    Reply
  22. Sue {munchkin munchies} May 4, 2012 at 11:59 am

    How cute is this!?! Love the lips:)

    Reply
  23. Paula Timmons May 4, 2012 at 3:45 pm

    Another great idea!

    Reply
  24. CakesOnTheLane May 4, 2012 at 5:27 pm

    Melissa, you’ve done it again! This is too cute for words. –Kathy

    Reply
  25. Dani Lerner May 5, 2012 at 12:13 pm

    Your site is amazing!!!

    Kisses from Brazil!!!

    Dani

    Reply
  26. Susan May 6, 2012 at 10:40 pm

    Thank you so much for sharing your wonderful talent, I made this cute little fish for my daughters 2nd birthday. It was easy and cute.

    Reply
  27. tammy May 7, 2012 at 2:41 pm

    FAB !!! and you make it look so easy and the outcome over the top.
    Do you have a favourite crumb coating (buttercream) recipe that you could share? again thanks for the lesson, cant wait to make fish of my own =)

    Reply
  28. Kellie May 7, 2012 at 8:22 pm

    Wonderful Tutorial! Love the Fish!

    Reply
  29. acerola May 8, 2012 at 11:08 am

    So cuuuuuuute!

    Reply
  30. MrsAB May 11, 2012 at 12:11 pm

    Thank your for this wonderful tutorial. I can appreciate the individually iced cupcakes instead of the entire lot of cuppies at once. It has a totally different look. The finished product is awesome!

    Reply
  31. Pepper May 15, 2012 at 7:44 pm

    AMAZING work!!! You are so talented… thanks for sharing.

    Reply
  32. Cherish Cordova May 17, 2012 at 9:23 am

    I made this & the crab cupcakes last night, and my buttercream kept sticking to the viva paper towel….I tried letting it sit longer…..I also tried putting it in the fridge, and then doing it…..nothing helped. What did I do wrong? I live in GA so it’s warm here & I did use the all butter recipe. Should I use a different recipe next time Thanks! :)

    Reply
  33. BeBe May 17, 2012 at 9:35 am

    Hi Cherish, your cake needs to be at room temperature for your buttercream to crust properly. When it isn’t at room temp it will take forever to crust. Could this have been the problem? It typically should take only a short time to crust, maybe 10 min. depending on your humidity.

    Reply
  34. RosemarieL May 19, 2012 at 8:20 pm

    This is the first cake I have made since joining this wonderful site. The cake/cupcakes came out GREAT-because the instructions are GREAT! My big problem was that I need to measure..my cake board was toooo small…made a last minute change..not perfect-but my co-worker will love this cake for her birthday…thanks

    Reply
  35. Melissa Diamond May 19, 2012 at 10:36 pm

    Hi Rosemarie–Hooray! Yes, nothing like those last minute changes of plan with board, etc …but so glad to hear that it came out great!

    Reply
  36. Karen Strutz July 3, 2012 at 8:16 pm

    This is ABSOLUTELY ADORABLE!! I have a cake to make for my step-granddaughter for her birthday…THIS will be the one! She is going to be thrilled.
    Thank you for sharing it !

    Reply
  37. Peggy Fisher July 26, 2012 at 3:19 am

    Love this! Made it for my nephew’s first birthday! Thank you so much :-)

    Reply
  38. paola September 24, 2012 at 2:50 pm

    siete bravissimi

    Reply
  39. Erika October 29, 2012 at 10:56 am

    I want to use this idea for my son’s birthday. Do you think it would look as good if I used larger round and increased the number of cupcakes for the body? I will have about 40 people. I was thinking about using a 9″ round. Thoughts?

    Reply
  40. Melissa Diamond October 29, 2012 at 11:23 am

    Hi Erika–That sounds like a good plan to me! ;0) Let us know how it goes. I’m happy you’re making it!

    Reply
  41. caleigh February 22, 2013 at 9:46 am

    wow! so going to try this!!

    Reply
  42. jessica March 19, 2013 at 9:22 am

    Hi! This is super cute! In order to make a 6 inch round, what are you using for a recipe?? Im not sure how much batter it takes for a 6 inch. Equivalent to the twelve cupcakes? Thank u!

    Reply
  43. Joan July 17, 2013 at 9:04 pm

    Thanks for sharing. I will make it for my granddaughters. They are going to love it!

    Reply
  44. Kristen July 31, 2013 at 4:32 pm

    I just made these and I found this to be super easy! I pinned this under my kid friendly ideas but I am making this tonight for a friend of mine as she loves the ocean so I figured this would be perfect! Thanks for this awesome and easy idea!

    Reply
  45. jenny beltran October 6, 2013 at 9:40 pm

    very cute & unique …..

    Reply
  46. Lilli Oliver June 27, 2014 at 3:53 pm

    What did you put the fish on? What is the blue background made of? Can you double this fish to make it bigger?

    Reply
  47. BeBe June 27, 2014 at 10:33 pm

    Hi Lilli, we used two or three cardboard cake boards taped together and covered with a blue plastic tablecloth ( we found ours at Party City). You could also use foam core or plywood cut to the size you need. The plastic tablecloth was cut and pulled tight to eliminate wrinkles and taped or stapled onto the cakeboard ( to staple is faster ) If you staple, just make sure the staples are all the way in so they won’t scratch a tabletop. For a bigger fish you could use an 8 inch layer instead of the 6 inch and enough cupcakes to make the fish body in proportion to the head and tail.

    Reply
  48. Wendys wonders April 15, 2015 at 2:17 pm

    Brilliant can’t wait to make one for the grandkids when they come for tea it’s bright an novel love it thanks for sharing

    Reply
  49. Tracy Bua Smith August 3, 2015 at 7:50 am

    We were so excited to see this cake idea for my 2 year old’s birthday party since we were having her party at our local beach! The tutorial was easy to follow and I added “bubbles” to my fish and made the mouth out of a cardboard heart shape and iced the mouth with pink icing. Check it out here on my blog: http://www.asliceofsmithlife.com/2015/08/birthday-bash-with-fish-cupcake-cake.html

    Thank you!

    Reply
  50. Bailey March 13, 2016 at 10:46 pm

    Would you be willing to share your frosting recipe!?

    Reply
  51. Codi June 28, 2016 at 10:37 am

    Hi, I love this cake and have a request to make it this weekend. What did you use to make the board blue?

    Reply
  52. Alyssa May 17, 2017 at 8:03 pm

    This is adorable. I am featuring this in a party roundup if you don’t mind.

    Reply
  53. Curso de Panetones Doces January 2, 2018 at 6:33 pm

    Hi Lilli, we used two or three cardboard cake boards taped together and covered with a blue plastic tablecloth ( we found ours at Party City). You could also use foam core or plywood cut to the size you need. The plastic tablecloth was cut and pulled tight to eliminate wrinkles and taped or stapled onto the

    Reply
  54. Jeanie December 3, 2020 at 4:47 am

    What size cake board did you use?

    Reply
  55. BeBe December 3, 2020 at 10:38 am

    Hi Jeanie, We used two or three 18×25 cake board taped together for stability when carrying the cake. I think you could also use a 14×19 inch cake board but you could only get 9 cupcakes on the board (serving the others from the kitchen) but it would be tight and Also, it is nice to have room for more blue to show around the fish. The blue is a blue plastic tablecloth we found at Party City, cut to size and taped or stapled to the board. The base could also be foam cord, plywood or particle board cut to size at the store or cardboard.

    Reply

Leave a Reply Cancel reply

Your email address will not be published. Required fields are marked *

You can click here to Subscribe without commenting

Add a picture

Melissa Diamond Meet MelissaWelcome! We'd love for you to check out our free cake tutorials & recipes, or join our site for online access to hundreds of videos and more!

Read More

The Perfect Gift

  • Lemon Buttermilk Cake {A Scratch Recipe}

    Lemon Buttermilk Cake {A Scratch Recipe}
  • Sweet Balloons Cake

    Sweet Balloons Cake
  • White Chocolate Coconut Cake

    White Chocolate Coconut Cake
  • Striped Buttercream Panels Cake

    Striped Buttercream Panels Cake
  • Lemon Coconut Cake with Lemon Curd Filling

    Lemon Coconut Cake with Lemon Curd Filling
  • Milk Chocolate Cake

    Milk Chocolate Cake
  • Buttercream Tulip Cake

    Buttercream Tulip Cake
  • Flamingo Ruffle Cake- A Cake Decorating Video Tutorial

    Flamingo Ruffle Cake- A Cake Decorating Video Tutorial
  • 50+ of the BEST Cake Recipes for Spring and Summer

    50+ of the BEST Cake Recipes for Spring and Summer
  • Lemon Cake {A Scratch Recipe}

    Lemon Cake {A Scratch Recipe}
Facebook Instagram Pinterest Twitter RSS
Login
Melissa Diamond Meet MelissaWelcome! We'd love for you to check out our free cake tutorials & recipes, or join our site for online access to hundreds of videos and more!

Read More

Your Favorites

  • Your favorites will be here.
  • home
  • free tutorials
  • videos
  • recipes
  • contact
  • join
  • login
  • home
  • free tutorials
  • videos
  • recipes
  • contact
  • join
  • login

Copyright © 2022 My Cake School. Melissa Diamond. All rights reserved | Terms and Conditions | Privacy Policy