S'mores Cake Recipe
If you like s'mores, you are going to LOVE our new homemade S'mores Cake recipe!
Inspired by the popular dessert, this unique and delicious cake combines chocolate graham crackers, and marshmallowy frosting!

Table of Contents
How to Make a S'Mores Cake
Now, a s'more is not a s'more without graham crackers, marshmallows, and chocolate. So, any self-respecting s'mores cake must represent this delicious flavor combination.
There are lots of S'mores Cake recipes floating around, and each one has it's own unique spin.
For our S'mores Cake, we doctored up our favorite homemade chocolate cake recipe by giving each layer a delicious graham cracker crust.

The thin graham cracker layer combines graham cracker crumbs, butter, and sugar. The mixture is pressed into the bottom of the pans before adding the chocolate batter.
Here are our freshly baked cake layers, with the graham cracker crumbs.

Seven Minute Frosting
Now that we have chocolate and graham crackers accounted for, we need the marshmallows! In this case, we decided to go with our light and airy Seven Minute Frosting Recipe!
This cloud-like favorite frosting has a marshmallowy flavor that works perfectly with this S'mores Cake recipe!

Assembling the S'Mores Cake
To assemble our cake layers, I placed the graham cracker side down for each layer, and filled with our seven minute frosting.
(If you'd like, you can spread the layer with a very thin glaze of cooled ganache before applying the frosting in between the cake layers.)
After stacking the layers, I frosted the sides of the cake with our fluffy seven minute frosting.
Graham Cracker Decoration
Next, we added graham crackers around the sides of the cake, carefully slicing each cracker longways with a serrated knife before pressing it into the frosted cake.

Saw lightly with long strokes to get a clean cut. Somehow I managed to only break a couple!
(Any broken graham crackers can be pieced back together when pressing them around the sides of the cake-- but I opted to spread my mistakes with frosting for a little snack ;0) -


Chocolate Ganache
I spread the top of the cake with a thin layer of ganache, and then drizzled more ganache around the top edge of the cake using a piping bag with the end snipped away. I always love a ganache drip!
The ganache should flow easily from your piping bag but should not be hot. Since this ganache recipe calls for equal parts chocolate and cream, it will stay fairly soft even at room temperature.
(However if it becomes too thick for a good "drip", you can warm it in the microwave in very small increments until the desired consistency is reached.)

Piping the Frosting
We covered the top of the cake with mounds of seven minute frosting, piped through a french tip. We mounded the frosting up nice and high as it will deflate slightly when torched.

Kitchen Torch
Next, we broke out our little kitchen torch to add a toasted effect to our frosting.
This technique works perfectly with meringue frostings, and really brings out the ridges and swirls!
The torching is my favorite part! We did notice that our frosting deflated ever so slightly from the heat of the torch...this is another reason to be generous with the amount of frosting you use. It gives us a little wiggle room!
 marshmallowy Seven Minute Frosting! From My Cake School's Cake Recipe Section!")
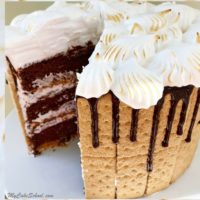
Ahhhh..... love it! S'mores in cake form!
Love the look of the inside too!

More Chocolate Cakes
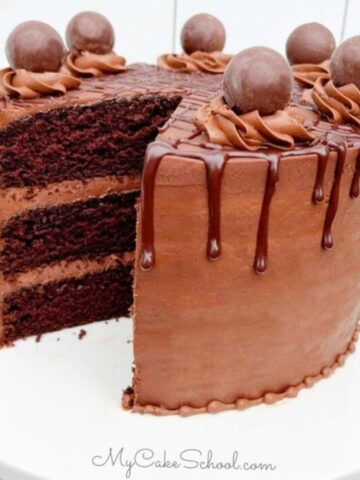
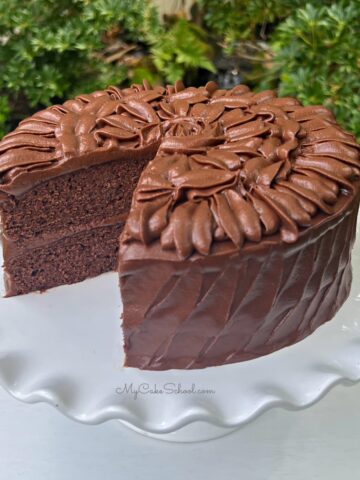
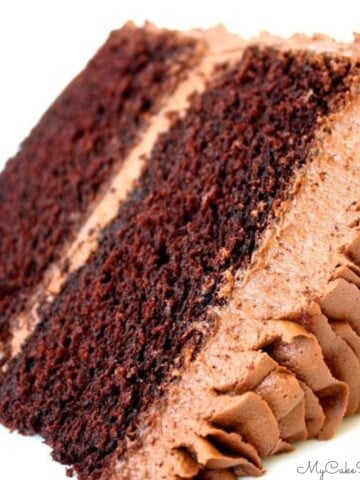
In addition to today's s'mores cake, we have so many more chocolate cake recipes that belong on your must-bake list!
Some of our favorites are Oreo Cake, German Chocolate Cake, Black Forest Cake from Scratch, and easy Chocolate Mousse Cake. Keep these in mind for birthday cake recipes, holiday desserts, and more!

Thanks so much for stopping by! We hope that you enjoy the recipe. We would love for you to check out our full collection of cake recipes, including cake recipes from scratch as well as cake mix recipes!
If you are interested in cake decorating, we have hundreds of free cake tutorials to share with you also!
Have you made this? We would LOVE for you to leave a ⭐️ rating as well as a comment and photo below! We really appreciate your feedback!
S'mores Cake Recipe
Ingredients
For the Graham Cracker Layer (to be combined & pressed into pans)
- 1 ¼ cups graham cracker crumbs (140g) (I used packaged graham cracker crumbs. If crushing graham crackers, place approximately 18 full size crackers in a plastic bag and crush with a rolling pin)
- ¼ cup white sugar (50g)
- ½ stick unsalted butter, melted ¼ cup ( 57g)
For the Chocolate Cake Layers (our Classic Chocolate Cake recipe)
- 2 cups white sugar (400g)
- 2 ¾ cup all-purpose flour (322g)
- 1 cup unsweetened cocoa (lightly spoon into cup then sift) (82g)
- 2 teaspoons baking soda (10g)
- ½ teaspoon baking powder (2g)
- ½ teaspoon salt (2g)
- 2 sticks unsalted butter, softened (226g)(do not soften in microwave) I cut the butter into 1 inch pieces onto waxed paper leaving on the countertop for 8 to 10 minutes it will still be quite cool when adding to the dry ingredients. If it becomes too soft, just refrigerate a few minutes
- ¼ cup vegetable oil (54g) We use canola oil.
- 4 large eggs at room temperature (If in a hurry, place the eggs in a bowl of warm water for 5 minutes.)
- 1 teaspoon vanilla extract (4g)
- 1 cup hot coffee, it can be instant or brewed (242g)
- 1 cup milk (242g)
For the Fluffy White Seven Minute Frosting
- ⅔ cup water (150g)
- 2 cup white sugar (400g)
- ½ teaspoon Cream of Tartar or 2 Tablespoon (30g) white corn syrup (2g)
- 4 egg whites
- 2 Teaspoons vanilla extract (8g)
For the Ganache
- 6 oz. Chocolate (semi-sweet or Dark) We used Ghirardelli (171g)
- 6 oz Heavy Cream (171g)
Graham Cracker Decoration around the Sides
- 11 Graham Crackers or more depending on size of the cake
Instructions
- Preheat the oven to 350 degrees. Grease and flour three 8 x 2 inch round pans. Place a waxed paper or parchment paper circle in the bottom of each pan. Spoon the combined graham cracker crumb/sugar/butter mixture into the 3 cake pans. Press down with the back of a spoon. Now you are ready to put the cake batter into the pans.
For the Chocolate Cake
- In a mixing bowl, add the dry ingredients: sugar, flour, cocoa, baking soda, baking powder, and salt. Whisk for 1 minute to blend.
- Add softened butter a few pieces at a time while the mixer is on low speed. Mix until the dry ingredients look like coarse sand and the dry ingredients are moistened. Scrape the bottom and sides of the bowl.
- In a separate bowl whisk the eggs, milk , oil and vanilla until blended.
- Method is important when using the Reverse Creaming Method. With the mixer on low speed, SLOWLY add approximately ½ of the egg mixture to the dry ingredients. Increase the speed to medium and mix for 1 ½ minutes at medium speed. Don't mix above medium speed. Scrape the bottom and sides of bowl. Add the remaining egg mixture in 2 pourings, beating for 20 seconds after each pour. Scrape the sides and bottom of bowl.
- Slowly add the cup of hot coffee and mix another 30 seconds until blended. The batter will be very runny. Don't worry!
- Pour into 3 prepared 8" pans and bake at 350 degrees for 25 to 30 minutes or until the center of the cake springs back to the touch and a toothpick comes out clean.
- Cool the cakes 10 minutes on a rack and then turn out of the pans.
- *Yields approx 9 cups of batter.
For the Seven Minute Frosting
- Make sure the mixing bowl and beaters are clean without a trace of grease. Any grease will keep the egg whites from increasing to full volume.
- Use a separate bowl to separate the eggs. You will be using only the whites and if a yolk happens to break and gets mixed in, the recipe will not work. Place the egg whites into the bowl of your mixer and add the vanilla. Set aside until time to beat the whites.
- In a saucepan, add the water, sugar, cream of tartar (or white corn syrup). Cook on medium/high heat. Do not stir, or stir just enough to distribute the sugar. You don't want sugar crystals sticking to the side of the pan. The mixture will begin to boil and become clear. After it boils for a minute or so, remove from the heat. You will be able to see that the sugar has dissolved.
- Beat the egg whites and vanilla to the soft peak stage. This happens rather quickly. At soft peak stage, the egg whites will not form peaks but will just fall over, cloud like. At this time, with the mixer beating on low speed slowly pour in a small stream of the hot sugar syrup into the egg whites. Avoid hitting the beaters as you pour.
- Increase the mixer to high speed and beat approximately 7 minutes (it could vary if using a hand mixer) until stiff peaks form (stiff peaks stand straight up). Makes 10 cups frosting. This recipe can be halved. Frosting sets up rather quickly and so it should be used very soon after making.
For the Ganache
- Place your chocolate into a microwave safe bowl.
- Pour heavy cream over the chocolate and place in the microwave for 1 minute. (Times may vary, see our note below).
- Remove and allow to sit for one minute.
- Gently stir and press chips to aid in melting. If there are still unmelted chips, microwave for 5-10 seconds. Stir and repeat as necessary. Be very careful not to overheat.
- *Microwave times may vary. If you are making a smaller amount of ganache, you should reduce the microwave time. If your chocolate hasn't melted after the recommended amount of time, simply microwave in small 5-10 second increments until it has nearly completely melted. Let sit one minute, then stir until smooth. The ganache will thicken a bit as it cools. Do not drizzle or glaze the cake when the ganache is hot.
Cake Assembly
- We assembled the cake layers graham cracker side down, (glazing with cooled ganache is optional), glazed the top of our cake with a layer of cooled ganache, and frosted the sides with white fluffy frosting.
- Next, we sawed the graham crackers lengthwise in half with a serrated knife, using long strokes back and forth to prevent breakage. We applied around the sides of the cake.
- We then loaded our ganache into a disposable piping bag with the tip snipped away and applied our drip over the top edge/graham cracker border. (Ganache should flow easily from the piping bag but should not be hot.)
- Using a french tip, we piped our frosting over the top of the cake, allowing it to mound up a bit.
- Finally, using a small culinary torch, we toasted some of the areas of our frosting (as an optional step).
Hi Sandra, Happy Birthday!! That is correct, a thin layer of cooled ganache on each layer before spreading the fluffy 7 minute frosting. It is also on top. Hope you love the cake.
This recipe looks like so much fun! I plan on making it for my daughter in a few weeks. One question I have: is there any suggestion for cutting the cake? It looks like it may fall apart when I cut into the graham cracker sides.
I will be making this cake on 5/30 for a social gathering. I’m nervous about the meringue part. I hope it turns out ok.
Hi Connie, I'm sorry your question was overlooked. You should not have a problem cutting the cake. The width of the graham cracker is a good size for cutting a slice so the graham crackers can serve as a guide........and if one falls off it should easily stick back on.
Hi Leon, All should go well for you. Just reread the instructions to have the process in your mind. There are a lot of steps to the cake so do some in advance, if you can. The cake can be made in advance and the layers frozen, if you have time. Even cutting the graham crackers in advance would be helpful. I know the guests will love your cake!!
This cake was delicious!
Hi Melissa! I'm a 13 year old beginner cake decorator. I made this for the second time for a friend's birthday! Turned out delicious and gorgeous both times! Here's a picture of it. (The drip was a little too runny, I know).