How to Make a Gum Paste Guy
In this video tutorial, I will show you how to make a gum paste man.
Creating gum paste figures is such a fun way to personalize a cake. You can easily take what you learn in this video and change up details like hair, clothing, etc. to fit the theme or the person being celebrated.
In this video tutorial, I'm going to demonstrate how to model a man from gum paste!
Table of Contents
Basics of Modeling Gum Paste Figures
There's more than one way to build a figure. You can build an entire body on a long lollipop stick or skewer, especially if you are in a hurry and need the extra support. Some decorators create armatures from wire or foil, etc. to cover with fondant or gum paste. However, I prefer to keep things as simple as possible.
You can also create your figures in sections, and allow them to dry before piecing them together like a puzzle. This is the method that I used in this video, and when time allows, it's my preferred method for standing figures because it is simple, and there are no worries of settling or sagging.
A Quick Rundown of Steps
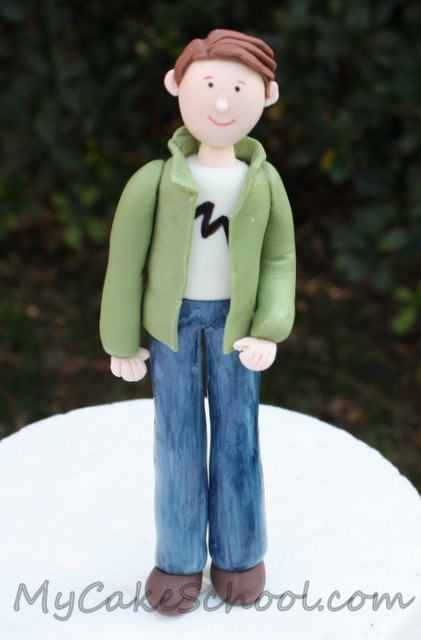
In this video, I build a man by creating his body in three main sections. I made the pants, put an anchor (lollipop stick) in the bottom of one leg, and another anchor (spaghetti) at the waist.
Then I made the torso & neck as the second section, making a hole in the bottom of the torso & an anchor (spaghetti) coming out of the top of the neck.
Then, I made a head that dried on a toothpick so that it would be round on all sides. I dried the pants & torso on fiberfill (pillow stuffing) and the next day I pieced everything together & added arms, shoes, hair, etc.
While it only took one day for me to assemble the gum paste man, I would recommend allowing at least a few days to be on the safe side--especially if you are working with fondant instead of gum paste.
If you are working with fondant, adding CMC or Tylose powder will help to strengthen your fondant and speed up the drying time.
Enjoy the video!
*You will be able to tell from the video that this one's an oldie! However, the information that I go over is still exactly how I would make a gum paste figure today. We hope that you find it helpful!
the gum paste guy looks awsome ........have u got a bride and groom video
Thanks for the videos on the standing guy and girl. Helps me to get over my fear of having to do one in a couple wks!
Glad to hear it, Molly!! ;0) You'll have to send me a picture.
I'm soooo glad I found you on the internet!! I've been making cakes for several years now, but I've learned so much in just the short time that I've been a member of your Cake School!! Thanks so much for all of your hard work on all this information!! :)
Lisa, thank you!! That is so nice to hear. I'm glad that you are a part of our site!
Thank you! I'm making a cake with police officers figurines. This is a great help!
Thanks Marty! Good luck!
I've only made two person figures before and they were pathetic! Funny how being shown a few tips and tricks makes all the difference! I always wondered how you put clothes on a figure! Thanks so much!
Hello, thanks for this video. I am making this man in the likeness of my husband for his birthday but he has stubbly facial hair (not a beard though). Any thoughts on the best way to add some facial hair whiskers? I don't want them to be too dark and detract from the overall look. A light accent would be ideal. Thank you in advance! :-)
Dawn--so happy that this video was helpful to you!! :0) --
Michelle-- For light facial hair/stubble, I skip piping and fondant altogether. I think that you'll be happiest by taking a small paintbrush and use your thumb to put pressure on the bristles so that they separate---dip the bristles into a "paint" that you have made with a little bit of coloring gel (whatever color you need) mixed with a little bit of vodka or lemon extract and apply to face. The alcohol evaporates, leaving the color. Do a practice run on a paper plate or spare piece of fondant. This should give you the light scruffy look that you need. You can always wipe away any mistakes with a very lightly dampened piece of paper towel or Q-tip, allow to dry and retry.
The alternative would be if you have a fine tipped food coloring pen that you could make tiny dots with--- OR, if you know that nobody will be eating the figure, you could even use a fine tipped "real" pen.
Hope this helps!
Thanks so much Melissa. I just tried the paint and brush option you suggested and it worked really well. Cheers!
Melissa! I love your site! Your videos are so easy to watch and then do. I tried the bride she was a chubby little bride lol next time I will thin her out. Now if someone could just thin me out! ;-) Thanks again!