Happy Halloweenie-Cake Tutorial
Today we are keeping things light and fun with our "Happy Halloweenie!" cake design!
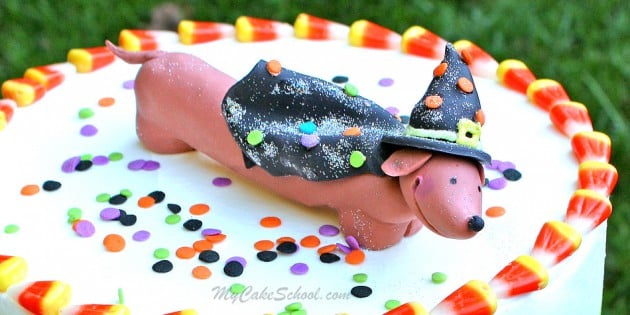
This free cake video features an adorable dachshund cake topper & a demonstration of tri-colored buttercream with a smooth finish.

We've posted several Halloween tutorials in our Blog section over the years, but we are happy to finally have our first Halloween cake video to share!
Of course the star of today's "Happy Halloweenie" video is a dachshund...or a "wiener dog"! - Our dog cake topper is very easy to assemble, and is sure to bring smiles!
Another technique that you will learn in this video is how to smoothly frost a buttercream cake with a tri-colored effect. I hope that you enjoy the tutorial as much as we enjoyed making it! Don't forget to scroll beneath the video for additional details!
Table of Contents
Materials for Happy Halloweenie Cake
(In our video, we frosted an 8" cake dummy that stood 4 inches tall, frosted with our "Fluffy Vanilla Buttercream.")
Crusting Buttercream: Crusting is important only if you plan to do the Viva method of smoothing. We used Fluffy Vanilla Buttercream from our recipes section but any crusting recipe will do.
Coloring Gel: Americolor Orange, Electric Green, Yellow (for broom & hat buckle), Chocolate Brown
Rice Cereal Treats (I used 1 ½ squares of pre-packaged 22g. cereal treat bars)
Pre-colored Black Fondant (optional) for cape and hat
Americolor Coloring Pen in black for eyes (you could also just paint on the eyes with coloring gel or use black sprinkles.)
Lollipop stick for broom and another for body
Halloween Confetti Sprinkles in desired colors.
Piping gel or glue of choice
Tylose (optional, but I kneaded a bit of tylose into my fondant for easier modeling.)
Toothpick or scriber needle for misc modeling techniques
Knife or xacto
small paintbrush for applying piping gel
pink petal dust (optional) for rosy cheeks
Silver hologram dust (optional) to add sparkle to the cape
Disposable piping bags
Wilton tip 2 for small details
Wilton Letter cutter set (optional)
Bench scraper for applying/smoothing frosting
Viva paper towels for smoothing (optional)
Candy Corn for a top border, black ribbon for bottom border ;0)
Additional Notes:
Frosting Amounts: We used approximately 1 cup of icing per color to our ("Crumb coated" 8" cake).
Gum Paste Dry Times: Whenever you are creating a topper from gum paste or fondant, it's best to work at least a couple of days in advance.
I was able to assemble my dog in a day, (allowing the head time to dry before adding it to the body)--but some of our members are in more humid areas which slows the dry times.
To be on the safe side, and especially if you are new to figure modeling, work in advance and allow the parts to dry before assembling.
Please let us know if you have any questions!
More Halloween Cakes to Try
We've created so many fun Halloween cakes over the years! You can find a roundup of our favorites here: Collection of Favorite Halloween Cake Designs. I'm sharing a few below!
Halloween Spider Cake- Free Video
Ghost With Balloons Cake- Free Video
Haunted House Cake- Free Video
Giant Spider Cake Topper- Free Video
Enjoy the Video!
We hope that you have fun with this Happy Halloweenie Cake! If you give it a try, we would love for you to leave a comment or photo below!
@Gloria- Thanks!! It was probably a bit of shortening giving that sheen that you see. I often rub my hands and the countertop with a small coating of shortening when working with fondant or gum paste. This will help the disco dust to adhere (as would wiping over the piece with a very lightly dampened paper towel).
@Fanny- Hmmm....I've never tried this. After crumb coating, I would mark the halfway mark on both sides with a toothpick. Then, using a medium round tip (maybe tip 10 or 12) I would outline each half with the color of buttercream that you will be using. Then fill within those lines using a piping tip or your spatula...whatever comes more easily. I would then use a bench scraper to clean things up (careful to keep each side separate). Then allow the buttercream to crust and smooth with a viva paper towel. (If you don't like the Viva paper towel method of smoothing, you can chill the frosted cake until firm and go in with a hot spatula to clean things up.) If it's too difficult to get a clean look where one color meets the other, just pipe a vertical row of dots or rosettes, etc. to make a more uniform look.
Loved this technique and I thought not bad for my first try. Used your chocolate cake recipe but substituted black cocoa for the cocoa and got a beautiful black cake inside that complemented the halloween theme.
Great job, Miranda, the black cocoa sounds fabulous! ;0)
The inside of a cake should be a pretty as the outside. I took a pic of the inside.