Candy Bar Drip Cake- Free Video Tutorial
I just love the dramatic look of a drip cake, and in today's cake decorating video tutorial, I'm going to demonstrate a new favorite- the candy bar drip cake!

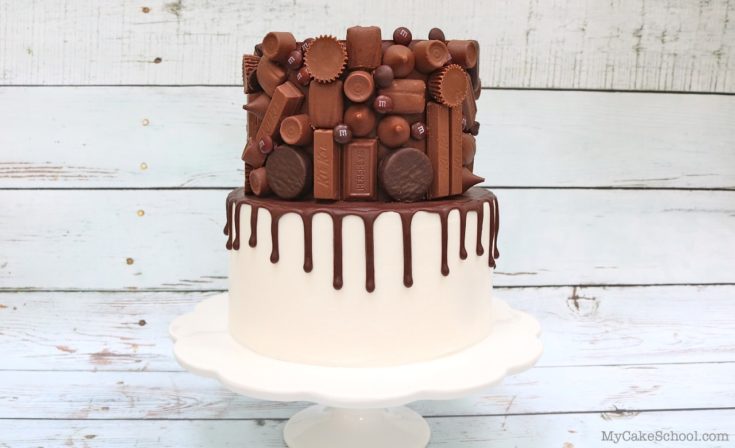
For this simple chocolate candy cake design and video tutorial, I'll show you how to decorate an entire tier in chocolate candy bars, as well as how to do a quick and easy chocolate drip.
This impressive design is surprisingly simple, and would be perfect for so many occasions from birthdays to groom's cakes, and even candy-filled holidays like Halloween and Valentine's Day!
As far as I'm concerned, it's always a great day for a chocolate cake covered in chocolate candy bars!
This idea is similar to our cake covered in Kit Kats & Reese's Cups, but I love the unique look of chocolate candy in so many different shapes and sizes!
Variety packs of mini candy bars can be found anytime, but with Halloween just around the corner, it's an especially good time to stock up! I had way too many candy bars during the making of this cake!
Table of Contents
How to Make a Candy Bar Drip Cake:
- Use your favorite chocolate cake recipe. For us, we used our Classic Chocolate Cake from scratch to make 8 inch and 6 inch tiers.v
- We frosted our 6 inch tier with a layer of ganache frosting (2:1 ratio of semi-sweet chocolate to heavy cream). Then, we chilled the tier to firm it up in the freezer for 10-15 minutes. We then added our chocolate pieces to the cake using ganache as our glue. Next, chill the tier while preparing the bottom tier of cake.
- We frosted our 8 inch tier with Fluffy Buttercream Frosting and chilled for 10-15 minutes in the freezer. Next we applied our ganache drip with a disposable piping bag with the tip snipped away.
- As I mentioned in the video, we usually use a 1:1 ratio of chocolate to cream for semi-sweet chocolate drips. However, since we already had mixed up a 2:1 ratio of ganache for our frosting, we decided to just warm it slightly in the microwave to achieve a good consistency for dripping. It worked well!
- After applying the ganache drip to our 8 inch cake, we chilled the tier for about 10 minutes to firm things up. Then, we moved it to our cake pedestal, and added four bubble tea straws cut to the height of the bottom tier for support. We placed our chilled candy bar tier on top of this, "glued" with a little fresh ganache.
How to Serve a Candy Bar Cake
- Some candy is going to be easier to slice through than others. When I sliced this cake, I first ran my knife under hot water, and then made my slices, removing a piece of candy here and there when necessary.
- If you'd like, you can line your candy up vertically for easy slicing, much like a Kit Kat Checkerboard Cake, but for me, it was no problem!
More Favorite Chocolate Cakes for the Chocolate-Lovers in your Life!
We hope that you enjoyed the video! Here are a few more favorite Chocolate Cakes from our Recipes Section!

Candy Bar Drip Cake- Free Video Tutorial
Learn how to make this fantastic, FUN, Candy Bar Drip Cake! Perfect for chocolate lovers!
Materials
- For this cake, we used our Classic Chocolate Cake Recipe, and frosted with a Simple Spreadable Ganache. (2:1 ratio of semi-sweet chocolate to cream). Our 8 inch and 6 inch tiers are each on their own cake cardboards cut down to size. We used 5 bubble tea straws beneath the top tier, cut to the height of the bottom tier.
- Ganache – We used a 2:1 ratio of chocolate to cream. In this case, we used 20 oz Ghirardelli Semi-Sweet Mini Chips, to 10 oz heavy cream and it was enough to fill both tiers, frost the top tier, and create a drip.
- Mini candy bars- Use whatever you like. We had a variety pack of candy bars– we used Hersey’s Kisses, mini Hershey bars, Rolos, mini & standard size Kit Kats, a few M&Ms, Almond Joy, Twix, mini Heath bars, Peppermint Patties, Chocolate Chips.
- Buttercream Frosting- We used our Fluffy Vanilla Buttercream Recipe
- Supports/Bubble Tea Straws- We used 5 bubble tea straws trimmed down to the height of the bottom tier to support the upper tier.
- Miscellaneous: Disposable piping bags (for applying ganache to back of candy), bench scraper is helpful in smoothing your frosting,
Instructions
- To make the ganache, we placed the chocolate and cream in a microwave-safe bowl, heated for one minute, stirred, heated for 30 more seconds, stirred until it came together with no unmelted pieces. (Repeat heating in small increments and stirring if needed until it’s ready). The ganache thickens as it cools.
- We frosted our 6 inch tier with a layer of ganache frosting (2:1 ratio of semi-sweet chocolate to heavy cream). Then, we chilled the tier to firm it up in the freezer for 10-15 minutes. We then added our chocolate pieces to the cake using ganache as our glue. Next, chill the tier while preparing the bottom tier of cake.
- We frosted our 8 inch tier with the vanilla buttercream and chilled for 10-15 minutes in the freezer. Next we applied our ganache drip with a disposable piping bag with the tip snipped away.
- After applying the ganache drip to our 8 inch cake, we chilled the tier for about 10 minutes to firm things up. Then, we transferred it to our cake pedestal, and inserted four bubble tea straws cut to the height of the bottom tier for support.
- We placed our chilled candy bar tier (which is resting on it's own cake cardboard cut to the size of the cake) on top and “glued” in place with a little fresh ganache.

Looks sinfully delicious! :-)
Oh My My!!!! :-)
Who are the lucky people that get to eat that fabulous cake?? Wow!! Must make!!
This looks sooo beautiful! I just have a couple of questions if I may... the one is, have you split and filled the cakes at all? And the second is, can I use butter in the fluffy frosting instead of shortening? I live in England and can't find any... many, many thanks :)
The cake is amazing. Thanks you!
Hi Karin, The bottom tier of the cake has 3 layers that are filled and the top tier is 2 six inch filled cake layers. Our Classic Vanilla and Classic Chocolate buttercream recipes use only butter, the recipes are in our recipe section. You could also use your favorite vanilla and chocolate recipes.
This is an amazing idea!! Cant wait to try it