Buttercream Cherry Blossoms Cake Tutorial
We are excited to share this beautiful Buttercream Cherry Blossom Cake with you!
I absolutely love this time of year, with so many beautiful flowers and trees in bloom.It's no coincidence that the cakes that I make in spring and summer tend to have more flowers also!

Today's cake features beautiful buttercream cherry blossoms and would work well for all sorts of special occasions, including birthdays, bridal showers, and weddings.
The design looks impressive, but the technique for the buttercream cherry blossoms is actually quite simple! I hope that you enjoy the tutorial!
Table of Contents
Materials for Buttercream Cherry Blossoms Cake
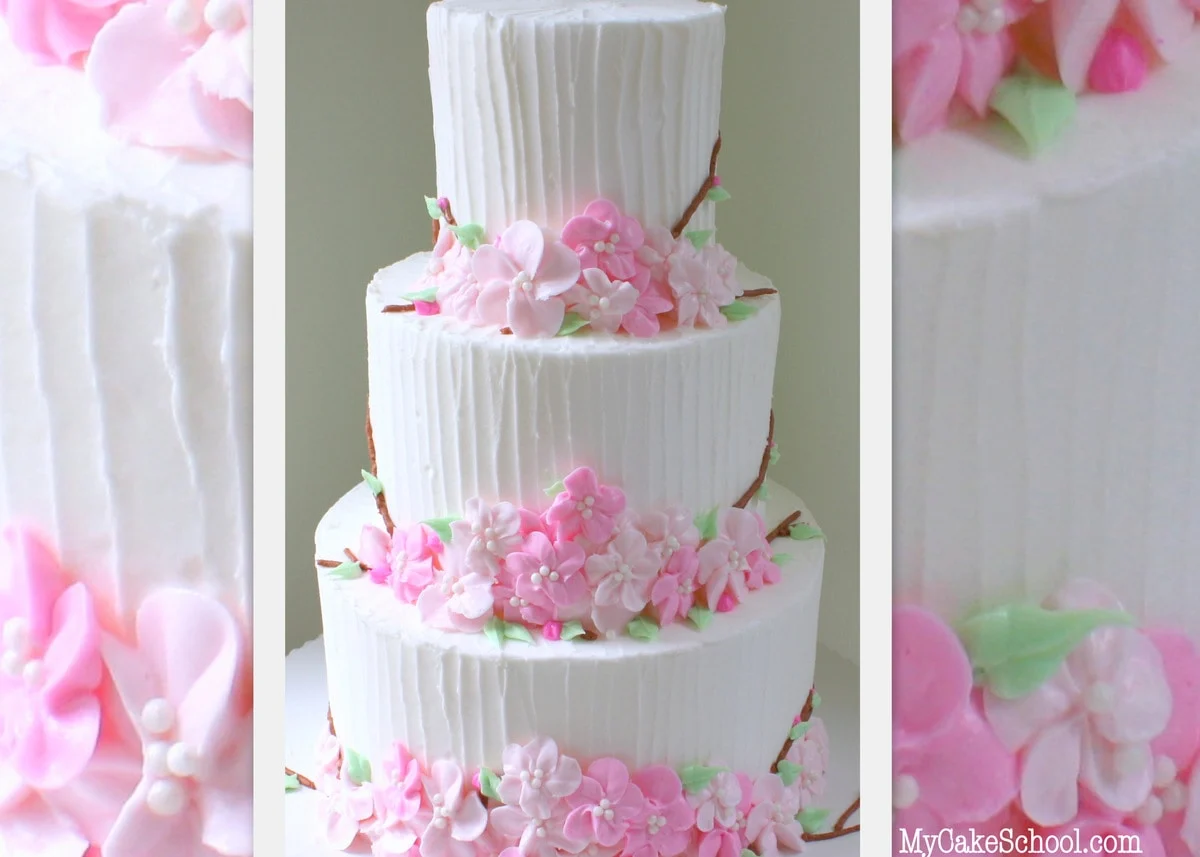
The cake in my tutorial is smaller than it appears. The tier sizes are 8 inch, 6 inch, and 4 inch. They are stacked using cake boards and bubble tea straws as supports. (See our tier stacking video if you have any questions about stacking.) - I used our Fluffy Vanilla Buttercream Frosting recipe.
Coloring Gels: Americolor Deep Pink, Wilton Rose, Chocolate Brown, Wilton Leaf Green
Piping Tips: Wilton (petal tips) 104 & 101, round tip 4,
Sugar Pearls (This is optional. You could also pipe white dots of buttercream into the blossoms with a small round tip.)
Waxed Paper
Rose Nail
Cookie sheet or tray for your blossoms
Small angled spatula (for textured design around sides of cake)
Misc: As usual, my tiers are resting on cardboard cake circles cut down to size, I used 7 bubble tea straw supports. Pedestal or cake base
Notes:
If using a crusting buttercream, an alternative to freezing is to allow your buttercream blossoms to dry on their waxed paper squares for at least 24 hours. Then, you can carefully peel from the paper and apply to the cake.
We chilled our flowers in the freezer for approx. 20 minutes. To keep condensation in check, I wouldn't recommend freezing for longer than 30 minutes. If you'd like to keep the tray of flowers chilled while you work, but the decorating process is taking a while, simply move them to the refrigerator. They will remain firm until you need them.
My flowers were the slightest bit shiny as they returned to room temp, but the moisture quickly evaporated.
Please let us know if you have any questions!
More Cherry Blossom Cakes
We have a couple more cherry blossom cakes to share! In addition to today's buttercream version, we also have a Gum Paste Cherry Blossom Cake as well as a Chocolate Cherry Blossom Cake!
These cake designs would make perfect birthday cake ideas, bridal shower cakes, baby shower cakes, and more!
Cake Recipes
We have lots of cake recipes that would be perfect for this buttercream cherry blossoms cake!
Just a few of our favorites are White Velvet Cake, Vanilla Velvet Cake, Almond Cake, Lemon Cake from Scratch, and Orange Cake.
Enjoy the Video!
Thanks so much for stopping by! We hope that you enjoy the video. If you give this cherry blossom cake a try, we would love for you to leave a comment and photo below.
Hi Melissa: I love-LOVE the rustic / modern look of this beautiful cake . I have a few questions:
1- How tall/thick are the cake pans you used?
2- How many cake layers you used for each tier ?
3- When stacking the tiers, did you insert a rod in the middle thru all the tiers?
4- Approximately how many people do you think this cake would serve?
Sorry for all the questions and thanks in advance for all you do!
Tammy
Hi Tammy, I'm glad you you like the cake!! Our cake pans for this cake are 4, 6 and 8 inches by 2 inches deep. Each tier has two cake layers and each tier is approximately 4 inches tall. When stacking we did not insert a rod in the middle. Each cake was on its own cake cardboard, cut down to size, and placed on bubble tea straws for support. We don't always show the stacking method since we have a video on that topic. This cake will serve approximately 36 - 37 people. The 4 inch tier - 4 - 5 servings........6 inch tier, 12 servings and the 8 inch tier 20 servings. On the homepage of the site under the MEMBER RESOURCES heading , click on HELPFUL LINKS to find the Wilton Serving Chart Guide. I want you to know that information is available to you, it could save you time in the future when that question comes up. Thanks for being a part of the site!
Good morning Melissa and Bebe, I attempted to pipe these blossoms into my rose nail last night, any ideas why my outer edges of my petals always come out jagged?
Hi Victoria, Yes, it is so annoying when the petals are jagged. This is a link to a February Forum post on jagged edges, Melissa and MsGF are giving their thoughts on this topic, . Let us know if this solved the problem for you. I hope it will be helpful.
I used this technique on this simple baby shower cake.
Hi Claire, Lovely, there is beauty in simplicity. Thanks so much for posting this great looking cake!!