Neapolitan Cake
There's no need to choose between homemade strawberry, vanilla, or chocolate cake when you can have them all in one amazing Neapolitan Ice Cream-Inspired layer cake!
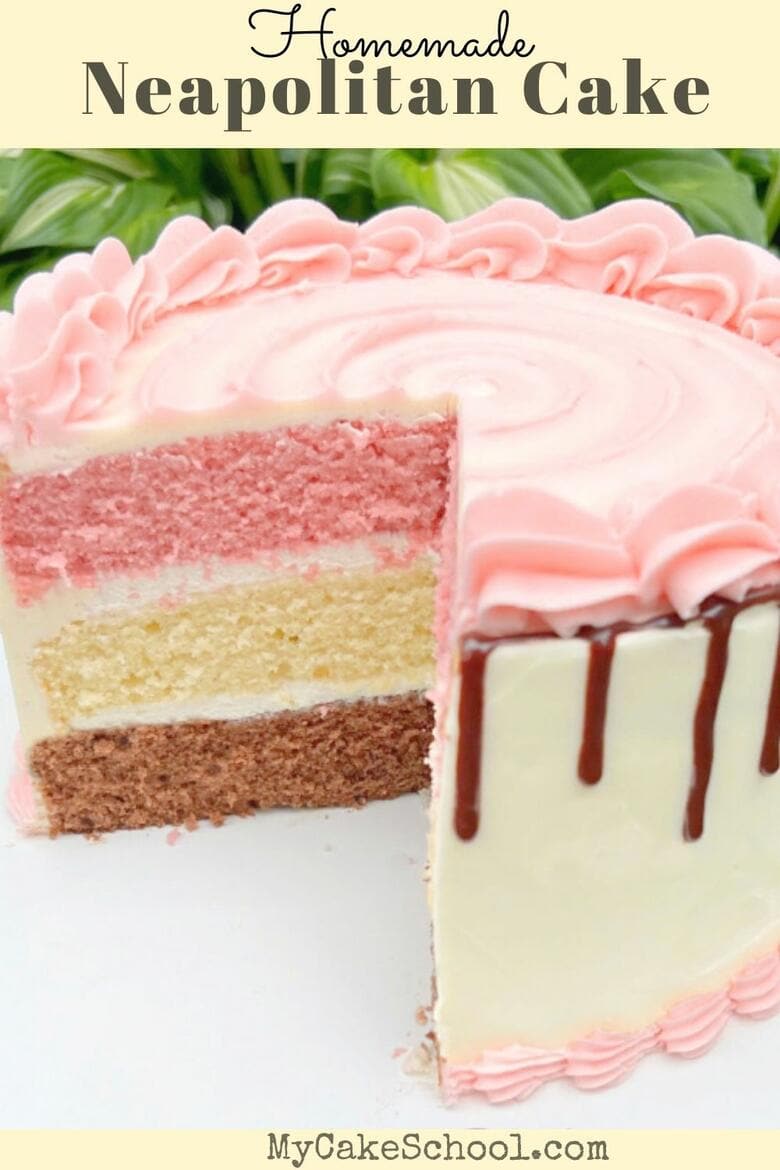
This fantastically flavorful, moist Neapolitan Cake is the perfect dessert for spring and summer. Ours is filled with a light sweetened whipped cream filling and frosted in vanilla buttercream.
Table of Contents
How to Make a Neapolitan Cake
This Neapolitan Cake is based on our popular scratch Vanilla Buttermilk Cake Recipe. We love the softness that the buttermilk adds to the cake texture. It is so moist, flavorful, and gives us plenty of batter for three 8 inch cake layers.
Saving Time with Add-Ins
I love that there's no need to prepare three different small batch cake recipes to achieve the three flavors of cake. (Nobody has time for that!) ;0)
Instead, our vanilla cake batter acts as our base recipe, which we then divided between three bowls. From there, we used add-ins to create the chocolate and strawberry batter.
*You can find the full, printable cake recipe below but here is a look at our steps!
For the Strawberry Reduction
For our strawberry cake layer, we are flavoring our vanilla cake batter with ¼ cup of strawberry reduction.
Reduction Alternative
(I wanted to incorporate real strawberries into our cake batter and so the reduction was the best option.
However, if this isn't as important to you, you can simply add a bit of additional strawberry extract or a few teaspoons of strawberry jell-o powder to the vanilla cake batter instead)
Preparing the Reduction
It's best to go ahead and make your strawberry reduction first as you want to allow it some time to cool off before adding it to the cake batter.
You can make the strawberry reduction in advance and refrigerate if you'd like!
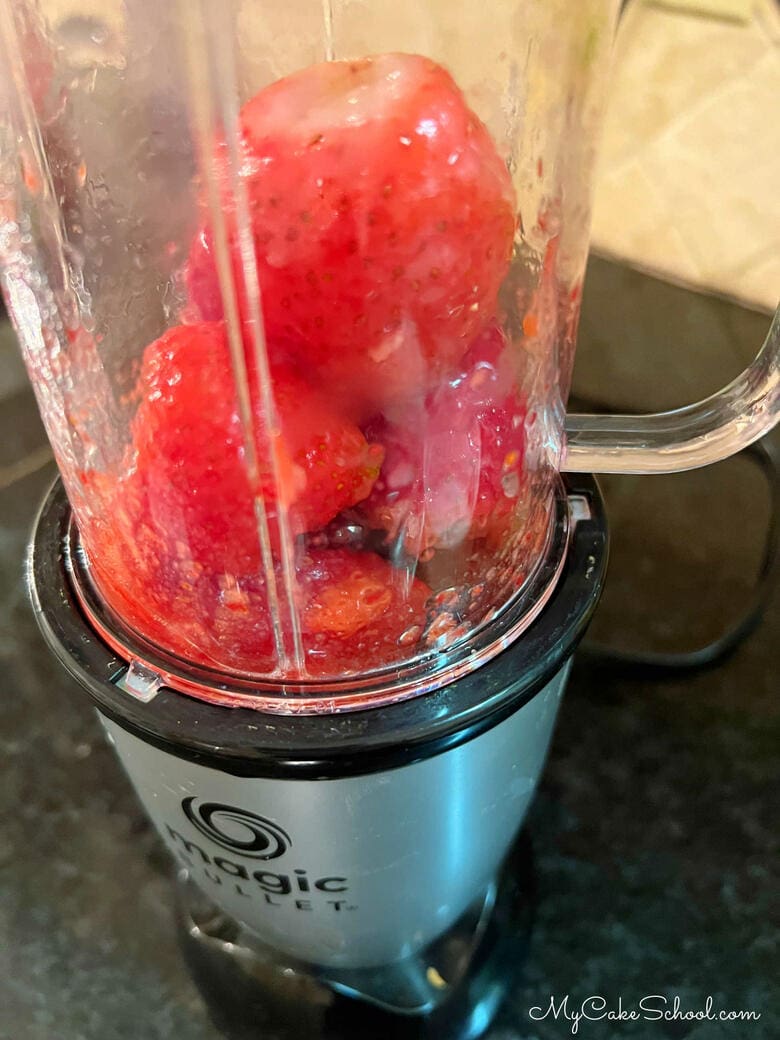
- We started out with ½ cup of pureed strawberries (I ran about 5-6 strawberries in a small blender to get ½ cup.) You can use frozen or fresh strawberries.
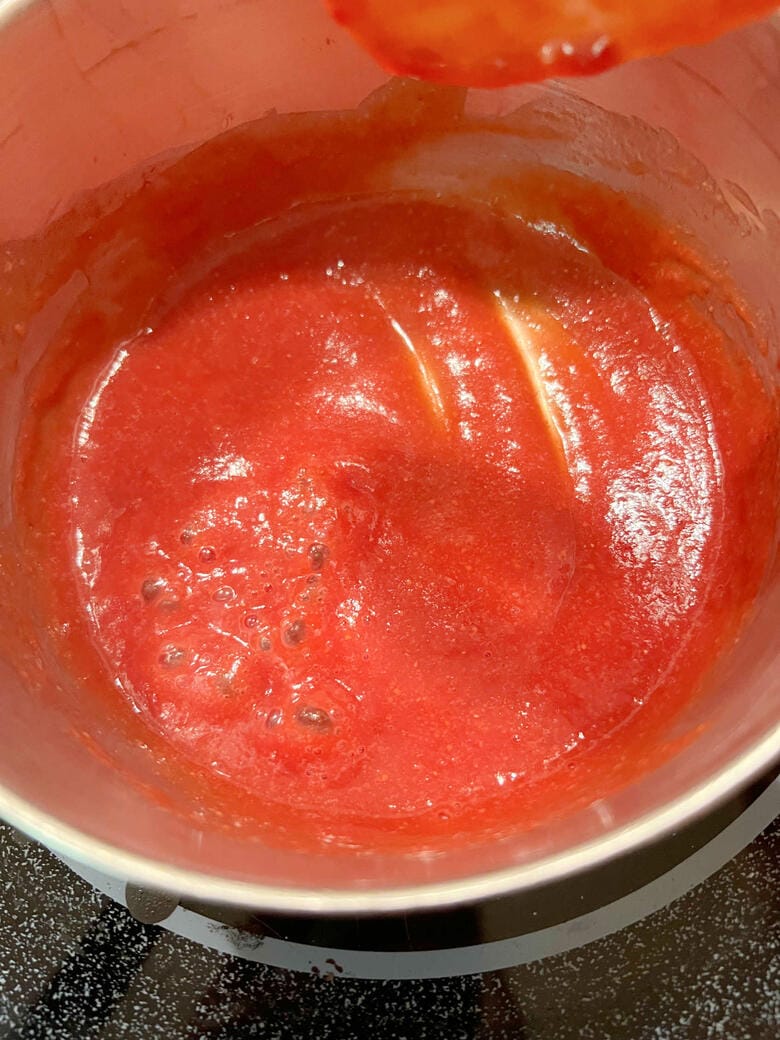
- You don't want to add ½ cup of strawberry puree to one cake layer's worth of batter- that is too much liquid. That's where the reduction comes in.
- In a small saucepan, I heated the strawberry puree for about 15 minutes or so over low-medium heat until the liquid had reduced to ¼ cup. Stir frequently.
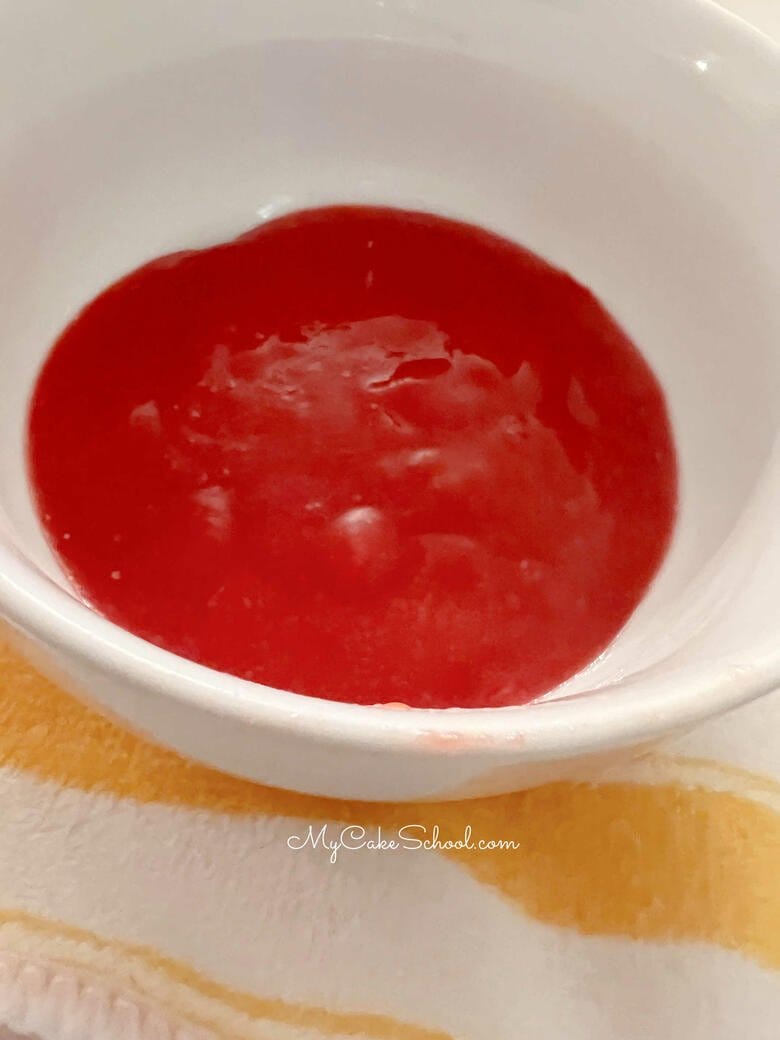
- Allow to cool. Here is our finished strawberry reduction ready to go!
For the Cake Batter
- Preheat the oven to 350 degrees, grease and flour three 8×2 inch round pans. We like to add a circle of parchment at the bottom of each pan as well.
- Combine the Flour Mixture: In a medium bowl, whisk the cake flour, baking powder, baking soda and salt for 30 seconds. Set aside
- Buttermilk Mixture: In another bowl, add the buttermilk, vegetable oil and vanilla extract. Set aside.
- Butter and Sugar: In the bowl of your mixer, add the butter and mix at medium speed until smooth. Gradually add the sugar and continue to mix on medium speed for 3 to 5 minutes until lightened in color and fluffy.
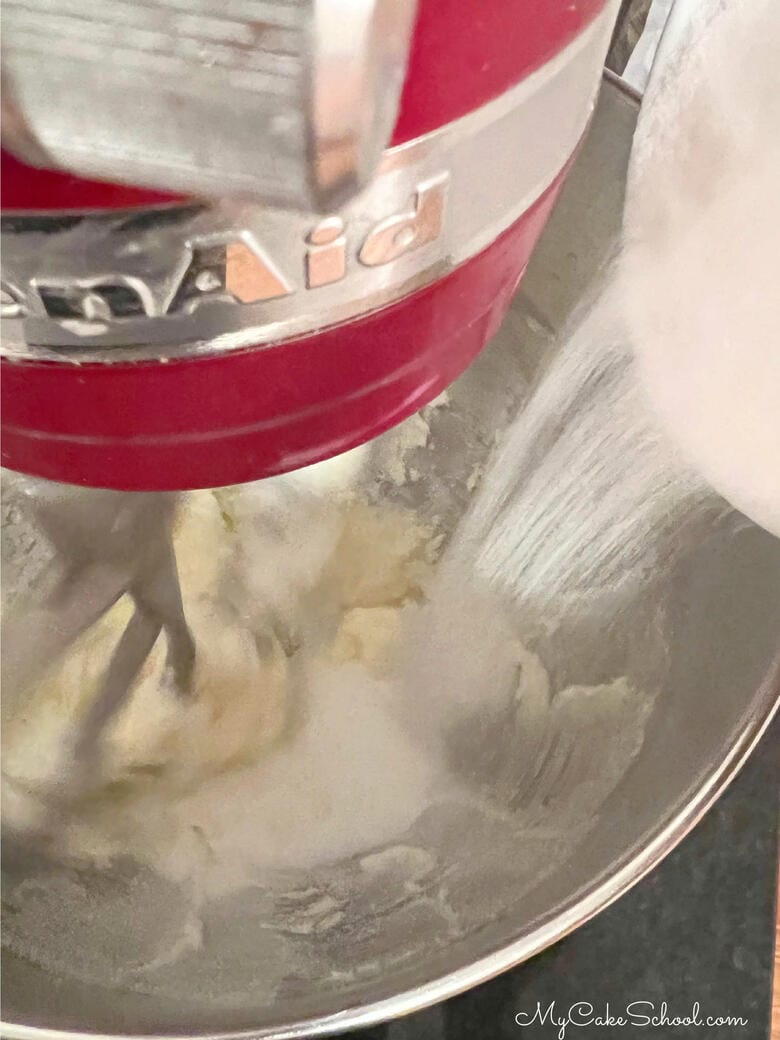
- Eggs: Next, add the room temperature eggs one at a time mixing until the yellow of the yolk disappears.
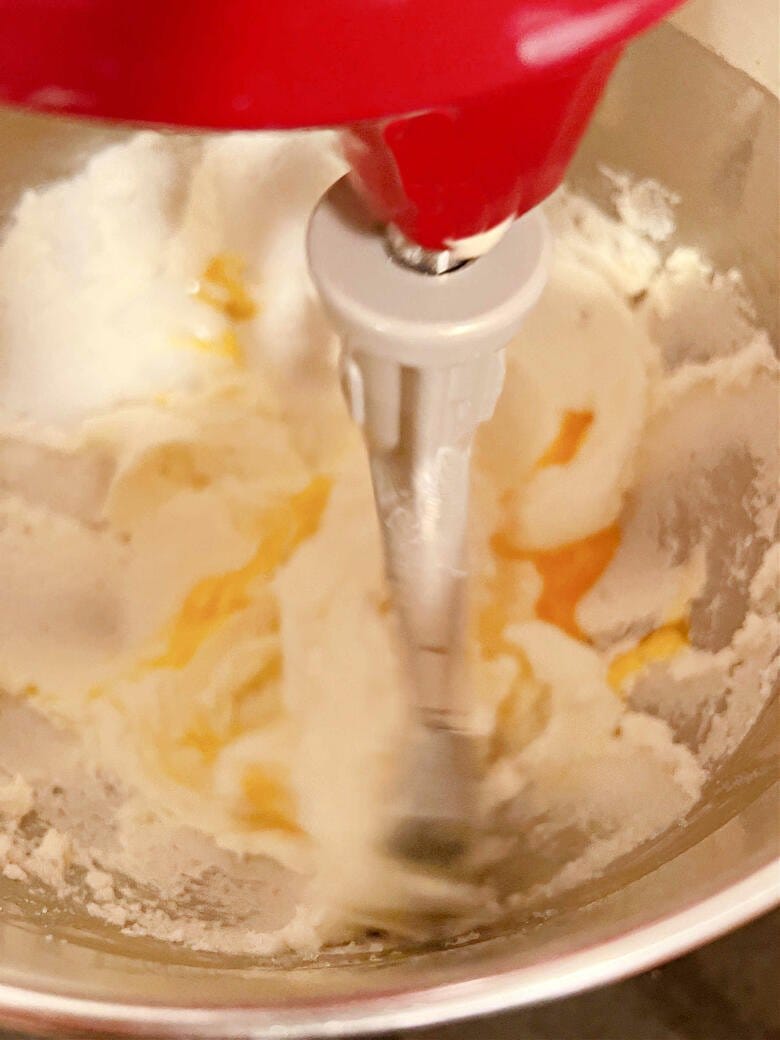
- Alternately Add Dry and Wet Ingredients: With the mixer on low speed, alternately add the flour mixture and buttermilk mixture, beginning and ending with the dry ingredients (3 additions of dry ingredients and 2 of liquid). Mix to blend- be careful not to over-mix.
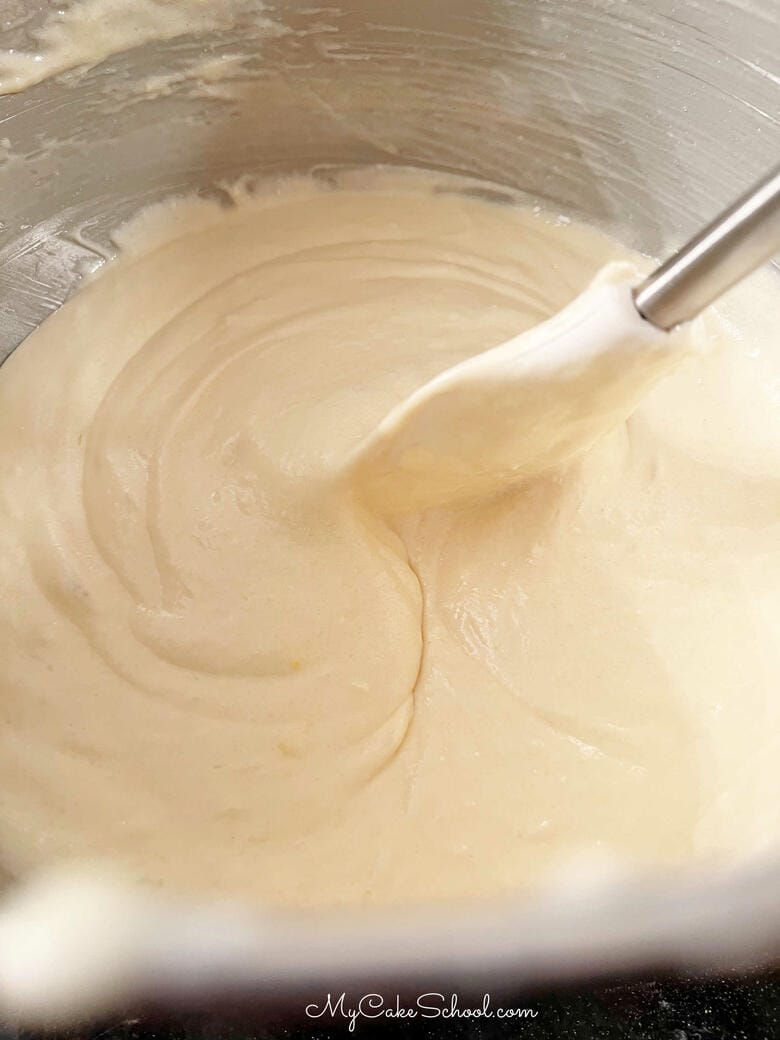
- Three Bowls of Batter: Then, divide batter equally into three bowls. (This recipe makes a total of about 7 ½ cups of cake batter)
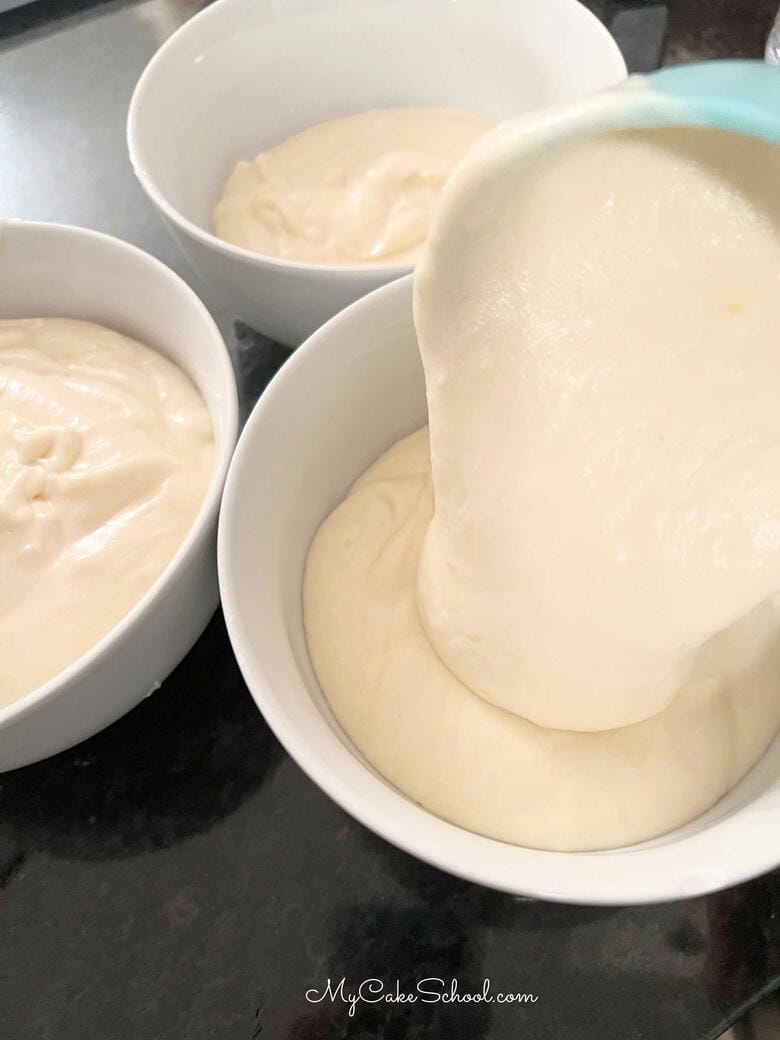
- One bowl will be for the vanilla cake layer, one bowl we will turn to chocolate batter, and one bowl we will turn into strawberry batter.
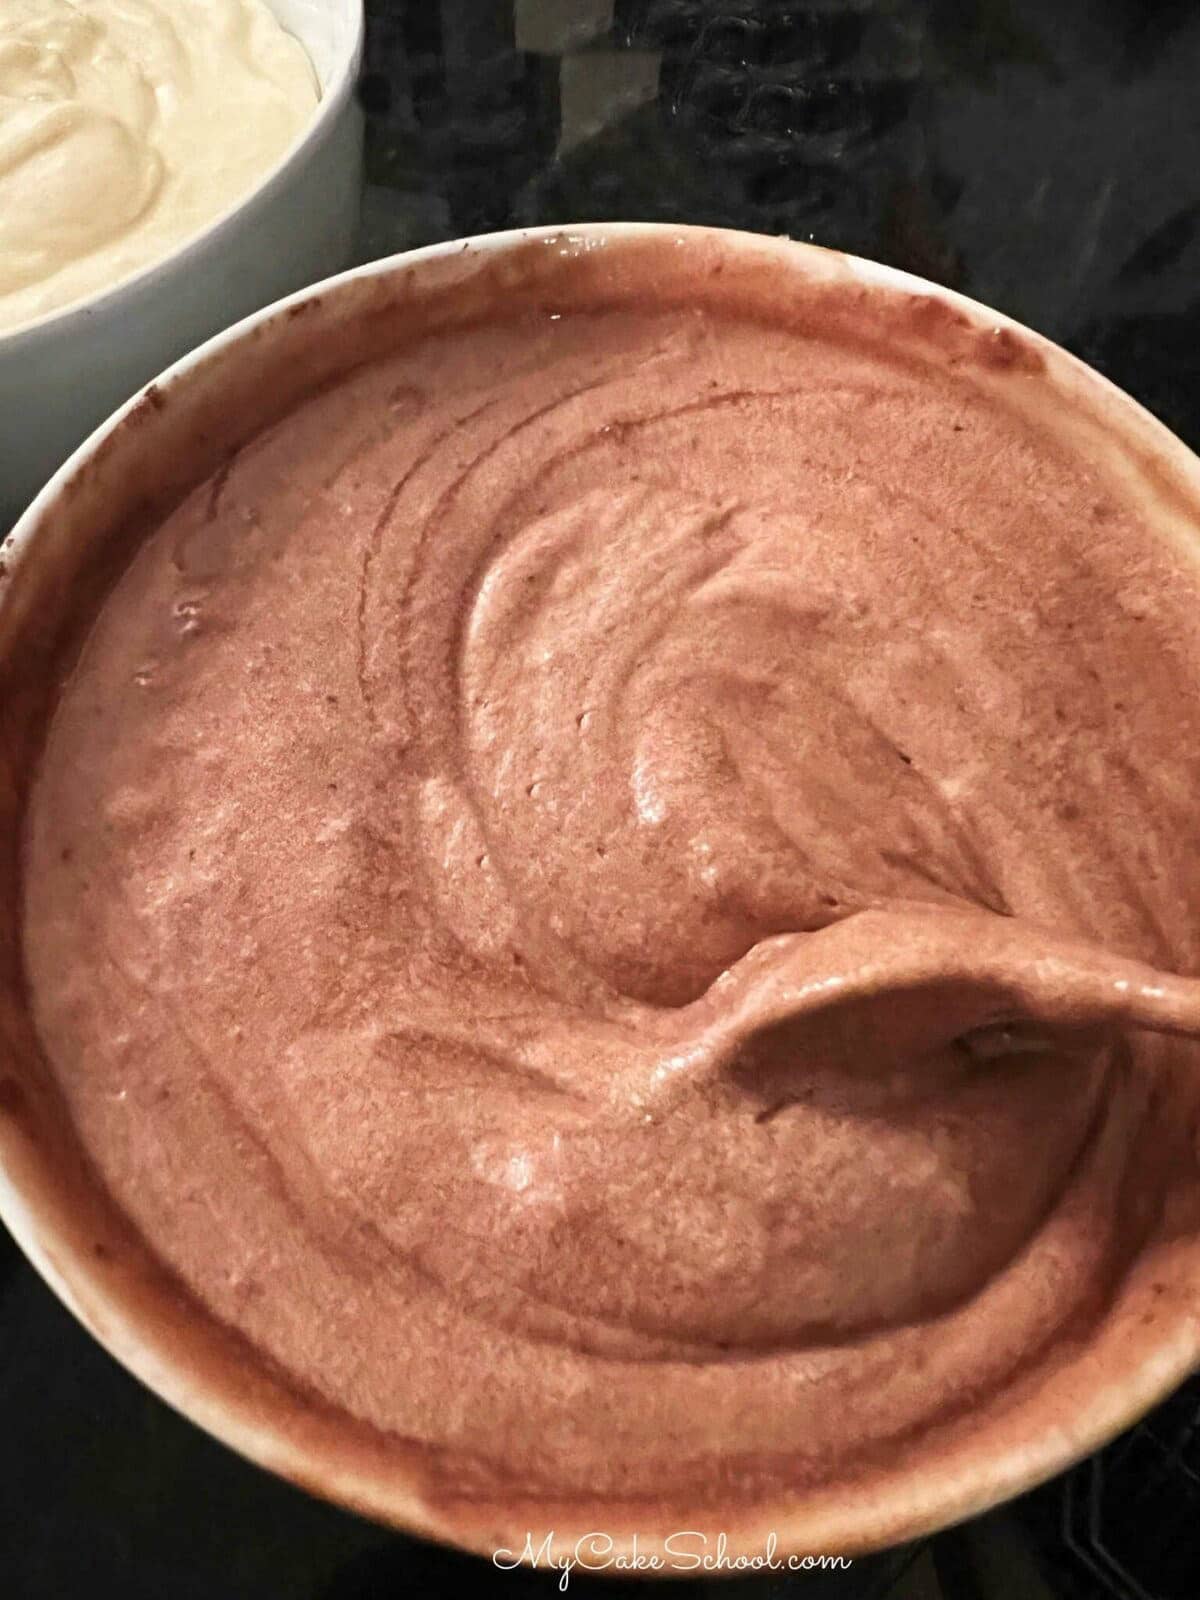
For the Chocolate Cake Batter
Dissolve the three tablespoons of unsweetened cocoa powder into three tablespoons of very hot water. Mix to dissolve and allow to sit for a few minutes.
Importance of Hot Water Step
The hot water step is important as it allows the cocoa to bloom, releasing more intense chocolate flavor. It also replaces the moisture that can be lost when adding cocoa to cake batter.
Stir this mixture into one of the bowls of vanilla batter until well blended to create chocolate batter.
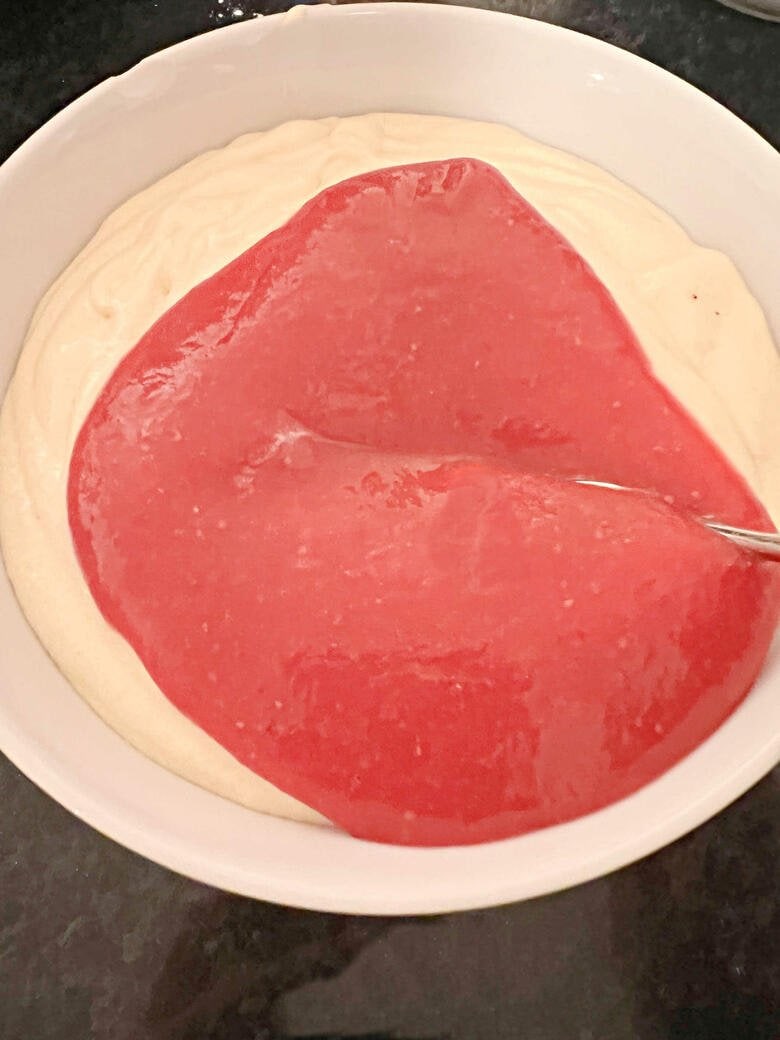
For the Strawberry Cake Batter
Stir the ¼ cup of strawberry reduction into another bowl of vanilla batter until well blended. As an optional step, in addition to the strawberry reduction, you can also add either 2 teaspoons of Strawberry Jell-O powder or ¾ teaspoon of Strawberry Extract. We added a small amount of pink coloring gel as well.
Below is a photo of the strawberry batter before blending.
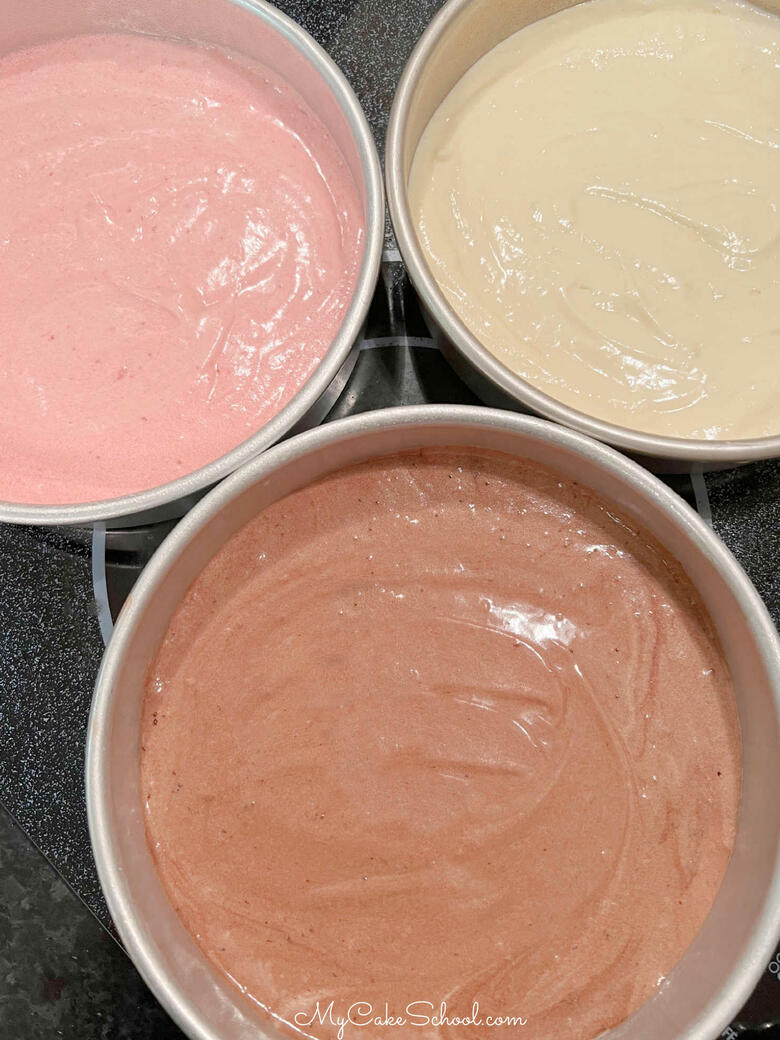
- One Flavor Per Pan: You should now have one bowl of vanilla batter, one bowl of chocolate batter, and one bowl of strawberry batter.
- Put one flavor of batter into each of the three prepared 8-inch round cake pans.
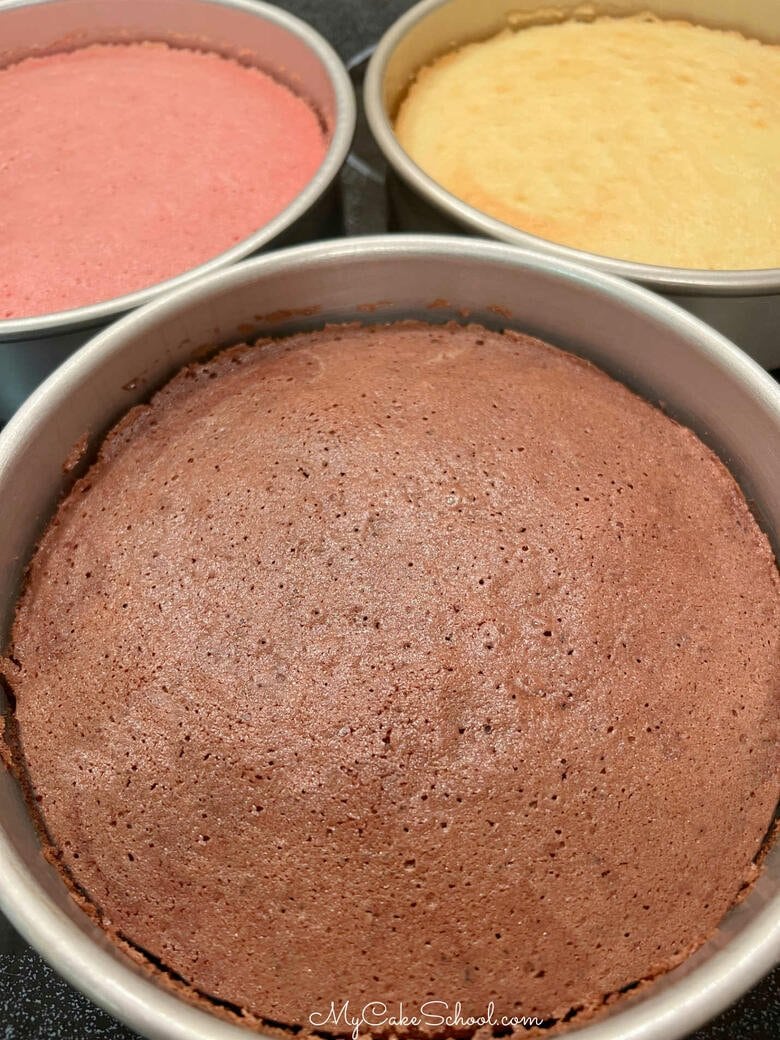
- Bake at 350 degrees for 25-30 minutes or until a toothpick inserted in the center comes out clean or with just few crumbs attached. Let cool 10 minutes and turn out.
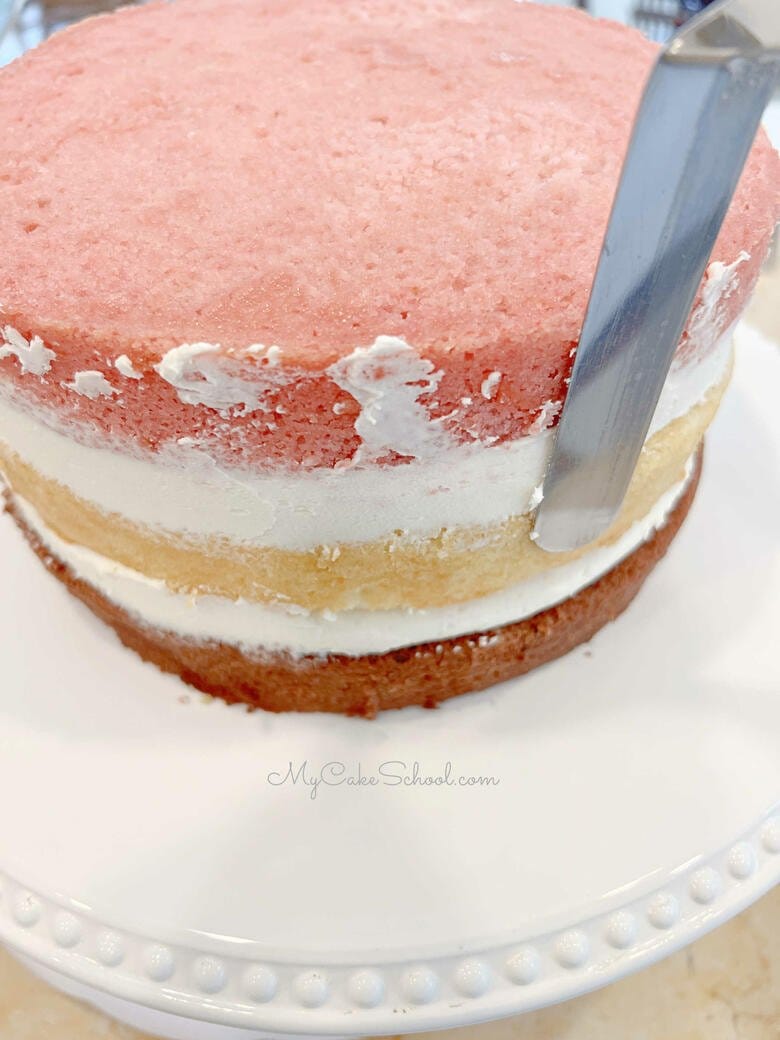
Now we have a beautiful strawberry layer, chocolate cake layer, and vanilla layer.
Assembling the Cake
Decide which order you'd like your cake flavors. I thought a little too long about this decision, haha. But I finally settled for the vanilla layer in the middle.
I placed the chocolate layer on the pedestal, then piped a dam of vanilla frosting using a disposable piping bag with the tip snipped away.
What is the Purpose of the Dam?
The purpose of the dam is to keep the whipped cream filling in place as the additional cake layers are added.
Soft fillings can sometimes try to escape and so whenever working with whipped cream, fruit, or mousse fillings, it's a good idea to pipe a dam of buttercream about ¼ inch to ½ inch from the edge of the cake layer.
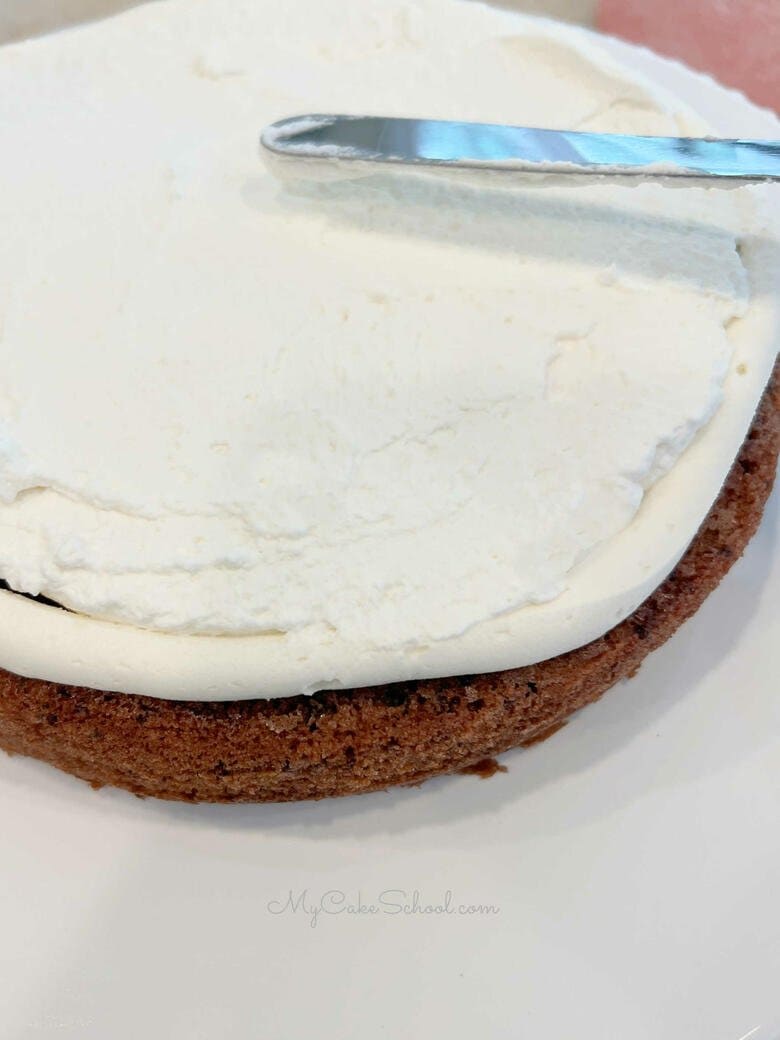
Within the dam, I spread a layer of whipped cream filling and topped with the vanilla cake layer. Repeat dam and filling steps. Top with the Strawberry Cake Layer.
Fill in any gaps between the cake layers with buttercream. (I do this with the same piping bag that I used for the dam.)
Crumb Coat, Chill, Final Coat
Frosting the Cake
Crumb Coat the top and around the sides of the cake with a thin layer of buttercream. At this point, I like to chill my cake for about 15 minutes in the freezer to firm everything up. This helps to prevent the cake layers from shifting as you decorate.
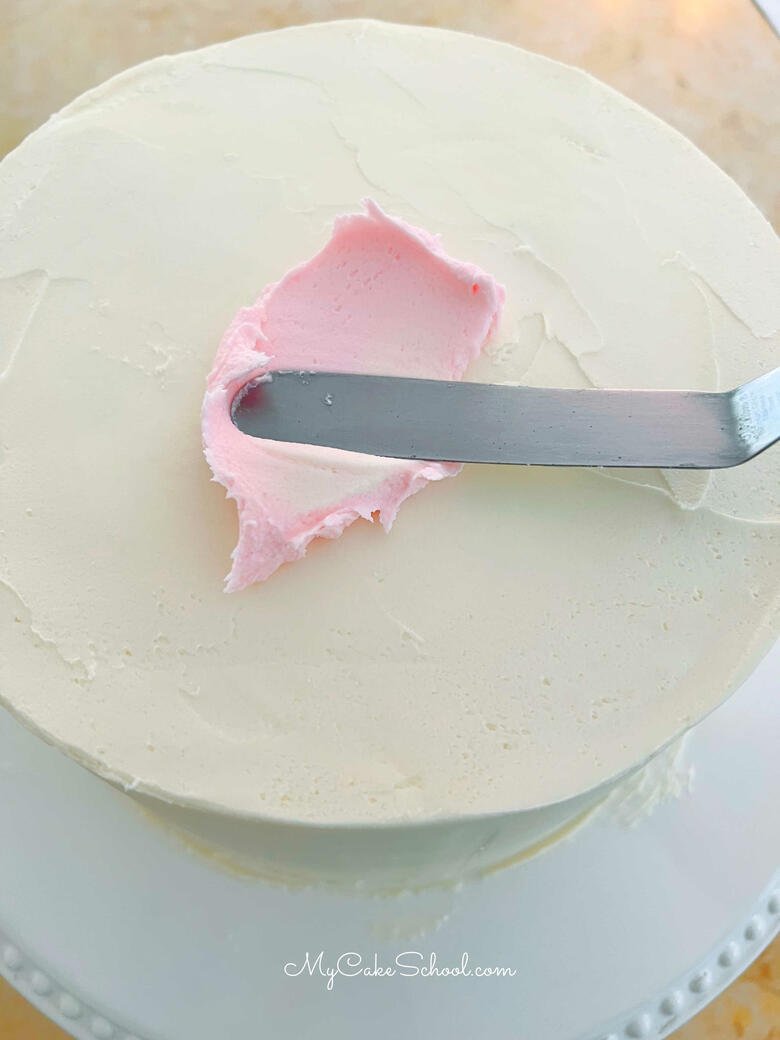
Apply the second/final layer of buttercream frosting. I reserved one cup of buttercream to tint light pink (Americolor Deep Pink). You can flavor the pink frosting with strawberry extract if you'd like (we did not).
Decorating the Neapolitan Cake
For the cake decoration of this cake, we kept things very simple!
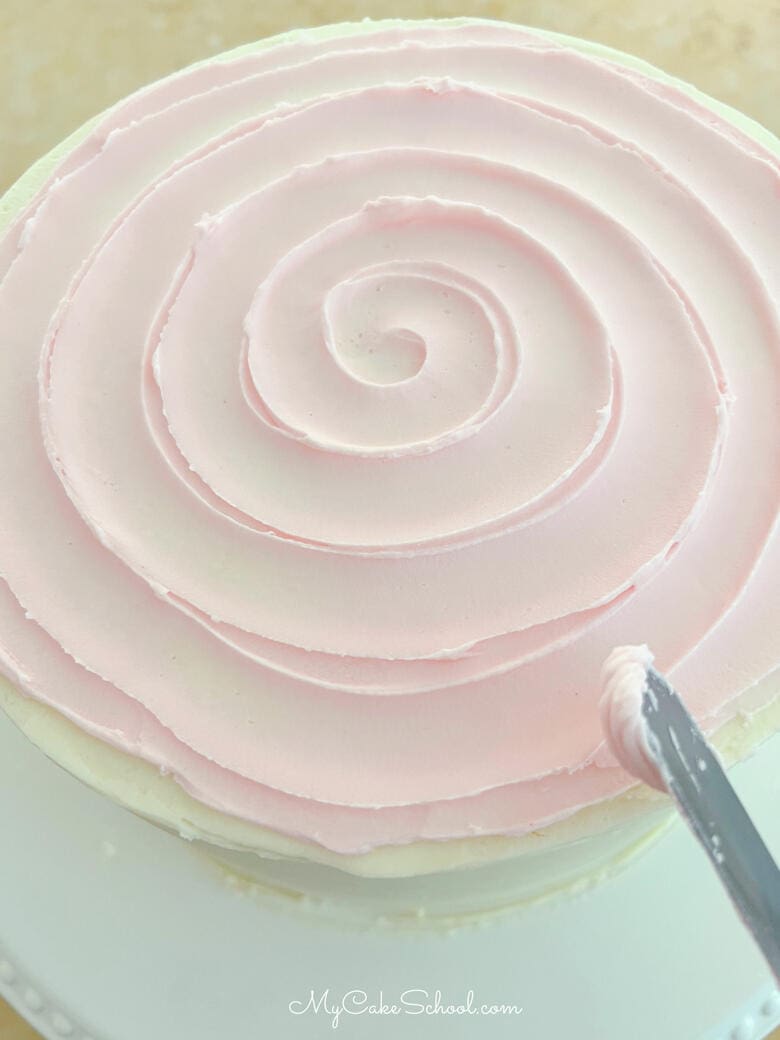
First, I spread a layer of pink buttercream frosting on top of the cake.
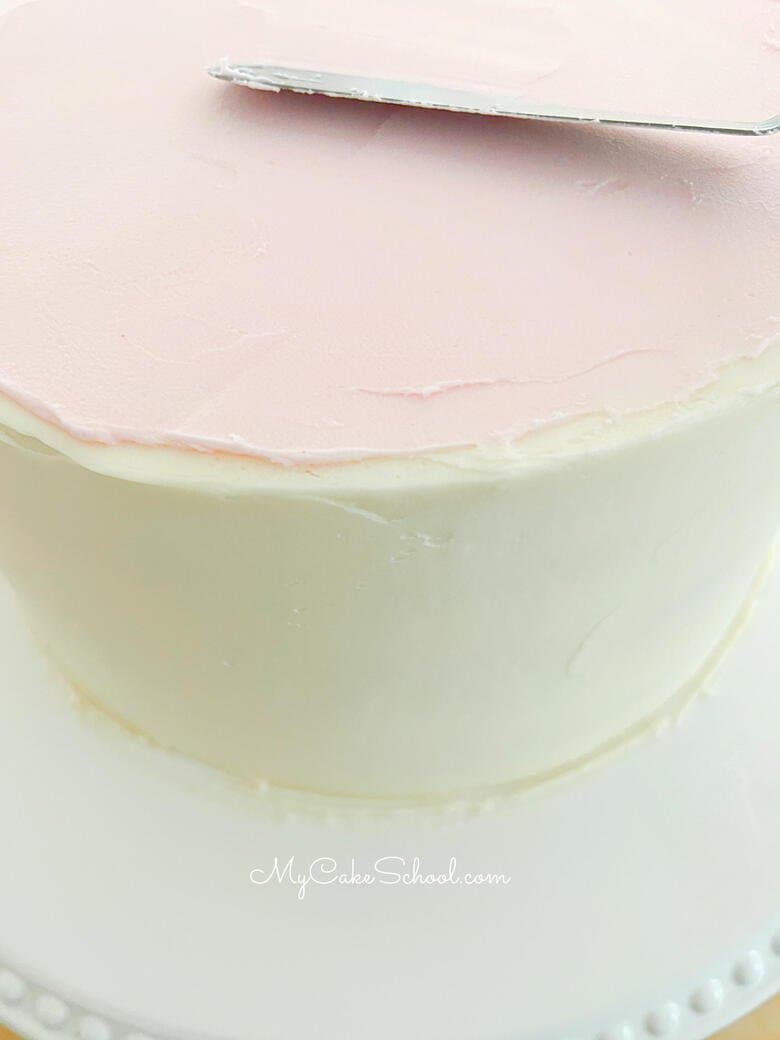
Easy Swirled Buttercream Design
Then, I used a spatula to create a spiral design as I turned it on the turntable, starting in the center and spiraling outward as it rotated.
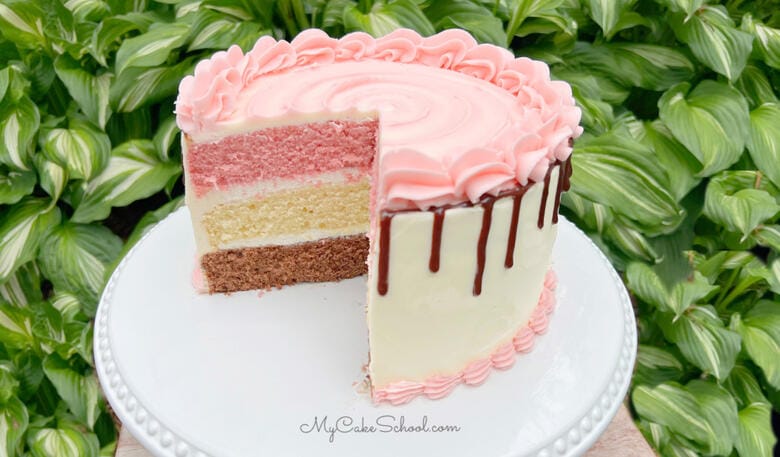
For the Ganache Drip
A ganache drip is completely optional but I always love a drip for a little added drama. (If you'd like more details about making and applying ganache drips, you can find them here: Easy Ganache Drip).
I applied the dark chocolate ganache drip around the top edge of the cake using a disposable piping bag with a small bit of the tip snipped away.
Top Shell Border
I then piped a fluffy shell border around the top edge of the cake with a large star 1M piping tip. I piped a small shell border around the base with a star tip 21.
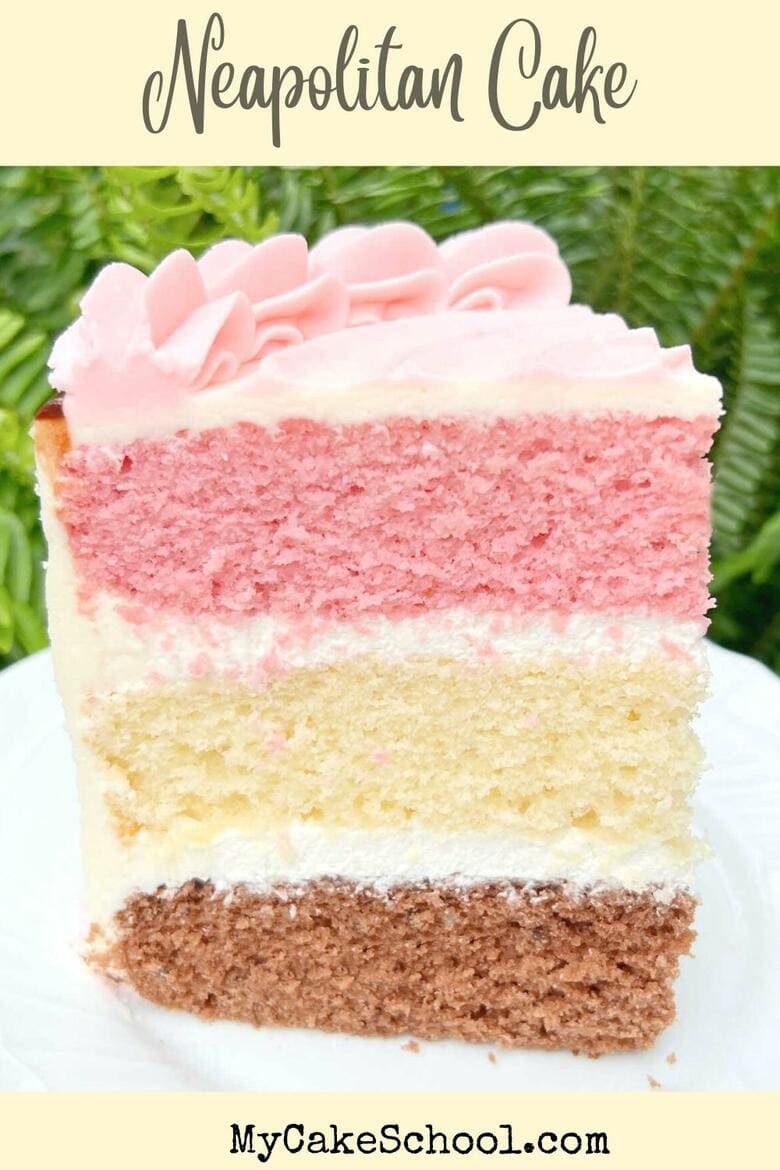
As much as I loved decorating this cake, the best part is the actual slice! It's such a pretty cake inside and out.
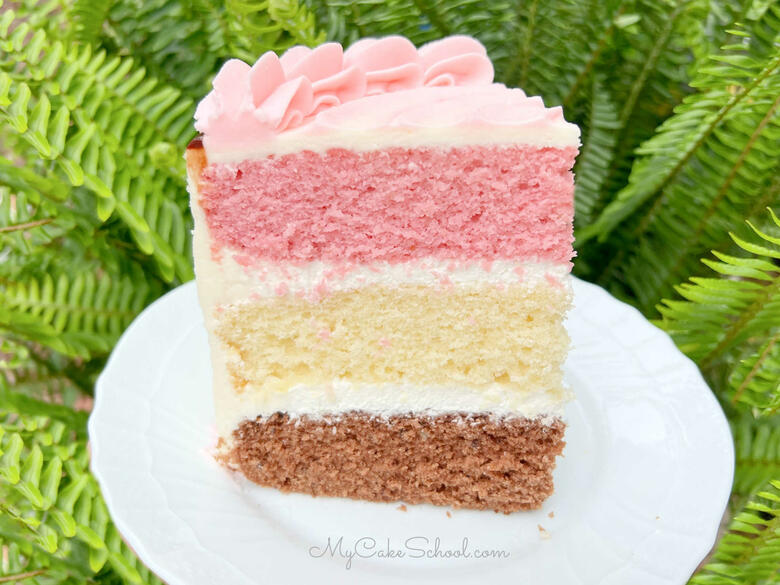
I love the look of the chocolate, vanilla, and strawberry cake layers together.
This is such a tender, flavorful cake- make sure to keep it in mind the next time you need a great dessert for a birthday party, potluck, holiday get-together, or just because!
More Ice Cream-Inspired Cake Recipes!
In addition to today's Neapolitan Cake as well as our delicious Neapolitan Pound Cake Recipe, you can find several more ice cream-inspired cake flavors below.
These crowd-pleasing cakes are popular year round, but especially in the spring and summer months!
- Orange Dreamsicle Cake
- Mint Chocolate Chip Cake
- Cherry Chocolate Chip Cake
- Cookies and Cream Cake
- Butter Pecan Cake
We also love this super easy Neapolitan Ice Cream Cake from WhiskandCanvas.com.
Have you made this? We would LOVE for you to leave a ⭐️ rating as well as a comment and photo below! We really appreciate your feedback!
Neapolitan Cake

This ice-cream-inspired Neapolitan Cake Recipe is so moist and is bursting with flavors of chocolate, vanilla, and strawberry!
Ingredients
For the Cake Batter
- 1 ½ sticks (170g) unsalted butter, softened ( holds it shape but dents when pressed)
- 2 cups (400g) sugar
- 4 large eggs, room temperature
- 3 cups (342g) cake flour (spooned into measuring cup and leveled off) If you do not have cake flour, see substitution in Notes below.
- 2 teaspoons (8g) baking powder
- ½ teaspoon (3g) baking soda
- ½ teaspoon (3g) salt
- 1 ¼ cups (296g) buttermilk — if you do not have buttermilk, see substitution below
- ¼ cup (54g) vegetable oil
- 2 teaspoons (8g) vanilla extract
For the Chocolate Layer/Batter
- (These are add-ins after batter has been divided into bowls)
- 3 Tablespoons (21g) Unsweetened Cocoa Powder
- 3 Tablespoons (44g) very hot water
For the Strawberry Cake Layer/Batter
- (These are add-ins after batter has been divided into bowls)
- ¼ cup Strawberry Reduction (Reduced from ½ cup strawberry puree- about 5-6 strawberries).
- Strawberry Flavor- Optional-- In addition to the strawberry reduction, you can also add 2 teaspoons Strawberry Jell-O powder or ¾ teaspoon Strawberry extract for an added boost of strawberry flavor.
For the Sweetened Whipped Cream Filling *Perishable Filling, see Notes
- 1 cup (240g) heavy cream
- ¼ (29g) cup powdered sugar
- 1 (4g) teaspoon vanilla
For the Vanilla Buttercream Frosting
- 3 sticks (339g) Unsalted Butter, softened
- 7 cups (805 g) Confectioners Sugar
- ⅓ c. (72g) milk or cream, more if needed
- ½ teaspoon salt (3g) (optional) to cut the sweetness (preferably fine grain or popcorn salt).
- 2 teaspoon (8g) Vanilla Extract
- Pink Coloring Gel- Optional
Ganache Drip (Optional!)
- 4 oz Dark Chocolate Chips (we used Ghirardelli) or Semi-Sweet. If using semi-sweet, I like to use closer to 5oz. If using milk chocolate, use closer to 8 oz.
- 4 oz. Heavy Cream (or Whipping Cream)
Instructions
For the Strawberry Reduction
- For the Strawberry Reduction: Puree approximately 5-6 Strawberries (fresh or frozen) in a blender to create ½ cup of strawberry puree (liquified strawberries). *See Notes
- Pour ½ cup of the strawberry puree into a small saucepan and simmer over low-medium heat for about 15 minutes or until reduced to ¼ cup- stir frequently. Set aside and allow to cool. This can be made in advance and refrigerated if you'd like.
For the Cake Batter
- Preheat the oven to 350 degrees, grease and flour three 8×2 inch round pans.
- In a medium bowl, whisk the flour, baking powder, baking soda and salt for 30 seconds. Set aside
- In another bowl, add the buttermilk, oil and vanilla. Set aside.
- In the bowl of your mixer, add the butter and mix at medium speed until smooth. Gradually add the sugar and continue to mix on medium speed for 3 to 5 minutes until lightened in color and fluffy.
- Add the room temperature eggs one at a time mixing until the yellow of the yolk disappears.
- With the mixer on low speed, alternately add the flour mixture and buttermilk mixture, beginning and ending with the dry ingredients (3 additions of dry ingredients and 2 of liquid). Mix to blend- be careful not to over-mix.
- Divide the Cake Batter equally into three bowls. (This recipe makes a total of about 7 ½ cups of batter)
- One bowl will be the vanilla layer, one bowl we will turn to chocolate batter, and one bowl we will turn into strawberry batter.
- For the Chocolate Batter: Dissolve the three tablespoons of cocoa powder into three tablespoons of very hot water. Allow to sit for a few minutes. Stir this mixture into one of the bowls of vanilla batter until well blended to create chocolate batter.
- For the Strawberry Batter: Stir the ¼ cup of strawberry reduction into another bowl of vanilla batter until well blended. As an optional step, you can add a boost of strawberry flavor along with the reduction by either by stirring in 2 teaspoons of Strawberry Jell-O powder or ¾ teaspoon of Strawberry Extract. (We used Jell-O).
- You should now have one bowl of vanilla batter, one bowl of chocolate batter, and one bowl of strawberry batter. Put one flavor of batter into each of the three prepared cake pans.
- Bake at 350 degrees for 25-30 minutes or until a toothpick inserted in the center comes out clean or with just few crumbs attached. Let cool 10 minutes and turn out.
For the Whipped Cream Filling
- Chill the mixing bowl and beaters/ whisk attachment in the freezer for 10 minutes.
- Pour the whipping cream, powdered sugar and vanilla into the chilled mixing bowl, begin beating on low speed gradually increasing to medium high speed.
- The cream begins to thicken (approx. 1 ½ minutes) and stiff peaks form- be careful not to overmix. This happens fairly quickly! At "stiff peak" stage, peaks form and hold their shape when beaters are lifted.
For the Vanilla Buttercream
- Cream the (slightly softened) butter until smooth. Blend in the vanilla.
- Add half of the powdered sugar and most of the milk. Beat at medium speed until the powdered sugar is incorporated.
- Add remaining powdered sugar and milk and mix at medium speed another 3 to 4 minutes scraping the sides of the bowl occasionally. I slow down the mixer to very slow for 1 to 2 minutes. This will help eliminate air pockets in the buttercream. The texture will become very smooth..
- Yields approximately 5 cups of frosting. Enough to frost a two layer 8 or 9 inch cake.
- If your buttercream is too thin, add more sugar. If the consistency is too thick, add a bit more milk.
For the Ganache Drip (optional)
- Place the 4 oz. dark chocolate into a microwave safe bowl.
- Pour heavy cream over the chocolate and place in the microwave for 30 seconds.
- Remove and stir. Microwave for 15 seconds more and stir. Repeat if necessary. When the chocolate has melted almost completely with just a few small soft pieces remaining, allow it to sit for a few minutes. The remaining pieces should melt away.
- The ganache will thicken as it cools. Cool for about 15 minutes or until you can pipe drips along the inside of your bowl and get the look that you are going for. (If the ganache is too warm, the drips will run all the way down. If they only drip part of the way down the bowl, it is ready. Some of this comes down to personal preference.)
Cake Assembly & Decorating
- Decide which order you'd like your cake flavors. For me, I placed the chocolate layer on the pedestal, then piped a dam of buttercream using a disposable piping bag with the tip snipped away.
- Within the dam, I spread a layer of whipped cream filling and topped with the vanilla cake layer. Repeat dam and filling steps. Top with the Strawberry Cake Layer. Fill in any gaps between the stacked cake layers with buttercream.
- Crumb Coat with a thin layer of buttercream. At this point, I like to chill my cake for about 15 minutes in the freezer to firm everything up- this helps to prevent the cake layers from shifting as you decorate.
- Apply the second/final layer of buttercream frosting. I reserved one cup of buttercream to tint light pink (Americolor Deep Pink). You can flavor the pink frosting with strawberry extract if you'd like (we did not).
- I spread a layer of pink frosting on top of the cake and used a spatula to create a spiral design as I turned it on the turntable, starting in the center and spiraling outward as it rotated.
- I applied a ganache drip around the top edge of the cake using a disposable piping bag with a small bit of the tip snipped away. I then piped a shell border around the top edge of the cake with a large star 1M piping tip. I piped a small shell border around the base with a star tip 21.
Notes
Substitute for Buttermilk: No Buttermilk? Here is a substitution: To a measuring cup, add 1 Tablespoons vinegar or lemon juice. Add milk to the 1 ¼ mark, stir. Wait 5 minutes and it is ready to use.
Substitution for Cake Flour: Using all purpose flour (plain in UK) to make Cake Flour: For each cup of flour in a recipe, remove 2 Tablespoons of flour and replace with 2 Tablespoons cornstarch (cornflour in the UK). This recipe has 3 cups of flour so you will measure out 3 cups of all purpose flour, remove 6 Tablespoons and replace with 6 Tablespoons cornstarch, whisk to blend
Recipe makes 7 ½ cups batter
About the Strawberry Puree/Reduction: We wanted to incorporate real strawberries into our cake layer which is why we did the strawberry puree and reduction. This gives great strawberry flavor and you can also add a little boost of additional flavor with a couple of teaspoons jello powder or ¾ teaspoon strawberry extract if you'd like.
*** If you do not wish to use real strawberries in the cake, you can use the flavorings mentioned in higher quantities- I would try either 3 teaspoons Strawberry Jell-O or 1 ½ teaspoons Strawberry Extract if you are not doing the reduction. You may even be able to use strawberry jam in place of the reduction but we haven't tried this yet. We will soon and update the post.
Refrigeration/Whipped Cream Filling
The whipped cream filling needs to be refrigerated. Because of this, you will need to refrigerate the cake. Remove it 2-3 hours before serving so that it can warm to closer to room temperature for best texture and flavor.
Very clever idea! I love it! Looks pretty inside and out! :-) Fabulous as always :-)
Thanks Teri!!
How can I convert this recipe into a three layer nine inch cake?
Hi Prica, This recipes makes 7 1/2 cups batter. A 9 inch round 2 inch deep pan can hold 5 cups of batter, though you can use less. If you want to use 5 cups per pan then you would need to double the recipe. You could increase the recipe by 1/2 to have 3 cups per pan. Be very careful if increasing by half that your measurements are correct. I suggest writing out the ingredient amounts then double check.
The vanilla buttercream directions mention vanilla but I don't see how much vanilla in the ingredient list.
Hi Claire, thanks for letting me know- We use 2 teaspoons of vanilla in the frosting but you can adjust it to your liking ;0)
Thank you! Coincidentally, that's exactly what I guessed. I haven't constructed the neopolitan cake yet but they're baked & they taste delicious!
Yay! Glad that you made the cake, hope that you enjoy it! ;0)
When I baked, the strawberry layer came out fine, but the vanilla layer sank in the middle. What did I do wrong?
Simple beautiful! I love to cook but, because I don't like sweet I have never interest in making cake or sweet, just in couples of time. Now I decided to make cake for my family on birthday or special occasion and I will try to learn. I love all your decoration an the variety of flavors in your cakes. Decorations are beautiful. Thanks! to share all your recipes!
I have 9 inch cake pans. What ingredient proportions do I use to increase the batter?
This Neapolitan cake was the first of your recipes that I made and it was so good. Chocolate mousse was the second and it was delicious. Everyone loved them both. I’m planning for the next one in a few weeks to be the strawberry cheese cake cake.
Hi Lynda, thanks so much for your comment! I'm so glad that you are enjoying the recipes. Hope you enjoy the strawberry cheesecake cake too! ;0)
could you use this recipe to make cupcakes ?