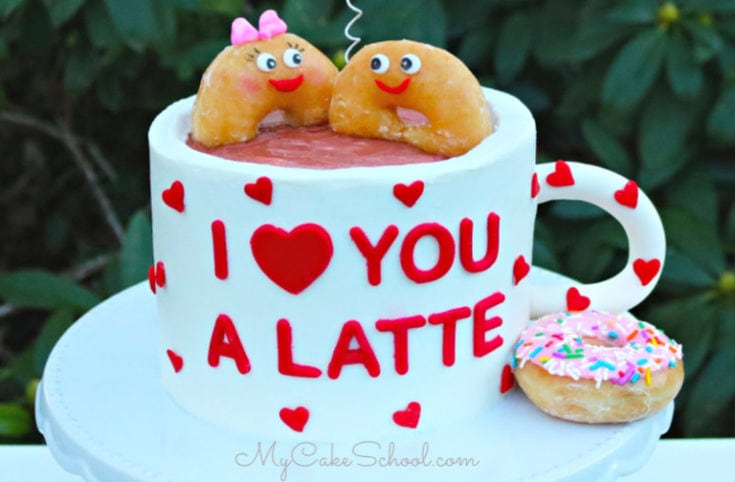
I Love You a Latte- A Free Cake Video Tutorial
Today's "I Love You a Latte" coffee mug cake design is so cute and fun, and would be perfect for Valentine's Day and anniversaries!

Table of Contents
A Cake that Looks Like a Coffee Mug
Coffee mug cakes are fabulous for the coffee-loving people in your life no matter what the occasion-- so you'll definitely want to add it to your cake-decorating bag of tricks ;0)
You can easily change up the message and design on the mug to fit the occasion--(in fact, we made a Father's Day version years ago in our blog which you can find here: Father's Day Coffee Mug Cake.
We hope that you enjoy this quick tutorial, and as an added bonus, you'll have an excuse to run out and buy a few donuts too!
How to make a 3-D Coffee Mug Cake
Roll a snake of gum paste (or fondant with tylose powder kneaded into it) for the coffee mug handle-- the length for our cake mug was 6 inches- adjust to your liking.
Insert a piece of lollipop stick into each end and curve to desired shape. Allow to dry on parchment-lined cookie sheet for 2 days. (It may be dry sooner depending on humidity, etc)
(Settling the Filled Cake Layers)
Fill the cake layers with buttercream and wrap the tier with plastic wrap, putting a book on top to settle for a few hours. ( I do this with every cake to prevent settling-related bulges in the frosting). My cake was on it's own cake cardboard cut to the size of the cake.
Crumb Coat and Chill the Cake
Apply the crumb coat/thin layer of buttercream to the tier and freeze for 15 minutes or until firm. Then apply second coat of frosting and smooth with a hot bench scraper.
Apply Second Coat of Frosting
Apply fresh buttercream as needed, and repeat smoothing steps as needed. (*** If you'd rather have a textured "pottery-style" mug, hold a small offset spatula against the freshly frosted cake while spinning it on a turntable, starting at the bottom and moving higher with each rotation for a ridged finish.)
Chill the cake in the freezer for about 15-20 minutes before moving to the pedestal or final cake base (attach with a little fresh buttercream).
Decorating the Cake Mug
Now for the fun part! It's time to really turn our cake into a a cute coffee mug design, complete with our donut couple ;0)
Cutting out the Fondant Letters
Roll your red fondant (with a little tylose powder kneaded into it) onto a countertop prepared with a light coating of vegetable shortening. Roll the fondant to about ⅛ inch or less. Allow to set up a few minutes before cutting your letters. (This will give you a cleaner cut). I also used a heart cutter for the heart.
Once the letters have set up a bit and can be easily picked up without distorting, apply to the cake. I like to do this step on a freshly chilled cake so that the frosting is firm and letter positions can be easily adjusted.
Adding the Handle and Donuts
Gently push in the dried gum paste handle.
Add faces to the donut halves, attaching eyes and mouth, etc. with a little piping gel or buttercream. Trim the bottom half or so. I also added a little pink petal dust applied with a dry brush to the girl donut for rosy cheeks ;0)
More Valentine's Day Cake Ideas
If you're looking for more fun, cute, and lovey-dovey cake and cupcake ideas, make sure to check out our roundup of favorites! We've made lots over the past ten years- check them out here!: Roundup of Favorite Valentine's Day Ideas!

Coffee-Themed Cake Flavors and Recipes
If you'd like for your coffee mug cake to consist of coffee flavored cake layers and fillings, we have you covered! Don't miss these delicious recipes!:
Valentine's Day Cake Recipes!
We've also made a roundup of our FAVORITE Valentine's Day Cake recipes! Of course, these recipes would be great no matter what the season, but if you're searching for Valentine's Day cakes, this roundup is for you.
We have everything from decadent Chocolate Cake to Red Velvet Cake, Cherry Cake, Black Forest Cake, Pink Champagne Cake, and more! Hop over to see! Favorite Valentine's Day Cake Recipes

Enjoy the Video!
Thanks so much for stopping by! We hope that you give the mug cake a try. If you do, make sure to leave a comment and photo below. We would love to see!
I Love You a Latte- A Free Cake Video Tutorial
This cute "I Love You a Latte" coffee mug cake design is perfect for Valentine's Day and anniversaries!
Materials
- *For this cake design, we used a three layer 6 inch cake, frosted in our Fluffy Vanilla Buttercream Recipe. The cake was approximately 4.5 inches tall.
- Buttercream of choice (We used our Fluffy Vanilla recipe. Our Classic Vanilla is a good choice also)
- Donuts! We used 3 mini donuts from Krispy Kreme -2 were glazed and then a sprinkle one for the pedestal.
- Letter Cutters or Molds for the message. We used a Wilton Letter Cutter Set
- Gum Paste (or fondant with tylose) for handle
- Red fondant + tylose for letters, white fondant for eyes
- Two Lollipop Sticks
- Coloring Gel: Chocolate Brown
- Sprinkles of choice- We used red heart sprinkles for our mug
- Heart Cutter for message on mug as well as to attach to the coiled floral wire
- Floral Wire (approx 22 gauge, or a gauge that can support weight of heart).
- Small straw for providing barrier for floral wire
- Piping gel or edible glue of choice (warm water + tylose powder makes glue also)
- Miscellaneous: disposable piping bags, turntable (optional), fondant rolled, vegetable shortening for preparing countertop before rolling out fondant, parchment or waxed paper for drying handle, spatula, bench scraper
Instructions
- Roll a snake of gum paste (or fondant with tylose powder kneaded into it) for the coffee mug handle-- the length was 6 inches- adjust to your liking. Insert a piece of lollipop stick into each end and curve to desired shape. Allow to dry on parchment-lined cookie sheet for 2 days. (It may be dry sooner depending on humidity, etc)
- Fill the cake layers with buttercream and wrap the tier with plastic wrap, putting a book on top to settle for a few hours. ( I do this with every cake to prevent settling-related bulges in the frosting). My cake was on it's own cake cardboard cut to the size of the cake.
- Apply the crumb coat/thin layer of buttercream to the tier and freeze for 15 minutes or until firm. Then apply second coat of frosting and smooth with a hot bench scraper. Apply fresh frosting as needed, and repeat smoothing steps as needed. (*** If you'd rather have a textured "pottery-style" mug, hold a small offset spatula against the freshly frosted cake while spinning it on a turntable, starting at the bottom and moving higher with each rotation for a ridged finish.)
- Chill the cake in the freeze for about 15-20 minutes before moving to the pedestal or final cake base (attach with a smear of fresh buttercream).
- Roll your red fondant (with a little tylose kneaded into it) onto countertop (prepared with a light coating of vegetable shortening). Roll to about ⅛ inch. Allow to set up a few minutes before cutting your letters. I also used a heart cutter for the heart.
- Once the letters have set up a bit and can be easily picked up without distorting, apply to the cake. I like to do this step on a freshly chilled cake so that the frosting is firm and letter positions can be easily adjusted.
- Add the handle
- Add faces to the donuts, attaching eyes and mouth, etc. with a little piping gel. Trim the bottom half or so. I also added a little pink petal dust applied with a dry brush to the girl donut for rosy cheeks ;0)
Notes
*It's always a good idea to make two handles in case of breakage. In a pinch, you could also make the handle from candy melts/candy coating, piping a thick, elongated "c" shape onto parchment. Chill until firm and then push into the side of the cake.
This cake is so cute!!!
Very cute & Sweet! :-) Love it!
Very Nice! Thank you for sharing, I really like it.