My Cake School

Cake Tutorials & Recipes

  • Facebook
  • Instagram
  • Pinterest
  • RSS
  • Twitter
Login
  • home
  • Videos
    • The Basics
    • Buttercream Techniques
    • Carved/3D
    • Chocolate Techniques
    • Cupcake, Cake Pop, etc. Methods
    • Gum Paste & Fondant
    • Themes and Occasions
    • See All Videos
  • Shop
    • Miscellaneous Cake Decorating Supplies
    • Kitchen Appliances
    • Chocolate and Candy Making
    • Fondant and Gum Paste
    • Piping Tips
    • Molds, Mats, Embossers, and Cutters
    • Cookbooks
    • Dusts and Sprays
    • Pantry Items
    • Bakeware and Tools
    • Sprinkles and Candy
  • Free Tutorials
  • forums
  • recipes
    • Cakes and Cupcakes
    • Fillings
    • Fondant/Gumpaste
    • Frostings and Glazes
    • Miscellaneous
  • contact
  • join

Autumn Leaves in Chocolate~ Blog Tutorial

October 30, 2013 By Melissa D. 112 Comments

18.1K shares
  • Share
  • Tweet

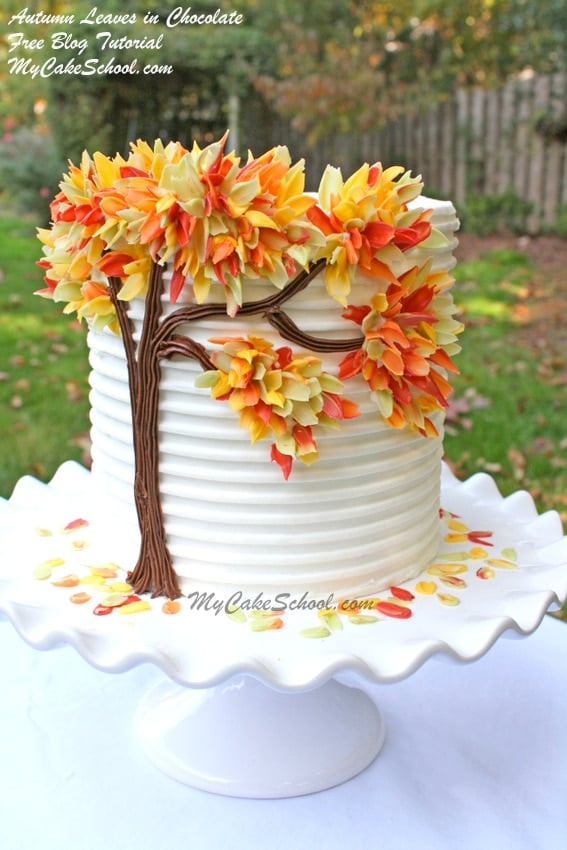
We are excited to share a beautiful free cake tutorial for colorful Autumn Leaves in Chocolate!

This cake design features a simple idea and method for creating a vibrant autumn themed cake that is as unique as it is beautiful.
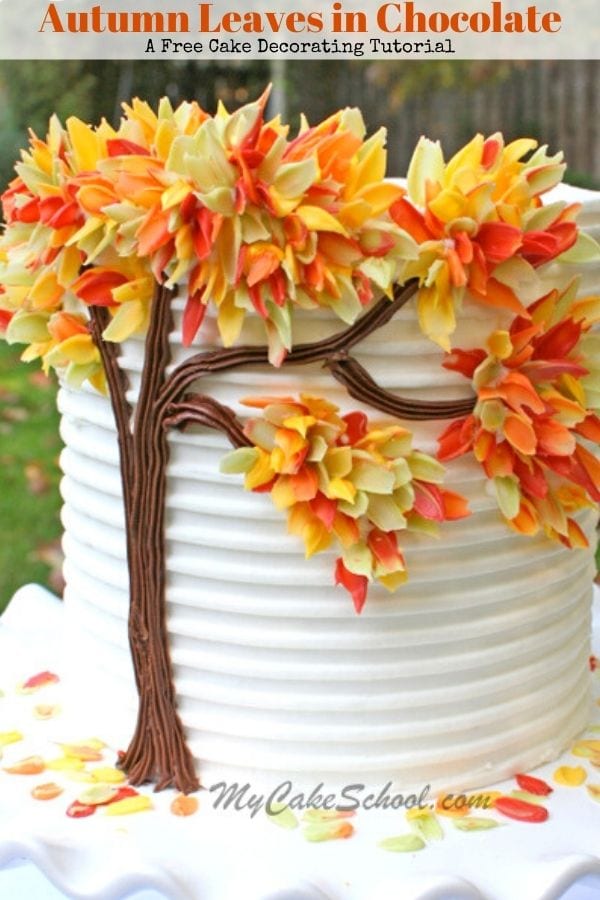
 

Autumn Leaves in Chocolate- A Free Cake Decorating Tutorial. This beautiful and unique cake design is perfect for fall entertaining!


This design would be perfect for any fall occasion, or on your Thanksgiving dessert table.  I hope that you enjoy it!

Let’s get started~

How to Make this Autumn Leaves in Chocolate Cake Design


First, I frosted my 6″ round (approx 6″ tall) cake with vanilla buttercream. I then combed it with my trusty Ateco cake comb.

Autumn Leaves in Chocolate- Free cake decorating tutorial by MyCakeSchool.com!

Next, I tinted my buttercream with Americolor Chocolate Brown and piped on my tree trunk with a Wilton star tip 16.  Any star piping tip of your choice would work nicely–even a round tip.  I wanted my tree trunk to have ridges and so I went with the star tip.
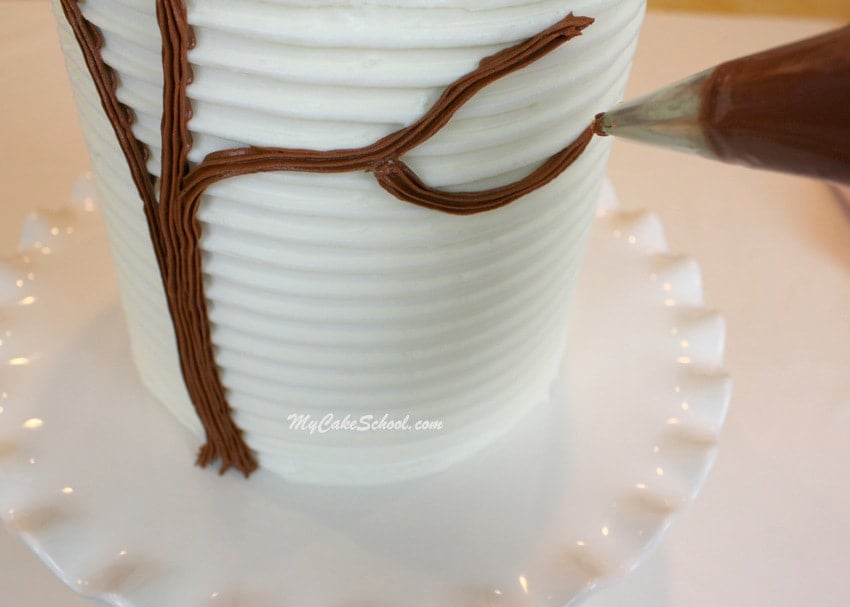
Autumn Leaves in Chocolate- Free cake decorating tutorial by MyCakeSchool.com!

Now for the leaves!  I melted pre-colored Wilton candy melts in autumn shades for our next step.  

After melting, I put each color into it’s own piping bag, and snipped the tip of the bag (rather than using piping tips).  

You’ll want to work fairly quickly during this next step, but if your chocolate becomes too cool and firms up, you can always reheat the bag for a few seconds in the microwave…or even have a warm cake pan nearby that you can place them in as you alternate between bags.
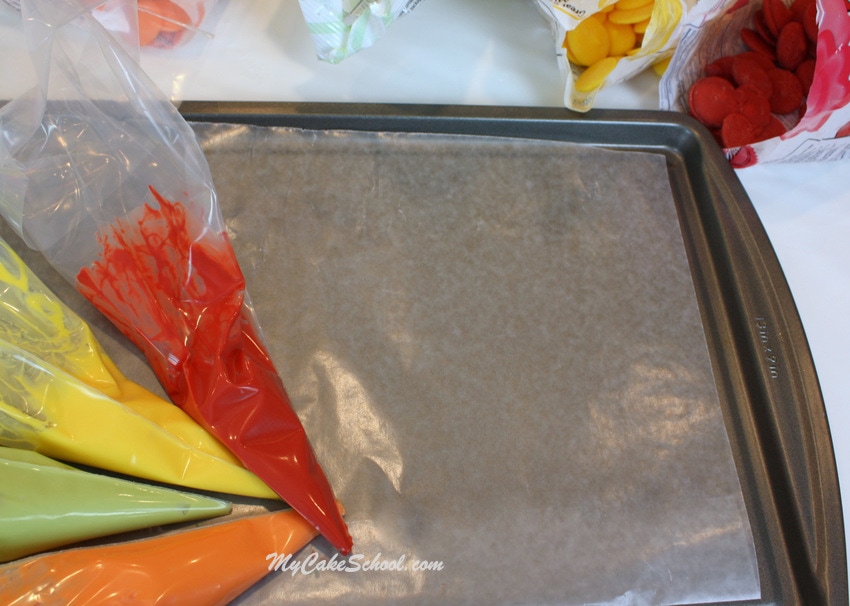
Autumn Leaves in Chocolate- Free cake decorating tutorial by MyCakeSchool.com!

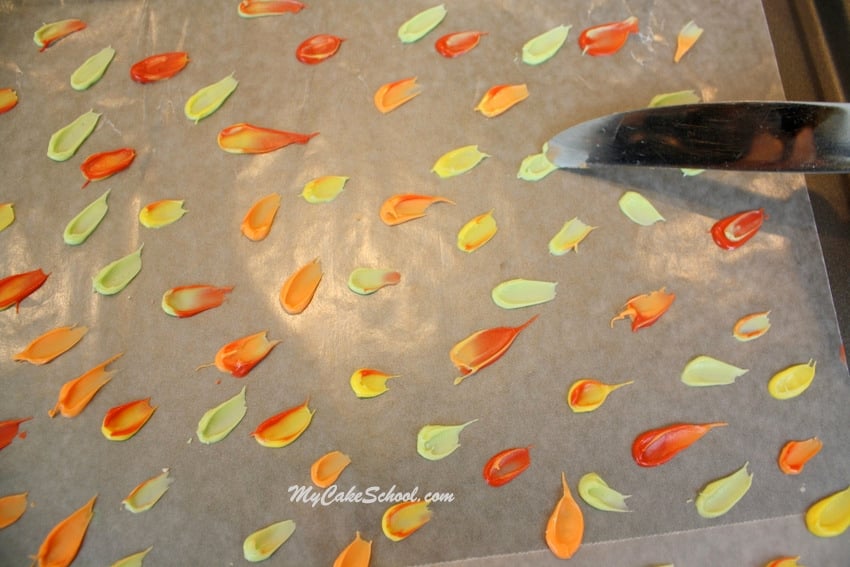
Here, you see that I piped several dots of chocolate onto my waxed paper lined cookie sheet.  With some of the dots, I added a touch or two of another color.  

It’s a little hard to tell from the photo, but my dots are larger than pea-sized, but smaller than marble-size ;0) –Experiment to see what size you like the best!
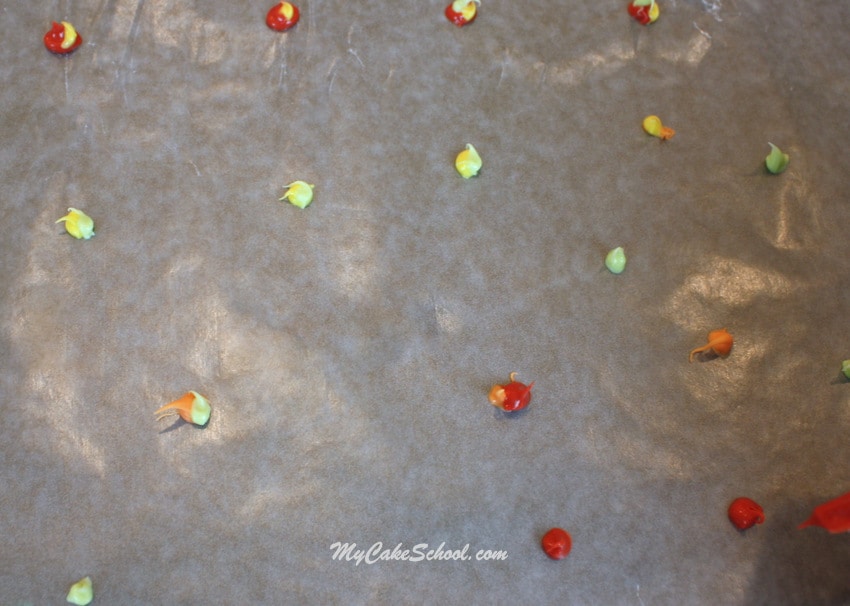
Autumn Leaves in Chocolate- Free cake decorating tutorial by MyCakeSchool.com!

Now, time to create our leaves!  I used a kitchen knife but any number of tools would work for the next step–a smallish spatula, a spoon , etc.   

Using the knife, I started from one side of my “dot” of chocolate and smeared it out, dragging the chocolate into a point–(or somewhat of a point!)   This creates a teardrop shaped leaf.  

Look at mine—they are not perfect!  In fact, out of context, these don’t look like leaves.  But you’ll see…they will!


Autumn Leaves in Chocolate- Free cake decorating tutorial by MyCakeSchool.com!

I made two full “cookie sheets” of these leaves.  Then, I chilled them in the freezer until they became hard– approximately 5-10 minutes is perfect.


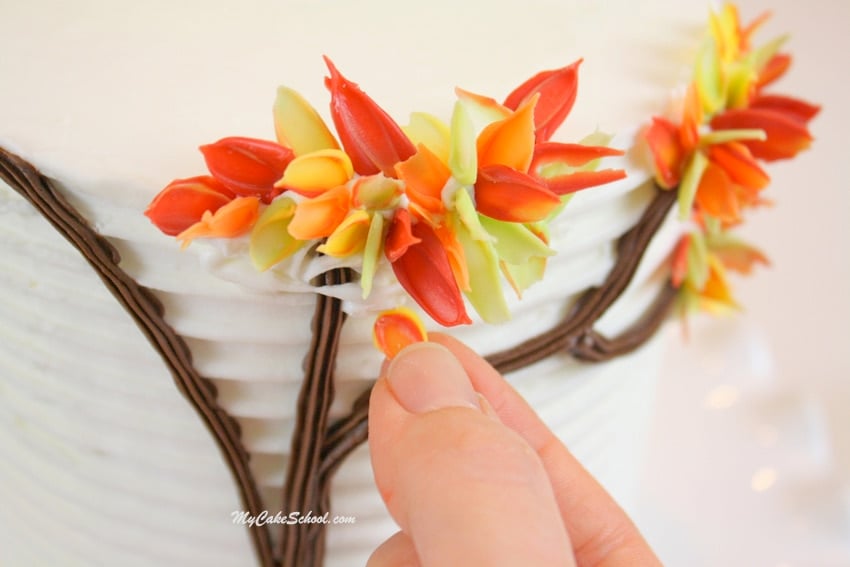
Next, it was time to build the tree!  I used buttercream as my glue.  You can see below, that I dotted the areas around the branches with white buttercream.  

I realized later that buttercream tinted yellow, orange, or green would have been an equally good (if not better) “glue”.  More on that in a little bit!

Autumn Leaves in Chocolate- Free cake decorating tutorial by MyCakeSchool.com!

With each new leaf, our little tree becomes more beautiful…(and the more our leaves begin to look like leaves!) ;0)

***It’s important to note that your leaves need to be cold when handling.  They are so thin, that they warm & therefore become more fragile quickly.  

So, I found it easiest to have two trays of leaves.  One in the freezer, the other out.  And then swap them out when things warm up.
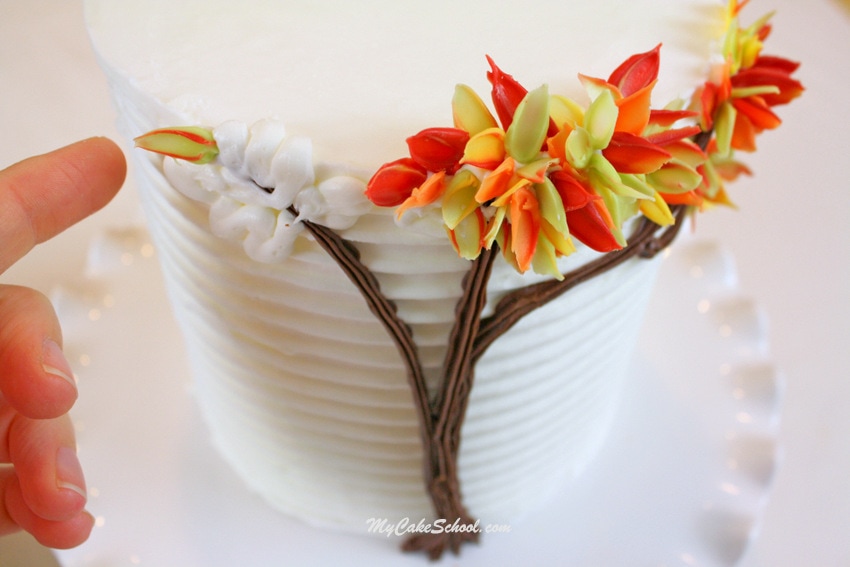
Autumn Leaves in Chocolate- Free cake decorating tutorial by MyCakeSchool.com! Perfect for your fall or Thanksgiving dessert table!

I mentioned earlier that yellow buttercream would make a good adhesive for our leaves.  I found this helpful in a few areas where I wanted to build out my leaves a little more, but the white buttercream would have stood out too much.  

The yellow buttercream was a perfect glue because it blended in so well with the chocolate leaves.  It’s a great way to fill things out here and there too if necessary!
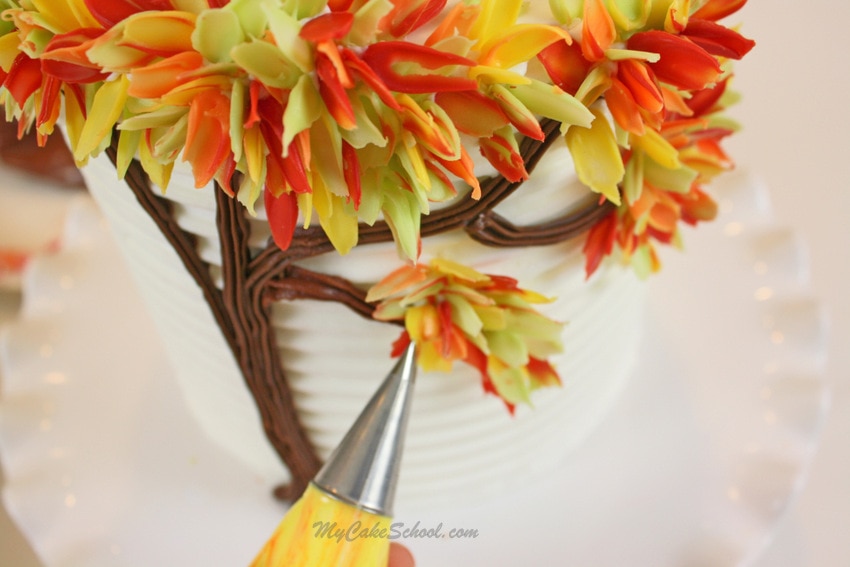
Autumn Leaves in Chocolate- Free cake decorating tutorial by MyCakeSchool.com! Online cake tutorials, cake videos, recipes, and more!

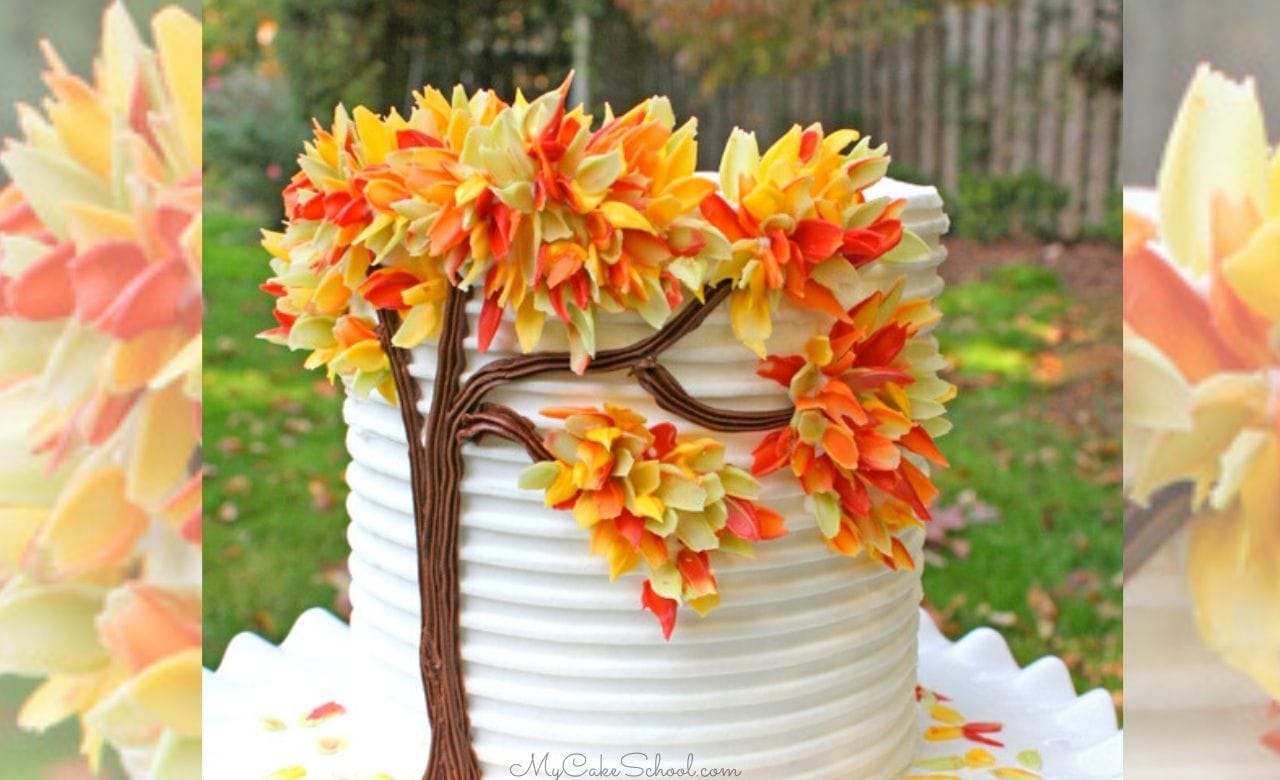
This cake was a little more time consuming than I expected– there are lots of leaves happening here!  I found it fun though…a little addictive too–I couldn’t make myself stop adding leaves!  

You could get a similar look by just piping buttercream leaves with a piping tip, but I really liked the unusual texture and flatness of the leaves that the chocolate gave us.  Some almost had a transparent look to them.

I scattered a few of my extra leaves around the base of the cake– it feels like fall, doesn’t it?

Free Cake Tutorial by MyCakeSchool.com! Gorgeous "Autumn Leaves in Chocolate" cake design by MyCakeSchool.com


Autumn Leaves in Chocolate- Free cake decorating tutorial by MyCakeSchool.com! So simple!


Thanks so much for stopping by, we’ll see you next time!


Autumn Leaves in Chocolate- A Free Cake Tutorial! This beautiful cake design is easier than it looks to achieve! The perfect cake for fall birthdays, Thanksgiving, and entertaining!


Related posts:

  1. Autumn Cake- Chocolate Leaves!~Blog Tutorial
  2. Witch Hats!- A Halloween Cake Decorating Tutorial
  3. Ghoulish Goodies!- Halloween Cupcake Tutorial!
  4. Bicycle with Balloons Cake~ A Blog Tutorial!
  5. Happy Halloweenie! Free Cake Video~ Featuring Topper & Tri-Colored Buttercream

Filed Under: Blog Tutorials, Chocolate Techniques, Fall, Seasonal & Holiday, Themes and Occasions Tagged With: autumn cake, chocolate leaves, fall cake, Thanksgiving cake, tree cake

« Buttercream Chrysanthemums on Textured Buttercream
Thanksgiving Cornucopia~ A Blog Tutorial »

Comments

  1. Maria October 30, 2013 at 8:15 pm

    This cake is going to be on our dessert table at Thanksgiving !!

    Reply
  2. Tammy Lantz October 30, 2013 at 8:25 pm

    Love this

    Reply
  3. adriana October 30, 2013 at 8:30 pm

    Love it!!!!

    Reply
  4. Samanthia October 30, 2013 at 9:00 pm

    This is beautiful. I really appreciate the tutorial.

    Reply
  5. Janet October 30, 2013 at 9:00 pm

    Fantastic!! Again, still and always!

    xo

    Reply
  6. Nazz Sharif October 30, 2013 at 9:04 pm

    It’s gorgeous Melissa :-)

    Reply
  7. queridam October 30, 2013 at 9:05 pm

    You continue to amaze! So so pretty!

    Reply
  8. Ronnie Bochat October 30, 2013 at 9:13 pm

    Love Love Love. Have fall cake for November. This will be nice.

    Reply
  9. SweetS October 30, 2013 at 9:27 pm

    Love it, Melissa!!!!

    Reply
  10. Chong Amoy October 30, 2013 at 9:28 pm

    I like this

    Reply
  11. Urs October 30, 2013 at 10:57 pm

    It looks amazing.

    Reply
  12. kartha October 30, 2013 at 11:05 pm

    looks lovely …i love it….

    Reply
  13. Pamela Contreras October 30, 2013 at 11:11 pm

    Nice artistic work.

    Reply
  14. Nellie October 31, 2013 at 12:23 am

    LOVE this cake so easy to do lots of color LOVE that you put lessons like this out there for people to learn and try new things THANKS

    Reply
  15. nefertiti romero October 31, 2013 at 1:51 am

    esta precioso gracias por compartir sus conocimientos.

    Reply
  16. esther cabre by tgaletes October 31, 2013 at 2:57 am

    I love it, very tanks!!;)

    Reply
  17. Julie October 31, 2013 at 3:58 am

    Very effective

    Reply
  18. Beverley October 31, 2013 at 3:58 am

    stunningly visual, elegantly easy

    Reply
  19. Tamara G October 31, 2013 at 5:58 am

    I was surpriset to find out that you make this cake in this techniqe and not in fondant. It looks gorgeous. Realy beautiful. :)

    Reply
  20. Pamela Maldonado October 31, 2013 at 7:53 am

    Every cake was beautiful

    Reply
  21. Terri October 31, 2013 at 8:30 am

    Again I am sitting her with my jaw dropped looking at this beautiful cake!! Thank you so much for sharing your talent with us. :-)

    Reply
  22. Teresa East October 31, 2013 at 9:28 am

    Love this fall cake!! The mixture of colors in your leaves is perfect.

    Reply
  23. houseofcake October 31, 2013 at 9:34 am

    I have to say you do come up with some really creative and easy ways to decorate a cake. Just love being apart of this website. Thanks!

    Reply
  24. GlendaLiz October 31, 2013 at 9:40 am

    Me encanta. Es algo diferente con chocolate y tan sencillo. Me gusta el chocolate

    Reply
  25. Joan October 31, 2013 at 10:34 am

    I love this cake. I especially like that it’s in buttercream. You make it look so easy, but I’m sure mine would not turn out as nice. I’m really enjoying this site and learning so much. Thank you so much.

    Reply
  26. cyndi barnett October 31, 2013 at 1:13 pm

    you are a constant treasure trove of ideas…there is nothing so beautiful as nature and to capture “fall” in this simple design is brilliant. thank you for sharing it with us!

    Reply
  27. Suebaru327 October 31, 2013 at 2:27 pm

    brilliant idea. i love it!

    Reply
  28. carolyn castleman October 31, 2013 at 3:18 pm

    Love the beautiful leaves on this cake! Great tutorial, as always!

    Reply
  29. Rebekah October 31, 2013 at 3:39 pm

    This is gorgeous!!!

    Reply
  30. Mayra59 October 31, 2013 at 3:49 pm

    Me gusto mucho :))) gracias por la clase!!!

    Reply
  31. Patricia truel October 31, 2013 at 4:39 pm

    I LOVE THIS CAKE!

    One of my favorites you’ve done!

    Reply
  32. Ansa Hogan October 31, 2013 at 8:10 pm

    omg I absolutely LOVE this cake!
    Cant wait to try it!
    thanks!
    Ansa

    Reply
  33. erica October 31, 2013 at 8:19 pm

    GORGEOUS! i will make one :) :)

    Reply
  34. Royal Bakery October 31, 2013 at 10:12 pm

    This is really rather lovely!

    Reply
  35. Sharon B. November 1, 2013 at 12:33 am

    Stunning!

    Reply
  36. LynnS November 1, 2013 at 12:56 am

    That is a gorgeous cake! Thanks for this.:-)

    Reply
  37. J J November 1, 2013 at 4:07 am

    Thank you for the tutorial. The cake looks beautiful! Look forward to making one!

    Reply
  38. J J November 1, 2013 at 4:12 am

    Will you be doing a video tutorial, of this stunning cake?

    Reply
  39. Adalis Dunand November 1, 2013 at 6:27 am

    Très joliment fait! J’adore !

    Reply
  40. slfdillard November 1, 2013 at 8:20 am

    I absolutely LOVE this! I will be making this for my family on Thanksgiving. Melissa, you did a beautiful job! I am a new member and so far EVERYTHING I have looked at on your site is so helpful. I’m thrilled that I decided to join and the cost is very affordable. I will certainly tell my friends about this great site! Thanks again so much for all your help. You are a fabulous teacher. Have a blessed day!

    Reply
  41. Sue {munchkin munchies} November 1, 2013 at 7:12 pm

    BEAUTIFUL! The perfect cake to usher in fall!

    Reply
  42. trina karnes November 2, 2013 at 2:25 am

    omg this is beautiful Melissa you so talented I am so glad that I came across this web site a couple of yrs ago I am a wilton method instructor and I have learned more from you then anything you are amazing much respect to you and your mother bebe

    Reply
  43. Melissa Diamond November 2, 2013 at 1:33 pm

    Thank you all SO much for your wonderful comments! I’m so thankful for your feedback, and very happy that you like the cake. I love it when simple ideas like this one have a dramatic result–those are always my favorite cakes because they are perfect for all skill levels.

    @JJ- Maybe we could do a mini-video sometime on this–there really are so few steps that we decided to go the blog route. But still, it may be nice to add it to our “chocolate” video section at some point. I’ll let you know ;0)

    Reply
  44. paintmycake November 2, 2013 at 2:41 pm

    Is Cream cheese frosting ok for this technique ?

    Reply
  45. maureen evans-kelly November 2, 2013 at 3:02 pm

    Wow! love it and looks so easy I am going to make this one and the other one with the pumpkins for Thanksgiving.

    Reply
  46. MICKEYCHEF07 November 2, 2013 at 5:13 pm

    This is simply beautiful!
    I am going to try it and send a pic!
    Thanks for such a creative design and so easy to accomplish.

    Reply
  47. paintmycake November 3, 2013 at 1:23 pm

    I am baking my cake for this right now. Very excited. After reading about the leaves, is it correct to assume that the leaves cannot be made several days ahead, since they may melt?
    If they can , would I store them in the freezer or refrigerator ?

    Reply
  48. Melissa Diamond November 3, 2013 at 1:53 pm

    Hi paintmycake~ You can definitely work in advance. I usually just keep them in a cool room in the house until I’m ready for them. At that point, I chill in the freezer for about 5 minutes to make them extra firm and safe to handle without worry of breaking.) —

    I suppose that refrigerating for a couple of days would be fine too…I just normally go the other route. (I wouldn’t recommend freezing for a prolonged period–that brings in other issues like condensation and sometimes discoloration.) Good luck!

    Reply
  49. paintmycake November 3, 2013 at 5:07 pm

    Thanks Melissa!

    Reply
  50. seabass123 November 3, 2013 at 6:52 pm

    Thanks for such a awesome tutorial. Your head is full of such amazing cake decorating ideas that are so simple. I wish I was near you when you finished that cake so that I could have taken a great big bite of it….lol

    Reply
  51. Colleen Brown November 3, 2013 at 7:36 pm

    Sooo creative. Thank you for sharing.

    Reply
  52. jean blasdell November 4, 2013 at 10:13 am

    that is a beautiful cake simple and elegant

    Reply
  53. Kathy Pry November 4, 2013 at 1:07 pm

    I love the look of this cake and even better it is easy to create! Thank you!

    Reply
  54. Tina Ainsworth November 4, 2013 at 1:12 pm

    LOVE it….will soooo be doing this for our Thanksgiving at work and possible our family Thanksgiving….and a huge THANK you for the tutorial

    Reply
  55. Terri Tate November 5, 2013 at 12:52 pm

    Hi Melissa and BeBe!

    I have a question…which is a more sizeable slice…doing a 2 layer cake, with torting OR making a 3 layer cake and just ice each middle? I have a cake to do this Saturday for 50 people, and I thought a 9″ and 6″ (3 layers) would do the trick. Do you have a recommendation? Also, do you have a cake serving chart that you can swear by? Thanks in advance!!!

    Reply
  56. Melissa Diamond November 5, 2013 at 1:40 pm

    Thank you all so much for your comments!!

    @Terri– I think that either way will give you approx the same amount of servings. (Two fat layers, torted vs. three medium sized layers). The height for either would likely fall into the neighborhood of 4″, which is what most cake charts are based on.

    I think that you’ll have trouble getting 50 servings from a 9″/6″, unless the 6″ is a double barrel. I like to go by Wilton’s party serving chart, but if this event is for a wedding or a cake where other food is being served, you could go with the smaller servings of Wilton’s wedding serving chart. Both of these charts are listed in the link below:
    https://www.mycakeschool.com/helpful-links/

    Hope this helps!

    Reply
  57. Rebekah November 5, 2013 at 7:10 pm

    Hey Melissa, I just saw on pinterest that this cake was posted by Wilton! (With credit given to you, of course) How neat!!! :-)

    Reply
  58. Margaret Brinkmann November 5, 2013 at 7:47 pm

    Such a nice cake. Because of time constraints, I was looking for a simple cake for my hubbies birthday, and I found it!

    Reply
  59. A.de.J Alvarez November 6, 2013 at 12:49 pm

    Grasias por tan bonito tutorial; es muy practico y facil de hacer.

    Mis cordiales saludos
    A.Alvarez

    Reply
  60. paintmycake November 6, 2013 at 1:15 pm

    Hi Melissa,
    Does this cake need to be doweled? My cake is 5 1/2″ tall, 5 layers of cake and a 6″ round. Will it be ok without a dowel or do you always dowel a cake this tall?
    Thanks.

    Reply
  61. paintmycake November 6, 2013 at 1:52 pm

    Oops, no need to reply. I found the answer on you Billy Balls tutorial.
    Thanks!

    Reply
  62. Ana Rijo November 6, 2013 at 7:06 pm

    Wow! Beautiful idea! I’ll be making it soon!!
    Thanks for the tutorial ;)

    Reply
  63. ASHOK KUMAR RAJ November 7, 2013 at 3:00 am

    Superbly …… Original & Authenticly …… creative

    Reply
  64. abeeha November 7, 2013 at 5:22 am

    awsome cake.plz guide me how can i beet the crem for cake.i have tried many times but failed.

    Reply
  65. Ayehza Avila November 7, 2013 at 8:16 am

    BellĂ­sima decoraciĂ³n!!!! MuchĂ­simas gracias, tutoriales como estos me estĂ¡n ayudando mucho para todo lo que quiero hacer y aprender! Feliz dĂ­a! <3

    Reply
  66. Darcy November 7, 2013 at 11:57 am

    Will your Cream Cheese icing work for this cake in place of buttercream?

    Reply
  67. BeBe November 7, 2013 at 2:49 pm

    Hi Darcy, We have not tried cream cheese icing with this technique, but think that it would be fine.

    Reply
  68. paintmycake November 7, 2013 at 10:07 pm

    I made it today and it was such a hit with my book club! Need some work on that comb technique. I’ll post the picture on the members gallery. Also made your pumpkins from the other cake for decoration. Easy! Thank you very much.

    Reply
  69. tln2000 November 8, 2013 at 2:49 pm

    I just joined my cake school and am so excited to learn more about cake decorating. Your cakes are so beautiful. Thank you for sharing your knowledge! I just love your fluted white cake pedestal in this tutorial. May I ask where you got it?

    Reply
  70. BeBe November 8, 2013 at 3:49 pm

    Hi, Thank you for your nice comments and welcome to the site. The cake pedestal was bought at Pier One. This style was in the store a few months ago and it is online.

    Reply
  71. Rosy November 9, 2013 at 11:12 am

    EstĂ¡ hermoso y padrĂ­sima la tĂ©cnica. Felicidades!

    Reply
  72. Carole November 9, 2013 at 1:11 pm

    What a gorgeous cake.

    I was a cake decorator for a local bakery for a short time in my early twenties. I really enjoyed. it, and felt like I was following in my mothers footsteps a little bit (she had passed away years earlier), as well as following my artistic heart.

    My mother was a self taught decorator (I learned by watching her and by ‘on-the-job’ training), her specialty being doll cakes (all the rage in the late 60/early70s). Sadly, I only have one photo of her work, a doll cake that she made for my 6th or 7th birthday, but I treasure it.

    I have decorated cakes off and on over the years, though not as often or as much as I’d like to.

    I’m happy to have stumbled onto this site. Off to peruse and gather inspiration. :-)

    Reply
  73. Melissa Diamond November 10, 2013 at 12:21 am

    Again, thank you all for your kind words!!

    @Carole, I enjoyed reading your post, thanks for stopping by…I’m happy that you found us too!

    Reply
  74. Michelle J November 10, 2013 at 6:01 pm

    This cake is so beautiful and creative! You always come up with such great ideas!

    Reply
  75. rosi lopez November 11, 2013 at 2:37 pm

    Wow Melissa, as always, beautiful and creative!

    Reply
  76. Diana November 19, 2013 at 7:21 pm

    This cake is just BEAUTIFUL! I want to try and copy it. :) I’m curious if in a small cake like this I need to add board and dowels to prevent the bottom layer from being crushed?

    Reply
  77. Adriana December 29, 2013 at 6:05 pm

    Hi Melissa!! i have a question about melting chocolate, i always have trouble trying to melt white chocolate, do you have any tip? or what is your method? Thank you!

    Reply
  78. BeBe December 30, 2013 at 9:02 pm

    Hi Adriana, for this tutorial we microwaved white candy coating at 30 second intervals until it was melted. It actually is still holding its shape but very warm and I stir until it is totally melted…..this is to avoid over microwaving and burning the chocolate. You could use this same method with chocolate chips but we think candy coating is easier to work with.

    Reply
  79. Leona March 23, 2014 at 5:50 pm

    Wow this cake is stunning!!

    Reply
  80. Carol September 22, 2014 at 4:17 pm

    I have baked both box mix and from scratch cakes. I really want to do scratch but they always seem dry, Do you have any suggestions ?

    Reply
  81. BeBe September 22, 2014 at 11:55 pm

    Hi Carol, have you tried any of the cakes in the recipe section? I don’t think they are dry. Some bakers like to brush simple syrup onto the tops of the cake layers before frosting. It is equal parts sugar and water, bring to a boil, remove from the heat and stir to dissolve the sugar. Add flavoring and cool, brush on a small amount to the top of each cake layer. Hope this helps.

    Reply
  82. Sarah September 30, 2014 at 9:50 pm

    I love this cake! I was designing my daughters cake in my head and wondered if I could do a tree with candy melt leaves and here you are! Thanks for the awesome tutorial!

    Reply
  83. margot osorio October 1, 2014 at 10:23 pm

    Hi Melissa, I want make this cake but I don’t sure what kind the recipe is for make the leaves? Thank you.

    Reply
  84. Mimi October 2, 2014 at 10:30 am

    Melissa, there is amazing Cake… I love all your creations and i’ll be member son. Thanks for your inspiratons!

    Reply
  85. Teri October 19, 2014 at 10:25 pm

    I attempted this cake for my Father-in-law’s birthday and was pleasantly pleased. Although my cake wasn’t as clean as yours was, I had fun doing it. Thanks for the tutorial.

    Reply
  86. BeBe October 19, 2014 at 10:53 pm

    Wonderful, we are so happy you made this cake!!

    Reply
  87. Emily October 30, 2014 at 10:08 pm

    Can this be done using a sheet cake? Planning on giving it a shot for my daughter’s 1st bday :-)

    Reply
  88. Melissa Diamond October 30, 2014 at 11:20 pm

    Thanks for your comments!

    @Margot–Sorry that I didn’t see this sooner. The leaves are just Wilton candy melts. Any melted candy coating or bark coating would work well.

    @Emily- Of course! A sheet cake would actually allow for a larger tree (or larger leaves) if you’d like! It will be beautiful ;0)

    Reply
  89. BeBe October 30, 2014 at 11:20 pm

    Hi Emily, Yes, I think it would look great on a sheet cake .

    Reply
  90. fatema badri May 6, 2015 at 5:35 pm

    Gorgeous cake Melissa… I made something like that but I used ganache…it turned out quite good …thanks for the inspiration

    Reply
  91. evi silvia June 18, 2015 at 5:52 am

    love this cake..
    <3

    Reply
  92. Samantha Pickett July 11, 2015 at 12:22 pm

    for starters I LOVE this cake, it’s gorgeous!!! I’m thinking of doing this cake for my fall wedding. I was wondering about how long this cake could set out before the chocolate leaves melt or lose there shape? Since I’m thinking of this for my wedding cake it would set out on display (in an air conditioned room) for a long time. Thank you!

    Reply
  93. Melissa Diamond July 11, 2015 at 12:56 pm

    Thanks for your comments!

    @Samantha, so glad that you are thinking of making this! The leaves will be fine at room temp for a long period of time. We actually left this cake out at least overnight and it was fine!

    For your peace of mind, you can make a few leaves sometime between now and then just for practice to see how they do. This chocolate/candy coating is firm at room temp (just as it is in it’s original “button” form), but the leaves are thinner and so they are a bit more fragile when handling. That is why I recommend applying them to the cake when the leaves are chilled. Would love to see the finished cake!

    Reply
  94. Sandra September 22, 2015 at 11:11 am

    Espectacular!!!!

    Reply
  95. Sharon October 7, 2015 at 10:04 pm

    Hi Melissa,
    Do you comb the cake immediately after smoothing and do you only comb lightly ?? I use a crusting buttercream. It seems to be an easy technique that i am making harder than it should be !!! Thank you for doing these tutorials for us !!!

    Reply
  96. Melissa Diamond October 7, 2015 at 11:26 pm

    Hi Sharon- After frosting the final coat of frosting on my cake, I immediately hold my bench scraper against the side of my cake and spin the cake on the turntable to smooth things out. This step also removes excess frosting, etc. If you don’t have a bench scraper, you can just use a long spatula. (I’m not concerned with the frosting being perfectly smooth since we’ll be going back over with the comb) – Once the frosted cake has been neatened up, I hold the cake comb against the side of the cake as I spin it once again on the turntable. It’s also easiest if you can turn your turntable a full rotation (or at least close to a full rotation) without stopping so that your lines will be as seamless as possible. You’ll want to comb your frosting before it has a chance to crust ;0) Hope this helps!

    Reply
  97. Dolores Kotab October 14, 2015 at 12:08 am

    I am planning on taking my facsimile of this cake to our church bazaar for the “specialty” Cake Walk Booth.
    It is stunning.

    Reply
  98. BeBe October 14, 2015 at 7:13 am

    That’s great, it is one of my favorites. I think they will love it!!

    Reply
  99. Amanda September 10, 2016 at 11:21 pm

    Once the leaves are in place does the cake need to remain chilled? I know the leaves will warm up quickly if held too long but did they manage fine once they were set in the buttercream?

    Reply
  100. Judy November 1, 2016 at 4:32 pm

    Is there a trick to gettingthe leaves so they don’t break when I lift them off paper. Using Wilton orange and leaves are coming out almost transparent. Am I not using enough chocolate? I know it takes practice – any suggestions??

    Reply
  101. Melissa Diamond November 17, 2016 at 9:09 pm

    @Judy- I’m sorry that I missed your comment before. It sounds like maybe you need to use a little more chocolate when piping your dots and try not to spread them quite as thin. Also, make sure that they are well chilled before trying to lift them. I freeze mine for a few minutes before releasing them…and if they become too warm on the cookie sheet after sitting out, back into the freezer they go. You can run your hand beneath the waxed paper, to help them release if they aren’t coming right off.

    Reply
  102. Judy November 20, 2016 at 9:02 pm

    Thx. Finally got the hang of it. Didn’t realize the cake was only 6 inches! I hope to be joining you website soon. Beautiful work.

    Reply
  103. Teresa Rudolph September 28, 2017 at 11:01 pm

    What size and how many layers?

    Reply
  104. Chococraft December 1, 2017 at 12:34 am

    What a fantastic post! The information is very useful. Thank you for sharing this here.

    Reply
  105. Aarati August 7, 2020 at 5:01 am

    Excellent work & very delicately arranged.lookes like a original one . Great job.

    Reply
  106. Teresa Lambert October 10, 2020 at 2:38 pm

    Wondering why not just use a star tip with multi colored buttercream to make the leaves? Or a leave tip. Seems less involved. I’m going to try it today.

    Reply
  107. Melissa Diamond October 10, 2020 at 2:48 pm

    Hi Teresa- yes, of course you can! I mentioned that in my post, but for this design I liked the unique look of the chocolate leaves. All- buttercream is a great option too (and faster).

    Reply
  108. Amanda October 10, 2020 at 4:14 pm

    Hey Teresa, using a star tip is definitely less involved, but using this technique gives such a different look! I used this technique on a cake, and recieved SO many compliments. The extra work was definitely worth it to me!

    Reply
  109. Amanda October 10, 2020 at 4:17 pm

    I meant to include a picture…

    Reply
  110. Melissa Diamond October 10, 2020 at 5:05 pm

    I love it, Amanda!

    Reply
  111. Jackie January 24, 2021 at 3:55 pm

    I made a version of this today with spring colors, entering it into a decorating contest being held by my apartment community. Thanks for the easy to follow instructions, it came out just how I wanted! It’s almost too pretty to eat!

    Reply
  112. BeBe January 24, 2021 at 6:50 pm

    Hi Jackie, I love the look in spring colors, great work. I’m ready for springtime.

    Reply

Leave a Reply Cancel reply

Your email address will not be published. Required fields are marked *

You can click here to Subscribe without commenting

Add a picture

Melissa Diamond Meet MelissaWelcome! We'd love for you to check out our free cake tutorials & recipes, or join our site for online access to hundreds of videos and more!

Read More

The Perfect Gift

  • Lemon Buttermilk Cake {A Scratch Recipe}

    Lemon Buttermilk Cake {A Scratch Recipe}
  • Sweet Balloons Cake

    Sweet Balloons Cake
  • White Chocolate Coconut Cake

    White Chocolate Coconut Cake
  • Striped Buttercream Panels Cake

    Striped Buttercream Panels Cake
  • Lemon Coconut Cake with Lemon Curd Filling

    Lemon Coconut Cake with Lemon Curd Filling
  • Milk Chocolate Cake

    Milk Chocolate Cake
  • Buttercream Tulip Cake

    Buttercream Tulip Cake
  • Flamingo Ruffle Cake- A Cake Decorating Video Tutorial

    Flamingo Ruffle Cake- A Cake Decorating Video Tutorial
  • 60+ of the BEST Cake Recipes for Spring and Summer

    60+ of the BEST Cake Recipes for Spring and Summer
  • Lemon Cake {A Scratch Recipe}

    Lemon Cake {A Scratch Recipe}
Facebook Instagram Pinterest Twitter RSS
Login
Melissa Diamond Meet MelissaWelcome! We'd love for you to check out our free cake tutorials & recipes, or join our site for online access to hundreds of videos and more!

Read More

Your Favorites

  • Your favorites will be here.
  • home
  • free tutorials
  • videos
  • recipes
  • contact
  • join
  • login
  • home
  • free tutorials
  • videos
  • recipes
  • contact
  • join
  • login

Copyright © 2022 My Cake School. Melissa Diamond. All rights reserved | Terms and Conditions | Privacy Policy