My Cake School

Cake Tutorials & Recipes

  • About
  • Recipes & Tutorials
  • Newsletter
menu icon
go to homepage
  • About
  • Recipes & Tutorials
  • Newsletter
    • Facebook
    • Instagram
    • Pinterest
    • Twitter
  • search icon
    Homepage link
    • About
    • Recipes & Tutorials
    • Newsletter
    • Facebook
    • Instagram
    • Pinterest
    • Twitter
  • ×

    Home » Blog » Video Tutorials » Gum Paste & Fondant Video Tutorials » Custom Toppers & Figure Modeling » Animals

    How to Make a Lion Topper~ Video

    August 3, 2014 By Melissa Diamond 6 Comments

    253 shares
    • Share
    • Tweet

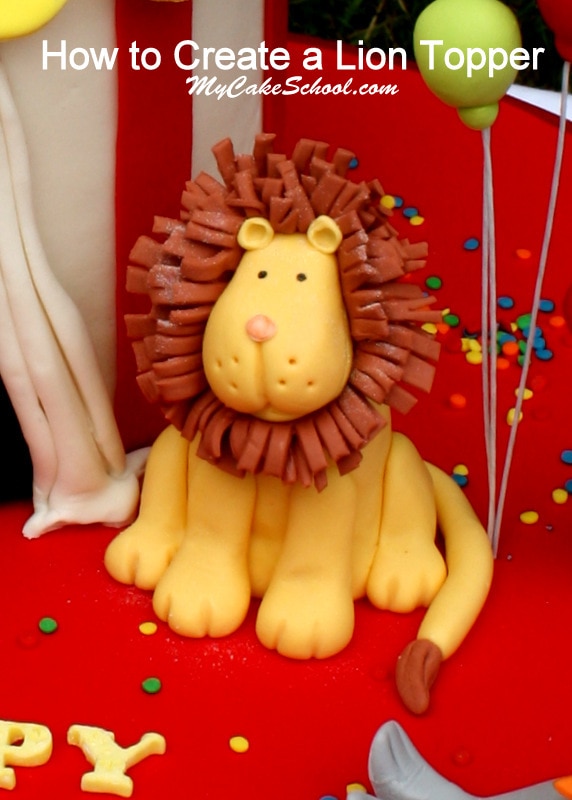
    Learn to make an adorable Lion Cake Topper in this My Cake School video tutorial! Perfect for Circus or Jungle Themed Parties!

    Hi everyone! In this tutorial, you will learn to make a simple lion cake topper--perfect for your jungle & circus cake themes! In our case, our lion will be featured in our Circus Cake Tutorial.  

    I hope that you enjoy it! Scroll below for a few notes!
    Materials:

    Rice Cereal Treats- (I used one 22g rice cereal treat for the lion's body). You could also use straight gum paste or fondant with tylose kneaded into it.

    Gum Paste Tinted golden yellow (I used Americolor Egg Yellow)

    Coloring Gels- Americolor Egg Yellow, Chocolate Brown (Mane), Pink (nose)

    Americolor Pen in black (for eyes)

    Toothpicks- For carving facial features and for anchors

    **We used a toothpick to anchor the head to the body. You will want to warn your guests/customers that there is a toothpick in the lion if you go this route and are afraid that they may try to eat the lion ;0). Another idea would be to secure the head with a lollipop stick (less sharp!) or dry pasta.

    *Around the time that we started our site, we included a lion cake tutorial for our jungle cake. The tutorial is similar to this one, however in our original tutorial, I drove a lollipop stick through a gum paste body and added the head almost immediately. I do my lions a little differently now-- mainly, I let the body either dry completely before adding the head, or I use a rice cereal treat for the body. This prevents the issue of sagging, which can sometimes happen when the head is placed on a body that hasn't had a chance to dry ;0)


    Related posts:

    1. How to Make Elephants & Seals! (Part of our Circus Cake)~Video
    2. Western Baby Shower Cake and Cowboy Boot Cake Topper Tutorial
    3. How to Make a Clown~ Video
    4. Leopard Print Baby Shower- Pattern on the Inside!- Video Tutorial
    5. Dinosaur Birthday Cake~ Video Tutorial
    « How to Make Elephants & Seals! (Part of our Circus Cake)~Video
    Circus Poodle!~ Video Tutorial »

    Comments

      Leave a Reply Cancel reply

      Your email address will not be published. Required fields are marked *

      Recipe Rating


      The maximum upload file size: 2 MB. You can upload: image. Drop file here

    1. Doreen Broughm August 3, 2014 at 11:05 pm

      He is just way too cute. Love him and the other animals too.
      Thanks for showing how to make these cute animals.

      Reply
    2. marlene August 4, 2014 at 8:09 am

      I wish I was half as talented as you. Melissa it looks like you burned your left hand. Ouch.

      Reply
    3. Melissa Diamond August 4, 2014 at 9:36 am

      Thanks Doreen & Marlene, so glad that you liked it! --

      @Marlene-- No burns here! Haha, must be the lighting playing tricks ;0)

      Reply
    4. MsGF August 16, 2014 at 4:46 pm

      I love this lion. Very cute!!

      Reply
    5. Donna Roberts March 19, 2016 at 8:58 am

      I am making this lion and was wondering what the back of the lions head ends up looking like.

      Reply
    6. Melissa Diamond March 19, 2016 at 2:35 pm

      Hi Donna! That's a good question- I can't remember if the back of the head was completely covered by the strips of fringed fondant. I would just go by what you feel looks best. If you prefer for it to be completely brown on the back of the head, you can cut a thin circle of brown fondant and fill in any remaining space...you can texture it also if you'd like. I'm glad that you are making him! ;0)

      Reply

    Popular Recipes

    • Champagne and Raspberries Cake
    • Cartoon Cake (Free Cake Video Tutorial)
    • Carrot Cheesecake Cake
    • Gluten Free Vanilla Cake
    • Peanut Butter Cupcakes (Cake Mix Recipe)
    • Mom's Chocolate Cake

    Featured Holiday Cakes

    • The BEST Free Cake Decorating Video Tutorials
    • How to Make a Turkey Topper~Blog Tutorial!
    • Buttercream Ruffle Cake Tutorial
    • 60+ Easter Cakes and Tutorials
    • 60+ Valentine's Day Cake Tutorials and Recipes
    • 60+ of the BEST Summer Cakes, Tutorials, and Ideas!

    More Seasonal Cakes

    Popular Recipes

    • Banana Pudding Cupcakes (Cake Mix Recipe)
    • Chocolate Almond Cake
    • 100+ Birthday Cake Ideas
    • Cherry Chocolate Chip Pound Cake
    • Our Most Popular Cake Recipes of 2022
    • 40+ New Year's Cake Ideas

    Featured Holiday Cakes

    • Sweet Stick Figure Couple- A free cake video tutorial
    • Lots of Love Cake- A Free Cake Tutorial
    • Eggnog Cake with Eggnog Buttercream- A Scratch Recipe
    • 60+ Christmas Cake Recipes
    • 60+ of the BEST Cake Recipes for Spring and Summer
    • A Roundup of Our Christmas & Winter Cake Tutorials!

    More Seasonal Cakes

    • Free Blog Tutorials
    • Free Cake Videos
    • Recipes
    • Contact
    • About

    Copyright © 2023 My Cake School. Melissa Diamond. All rights reserved | Terms and Conditions | Privacy Policy