How to Make a Lion Cake Topper
In this tutorial, you will learn to make a simple lion cake topper--perfect for your jungle & circus cake themes!
In our case, our lion will be featured in our Circus Cake Tutorial. We made a similar lion in our Jungle Cake Tutorial as well!
I hope that you enjoy it! Scroll below for a few notes!
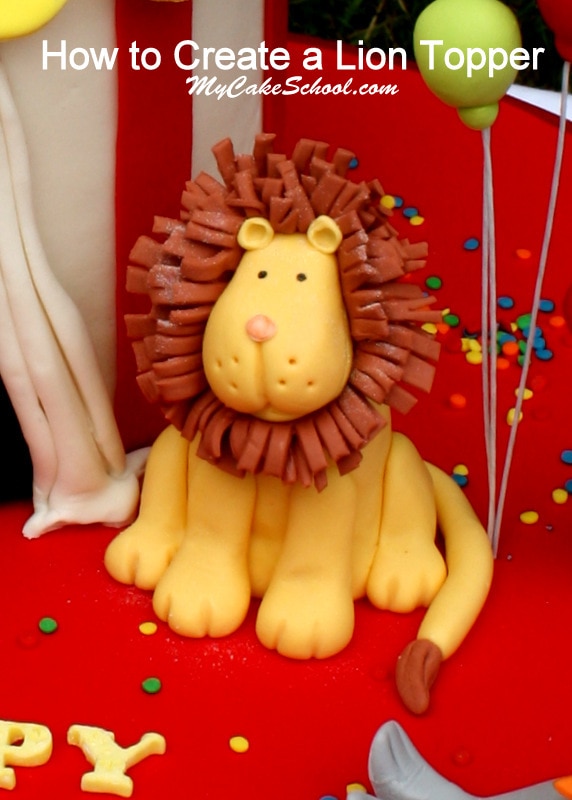
Table of Contents
Materials for Lion Cake Topper:
Rice Cereal Treats- (I used one 22g rice cereal treat for the lion's body). You could also use straight gum paste or fondant with tylose kneaded into it.
Gum Paste Tinted golden yellow (I used Americolor Egg Yellow)
Coloring Gels- Americolor Egg Yellow, Chocolate Brown (Mane), Pink (nose)
Americolor Pen in black (for eyes)
Toothpicks- For carving facial features and for anchors
**We used a toothpick to anchor the head to the body. You will want to warn your guests/customers that there is a toothpick in the lion if you go this route and are afraid that they may try to eat the lion ;0). Another idea would be to secure the head with a lollipop stick (less sharp!) or dry pasta.
More Animals to Learn!
If you enjoy figure modeling, we have created many other fondant and gum paste animals over the years! Here are just a few:
Toy Box Cake Topper (with bear, giraffe, bunny, & elephant)
Noah's Ark Cake (hippos, flamingos, lion, panda, etc.)
Jungle Cake (Monkeys, Lion, Giraffe)
Cat Birthday Cake (kittens and balls of yarn)
Enjoy the Video!
Thanks so much for stopping by. We hope that you enjoy the tutorial! Figure modeling is such a fun way to personalize cakes, and it is surprisingly simple once you learn the basics!
The techniques that you learn in this tutorial can be applied to all sorts of animals with a few simple adjustments. Please let us know if you have any questions!
He is just way too cute. Love him and the other animals too.
Thanks for showing how to make these cute animals.
I wish I was half as talented as you. Melissa it looks like you burned your left hand. Ouch.
Thanks Doreen & Marlene, so glad that you liked it! --
@Marlene-- No burns here! Haha, must be the lighting playing tricks ;0)
I love this lion. Very cute!!
I am making this lion and was wondering what the back of the lions head ends up looking like.
Hi Donna! That's a good question- I can't remember if the back of the head was completely covered by the strips of fringed fondant. I would just go by what you feel looks best. If you prefer for it to be completely brown on the back of the head, you can cut a thin circle of brown fondant and fill in any remaining space...you can texture it also if you'd like. I'm glad that you are making him! ;0)