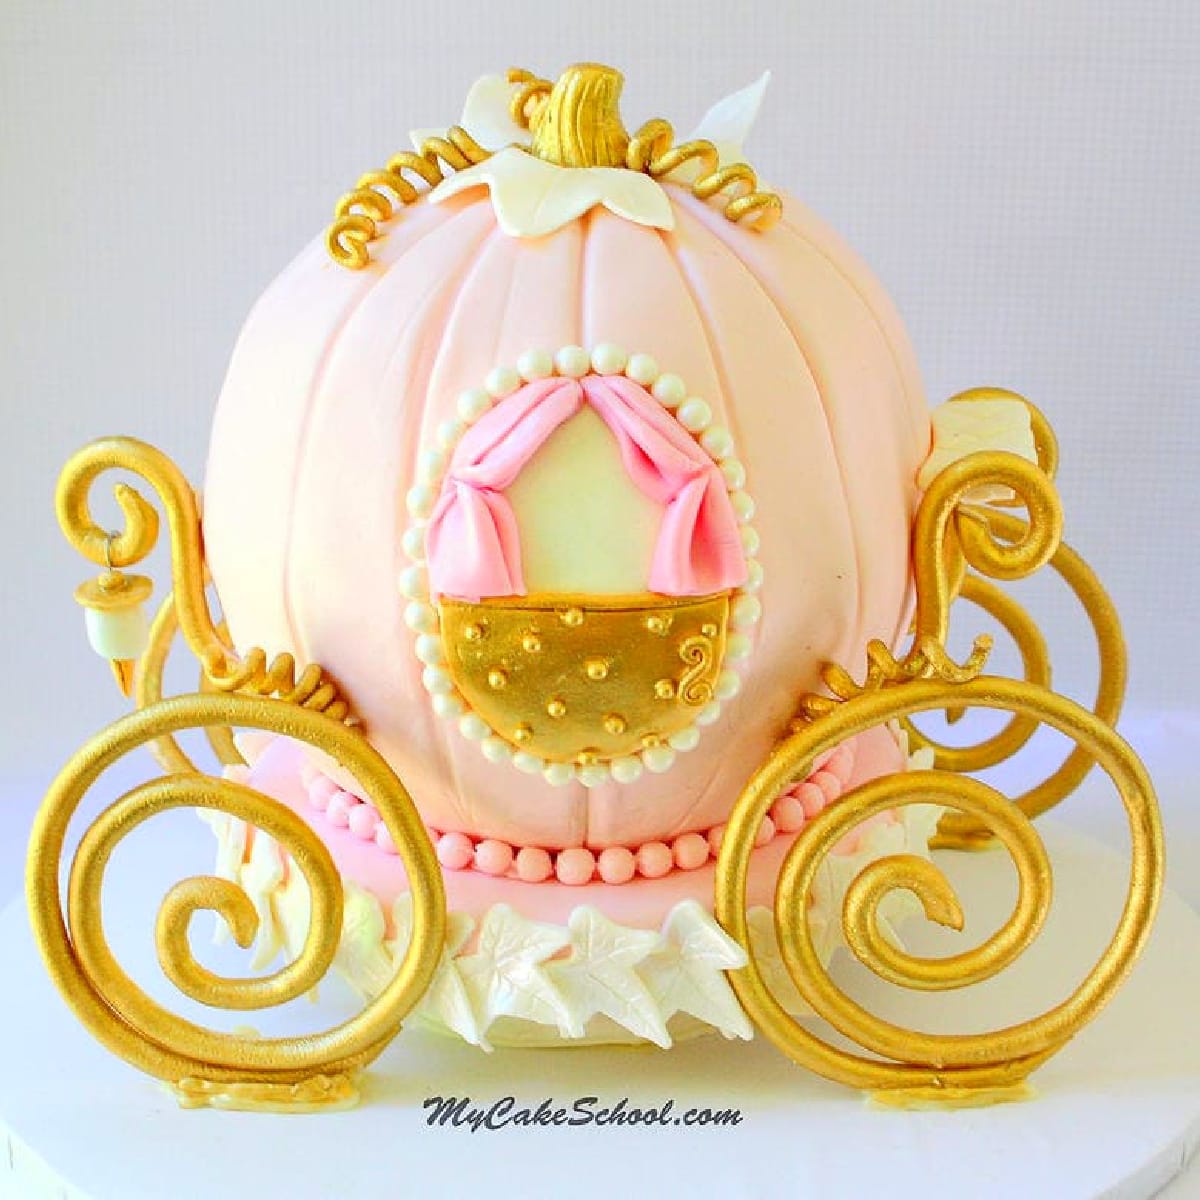
Cinderella Carriage Cake- Video Tutorial
In this free cake video tutorial, you will learn how to make a gorgeous Cinderella Carriage Cake!
This cute cake was so much fun to make, and would be the perfect birthday cake for princesses of all ages!
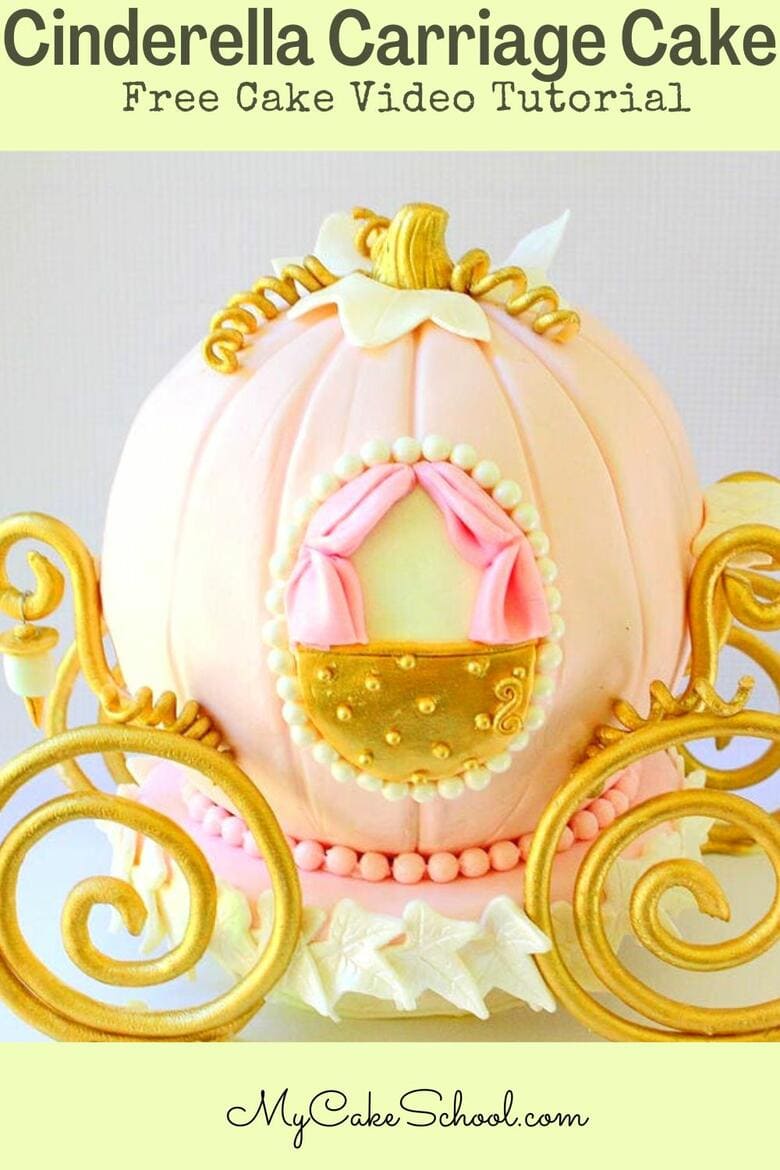
We have fallen in love with this sweet carriage cake design! We will walk you through all of the steps from start to finish in our cake video tutorial.
Table of Contents
Materials for Carriage Cake:
For this cake, we used a Wilton Sports Ball Pan (aff.) and our scratch White Almond Sour Cream Cake Recipe. We frosted the cake in white chocolate ganache (3:1 ratio of chocolate to cream), and covered in fondant. Wheels and freestanding accents should be created in gum paste (or fondant with a good amount of tylose kneaded into it.) and dried at least 2-3 days in advance.
White Chocolate Ganache- 3:1 ratio of chocolate to cream. (We used 624g chocolate, 208 g heavy cream) *For more info on making the ganache, see Notes section below.
Cardboard Cake Circles- We used three 6 inch cake circles for the small pink base that cake sat on. We also used 2 additional 6 inch cardboard cake circles cut down to size to go beneath the cake as well as halfway up. used four 12 inch cake cardboards for large base.
Styrofoam circle - used to elevate the cake. You could substitute cardboards or foam core. (approx 4 ¼ inches diameter.)
Templates for Leaves, Window/Door, Wheels, Curls, etc.
Fondant (we used Liz Marek's fondant recipe)
Coloring Gels: Americolor Deep Pink, Ivory
Luster Dust: We used Rolkem Super Gold, Super Pearl (optional for dusting over white leaves)
Vodka or Lemon Extract- (We use vodka). Mixed a tiny bit with the gold dust to create gold paint for accents.
Sugar Pearls: We used large sugar pears around window/door, and smaller ones on door (painted over with gold paint.)
Extruder- Optional. We used our Makin's Ultimate Clay Extruder to create ropes of gum paste for the wheels and curled accents.
Silicone Bead Former- Optional. (We used for creating pink pearl border. You could also use sugar pearls or piping.
Bubble Tea Straw (cut to size and placed in bottom half of cake to support upper half)
Wooden Dowel- approx ¼ inch width, sharpened to a dull point (a sharp point may break off into cake).
Cake Base- We recommend 4 cardboard cake circles (we wrapped in a white plastic tablecloth). Needs to be thick so that the sharpened wooden central dowel can be securely hammered & anchored into base.
Piping Gel
Floral wire- I used a small piece for the lantern.. (any pliable gauge that can hold the weight of the lantern.) Ours was 22 gauge.
Melted Candy Melts ("glue" for wheels, attaching cake to base, etc.)
Miscellaneous: Small paint brushes, vegetable shortening for prepping counter..etc,. sharp knife or exact, parchment paper, spatula for ganache, turntable is helpful, fondant rolling pin

Additional Notes for Making a Carriage Cake
I love how this cake turned out, but in hindsight there are a couple of things I would change about the wheels and chassis that would make the carriage even simpler.
First, you may want to consider an oblong or rectangular chassis/cake base for your cake. Since I used a 6 inch round cake base rather than rectangular, the wheels didn't have as much surface area to be glued to. Just something to think about!
Carriage Cake Wheels- Please Read
Next, as much as I love the look of the gum paste spiral wheels, they are rather fragile. You'll want to make an extra one or two to be on the safe side. *A great alternative would be solid gum paste circles for wheels that could be decorated with thin extruded spirals for a similar look which would be stronger. If I were to do this again, I would probably use solid wheels because I would hate for anyone to wind up with a broken wheel at the last minute.
Make sure to dry your gum paste wheels and decorative curls in advance--at least 2-3 days to be on the safe side. (Dry times can vary depending on brand of gum paste, humidity in the air, etc.)
Making the Gold Paint
Gold Paint: In order to paint the wheels, etc, I put a little Rolkem Super Gold luster dust onto a palette, and put a little vodka into one of the wells.
Then, bit by bit I dipped my brush into the vodka & combined a little vodka into the dust until it became a thick, smooth consistency for painting. (Mom is allergic to the gold dust in the air & so I do this step outside.)
Making the Ganache
For the White Chocolate Ganache: You'll want a 3:1 ratio of chocolate to cream. We used 3 packages of Ghirardelli white chocolate chips (624 g) and 208 grams heavy cream (which is just under one cup).
Combine the chocolate and cream in a bowl and microwave for 1 min at full power. Let sit 2 minutes. Microwave 20 seconds full power.
Stir (try not to incorporate air). Then if needed, 30 more seconds at half power. Stir to melt any remaining chocolate pieces. Let set at room temperature. (If it becomes too firm, microwave in small intervals until it returns to frosting consistency.)
A note about Elevating the Carriage Cake
We decided to elevate our carriage cake slightly on a small piece of styrofoam (covered with fondant), but this is a completely optional step.
If you are new to cake decorating, or simply don't want to put the time into this step, the carriage would adorable whether elevated or not!
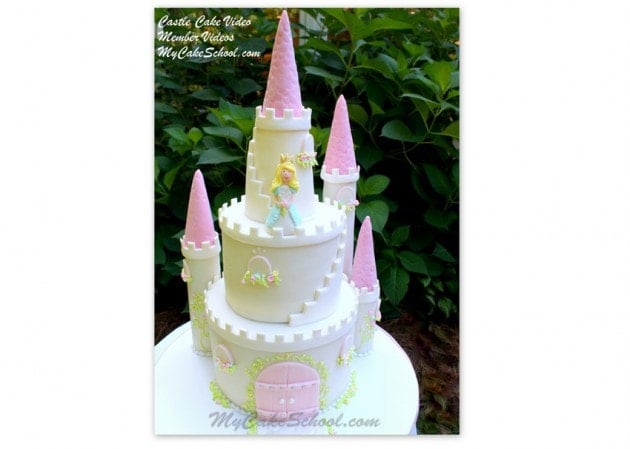
Another Princess Themed Cake
While we're on the topic of princess themed cakes, did you know that we also have a Free Castle Cake Video Tutorial? It is a fun option also for the princess in your life ;0)
Enjoy the Video!
Thanks so much for stopping by, we hope that you enjoy the Cinderella Carriage Cake video! We would love for you to check out our full cake decorating section for many more birthday cake ideas!
We also have tons of cake recipes to share with you that would be great for this cake and others, from white velvet cake to yellow cake, scratch chocolate cake and more!
Have you made this? We would LOVE for you to leave a ⭐️ rating as well as a comment and photo below! We really appreciate your feedback!
Hi Tambra, it's possible & I've seen it done, but it really wouldn't be my first choice since chocolate wheels are so fragile. You would definitely want to make extra just in case of breakage and handle them when chilled.
As chocolate cools, it thickens. If the chocolate is too warm and thin, you can wait a couple of minutes before piping your wheels. If you'd like them even thicker, you can chill them, and then pipe on another layer. You'll probably like the look of the flat, smooth side best. Good luck!
Did you paint the gold on the wheels with an air brush or hand painted? I'm in the middle of making one for my grand daughter's birthday and was just wondering. Thanks for the awesome tutorials!!
Hi Ginny, I used Gold Luster Dust (Rolkem Gold) mixed with a tiny bit of vodka to paint the wheels. After they dried, I dusted over with dry gold dust. Mom is really sensitive to the gold dust in the air and so I often do this step outside (off camera).
Thank you!
Beautiful cake Melissa! And Marlene - I LOVE your cake and colors -OMG its gorgeous. I would love to see a close up of it. :) Melissa, I need to cover the 3 cake boards as you did, but I need to cover some of the underside also as it will be a roof with about an inch or two of overhang. I tried to cover the top and bottom in one piece but had so much bulk it was awful! Is there a tutorial somewhere that shows top and bottom being covered? If not, how would you go about doing it so the bottom is as smooth as the top? Thanks!
Hi Gloria, I'm glad that you're making this!
I think that I would cover the top and sides as usual, trim away the excess and let it dry...and then once dry, flip it over and cover the bottom separately with a layer of fondant (or an outer ring of fondant if just a small amount of the bottom will show.) - You can brush piping gel onto the underside before applying the fondant to help it adhere.
Hi..I have a question. I was asked to make the carriage as a cake topper so I was wondering if I could just use a 6inch smooth Styrofoam ball. If so what would you suggest as to covering the Styrofoam? White chocolate ganache? I have never used them so I am new to using dummy cakes...thanks for your help.
Hi Adrienne- You can just brush your styro ball with piping gel, and then apply the fondant. You'll want to allow it to set up a bit before handling so that you don't create fingerprints when placing it on the cake--
We cover a styrofoam ball in our gravity defying teapot cake if you'd like to see. It's the first thing that we do in Part 1 of the video. Here is a link:
Thanks rhe tutorial, it's beautyful! This is my version.?
Awww...it's beautiful! Thanks for sharing your photo! xo
I seen where u said next time you would make a rectangle type board to sit it on instead of a round one. well I seen a pic of one on pintrest that was rectangle base sitting on a small round one. what size should I make it.. im trying this in feb for our churchs daddy daughter dance and the theme is Cinderella. this would be perfect.
Hi Rebecca, I think that you could still use the small circle of styrofoam covered in fondant for the very bottom as I did in the video (which was a little over 4 inches in diameter. The circular base in my video was made from three 6 inch rounds--
I actually thought that the 6 inch width of the base worked well with our cake...but since it was round, I had less surface area to attach/support the wheels. I think you would find it easier either to go with a 6x6 inch square base...or a 6 inch width and slightly longer length (maybe 6x7 or 6 x8 rectangle).
You could even wait until your cake is made before deciding how much length you want for the platform/base so that you can actually see it rather than guess..(or you could piece together your two cake pans and place on a rectangle template). Let us know how it goes!