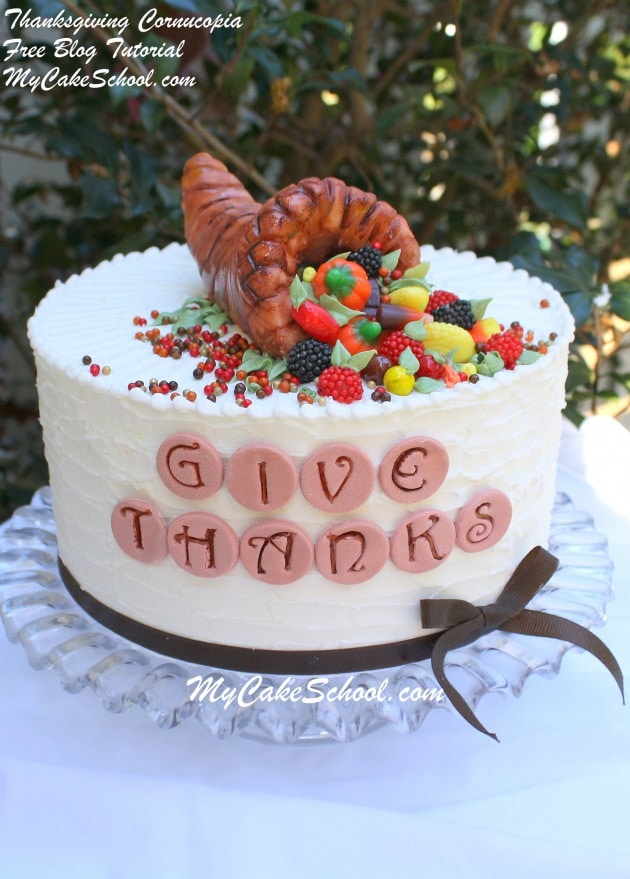
My Cake School

Cake Tutorials & Recipes

  • Facebook
  • Instagram
  • Pinterest
  • RSS
  • Twitter
Login
  • home
  • Videos
    • The Basics
    • Buttercream Techniques
    • Carved/3D
    • Chocolate Techniques
    • Cupcake, Cake Pop, etc. Methods
    • Gum Paste & Fondant
    • Themes and Occasions
    • See All Videos
  • Shop
    • Miscellaneous Cake Decorating Supplies
    • Kitchen Appliances
    • Chocolate and Candy Making
    • Fondant and Gum Paste
    • Piping Tips
    • Molds, Mats, Embossers, and Cutters
    • Cookbooks
    • Dusts and Sprays
    • Pantry Items
    • Bakeware and Tools
    • Sprinkles and Candy
  • Free Tutorials
  • forums
  • recipes
    • Cakes and Cupcakes
    • Fillings
    • Fondant/Gumpaste
    • Frostings and Glazes
    • Miscellaneous
  • contact
  • join

Thanksgiving Cornucopia~ A Blog Tutorial

November 14, 2013 By Melissa D. 20 Comments

339 shares
  • Share
  • Tweet


Today I’m going to demonstrate how to make a beautiful Thanksgiving Cornucopia cake topper!

We love this simple Thanksgiving Cornucopia Cake Topper! Free cake tutorial by MyCakeSchool.com!


Today was my first try at creating a cornucopia cake topper, but it came together surprisingly quickly!  With rice cereal treats on our side, anything is possible!

This will not only make a great cake topper, but for all of the cookie or cupcake fans out there, it would also make a great centerpiece for the middle of your dessert platter.

Let’s get started…


How to Make a Thanksgiving Cornucopia Cake Topper


First, I mashed and shaped four Rice Krispies Treats (22g) together into the shape of a cornucopia.

How to Make a Cornucopia Cake Topper! Free Cake Decorating Tutorial by MyCakeSchool.com!


You can see in this photo how I made a depression where the opening of the cornucopia would be, to give it a little depth.  I also rolled out some white fondant.  (Gum paste would be fine too if you would rather!) Cute Thanksgiving Cornucopia Cake Topper Tutorial by MyCakeSchool.com! Free step by step cake tutorial!

Next, I rubbed a light coating of vegetable shortening onto my cereal treat cornucopia before covering it with a layer of fondant.  I trimmed away the excess with a pizza wheel.

Adorable Thanksgiving Cake Topper Tutorial by MyCakeSchool.com! Learn to Make a Cornucopia in this Free Tutorial!

Next, I used a toothpick to create impressions.  (Use whatever you’d like…the dull side of a knife, paintbrush handle, scriber needle, etc.)


Thanksgiving Cornucopia Cake Topper Tutorial by MyCakeSchool.com! Free step by step cake tutorial!

Next, it was time to paint!  I painted the cornucopia with Americolor Chocolate Brown, which was diluted a bit with vodka.  Mixing vodka (or even lemon extract) with coloring gel is really helpful when painting because the alcohol greatly speeds up the dry time.  If you’d prefer not to paint, you can tint your fondant brown with coloring gel from the beginning.


Cornucopia Cake Topper Tutorial by MyCakeSchool.com! SO simple and festive!

Here’s our cake of honor, an 8″ cake which is frosted with our Classic Vanilla Buttercream Recipe.  I used my small offset spatula to give it a little texture.

Fabulous Cornucopia Cake Topper Tutorial by MyCakeSchool.com! Try our free step by step cake tutorial!

Here you can see that I pushed a bubble tea straw (cut to the height of the cake) into the center.   This is an optional step, but it’s not a bad idea to add a support beneath your cake toppers to prevent any chance of sinking.

Free and Simple Cornucopia Cake Topper Tutorial by MyCakeSchool.com!

Next, I rolled out a bit of fondant (tinted Americolor Chocolate Brown), and used my 2D piping tip to cut out circles.  

Using a  Stone Stamp Set (aff.), which can be found online and often at craft stores (like Michael’s, etc.).

I embossed the fondant circles to spell our Thanksgiving message.  I used a little of my vodka/coloring gel paint to darken the letters so that they would pop out a little more, but that is optional!

Free Step by Step Cornucopia Cake Topper Tutorial by MyCakeSchool.com! Perfect for Thanksgiving cakes!


I placed the cornucopia onto our cake and filled it with assorted colorful fall candies–you have some flexibility with this step.  

Use whatever candy or piped designs you’d like.  I went to our local candy store and bought a little bit of everything…(gummi raspberries, Sixlets, Indian Corn, and candy pumpkins).  

I filled in with fall colored sprinkles and buttercream leaves (tinted Americolor Avacado Green and piped with a leaf tip 352).


Cornucopia Cake Topper Tutorial by MyCakeSchool.com! So quick, easy, and festive!

I glued our fondant letters onto the cake with a little bit of buttercream.  

As a final touch, I piped a small bead border around the top edge with a Wilton tip 4, and used a brown ribbon to create my bottom border.  (When I use ribbon on a cake, I lightly grease it with a little vegetable shortening to prevent splotchiness.) –

That’s it! I love how this sweet cornucopia topper turned out! If you ever give this fall cake design a try, we would love to see your photos in the comments below!


Cornucopia Cake Topper Tutorial by MyCakeSchool.com!


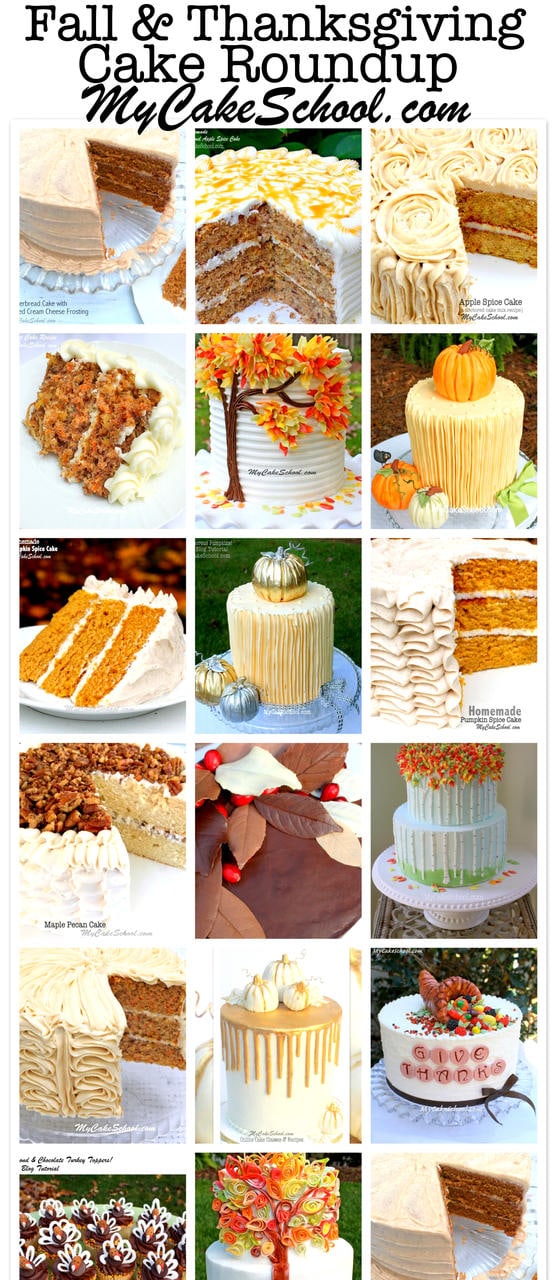
More Fall Recipes and Cake Decorating Ideas!

Interested in even more fall cake designs and  favorite cake recipes? Don’t miss our roundup! I’m listing just a few of them below, but if you click over to our roundup, you will find many more!  

  • Pumpkin Spice Cake- Doctored Cake Mix


  • Pumpkin Spice Cake from Scratch


  • Pumpkin Spice Latte Cake 


  • Gingerbread Cake-Doctored Cake Mix


  • Orange Spice Doctored Cake Mix


  • Sweet Potato Cake from Scratch


 Fall & Thanksgiving Roundup of the BEST Cakes, Tutorials, and Ideas!


The BEST Fall and Thanksgiving Cake Roundup! Recipes and Cake Design Ideas by My Cake School!


MY CAKE SCHOOL- CAKE DECORATING RECIPES & TUTORIALS

For more cake decorating ideas, don’t miss our Free Tutorials Section. Or, if you are interested in accessing our entire collection of hundreds of cake decorating tutorials, you should consider becoming a member of My Cake School!

Our memberships are $30/year and will give you online access to every cake decorating video we’ve made for as long as you are a member. You can find the joining details here: Joining Information for My Cake School. We would love to have you!

Also, if you love baking cakes, don’t miss our full collection of tried and true cake and frosting recipes from our Recipes Section!

We have tons of scratch cake recipes as well as doctored cake mix recipes and a huge collection of favorite frostings and fillings! There is something for everyone! Enjoy!


Related posts:

  1. Happy Halloweenie! Free Cake Video~ Featuring Topper & Tri-Colored Buttercream
  2. Witch Hats!- A Halloween Cake Decorating Tutorial
  3. Nursery Rhyme Cupcakes!
  4. Valentines Day Cupcake Tutorial! My Cake School
  5. Let’s Hoo Hoo Hula!~ Owl Cake Topper Tutorial

Filed Under: Blog Tutorials, Custom Toppers & Figure Modeling, Fall, Gum Paste & Fondant, Seasonal & Holiday, Themes and Occasions Tagged With: Cornucopia Cake, Cornucopia Cake Topper

« Autumn Leaves in Chocolate~ Blog Tutorial
Sledding Snowmen Cake Video! »

Comments

  1. Maureen Zaccaria November 15, 2013 at 12:17 am

    This is such a beautiful cake!! Thank you so much for the instructions!! I always wanted to make a cornucopia for a cake and you made it look so easy. You really are so so talented and real artistic!

    Thanks so much,
    Maureen Z.

    Reply
  2. Rosario Carrillo November 15, 2013 at 1:23 am

    Thank you for sharing the idea and the instructions is so helpful to me
    its simple but beautiful!!

    Reply
  3. MsGF November 15, 2013 at 9:01 am

    Very nice. Love all the beautiful Autumn colours.

    Reply
  4. LynnS November 15, 2013 at 9:18 pm

    This is really lovely. :-)

    Reply
  5. Melissa Diamond November 16, 2013 at 12:44 pm

    Thank you all so much!

    Reply
  6. Jillian November 18, 2013 at 10:07 am

    This is beautiful and I am actually planning on making this next week! I have one question… did you put anything underneath the vegetables and fruit to make the cascade out of the cornucopia? Or is it just more candy? Thanks!

    Reply
  7. Melissa Diamond November 18, 2013 at 10:39 am

    Hi Jillian–Thanks! No, I didn’t put anything underneath the candy. Actually, the depression in the center of the cornucopia paired with the edge being fairly wide gave us a nice little slope for our candy. I didn’t need to do much building at all! Good luck! ;0)

    Reply
  8. seabass123 November 19, 2013 at 5:20 pm

    Melissa…..Simply adorable. Too pretty to eat!

    I wish you and Bebe and your family a warm and happy Turkey Day.

    Reply
  9. Brenda @ SweetSimpleStuff November 19, 2013 at 11:48 pm

    Gorgeous cake … pinned it!

    Reply
  10. Ann from Atlanta November 20, 2013 at 9:39 am

    Lovely addition to a family Thanksgiving! Let us give thanks for we are so blessed!
    Happy Thanksgiving Melissa to you and your family!

    Reply
  11. afroditi giagli November 20, 2013 at 3:01 pm

    hi…thanks for your lovely tutorials that make our lives a bit easier!

    Reply
  12. June from Hawaii November 20, 2013 at 6:39 pm

    This is a wonderful tutorial, thank you so much!!!

    Reply
  13. Melissa Diamond November 20, 2013 at 6:49 pm

    Thanks so much for your comments! I hope that you all have a great Thanksgiving! xo

    Reply
  14. Anita Barron November 20, 2013 at 7:17 pm

    Beautiful—–To pretty to eat

    Reply
  15. Joanne November 20, 2013 at 7:39 pm

    I love this … I will have to remember this for next year. Thanksgiving falls mid October here in Canada :)

    Reply
  16. Joy November 21, 2013 at 12:30 am

    Awesome cake and tutorial, simple and effective. Love your work

    Reply
  17. AUXAI TARTAS February 4, 2014 at 6:14 pm

    Stunning! Love it!

    Repostería creativa, tartas fondant

    Reply
  18. gracie March 1, 2014 at 2:48 pm

    How do you attach ribbon to the bottom of the cake?

    Reply
  19. Melissa Diamond March 1, 2014 at 9:06 pm

    Thanks for all of your comments!

    @Gracie– I lightly greased the ribbon with vegetable shortening and wrapped it around the cake. This is what I like to do whenever using ribbon so that there is no splotchiness from the frosting (everything is evenly “discolored”). I let the two ends slightly overlap in back and glue together with a dot of buttercream.

    Reply
  20. Stella September 7, 2014 at 1:35 pm

    beautiful cake,,,,,

    Reply

Leave a Reply Cancel reply

Your email address will not be published. Required fields are marked *

You can click here to Subscribe without commenting

Add a picture

Melissa Diamond Meet MelissaWelcome! We'd love for you to check out our free cake tutorials & recipes, or join our site for online access to hundreds of videos and more!

Read More

The Perfect Gift

  • Lemon Buttermilk Cake {A Scratch Recipe}

    Lemon Buttermilk Cake {A Scratch Recipe}
  • Sweet Balloons Cake

    Sweet Balloons Cake
  • White Chocolate Coconut Cake

    White Chocolate Coconut Cake
  • Striped Buttercream Panels Cake

    Striped Buttercream Panels Cake
  • Lemon Coconut Cake with Lemon Curd Filling

    Lemon Coconut Cake with Lemon Curd Filling
  • Milk Chocolate Cake

    Milk Chocolate Cake
  • Buttercream Tulip Cake

    Buttercream Tulip Cake
  • Flamingo Ruffle Cake- A Cake Decorating Video Tutorial

    Flamingo Ruffle Cake- A Cake Decorating Video Tutorial
  • 50+ of the BEST Cake Recipes for Spring and Summer

    50+ of the BEST Cake Recipes for Spring and Summer
  • Lemon Cake {A Scratch Recipe}

    Lemon Cake {A Scratch Recipe}
Facebook Instagram Pinterest Twitter RSS
Login
Melissa Diamond Meet MelissaWelcome! We'd love for you to check out our free cake tutorials & recipes, or join our site for online access to hundreds of videos and more!

Read More

Your Favorites

  • Your favorites will be here.
  • home
  • free tutorials
  • videos
  • recipes
  • contact
  • join
  • login
  • home
  • free tutorials
  • videos
  • recipes
  • contact
  • join
  • login

Copyright © 2022 My Cake School. Melissa Diamond. All rights reserved | Terms and Conditions | Privacy Policy