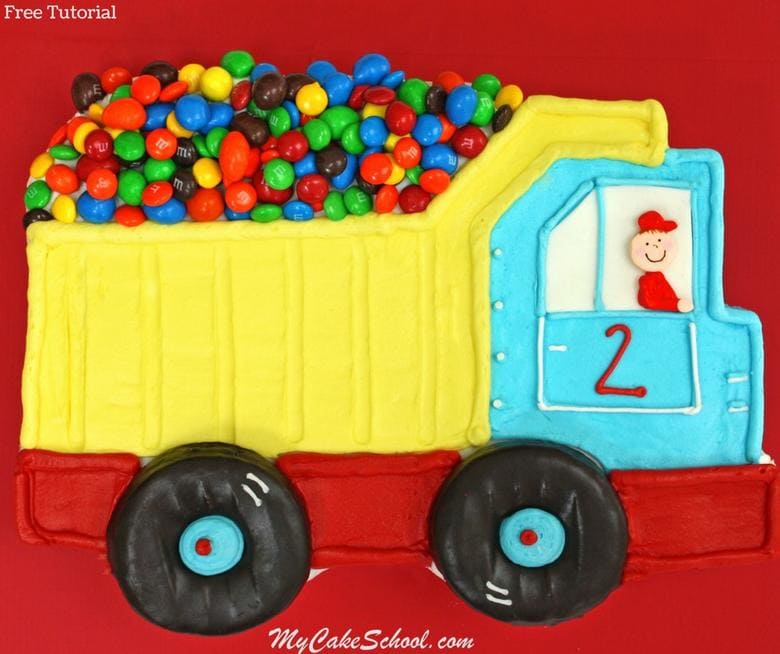
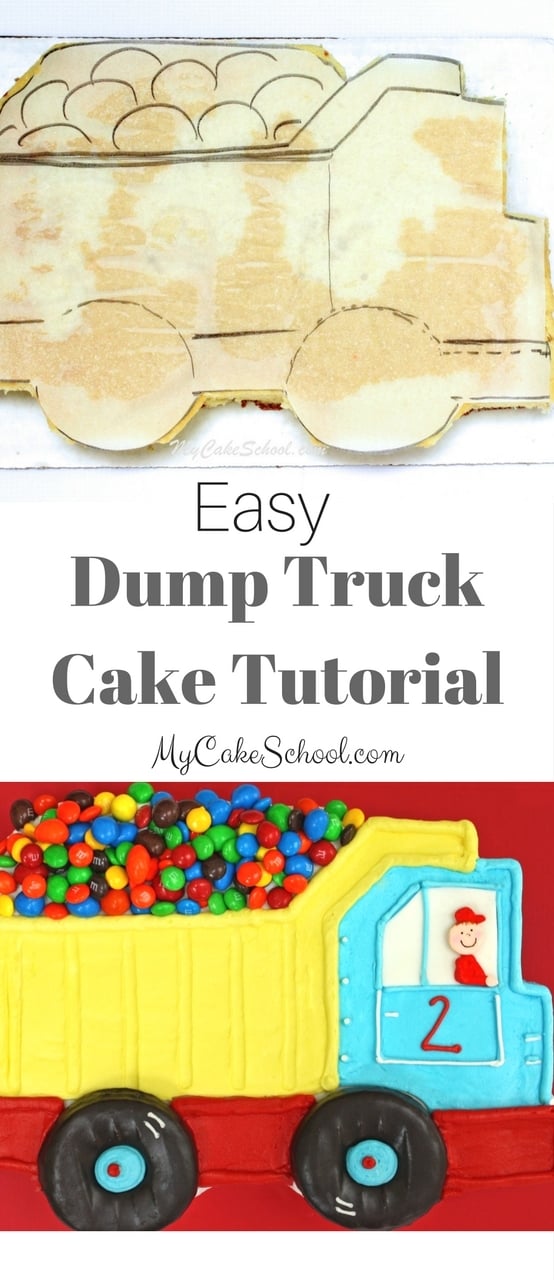
egiToday I'm going to share a CUTE and easy Dump Truck cake tutorial that would be perfect for young birthdays, and great for all skill levels of cake decorating!
Table of Contents
Easy Dump Truck Sheet Cake Design!
Sheet cakes are always a popular choice for children's birthday parties, but the broad rectangular shape can be limiting when it comes to creative cake design ideas.
With a few simple slices here and there, we'll show you how to transform an ordinary sheet cake into an adorable dump truck cake that is as fun to look at as it is to eat (well...almost)!
Children are fascinated by trucks of all kinds, and so I'm happy to share this cake idea for truck-themed birthday parties!
Whether you'd like to create this exact dump truck cake design, or make a few tweaks of your own to create a different style of truck, I think that you'll find this tutorial helpful (and simple)!
How to Make a Dump Truck Cake
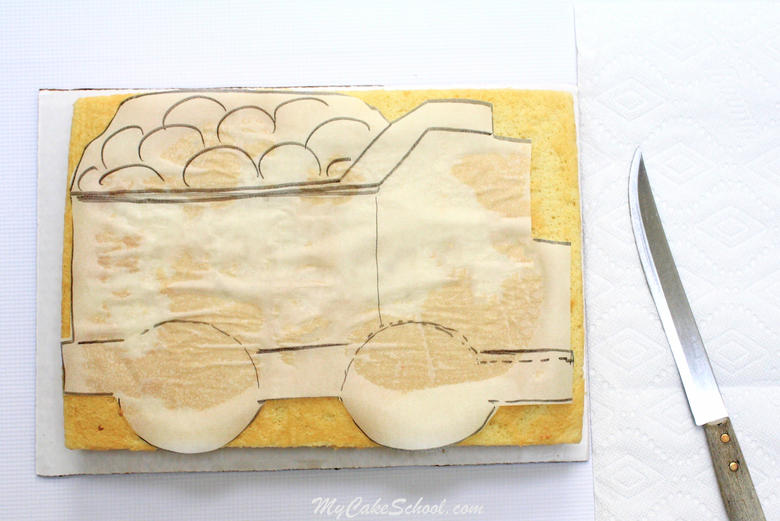
For today's tutorial, I'm working with a single layer 9x13 inch sheet cake. Any size of sheet cake will do, although our template is sized for a 9x13 inch sheet cake.
Carving the Cake
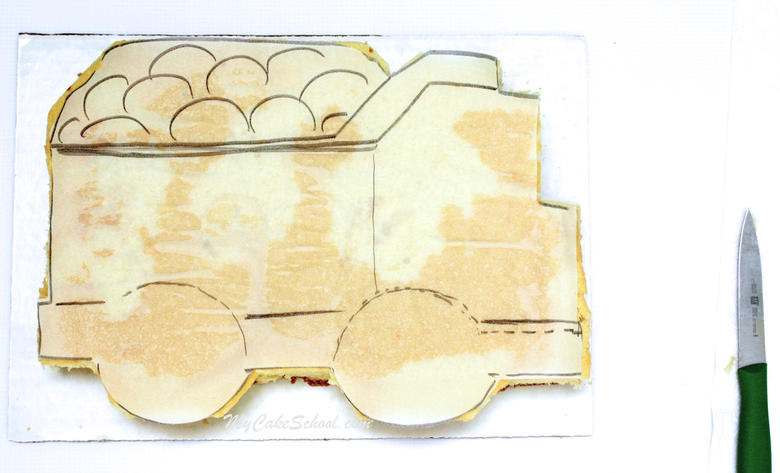
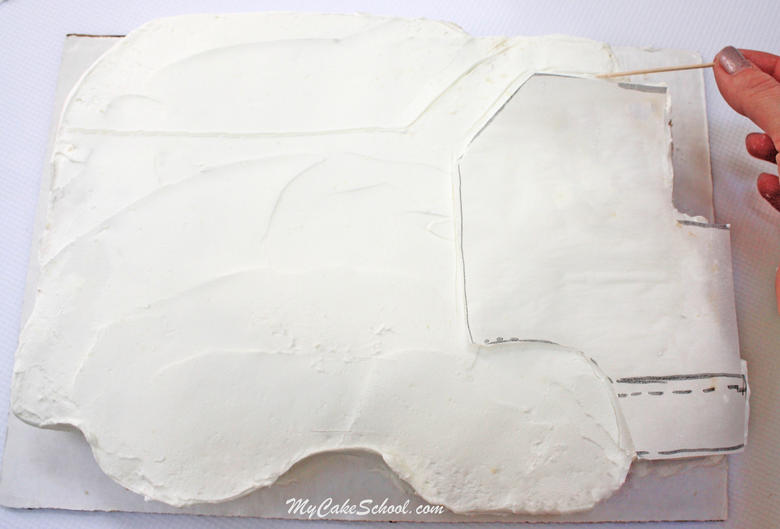
As you can see in the photo below, I started by drawing a rough template onto parchment paper and laid it onto my partially frozen cake layer.
(I prefer to work with partially frozen cakes whenever carving is necessary for the design. It's much easier to get a nice, clean cut when the cakes are a bit firm!)
If you'd like to use our templates, we have two pages of templates for you. Since the cake is larger than a sheet of printer paper, we divided the truck into parts.
I chilled the frosted cake in the freezer for about 10 minutes until the buttercream was firm, and then used pieces of the template to mark off sections of the truck.
Next, I used an xacto knife to trim the excess cake board away from the cake and then "glued" the cake to the final cake base with a smear of buttercream.
Cake Base for the Sheet Cake
Use whatever cake base or platter you like. Our cake base is three cardboard sheet cake boards taped together. I wrapped them tightly with a red plastic tablecloth. (We stapled it beneath to secure.)
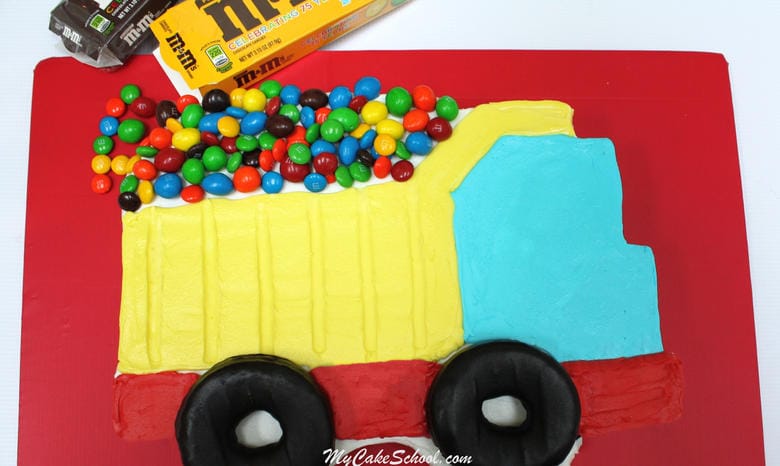
Time to Decorate the Dump Truck Cake!
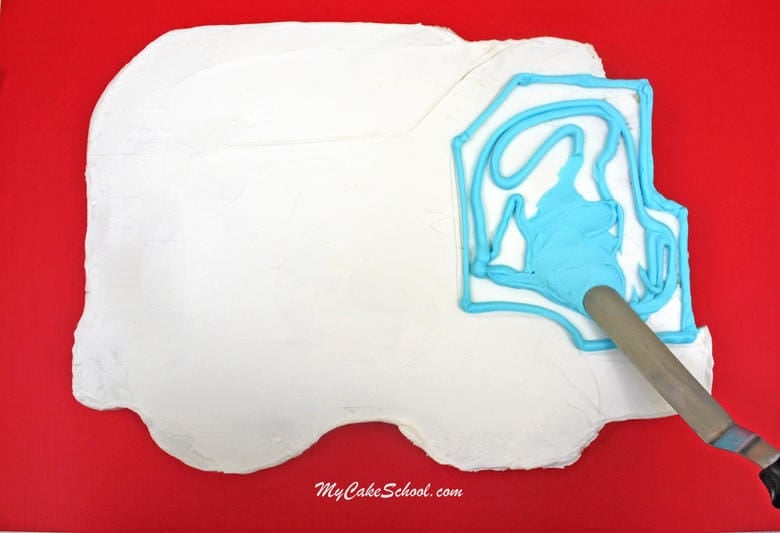
Using the lines that I drew as a guide, I filled in with tinted buttercream.
For the front of the truck, I used a disposable piping bag fitted with a piping tip 10 to outline and fill in with buttercream tinted with Americolor Sky Blue.
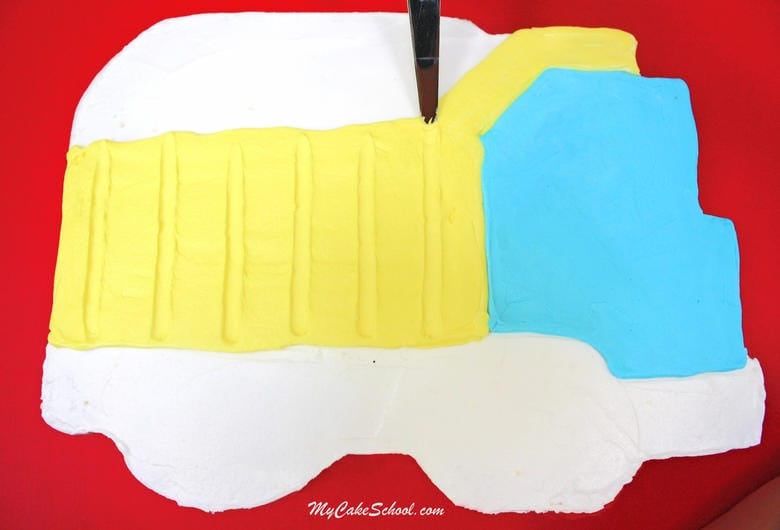
I continued to add color to the truck by tracing and filling in the yellow section with buttercream (tinted with Americolor Lemon Yellow).
Smoothing the Buttercream
There are a couple of methods that you can use for extra-smooth frosting. Since I was working with a Crusting Vanilla Buttercream frosting, I was able to use a Viva brand paper towel (which has no quilting or impressions) to create a smooth finish after the frosting had set up for a few minutes.
Another popular choice is the "hot knife method" of smoothing which involves smoothing over chilled frosting with a heated spatula.
Next, I created simple vertical impressions using a tapered spatula.
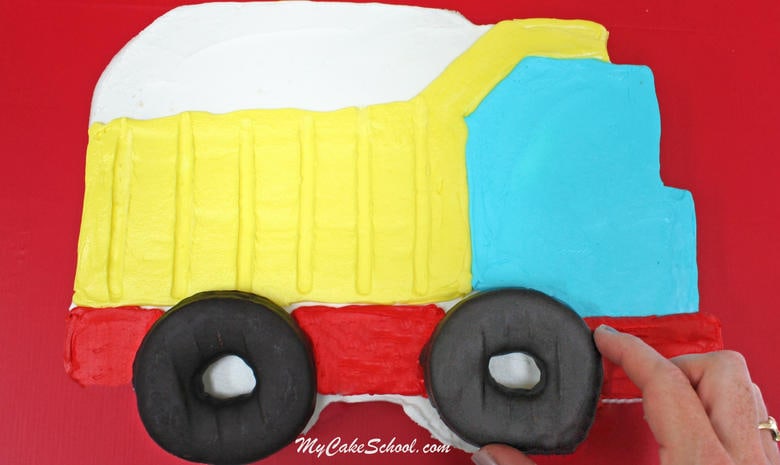
Making the Tires
For the tires, I added chocolate donuts! I like the added depth that they give to the cake, but you could also use fondant or buttercream for the tires.
Adding the Candy!
Now for the fun part! I filled the truck with plain & peanut M&Ms. For this step, the options are endless. Crushed chocolate cookies would have worked well also!
You can spread a little fresh buttercream onto the cake before pressing on the candy or cookies so that they will stay in place.
I had some excess cake that was showing around the donut tires and so I trimmed it away with a sharp knife. I overestimated the size of my donut tires when creating the template!
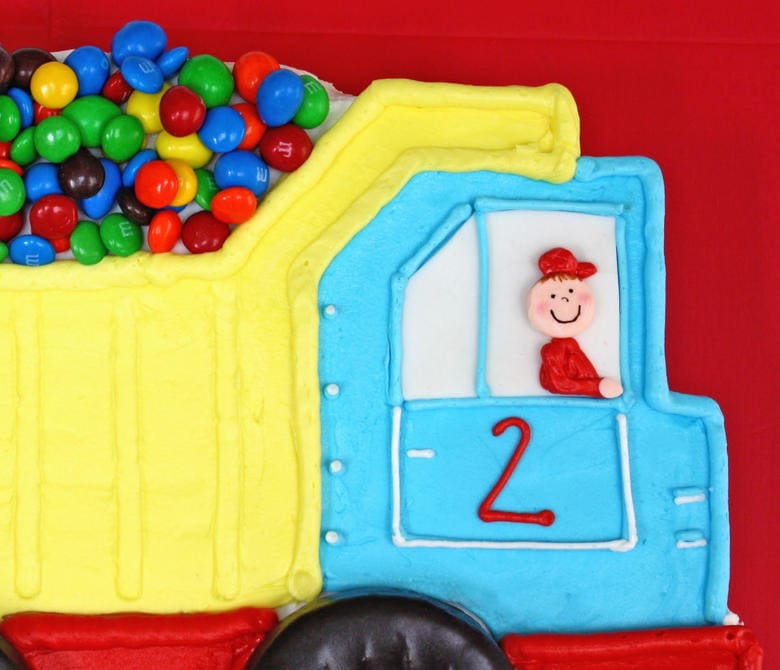
Making the Driver
Our sweet little driver's face is made from fondant (tinted with the tiniest bit of Americolor copper coloring). You can form the circle by hand, or cut out a the fondant circle with a large piping tip.
His face and hair were drawn with food coloring pens.(Wait for surface of fondant to dry before adding these details).
I dusted on a little pink petal dust for rosy cheeks. I just can't help myself when it comes to rosy cheeks!
Next, I added piped details using a small round (tip 3) piping tip to outline the window, door, etc.
Also, using a piping tip 10, I outlined the larger sections of the truck. (You could skip the piping tip and just snip the piping bag if you prefer!)
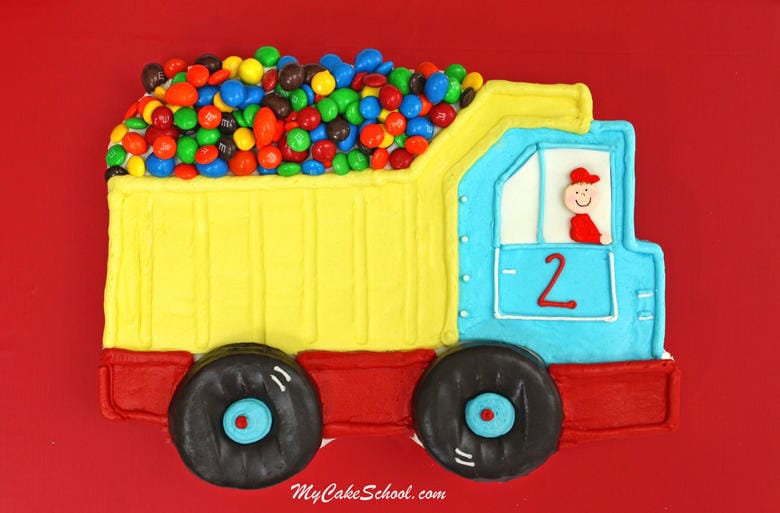
Hooray! Our cake is finished!
We hope that your little ones will love this sweet dump truck cake! Even decorating beginners will find this design to be very forgiving and fun!
Who wouldn't love a dump truck filled with M&Ms on their birthday?! Enjoy!
More Shaped Cakes
Make sure to check out these other step-by-step blog tutorials for easy! These would be perfect for young birthdays. You may also like our Roundup of 100+ Birthday Cakes!

Well isn't that stinkin' cute :-) I love it! Being a family of boys this would be a huge hit at a party! Fabulous as always!
Adorable as always! Thank you Melissa!!!
Thanks MsGF & Jennifer!! xo
thanks Melissa
Can I use tracing paper to draw the truck
Hi Suki, Yes, that would be fine.
I made this cake! It turned out so well. I am by no means a skilled cake person, and this exceeded my expectations. It’s adorable. Thank you.
that is very cute!!! I'm making one too, and hope it turns out as cute as yours did!
Hi Amy, I am sorry I did not see this in March when it was posted. It looks fantastic and I love the colors you chose. Great work!!
Can I just make the truck shape right in the 13x9 pan ( frost the whole thing white & then design the truck - the background will be white)
Hi BG- Yes, you can just put the truck design on top of a 9x13 sheet cake if you'd rather not carve the shape! That will be cute also. ;0)
Thanks for this, was very easy to follow! Mine is not as professional but very cute still!
Oh yay! Love it, Rebecca! The cookie wheels are too cute- thanks for sharing!!
What recipe do you use for the cake? Each shet cake recipe says to use a sheet cake but besides the pan size there is no information that I can find.