Piping Chocolate Letters for your Cakes
If you are new to buttercream piping or just find the process of writing on cakes a little nerve racking, we have you covered! Piping letters in chocolate candy coating makes the process SO much easier!
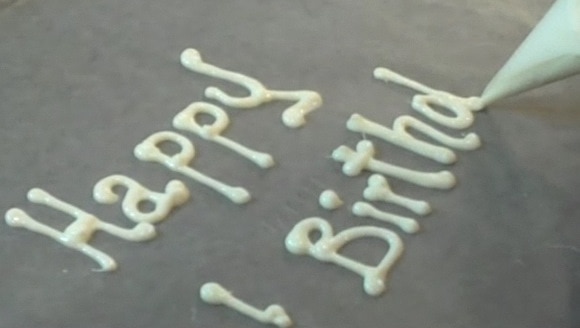
Table of Contents
Why is Chocolate Candy Coating the Easiest Medium for piping messages onto Cakes?
Writing letters with melted candy coating is a great alternative to piping letters in buttercream, especially for those that are new to decorating.
This technique allows you to slide a template beneath your wax paper which you can trace (if you'd like)-- or you can simply pipe the letters that you need as many times as you like.
Then, chill the candy coating letters to firm them up, and pick and choose the best ones for your message. Place them right on the cake- that's it!
Working with Candy Coating
With this method (as with many of our chocolate accents) we prefer to work with chocolate candy coating. This is also known as compound chocolate, almond bark, candy melts, etc.
Candy coating is so easy to work with and doesn't require tempering. You simply heat the chocolate in the microwave in small increments, pipe your accents or letters, etc., chill, and apply to the cake!
Make sure to always chill your candy coating creations in the freezer for 5 minutes or so to firm them up before handling. It is also a good idea to pipe more than one of whatever you are creating, just in case of breakage.
If Decorating a Buttercream-Frosted Cake
If decorating a buttercream-frosted cake, it's a good idea to chill the cake first-- maybe 15 minutes or so in the freezer (or longer in the refrigerator) to firm up the buttercream.
This way, you can arrange the chocolate letters onto the chilled, buttercream-frosted cake and adjust the placement if needed with no worries of messing up the smooth finish of the frosting.
More Writing on Cakes
After experimenting with chocolate letters on cakes, you may decide that you'd like to try writing in buttercream. We have a tutorial for that also! You can find it here: How to Write in Buttercream on Cakes
More Cake Decorating Basics
We have several more cake decorating video tutorials that are extremely helpful if you are new to cake decorating!
Make sure to check out our tutorials on How to Use Star Piping Tips, How to Use Petal & Ruffle Tips, and How to Use Round Piping Tips! These videos will give you the basics on creating borders and simple accents that will take your cakes to another level!
Also, if you haven't checked it out yet, make sure to see our video on How to Make a Cake from Start to Finish! There's a lot of great information there! Let us know if you have any questions!! xo
Hi Connie-- It's very unlikely that you would have problems with melting (unless of course the cake is sitting outside on a very hot day--in which case, melting icing would also be a worry) ;0) -- The chocolate bark/candy coating that we use starts out firm at room temperature. We warm it to soften, but as it cools, it becomes firm again. (We chill them just so that they are less fragile when we place them on the cake...but not to prevent melting.) - I think you'll like the technique!
Thanks :)
Loved this video Melissa and I also enjoy reading comments because so many of my questions get asked and answered by others! I do have a question: can this writing technique be done with buttercream (freezing the letters) if you opt not to use a "candy melt" type of product? Any benefit to using buttercream? I am making a cake where I may do a buttercream transfer and some writing and thought I may do it all in buttercream. Thanks!
Hi Paula-- Hmmm...I think that the thinness of your piped letters may cause issues as you try to press the letters onto the cake and peel away the backing. They are going to be more likely to break than the chocolate, which so easily pops off. I remember trying this a long time ago and I remember that I didn't have very good results (my piped letters were thin)--but if you ever give it a try, let us know if you have better luck!
For thicker letters, or for letters that are backed and surrounded by buttercream, it would be fine. Or, for instance with a logo where you've done your lettering and then added a layer of buttercream to the back, etc, that would be fine. Something like that would be thicker, and once frozen it would be much easier to work with than individual thin frozen buttercream letters.
I love the videos but I am having trouble with hearing her on all classes, I have video volume and computer volume turned all the way up. any suggestions?
whoot whoot!! my wonderful husband went and bought me speakers and now I can hear it loud and clear, I was heart broken when I thought I was not going to be able to keep my cake school I have been wanting to join for a while now but couldn't I had to put it on the back burner. this was a gift from my husband so when I couldn't hear it I simply gave him the sad I will ask for a refund face look if you want me too ( and might I add my cake school offered some advise plus a refund no questions ask! ) and off he went to buy my speakers! im so happy because I cant wait to start exploring everything you guys have to offer! just thought I would share this and thank you for your super fast response.
How long do you let the chocolate sit for before you begin piping?
@Denna~ I'm sorry that you were having trouble hearing but am so glad that you are hearing us loud & clear now! ;0) xoxox Sounds like you have a fabulous husband!
@Sandy-- I usually don't find that I need to wait. If you fill your piping bag and find that the chocolate is coming out way too quickly, then it is a bit too hot and needs to cool a few minutes before trying again. Have fun! ;0)
Ladies, what kind of food coloring do I use to tint my chocolate so that it does not seize? Oil Based? I noticed in the video you said to use coloring that is appropriate for chocolate but never caught the best kind?
Thanks! Kimberly
Hi Kimberly, Yes, you will need to use oil based coloring. We have used Wilton brand and also AmeriColor.
How do I attach chocolate letters to fondant.
Hi Sylvia--For lightweight letters like these, you could use piping gel, dots of chocolate, buttercream, or royal--whatever you have on hand.