Buttercream Eyelet Cake Tutorial
Hi everyone! Today we are sharing a beautiful buttercream eyelet cake. This delicate technique is perfect for everything from baby and bridal showers to wedding cakes.
Not only will you learn how to pipe buttercream eyelet, but also a lovely pattern of piped leaves on our bottom tier and a variety of buttercream flowers.

I love the vintage feel of this cake, and hope that you enjoy these simple but impressive piping techniques!
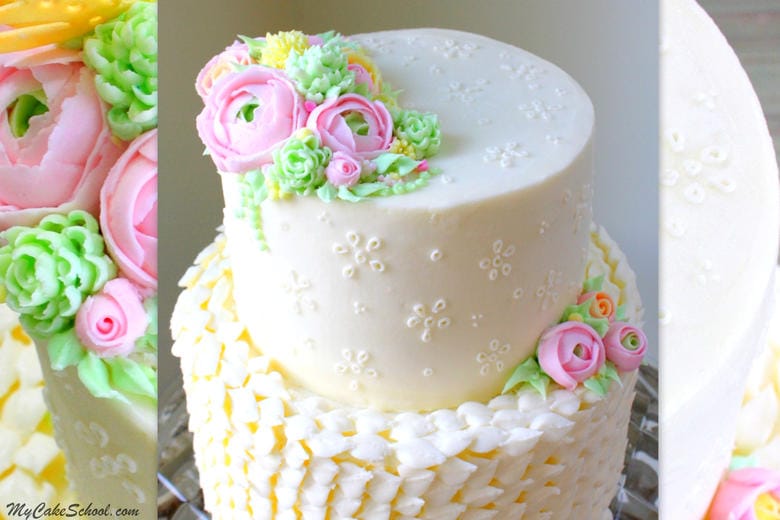
Table of Contents
Materials for Buttercream Eyelet Cake:
I used 8" and 6" tiers for this tutorial with our Classic Vanilla Buttercream recipe. As usual, you will need a cake circle beneath each tier as well as supports beneath the top tier. (4 bubble tea straws or your supports of choice)
Piping tips: Large leaf 366, Small leaf 352, round Tip 1, petal tip 104, tip 61 (curved petal tip), tip 81 , tip 3
Coloring Gels: We used Wilton Leaf Green, Americolor Deep Pink, Americolor Lemon Yellow.
Gum Paste or Fondant with Tylose Powder kneaded into it for butterfly.
Petal Dust: We used Yellow Petal Dust & Super Pearl Dust for dry dusting our butterfly. (You could also just tint your gum paste with coloring gel.)
Miscellaneous: Waxed Paper, Parchment Paper, Rose Nail, Butterfly Cutter (we used a PME Butterfly Cutter)
Covering the Tier in Buttercream Leaves
I just love covering cake tiers in piping. It is such a beautiful and easy technique. This was certainly the case for our bottom tier in today's tutorial!
Simply repeating rows of small buttercream leaves piped with a tip 352 created such an elegant and unique feel for our cake. This would be a beautiful effect on cakes for all sorts of occasions!
More Buttercream Tutorials
We have so many free buttercream cake tutorials to share with you! I'm listing a few below, but make sure to check out our Buttercream Techniques Section for even more!
Vintage Buttercream Piping Tutorial
Elegant White Buttercream Flowers
Buttercream Palette Knife Painting
Enjoy the Video!
Thanks so much for stopping by! We hope that you will give this buttercream eyelet cake a try as well as the piped leaves technique and buttercream flowers!
If you try any of these designs, we would love for you to leave a comment and photo below.
Very nice. Pretty.
Beautiful as always!!!
Very beautiful! Love the bottom tier - looks fancy :) Fabulous flowers! Gorgeous and elegant looking - awesome video as always! :)
Simple AND Stunning! Another for my future projects list!
Thanks Melissa - I love your vintage style
Oh my goodness! What an elegant cake. I love the eyelet and leaf designs!
Beautiful design, Melissa. I love the creative use of the leaf tip. So, as you said, there would be a cake circle under the top tier before you place it on the lower tier...my question...the bottom tier must be crusted before placing the top tier w/cake circle on top? A touch of buttercream to adhere the bottom of the top tier (cake circle) to the bottom tier (necessary, or good idea)? Thank you as always for such amazing and well presented videos, and for answering my questions. :-)
Thank you everybody for your comments! I'm so glad that you like the cake.
Hi Paula, I always chill my tiers before stacking to make everything nice and firm. I didn't mention it in the video but if you are worried about the frosting sticking to the top tier when it's time to separate tiers, a circle of parchment paper cut to the size of the top tier can be attached to the bottom tier before placing the top tier. Whether using a parchment circle or not, I would still add a bit of buttercream to the center of the bottom tier before placing the top tier. I skipped this step once and my top tier almost slid off of the bottom tier during transport. So, it's just a little added insurance. ;0)
Beautiful job!