Elephant with a Cupcake!~ A Blog Tutorial
In today's cake tutorial, I'm going to show you how to create an adorable Elephant with a Cupcake design from a sheet cake.

This cake tutorial is short and sweet...but I hope it brings a smile to your face! We wanted to create an animal of some sort...and after a bit of consideration, a pink polka dotted elephant won out over the rest!
Table of Contents
How to Make an Elephant Shaped Sheet Cake
First, we made a 9x13 sheet cake and reserved enough batter to make a cupcake too. Our elephant loves cupcakes! ;0)
After baking the sheet cake, I drew out a template, which you can print out and use if you would like~ Elephant Sheet Cake Template
Carving the Sheet Cake
Since I was working with a fairly dense cake, I had no trouble carving out my elephant shape while the cake was at room temperature. If you are working with a fragile cake, you can carve it while the cake is partially frozen.
Here we go! ~

Save Scrap Cake for Party Hat
You'll have a few scraps leftover~ don't throw them away! You'll want at least one of the scraps for a party hat ;0)
Frosting the Cake
After carving, I frosted my cake with a Crusting Vanilla Buttercream. This has been tinted with a little Americolor Deep Pink coloring gel. We have a few crusting Vanilla Buttercream recipes in our Recipes section, here is one of them!: Classic Vanilla Buttercream.

Smoothing the Frosting
Once my buttercream had had a chance to crust (5-10 minutes assuming that your cake wasn't frosted while cold), I smoothed it with a Viva brand paper towel. (We have a tutorial on this Viva Method of Smoothing if you'd like to see!)
There are other methods for smoothing- the Hot Knife Method is another one. Or, you could comb the cake with a decorating comb for a fun ridged pattern- anything goes!

After smoothing the frosting, I used an xacto knife to cut away the excess cake cardboard. All of my cakes rest on a cardboard, which makes it easier to transfer it to it's final base later. (If you'd rather do this "cut away step" before frosting the cake, that works too!)

The Finishing Details for Our Elephant Cake
Now, to give our elephant a sweet face & some personality! This is the time for you to have fun with your design--but feel free to copy mine if you'd like!
I piped on some polka dots with a Wilton (medium round) tip 12. My buttercream dots are also tinted with Americolor Deep Pink coloring gel.
I piped on and filled in my elephant's ear using my Wilton tip 12 also, and then smoothed it with a Viva paper towel after it crusted. The small dots and outlines on my elephant were piped with a Wilton tip 3 (smallish round tip).
The elephant's eye is a chocolate chip (with a small buttercream dot in the center). The eyelashes & mouth were drawn with a toothpick!
You'll see the full photo soon...but here's a sneak peek!

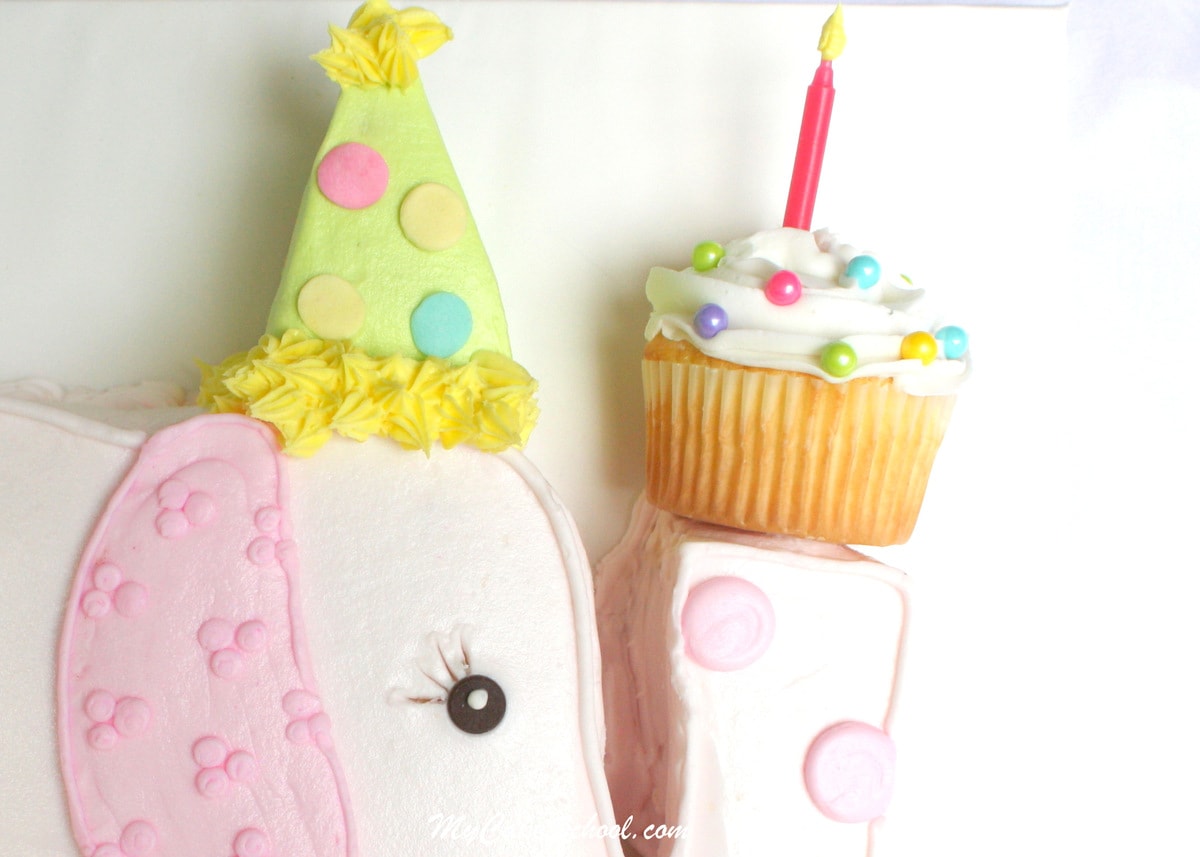
Party Hat and Cupcake
Our elephant could have been done at this point, but we wanted to give her a party hat & cupcake. It is a birthday party, after all!
We cut a small wedge of scrap cake into a triangle and frosted it with some buttercream tinted with Americolor Electric Green. I found it easiest to pipe on my frosting with a Wilton tip 12 and then smooth it. You could also just use a star tip to get a different effect.
I frosted the party hat cake while it rested on a paper plate. After smoothing it, I chilled it in the freezer for 10 minutes to firm things up, so that I could then pick it up and place it on our cake board, right where it belonged.

We decorated the party hat with Wilton Jumbo confetti sprinkles, and added fringe with a Wilton star tip 12. Our cupcake was "glued" to the board and elephant trunk with some dots of icing. Then, I used my 2D large star piping tip to pipe on a little frosting.
Don't go too heavy on the cupcake frosting, or it may tip over! I added a few sprinkles..and a candle with a buttercream flame piped onto the wick!

That's all there is to it! I think that this sweet elephant would be the perfect guest for any little one's birthday party. I hope that you agree!

Thanks for stopping by, and if you make a sweet elephant cake of your own, we would love to see! Feel free to leave a photo in the comments!

More Cute Sheet Cake Designs!
Don't miss these other fun, easy sheet cake designs for young birthdays!
Hello Bridgette! We wrap and freeze unfrosted cakes all the time and then thaw & decorate the day before.
Ideally, I don't like to freeze frosted cakes because of the condensation that can happen when bringing it back to room temperature. However, if you really need to decorate the cake today, I would recommend boxing in a bakery box taped tightly shut.
You can begin the thawing process in the refrigerator (still boxed) on Friday night, and then just bring to the countertop on Sunday morning. The bakery box should absorb some of the moisture, and thawing in the refrigerator rather than room temp also will reduce condensation. However, if there is any condensation left, you can place the cake in front of a fan to speed along the evaporating.
Good luck!!
This is so cute! And the best thing is that this cake-elephant has its very own cake. Love everyone elses different decorations in the comments too!
I am super NOT a cake decorator!! I always manage to come up with something for my 3 boys birthdays, but it's never Pinterest cute. My newly 3 year old wanted an elephant cake and I found your tutorial. Thank you so much for the stencil and for giving me the confidence to tackle this. I am so pleased that it actually looks like an elephant! Thanks so much :)
@B Holmes- I'm so happy to see your cake! You did a great job!
Thank you for the recipe and guidelines. Attaching a pic.
Hi my name is kristal and I really want to try to make this cake but I can't ice a cake to save my life I always lift the top of the cake while icing so all the bread crumbs end up in the icing. I was wondering if you could give me some advice??
Hi Krista, The crumb problem can be solved by doing a crumb coat. A crumb coat is a very thin coating of frosting over your cake. This will trap the crumbs in the frosting so that when putting on the final coat of frosting, you will have no problem. Also, make sure your frosting is not too stiff and thick, that also contributes to pulling up too many crumbs. When doing the crumb coat, don't scrape the frosting from your spatula back into the frosting bowl. Scrape it into a cup or something else, you don't want to have any crumbs in the frosting that you will be using for the final coat of frosting. Also, when carving the elephant it is helpful (but optional) to carve when the cake is partially frozen. However, it you are going to use the Viva Paper Towel method of smoothing the frosting, you must let the cake come back to completely room temperature or it will take forever for the frosting to crust (crusting is when you can touch the frosting with your finger, and no frosting will transfer to your finger) The frosting must have a light crust before you can do the paper towel smoothing method. Also, I forgot to mention that after you crumb coat a cake, you can refrigerate for maybe 10 minutes ....... you don't want the cake to become cold, just the thin crumb coat of frosting. This will help when applying the final frosting. Hope this helps.
Melissa has a free video on Making a Cake Start to Finish that I think will be helpful. Part 2 is on frosting the cake.
Here is a link:
Are you able to recommend which of you chocolate cake recipes would be suitable for this cake to make carving the cake simple?
Kind regards
Belinda
Hi Belinda, if you are waning a scratch cake, the Classic Chocolate Cake (reverse creaming method) would hold up well to this type of carving. If you like doctored cake mix, I would go with the Chocolate Sour Cream Cake. In either case, it's easiest to carve when the cake is partially frozen.
Thanks Melissa I have just looked up the Doctored Sour Cream Cake and plan to make that one. I will be using the Betty Crocker Chocolate Devil Cake. This maybe a silly question, but is the All Purpose Flour the same as using Plain Flour? Also is ok to use brown sugar instead of granulated sugar? Just looking at what I have in the cupboard. I will also freeze the cake as you recommend
Cheers
Belinda
Hi Belinda, yes you would use the same amount of Plain Flour. I'm not sure about the brown sugar. It would be an experiment! You may notice a slight flavor difference and brown sugar brings in a bit more moisture than white, but cake mixes are generally very forgiving and give you a little wiggle room to play around with ingredients. Let us know how it goes!
Thanks Melissa. I found that I have some caster sugar so will use this. Thank you for all your great tips.
Much appreciated