Chocolate Candy Cane Cake with Striped Buttercream Filling
Today I'm going to share an amazing Chocolate Candy Cane Cake with Striped Filling Video Tutorial!
Not only are chocolate and mint made for each other, (one of my favorite combinations of all time), but this adorable Christmas Cake tutorial will show you how to make a festive striped buttercream filling that is sure to wow your guests. Everybody loves a surprise!

This moist and delicious chocolate cake with flavorful peppermint buttercream will be the hit of the party, and the unique striped buttercream filling is a super easy method that can be applied to cakes for all occasions.
The striped buttercream filling is so unexpected that it always brings smiles when the time comes to slice the cake! I use this striped buttercream technique for cakes year-round.
For other party themes, consider bringing in a couple of your cake's accent colors, or a full rainbow! (Find an example of this in our Rainbow Filling Cake Tutorial!)

Table of Contents
How to Make a Chocolate Candy Cane Cake
This cake is made up of our decadent classic chocolate cake layers and is filled and frosted with a delicious (and easy) peppermint buttercream. If you are a fan of chocolate and peppermint, you are just going to fall in love with this fantastic recipe!
- First, choose your favorite chocolate layer cake recipe. We chose our Scratch Classic Chocolate Cake for this design. This scratch chocolate layer cake is so moist and decadent. If you prefer to work with doctored cake mixes, you will also love our Chocolate Sour Cream Cake (doctored cake mix) recipe!
- Next, tint a portion of the Peppermint Buttercream Frosting red, to be used for the striped candy cane filling.
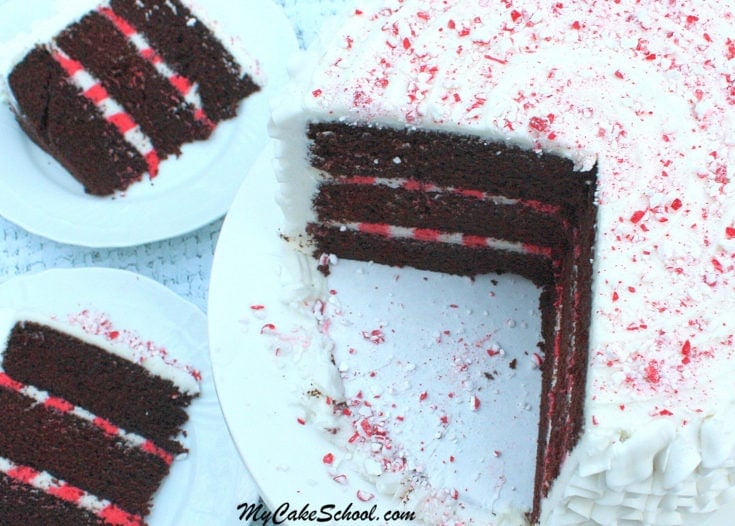
- Place the first chocolate cake layer onto your cake base or cake pedestal. Next, pipe a red circle (filled in) of buttercream in the center.
- Follow with a ring of white buttercream, then red. Alternate piping red and white rings until the cake layer is covered. (I always carry my fillings to within about ¼- ½ inch from the edge of the cake layer).
- Place the next cake layer onto the filling and repeat the above steps. Finish with the third cake layer and frost the cake with peppermint buttercream. Sprinkle with crushed candy canes.

Helpful Hints for Buttercream Ruffles
- If you pipe ruffled buttercream as I did in this tutorial, you can do this with a 104 piping tip. These petal tips have a teardrop shaped opening.
- I always like to pipe my buttercream ruffles immediately after crumb coating the cake. (The crumb coat is the very thin layer of frosting that is applied to the cake before applying the final coat). Piped buttercream ruffles, rosettes, etc. tend to grab onto the surface of the cake better if it has been freshly crumb coated.

White Chocolate Peppermint Cake- Another Great Option!
** We also have a white chocolate version of this recipe called White Chocolate Peppermint Cake! It's another of our favorites for Christmas. I couldn't possibly pick a favorite as they are both so good--so I will just recommend that you make them both! You can find the recipe here: White Chocolate Peppermint Cake

More Christmas and Winter Cake Fun!
For our full collection of Christmas and Winter Cake Recipes, Tutorials, and Inspiration, don't miss our Roundup of FAVORITE Christmas and Winter cakes! We've made tons of Christmas and winter-themed cakes over the years, as well as many tried and true recipes! There is something for everyone!
Have fun with this Candy Cane cake, and don't forget to check out our notes and cake recipe links below!
We used THIS Scratch Chocolate Cake Recipe and THIS Peppermint Buttercream Recipe for our Chocolate Candy Cane Cake.
This flavorful peppermint buttercream recipe has just the right amount of mint, and complements our most favorite moist and delicious Classic Chocolate Cake perfectly! If you prefer to work with doctored cake mix recipes, check out our Chocolate Sour Cream Cake (doctored mix) Recipe!
Chocolate Candy Cane Cake with Striped Filling!- Free Video
Amazing Chocolate Candy Cane Cake! This recipe is so delicious and the striped candy cane filling is so unique and festive!
Ingredients
For the Chocolate Cake (Our Classic Chocolate Cake)
- I use the reverse creaming method with this recipe
- 2 cups (400g) granulated sugar
- 2 ¾ cup (322g) all-purpose flour
- 1 cup (82g) unsweetened cocoa (lightly spoon into cup then sift)
- 2 teaspoons ((10g) baking soda
- ½ teaspoon (2g) baking powder
- ½ teaspoon (2g) salt
- 1 cup (2 sticks) (226g) unsalted butter, softened (do not soften in microwave) I cut the butter into 1 inch pieces onto waxed paper leaving on the countertop for 8 to 10 minutes it will still be quite cool when adding to the dry ingredients. If it becomes too soft, just refrigerate a few minutes
- ¼ cup (54g) vegetable oil
- 4 large eggs at room temperature
- 1cup (220g) milk
- 1 teaspoon (4g) vanilla extract
- 1 cup (220) hot coffee, it can be instant or brewed
For the Peppermint Buttercream Frosting
- 3 sticks (1 ½ cups) (339g) unsalted butter, softened
- 8 cups (920g) powdered sugar (you can adjust depending on desired consistency)
- 1 ½ teaspoons (12g) peppermint extract ....taste for desired flavor, the flavor does intensify over time
- ½ to ¾ cup (121g to 180g) milk
- ½ teaspoon (3g) salt optional, to cut sweetness. Popcorn salt dissolves more quickly
For Garnish
- Crushed candy canes
Piping Tips
- We used a 104 petal tip for the ruffles
Instructions
For the Chocolate Cake
- Preheat oven to 350 degrees
- Grease and flour three 8 inch cake pans
- In a mixing bowl, add the dry ingredients: sugar, flour, cocoa, baking soda, baking powder, and salt. Whisk for 1 minute to blend.
- Add softened butter a few pieces at a time while the mixer is on low speed. Mix until the dry ingredients look like coarse sand and the dry ingredients are moistened. Scrape the bottom and sides of the bowl.
- In a separate bowl whisk the eggs, milk , oil and vanilla until blended.
- Method is important when using the Reverse Creaming Method. With the mixer on low speed, SLOWLY add approximately ½ of the egg mixture to the dry ingredients. Increase the speed to medium and mix for 1 ½ minutes at medium speed. Don't mix above medium speed. Scrape the bottom and sides of bowl. Add the remaining egg mixture in 2 pourings, beating for 20 seconds after each pour. Scrape the sides and bottom of bowl.
- Slowly add the cup of hot coffee and mix another 30 seconds until blended. The batter will be very runny. Don't worry!
- Pour into 3 prepared 8" pans and bake at 350 degrees for 25 to 30 minutes or until the center of the cake springs back to the touch and a toothpick comes out clean.
- Cool the cakes 10 minutes on a rack and then turn out of the pans.
- *Yields approx 9 cups of batter.
For the Peppermint Buttercream
- Cream the softened butter. Add half of the powdered sugar, the peppermint extract and one half of the milk.
- Begin mixing on low speed increasing to medium speed for 2 to 3 minutes. Add remaining powdered sugar. Add the remaining milk gradually, determining how much you need for the right consistency.
- Mix at low to medium speed another 3 to 4 minutes scraping the sides of the bowl occasionally. Slow down the mixer to very slow (#2 speed on the KitchenAid) for the last 1 to 2 minutes. This will help eliminate air pockets in the buttercream. The texture will become very smooth.
Assembly of Cake
Place the first cake layer on the pedestal/base
Load two disposable piping bags- one with white peppermint buttercream, and the other, tinted red. Snip the tips away, leaving about ¼ inch opening or so.
Pipe a circle (filled in) of red buttercream in the center of the cake layer. Pipe a ring of white around that. Then red, and so on until the cake layer is filled. I like to stop about ¼ inch to ½ inch from the edge. **Hold the piping bag slightly higher than usual so that the stripes won't be so thin.
Place the second cake layer on top and repeat the above steps. Then, add the last layer.
Crumb coat with peppermint buttercream and follow with ruffles (if following our design). We piped our ruffles with a 104 tip, piping from bottom to top, row by row. The fat end of the piping tip should almost touch the cake as you work.
Add sprinkles of crushed candy canes
Thanks so much for stopping by! We hope that you'll give this Chocolate Candy Cane recipe a try this holiday season!
How do you get your buttercream so white? Mine is always a yellow colour? Thanks ????
You can also use clear vanilla for a whiter look.
Hi Rebecca, Some brands of butter are more yellow than others. We use Land 'O Lakes. You can also use white gel coloring to lighten up your buttercream. For a frosting that is pure white, you would use all shortening and no butter. We often use our Fluffy Vanilla Buttercream recipe which uses shortening and butter.