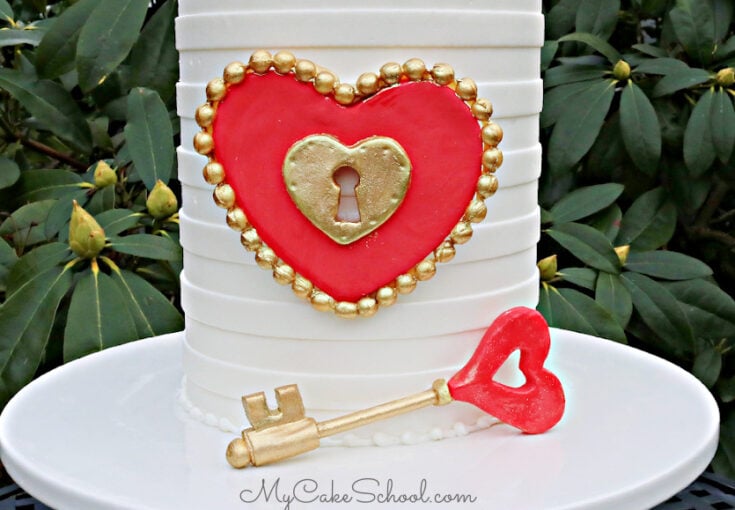
You Hold the Key to My Heart- Cake Tutorial
Today's Lock and Key Cake Tutorial is perfect for Valentine's Day and anniversaries! In this short cake video, we'll show you how to create a beautiful heart-themed lock and key cake!
While we created this as a double barrel cake design, our fondant lock and key decorations could be used on cakes of any size, including sheet cakes!
We hope that you enjoy the video!

Table of Contents
How to Make a Lock and Key Cake (You Hold the Key to My Heart- Valentine's Day Cake)
Make sure to check out the full, printable "How-To" Card at the bottom of this post! Here is a quick rundown of how we made it!
(We decorated a four layer, 6 inch, double barrel cake for this cake tutorial. The cake is frosted in our Fluffy Vanilla Buttercream recipe-use your favorite frosting of choice!.)
What is a Double Barrel Cake?
Since the focus of our video is the fondant lock and key, I wanted to include a brief description of a double barrel cake, since we are decorating a double barrel cake in the video.
A double barrel cake is an extra tall cake with a cake cardboard halfway up and supports beneath that middle board. In our case, we used four 6 inch cake layers.
After filling the first two cake layers, I inserted four bubble tea straw supports cut to the height of the first two cake layers, and then added a cake cardboard on top of that.
Then I added the next two cake layers, adding filling in between. Then frost as usual.
For the Fondant Lock and Key Decorations
For the Fondant Key
To make the key, we cut out a heart of fondant (with tylose powder kneaded into it). Gum paste would work well for this also. It should be thick enough that a cookie or lollipop stick can be pushed into the lower back of the heart.
I also used a small heart cutter to cut a hole from the center of the heart.
Using yellow fondant (with tylose powder kneaded into it) or gum paste, cut out a strip and fold it over the bottom of the cookie stick. This will eventually form the teeth of the key.
Use an xacto knife or small sharp knife to cut notches out of the yellow fondant. We also added a yellow ball of fondant to the end of the cookie stick, and small strand of fondant just under the heart.
After it has firmed up a bit, you can add a thinly rolled piece of red fondant to the back of the heart (attach with tylose glue or piping gel) to seal in the cookie stick.
Allow to dry for several hours or overnight.
For the Fondant Lock
For the lock, cut out a large heart of red fondant (with tylose kneaded into it) or gum paste. I rolled it fairly thin- maybe ⅛ inch- so that it would not be too heavy.
Using a large piping tip- 2D or 1M for example, I cut a hole in the center of the heart that would be smaller than the small yellow heart that we will layer on later.
Cut out a yellow heart from thinly rolled fondant (with tylose) or gum paste. Allow to set up for several minutes before cutting out a "lock" shape. I did this with a piping tip 12 for the round circle and then used an xacto knife to cut the rest of the shape. As an optional step, I also made small little round impressions with a small paintbrush handle around the edges of the heart.
Layer the yellow heart onto the red heart (over the hole that you cut out earlier)
Use a bead former/mold to create strings of fondant beads with your yellow fondant (with tylose kneaded into it) or gum paste. Attach with tylose glue or your edible glue of choice.
What is Tylose Glue?: For tylose glue, I just sprinkle tylose into a small dish and add a few drops of warm water, mixing until it dissolves into a clear, gel-like food safe glue. If you'd rather not estimate, check out our recipe for tylose glue!
If you don't have tylose glue, piping gel works also but I find tylose glue to be a little stronger.
Allow the lock and key to dry for several hours or overnight. (You could apply the lock and heart to the cake while still soft, but it will adhere to the curve of the cake. For a sturdier "lock" decoration, it will need to dry for several hours.)

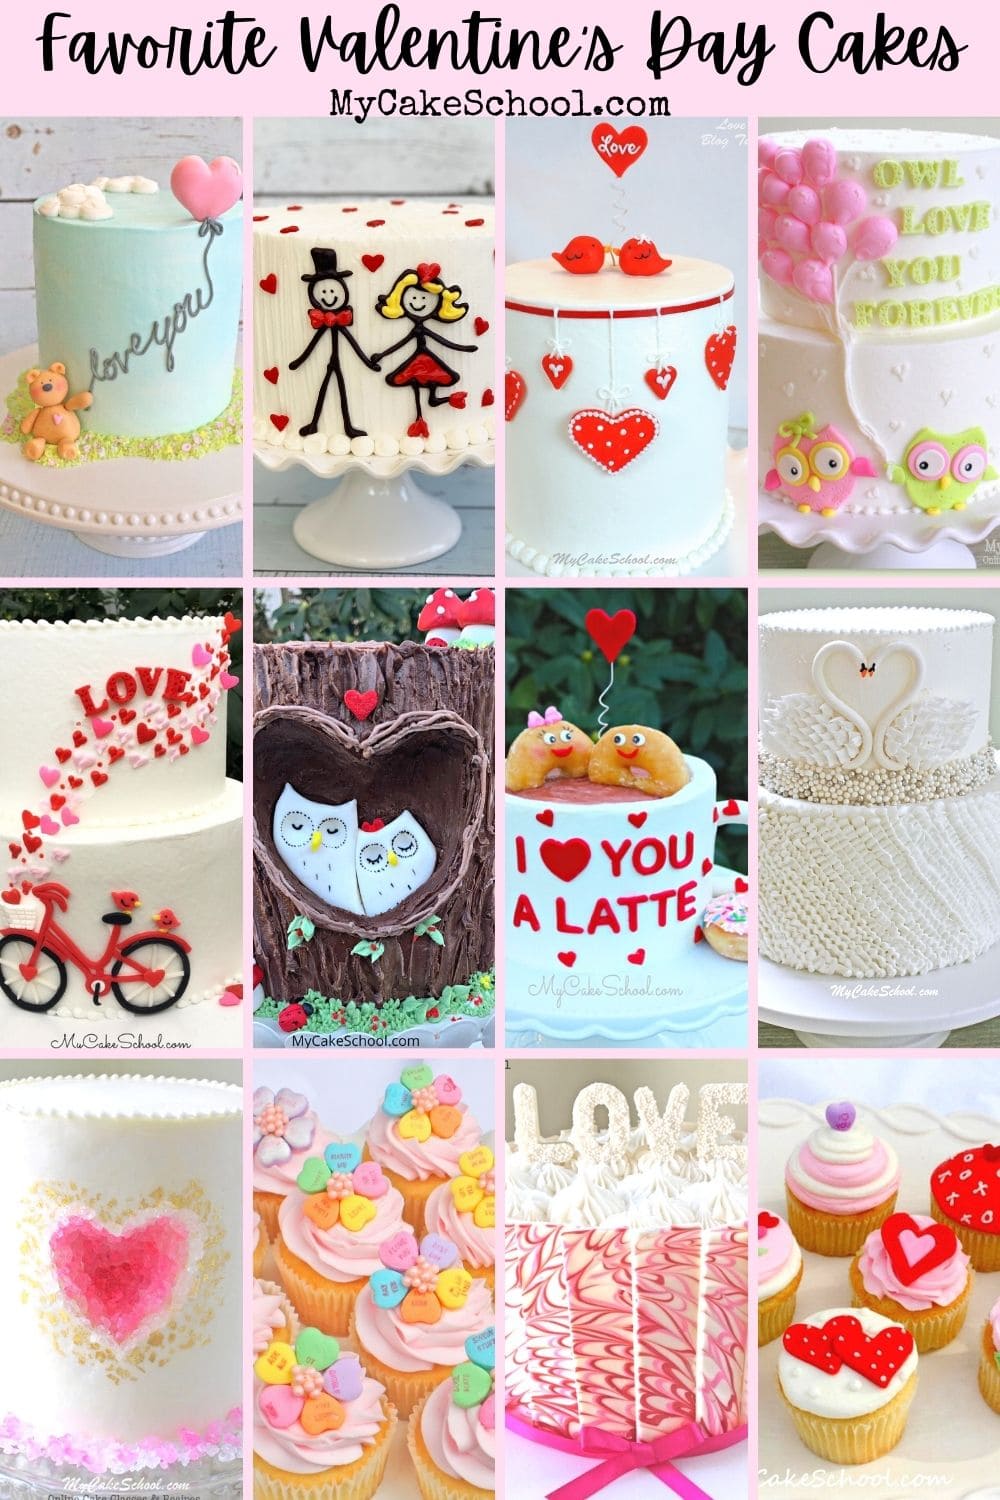
Looking for More Valentine's Day Cakes?
We've made tons of Valentine's Day cake tutorials over the years! If you'd like to scroll through the full list, don't miss our roundup of our Favorite Valentine's Day Cake Tutorials!
This collection of Valentine's Day cakes involves more free cake tutorials as well as some ideas from our member section also. Enjoy scrolling through!
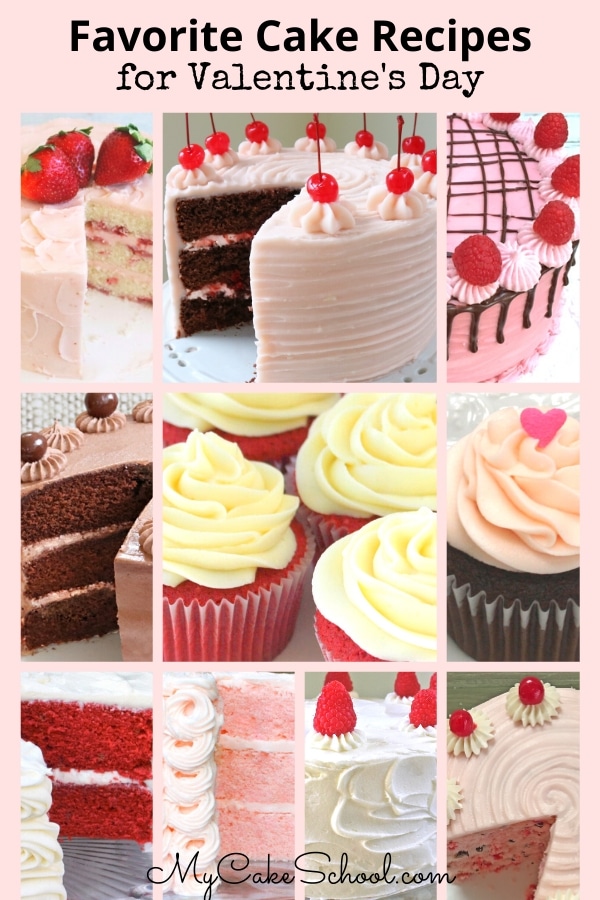
Looking for Valentine's Day Cake Recipes?
If you need an excuse to head to the kitchen and do a little cake baking, Valentine's Day is a great one! There are so many delicious cakes that will make your Valentine's Day feel more special.
Check out our collection of Favorite Valentine's Day Recipes, including Black Forest Cake, Chocolate Covered Strawberry Cake, Cherry Cake, decadent Chocolate Cake, Pink Champagne Cake and so many more!!

.
Enjoy the Video!
Thanks so much for stopping by! If you give this Lock and Key Cake a try, we would love for you to leave a comment and photo below.
You Hold the Key to My Heart- Lock & Key Cake Tutorial {Free Video}
Learn how to make a beautiful "You Hold the Key to My Heart" cake design with a fondant lock and key in this free cake video tutorial! This cake would be perfect for Valentine's Day and anniversaries!
Materials
- Use your cake of choice- We used a four 6 inch cake layers with a cake board on the bottom as well as halfway up with supports beneath. This is a double barrel (tall) cake.
- Fondant (with tylose powder kneaded into it) or Gum paste
- Coloring Gel: Super Red, Lemon Yellow
- Cookie stick or lollipop stick for Key handle. (Cookie sticks are a little thicker)
- Heart Cookie Cutters- Our large heart was 4 inches wide, the smaller heart for key & lock was 2 inches. I also used a very small heart cutter for center of the key.
- Bead Former/Mold- Optional.
- Cake Comb- Optional. I combed my frosting with a tall comb (from Evil Cake Genius)
- Gold Luster Dust- We used Rolkem Super Gold
- Vodka (Combined a small amount with luster dust to create paint. You can substitute with lemon extract also.)
- Edible Glue of choice (piping gel, tylose glue...)
- Piping Tips: we used a 104 petal tip for the ruffles on top, and a Tip 4 for the bead border at the base.
- Tylose Powder (we kneaded tylose into our red & yellow fondant and also mixed the powder with a little warm water to create a glue).
Instructions
For the Key
To make the key, we cut out a heart of fondant (with tylose powder kneaded into it). Gum paste would work well for this also. It should be thick enough that a cookie or lollipop stick can be pushed into the lower back of the heart. I also used a small heart cutter to cut a hole from the center of the heart.
Using yellow fondant (with tylose powder kneaded into it) or gum paste, cut out a strip and fold it over the bottom of the cookie stick. This will eventually form the teeth of the key.
Use an xacto knife or small sharp knife to cut notches out of the yellow fondant. We also added a yellow ball of fondant to the end of the cookie stick, and small strand of fondant just under the heart. After it has firmed up a bit, you can add a thinly rolled piece of red fondant to the back of the heart (attach with tylose glue or piping gel) to seal in the cookie stick.
Allow to dry for several hours or overnight.
For the Fondant Lock
For the lock, cut out a large heart of red fondant (with tylose kneaded into it) or gum paste. I rolled it fairly thin- maybe ⅛ inch- so that it would not be too heavy.
Using a large piping tip- 2D or 1M for example, I cut a hole in the center of the heart that would be smaller than the small yellow heart that we will layer on later.
Cut out a yellow heart from thinly rolled fondant (with tylose) or gum paste. Allow to set up for several minutes before cutting out a "lock" shape. I did this with a piping tip 12 for the round circle and then used an xacto knife to cut the rest of the shape. As an optional step, I also made small little round impressions with a small paintbrush handle around the edges of the heart.
Layer the yellow heart onto the red heart (over the hole that you cut out earlier)
Use a bead former/mold to create strings of fondant beads with your yellow fondant (with tylose kneaded into it) or gum paste. Attach with tylose glue or your edible glue of choice.
Allow to dry for several hours or overnight.
For the Cake
We frosted our cake in fluffy vanilla buttercream using a metal cake comb. Chill the cake in the freezer for about 10-15 minutes before attaching the lock to the cake. Firming up the frosting will protect it just in case you have to move the decoration around a little during placement.
Attach the heart lock to the cake by spreading a little buttercream onto the back.
Attach the key to the cake with a little buttercream also.
I added a bead border using a small round tip 4.
I decorated the top of the cake with ruffles using a tip 104.
I LOVE this! Great theme and gorugeas cake!
Love it! Very cool design. Simple and fabulous! :-)