Wafer Paper Flowers- A Cake Decorating Video
In this two part video, you will learn to make beautiful wafer paper flowers!
Wafer paper is a tasteless, edible paper made from potato starch, vegetable oil, and water.
With these techniques, you can make an endless variety of delicate, lightweight accents for your cakes. I really enjoyed creating the flowers that you will see in this tutorial, and cannot wait to continue experimenting with this versatile decorating medium. Enjoy the video!
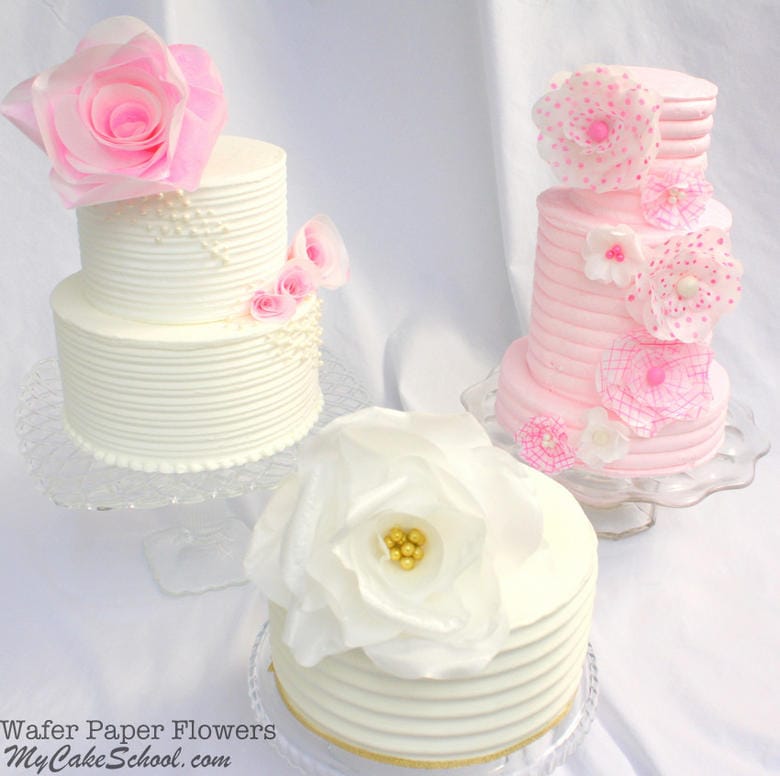
Table of Contents
Materials:
(I am using cake dummies in my video that are frosted with a crusting buttercream (high ratio recipe). To give you an idea of the dimensions, the large white flower is on an 8" round, The large pink rose is on 8",6" tiers, and the three tiered cakes are 8",6", and 4".)
Wafer Paper: This can be found online in a number of online cake supply shops. I found my pack of 8x11 sheets HERE. -
Circle Punch & Flower/Daisy Punch- I used a 3.5" circle punch to create petals for the large white flower and large pink flower. I used a "daisy punch" for the patterned flowers on my 3 tiered cake. These punches are not made specifically for wafer paper or cake decorating. I bought them on the scrapbooking aisle of Michael's. You could cut your shapes out with scissors if you prefer, but the punches greatly speed up the process!
Water or Vodka - This acts as adhesive for your petals, and also creates movement. I use vodka because it dries so quickly but water works very well also.
Coloring Gel: I used Americolor Deep Pink & Americolor Bright White
Dragees and Sugar Pearls - Optional. I used gold dragees (8mm India Tree) for my white flower, and sugar pearls accents for my 2 tiered cake.
Lollipop Sticks- I used a lollipop stick for my white flower.
Scissors- Sharp, thin scissors are good for cutting out your shapes.
Paint brushes- I used for painting designs on my flowers as well as for dampening my petals
Fondant: I used small balls of fondant for centers on my patterned flowers.
Piping Gel- (Or your "glue" of choice). I used for attaching my fondant centers.
Cake Combs- Optional. I used a set of Wilton cake combs in the tutorial for combing my buttercream.
Enjoy the Videos!
We hope that you enjoy this tutorial on wafer paper flowers! Make sure to check out these other video tutorials as well for more wafer paper flower fun!:
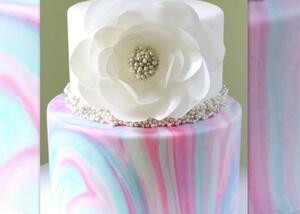
Marbled Fondant Cake with Wafer Paper Flower
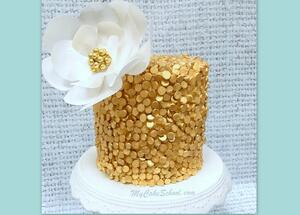
Gold Sequin Cake with Wafer Paper Flower
In Part One: Learn to make a beautiful large flower and pattered blossoms...
In Part Two: Learn to make beautiful, simple roses with dramatic results!
Hi wed1121, we have ours in a zip-lock bag that was put into a plastic air tight container ........stored on a shelf out of sunlight.
Can we use Everclear rather than vodka? I have a huge bottle of Everclear. Ha ha!!
Hi TerriLynn-- Ha! That should work (and dry very quickly) :0) - I would do some experimenting.
how far in advance can you make wafer paper decorations? and can i airbrush them instead hand painting? If I can make them ahead of time. how will i have to store them. I learn soo much from you. The cake i plan on making is need for Jan. 28th, i wanted to get the decorations done ahead of time.
Thank You Soo Much
Hi Caroljup, yes you can airbrush them lightly. Just keep in mind that the more moisture you add, the more prone to curling the wafer paper becomes. You can go ahead and make your flowers at any time for your Jan 28th cake. I would just keep them in a dry place out of sunlight. Have fun experimenting!