Sweet Sixteen Cake
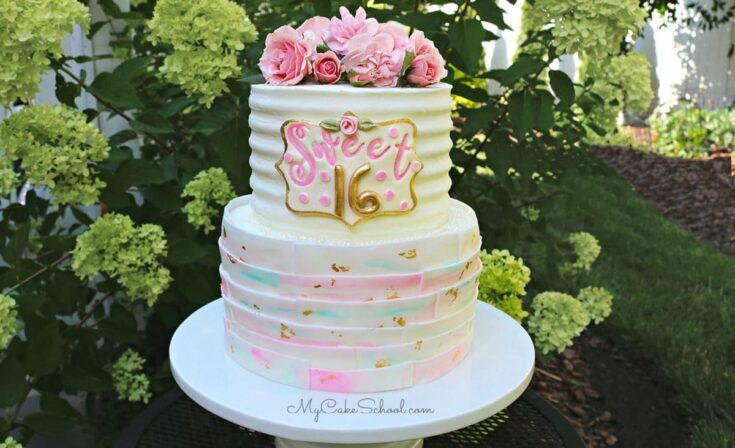
Today's cake has a Sweet Sixteen theme with soft pastels and flecks of gold leaf, as well as a beautiful decorative plaque for the front of the tier.
My favorite part of this cake tutorial is the fondant technique that we used on the bottom tier, which involves applying strips of thinly rolled fondant to the frosted cake.

This fun and unique Sweet Sixteen cake design is one that can very easily be changed up to fit any special occasion. We hope that you enjoy these easy but impressive cake techniques!
For our plaque, we demonstrate using "Sweet Stamps", which is a product that allows you to emboss your fondant or gum paste with lettering, however if you do not have Sweet Stamps, use your lettering method of choice (whether food writer pens, buttercream piping, tappits or other cut outs or even an edible image.)
Make sure to scroll down past our video tutorial for additional notes! Thanks so much for stopping by!
Table of Contents
Materials for Sweet Sixteen Cake:
You can find the printable how-to card further down in this post, with details about the materials used and additional notes.
For our Sweet Sixteen Cake, we used an 8 inch bottom tier and a 6 inch top tier stacked as usual. (Here is a quick video tutorial on the basics of tier stacking if you need a refresher!)
Each tier is on it's own cake cardboard cut down to the size of the cake, and frosted in our Classic Vanilla Buttercream. There are four bubble tea straw supports cut down to the height of the bottom tier beneath the top tier.
Fondant- (Approx 200 g.) I used Wilton pre-made fondant for this project, rolled very thin and allowed to set up enough that it is still very pliable but not too soft or stretchy. (see Notes below).
Vodka (or lemon extract) for mixing with coloring gel
Coloring Gels- I used Wilton Rose and Americolor Turquoise, Avocado Green (for ribbon rose leaves), Ivory (optional- I tinted the fondant for the "16" ivory before painting gold)
Gold Luster Dust of Choice for plaque- I used Rolkem Super Gold (Not intended for consumption)
Pixie Dust- Optional for Plaque (Not intended for consumption)
Cake Comb- I used a comb from a Wilton Set
Gold Leaf (ours is LA Gold Leaf)
Plaque Cutter- Mine was from a Wilton set, you could also make a round, square, or rectangle plaque.
Sweet Stamp- I used this for the "Sweet Sixteen" message. Mine are from the Sweet Stamp (by Amy Cakes) Elegant Letters Set-- I also used the Sticky Block to apply the stamp to the fondant. These can be purchased at a number of places online (mine were from Evil Cake Genius).
Fondant Rolling Pin (or regular rolling pin)
Miscellaneous: Small paintbrushes (used just for cake decorating), turntable is helpful when frosting tiers, offset spatula for applying frosting
Fresh, food-safe flowers- We used roses & carnations
Parchment
Sugar Pearls -Optional- I used these on top of the bottom tier.
Notes on Strips of Fondant:
Our bottom cake tier has a unique look as it is covered in very thinly rolled strips of fondant, which we later painted and speckled with flecks of gold leaf.
This is a fun and forgiving fondant technique which can be used on cakes for any occasion- the applied strips of fondant are beautiful on their own, or with additional painted details, etc.
Preparing the Strips of Fondant
For the fondant strips, I rolled out my Wilton fondant very thinly on the countertop which was prepared with a light coating of vegetable shortening and allowed to dry for about 15-20 minutes.
The top surface of the fondant becomes less tacky as it dries. I then flipped the fondant to dry the other side a bit more.
You do not have to let your fondant set up but I find that it is much easier to work with when the fondant has set up enough that it is still very pliable but not too soft or stretchy.
This allows you to cut your strips very easily and add right to the cake without them stretching.
Depending on factors like the brand and consistency of your fondant, the humidity in the air, etc. your fondant may dry more quickly than mine.
My fondant was very soft at first and so I left it out for several hours (I stacked the rollled fondant sheets on a cookie sheet, separated by parchment) and it was fine!
Applying the Fondant to the Cake
When applying the strips, I started at the top of the bottom tier, placing so that the strips extend slightly past the top edge of the tier (optional). Start at the top and work your way around and down the tier row by row with a slight overlap.
For the fresh flowers on top of the cake
We added fresh flowers to our cake with a parchment barrier beneath. Roses and carnations are safe to use on cakes-- if you use different flowers, just make sure to check if they are food-safe.
We did not use as water source (flower picks, oasis foam, etc) and they still looked good the next morning after being refrigerated overnight on the cake. (Refrigerating likely helped keep them fresh.) However, ideally, you would apply the flowers to the cake within hours of your event.)

Sweet Sixteen Cake
In this cake decorating tutorial, we'll show you how to create a beautiful Sweet 16 birthday cake! Many of the featured techniques can be applied to cakes for all sorts of special occasions!
Ingredients
- For this cake, we used an 8 inch bottom tier and a 6 inch top tier stacked as usual. Each tier is on it's own cake cardboard cut down to the size of the cake, and frosted in our Classic Vanilla Buttercream. There are four bubble tea straw supports cut down to the height of the bottom tier beneath the top tier.
- Fondant- (Approx 200 g.) I used Wilton pre-made fondant for this project, rolled very thin and allowed to set up enough that it is still very pliable but not too soft or stretchy. (see Notes below).
- Vodka (or lemon extract) for mixing with coloring gel
- Coloring Gels- I used Wilton Rose and Americolor Turquoise, Avocado Green (for ribbon rose leaves), Ivory (optional- I tinted the fondant for the "16" ivory before painting gold)
- Gold Luster Dust of Choice for plaque- I used Rolkem Super Gold (Not intended for consumption)
- Pixie Dust- Optional for Plaque (Not intended for consumption)
- Cake Comb- I used a comb from a Wilton Set
- Gold Leaf (ours is LA Gold Leaf)
- Plaque Cutter- Mine was from a Wilton set, you could also make a round, square, or rectangle plaque.
- Sweet Stamp- I used this for the "Sweet Sixteen" message. Mine are from the Sweet Stamp (by Amy Cakes) Elegant Letters Set-- I also used the Sticky Block to apply the stamp to the fondant. These can be purchased at a number of places online (mine were from Evil Cake Genius).
- Fondant Rolling Pin (or regular rolling pin)
- Miscellaneous: Small paintbrushes (used just for cake decorating), turntable is helpful when frosting tiers, offset spatula for applying frosting
- Fresh, food-safe flowers- We used roses & carnations
- Parchment
- Sugar Pearls -Optional- I used these on top of the bottom tier.
- Bubble Tea Straws, cake cardboards
Instructions
FOR THE FONDANT STRIPS ON THE BOTTOM TIER
- I rolled out my Wilton fondant very thinly on the countertop which was prepared with a light coating of vegetable shortening and allowed to dry for about 15-20 minutes so that the top surface was less tacky, and then flipped and dried some more.
- You do not have to let your fondant set up but I find that it is much easier to work with when the fondant has set up enough that it is still very pliable but not too soft or stretchy. This allows you to cut your strips very easily and add right to the cake without them stretching.
- Depending on factors like the brand and consistency of your fondant, the humidity in the air, etc. your fondant may dry more quickly than mine. My fondant was very soft at first and so I left it out for several hours (I stacked the rollled fondant sheets on a cookie sheet, separated by parchment) and it was fine!
- **When applying the strips, I started at the top of the bottom tier, placing so that the strips extend slightly past the top edge of the tier (optional). Start at the top and work your way around and down the tier row by row with a slight overlap.
FOR THE FLOWERS ON TOP
- We added fresh flowers to our cake with a parchment barrier beneath. Roses and carnations are safe to use on cakes-- if you use different flowers, just make sure to check if they are food-safe.
- We did not use as water source (flower picks, oasis foam, etc) and they still looked good the next morning after being refrigerated overnight on the cake. (Refrigerating likely helped keep them fresh.) However, ideally, you would apply the flowers to the cake within hours of your event.)
Notes
This beautiful cake design can be applied to cakes of all sizes.
Beautiful! I just love this cake! Fabulous as always.
Such a Beautiful cake!!
Thanks so much, ladies! I'm glad that you liked it! xoxo
Question - when plaque applied to the buttercream, will it fall off if cake in room temperature for a while? I'm worried it will fall off with the humidity. Thanks!
Hi Catherine, I've never had a problem with attaching fondant or gum paste pieces like this one with buttercream and leaving at room temperature. I rolled my plaque fairly thin.. less than 1/4 inch. I
Thank you Melissa!
Oh my goodness, this cake! Imagining the lucky 16yr. old girl getting this gorgeous cake on her day.♡
Beautiful explanation and cake thank you for sharing I will try it!