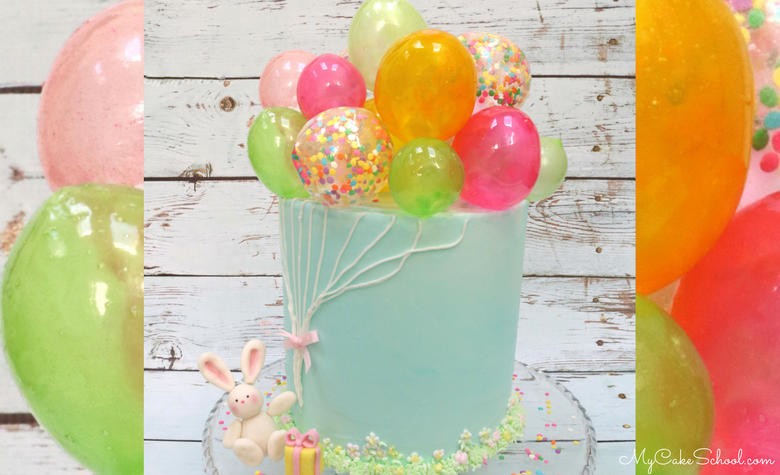
Gelatin Balloon Cake- Learn to Make Gelatin Bubbles!
Today, I'm going to show you how to make gelatin bubbles for cake decorating in this adorable balloon themed cake video tutorial!
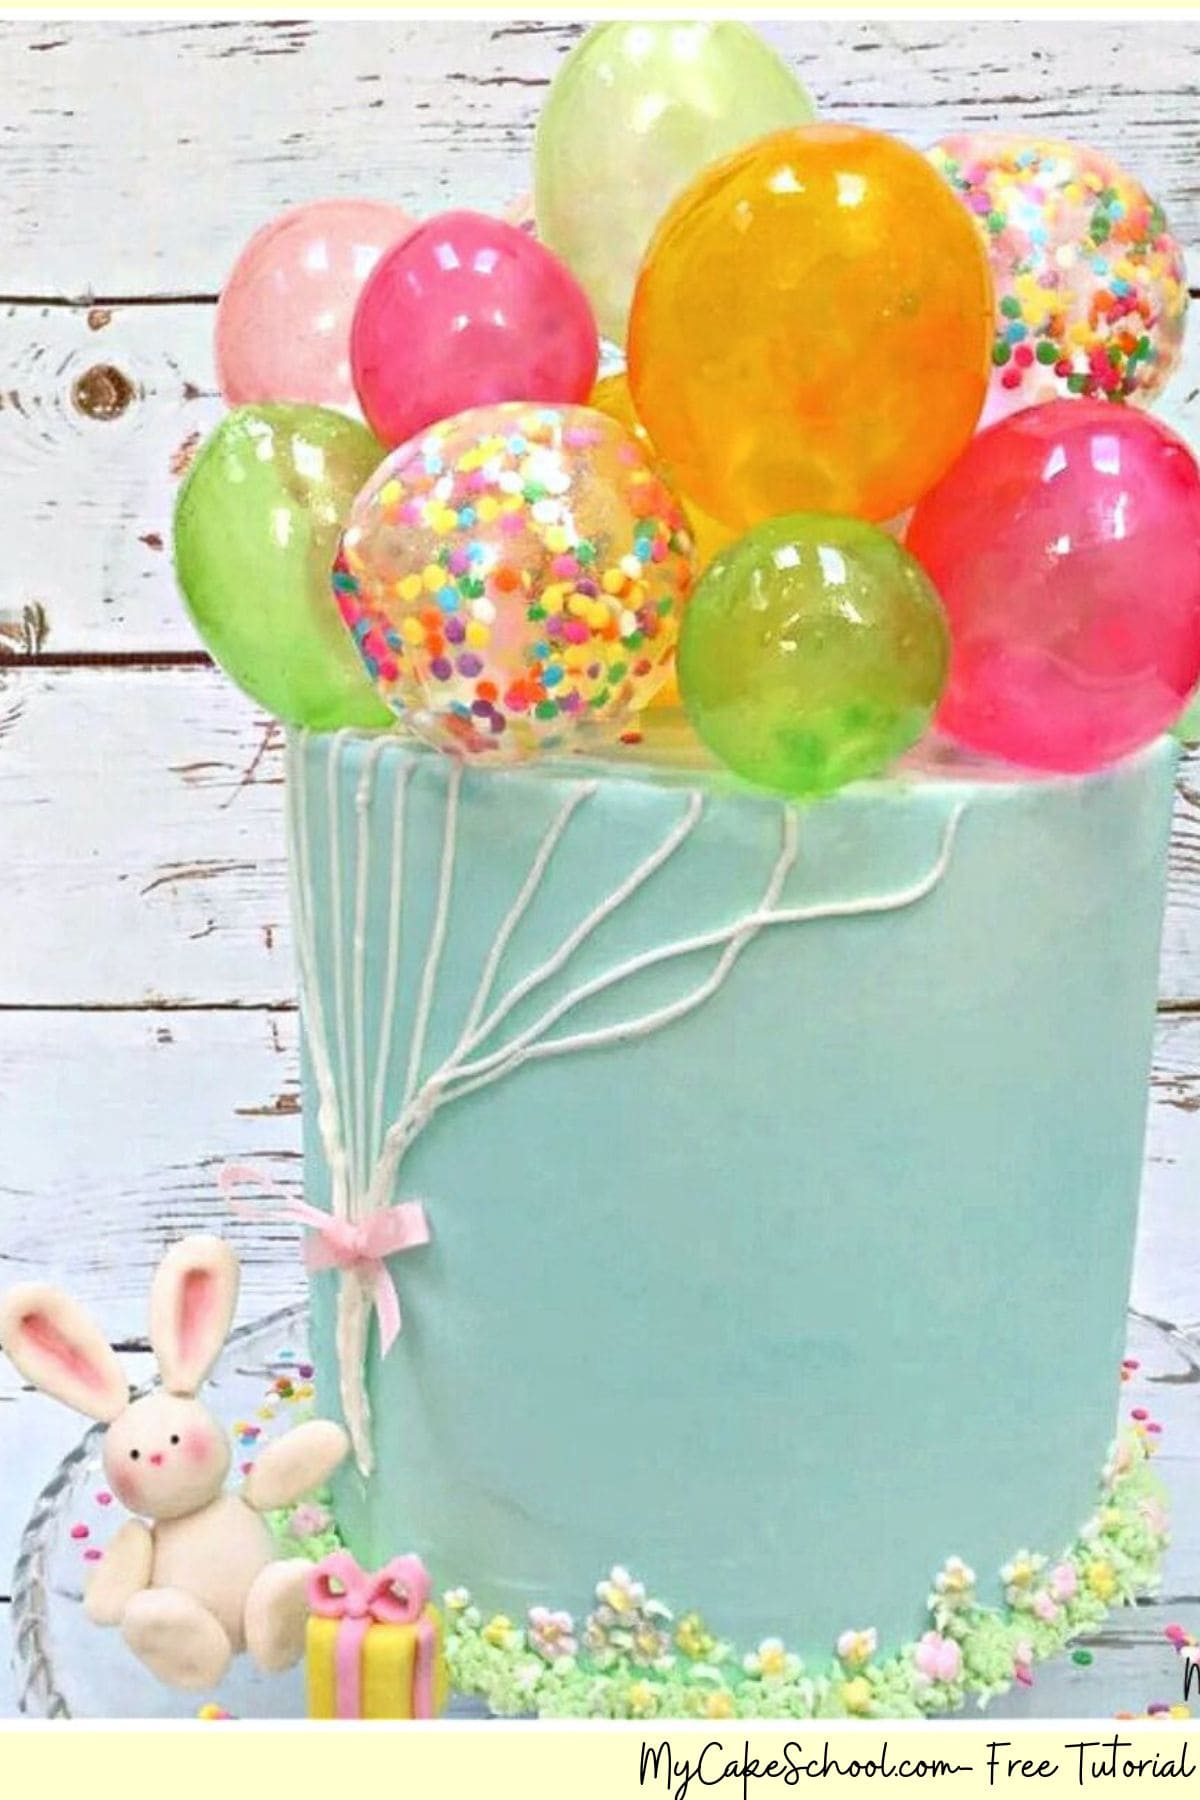
This cheerful design was so much fun to create, and this is our first cake tutorial that features gelatin bubbles.
If you've never tried creating gelatin bubbles before, the process is very simple (and pretty messy too)! But in the end, the final result is definitely worth it. Gelatin bubbles are really great for that WOW factor!
Table of Contents
Enjoy the Video!
Are Gelatin Bubbles Edible?
A quick note about gelatin bubbles-- they are not meant for consumption. They are completely food safe, but the taste is just not something that anyone would enjoy. You'll get a sense of this from the smell of the gelatin & water solution ;0)
I've seen decorators mention adding extracts to improve the taste, but for me I would rather just call it cake art and leave it at that!
** Don't miss the additional notes that I leave beneath the video about the number of balloons as well as the option of "double dipping" for added thickness & strength.
Materials for The Gelatin Balloons Cake:
The cake that we decorated was a four layer six inch double barrel cake.
This means that for the bottom two layer "tier", we inserted four bubble tea straws/supports cut to the height into the tier, placed a cardboard cake circle on top, and followed with the top two layer "tier". Then we frosted it all as one cake. We frosted with our Fluffy Vanilla Buttercream recipe.
Powdered Gelatin (We used Knox brand- Buy 2-3 boxes if making the amount of balloons we made...)
Cold Water
Small bowls for dipping
Styrofoam block/dummy, or you can use a mug if drying the balloons on lollipop sticks.
Lollipop sticks &/or toothpicks
Coloring Gels: We used Wilton Rose, Wilton Leaf Green, Americolor Lemon Yellow
Confetti Sprinkles (optional)
Fondant or Gum Paste (We used fondant with a little Tylose Powder kneaded into it)
Pink petal dust (optional) for bunny
Food coloring pens in pink & black for the bunny eyes and nose. (You could also use fondant)
Piping Tips: Tip 2 for the strings, Tip 233 for the grass
Piping gel for adhesive
Notes on Making Gelatin Bubbles:
Preparing the gelatin Mixture:
You'll want to use a ratio of 2 parts water to 1 part gelatin. (So, however much gelatin powder you use [by tablespoon or gram weight], you'll use twice that amount of water.)
In the video we used 4 tablespoons water to 2 tablespoons gelatin per color used. You may want to at least double this amount depending on the amount of gelatin bubbles you need, and how many times you plan to dip your bubbles.
*4 tablespoons of water to 2 tablespoons gelatin gave me about 5-6 *thin* bubbles. If you'd prefer to double dip for a harder bubble, this amount will give you about 2-3 bubbles. If making lots of the same color, you of course can increase the amount of gelatin & water used! (Just keep that 2:1 ratio of water to gelatin)
For my cake, some of the bubbles were dipped once, others were dipped twice. Thin ones (single dipped) are more transparent..but also have a little crinkle factor when squeezed! To dip a bubble twice, you'll first dip the bubble(s) once, allow to drip/dry for maybe 10 minutes until it can be lightly touched without tackiness, and then re-dip & dry for several hours.
How to make Gelatin Bubbles for Cakes
- Blow up your balloons and coat very lightly with a small amount of shortening. Tie to lollipop stick or push a toothpick through the tie as in the video.
- Combine your gelatin and water mixture (using twice as much water as gelatin powder). Allow to "bloom" for a few minutes until it has thickened. Microwave for 15-20 seconds. Tint the liquified mixture.
- Dip your balloons and allow to dry. If you are "double dipping", wait 10 minutes or so until balloons are dry/can be lightly touched. You may need to reheat the gelatin in very small increments if it becomes too thick.
How Long do Gelatin Bubbles Need to Dry?
- Balloons will be ready after 4-12 hours depending on how many times they've been dipped.
- These will keep indefinitely in an airtight container.
Can Gelatin Bubbles be Refrigerated?
- We did not have any issues from refrigerating the finished cake although some sites caution against it. I would test a bubble in the refrigerator first before placing the entire cake in the refrigerator. If the refrigerator's moisture levels are high, it could effect the bubbles as water can soften gelatin.
Can Gelatin Bubbles be Placed on Crusting Buttercream Frosting?
- We didn't have any softening from the bubbles being placed onto our crusting buttercream frosting.
More Balloon Themed Cakes
We've created many balloon themed cakes over the years! These other ballon themed cakes were created with other mediums.
The result is always so cheerful! Make sure to check out these other free balloon cake tutorials!
Bicycle and Balloons Cake (from our free cake blog tutorial)
Sweet Balloons Cake (these are raised candy coating balloons)- Free Cake Video
Owl Love you Forever Cake- Free Video (buttercream balloons)
Ghost with Balloons Cake- a fun free Halloween Cake Video
I just love it! :-) So cute and clever. Love the idea of adding sprinkles inside the balloons. I haven't tried making gelatin bubbles yet, but you made it look easy so I will have to give it a go :-) Fabulous as always!
This cake is so CUTE!! i always thought the gelatin bubbles would be hard to make. You made it look easy. Thanks for sharing another fun video. Jan from Indiana
Thanks MsGF & Ann!! xoxo So glad that you liked it! If you give the bubbles a try, let us know how it goes!
Can you use regular jello for the bubbles?
Hi Deb- I've read that it doesn't work, but I haven't tried it myself. Maybe I can do a little experiment this weekend just out of curiosity. I'll post here when I do...
OK, thanks
Your work and teachings are on another level. Can't wait to try this out. Thank you.
Hi Asanda, Thank you for the nice compliment!
I made this gelatin ballons cake on the weekend. Was a fun learning experience. Took a trial period to get the balloons looking the way I wanted, then getting the balloons to stick to each other and on the cake. The piping gel worked perfectly for getting them to stick to each other. Thank you for the tutorial! Also, traveling with the cake was soo much easier than I expected. Was a stressful weekend but the client's excitement made it worth the effort.
Another view
Hi Valarie! I'm so glad that you made this cake! The photos are showing very narrow for some reason on my desktop but I can see enough to know that it is adorable! I love the colors that you chose!
I will be using this soon, my cake will be buttercream cake and i will have the bubbles along the side going to the top of the cake. would you please answer my questions. does the gelatin have to be knox brand and can i use corn syrup instead of pipping gel. thank you