My Cake School

Cake Tutorials & Recipes

  • Facebook
  • Instagram
  • Pinterest
  • RSS
  • Twitter
Login
  • home
  • Videos
    • The Basics
    • Buttercream Techniques
    • Carved/3D
    • Chocolate Techniques
    • Cupcake, Cake Pop, etc. Methods
    • Gum Paste & Fondant
    • Themes and Occasions
    • See All Videos
  • Shop
    • Miscellaneous Cake Decorating Supplies
    • Kitchen Appliances
    • Chocolate and Candy Making
    • Fondant and Gum Paste
    • Piping Tips
    • Molds, Mats, Embossers, and Cutters
    • Cookbooks
    • Dusts and Sprays
    • Pantry Items
    • Bakeware and Tools
    • Sprinkles and Candy
  • Free Tutorials
  • forums
  • recipes
    • Cakes and Cupcakes
    • Fillings
    • Fondant/Gumpaste
    • Frostings and Glazes
    • Miscellaneous
  • contact
  • join

Tiered Sheet Cake- Free Cake Tutorial

January 6, 2017 By Melissa D. 20 Comments

5.0K shares
  • Share
  • Tweet

Who says that sheet cakes are boring? Today I’m going to show you the CUTEST “tiered” sheet cake design. This is so simple, and can be modified to fit all sorts of occasions from birthdays to bridal showers!
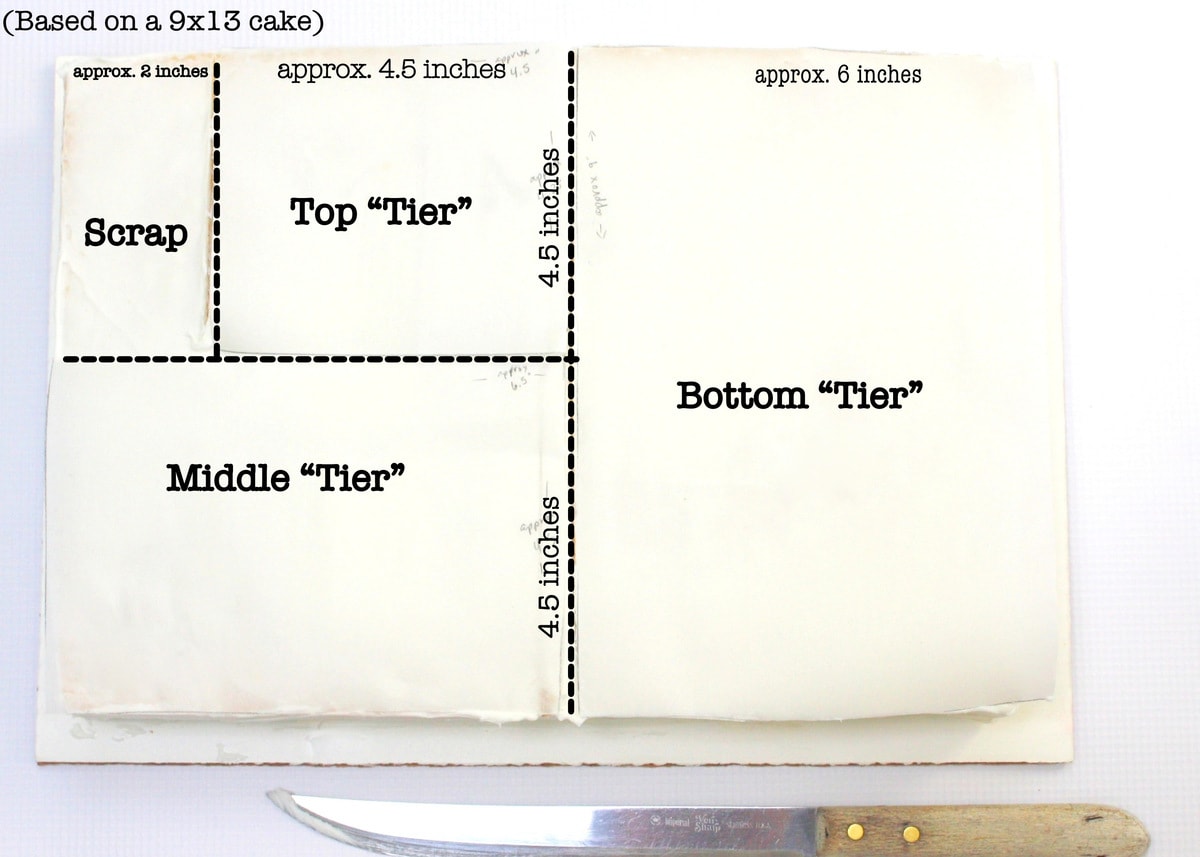

Adorable "Tiered" Sheet Cake design by MyCakeSchool.com! Free Tutorial!

For this cute cake design, I’m working with a 9×13 sheet cake (which happens to be the doctored mix White Almond Sour Cream Cake in our Recipes section).

I like to carve my cakes while they are partially frozen so that they are less fragile and can be handled more easily. I frosted my cake with a crumb coat of vanilla buttercream, and then made my slices as you see below.

You can use my photo below as a basic guide no matter what size sheet cake you’re working with.

You can see below that I basically sliced the cake in half to get my “bottom tier”. With the remaining half, I created my top and middle “tiers”.


 Adorable Tiered Sheet Cake! Free Tutorial by MyCakeSchool.com!

Since my layers were partially frozen, I was able to pick up the crumb coated layers and place on the final cake base. (Use your cake base of choice. I used three 14×19″ cake cardboards, wrapped with a white plastic tablecloth which was secured on the bottom with staples).

Whenever I’m decorating the cake on the final cake base, I like to slide sheets of waxed paper just under the edge of the cake all the way around. This helps to keep things nice and clean.

I added a thin layer of frosting around the freshly cut edges of the cake before continuing.

I-KLKMNJL5MBU1

Time to start piping!
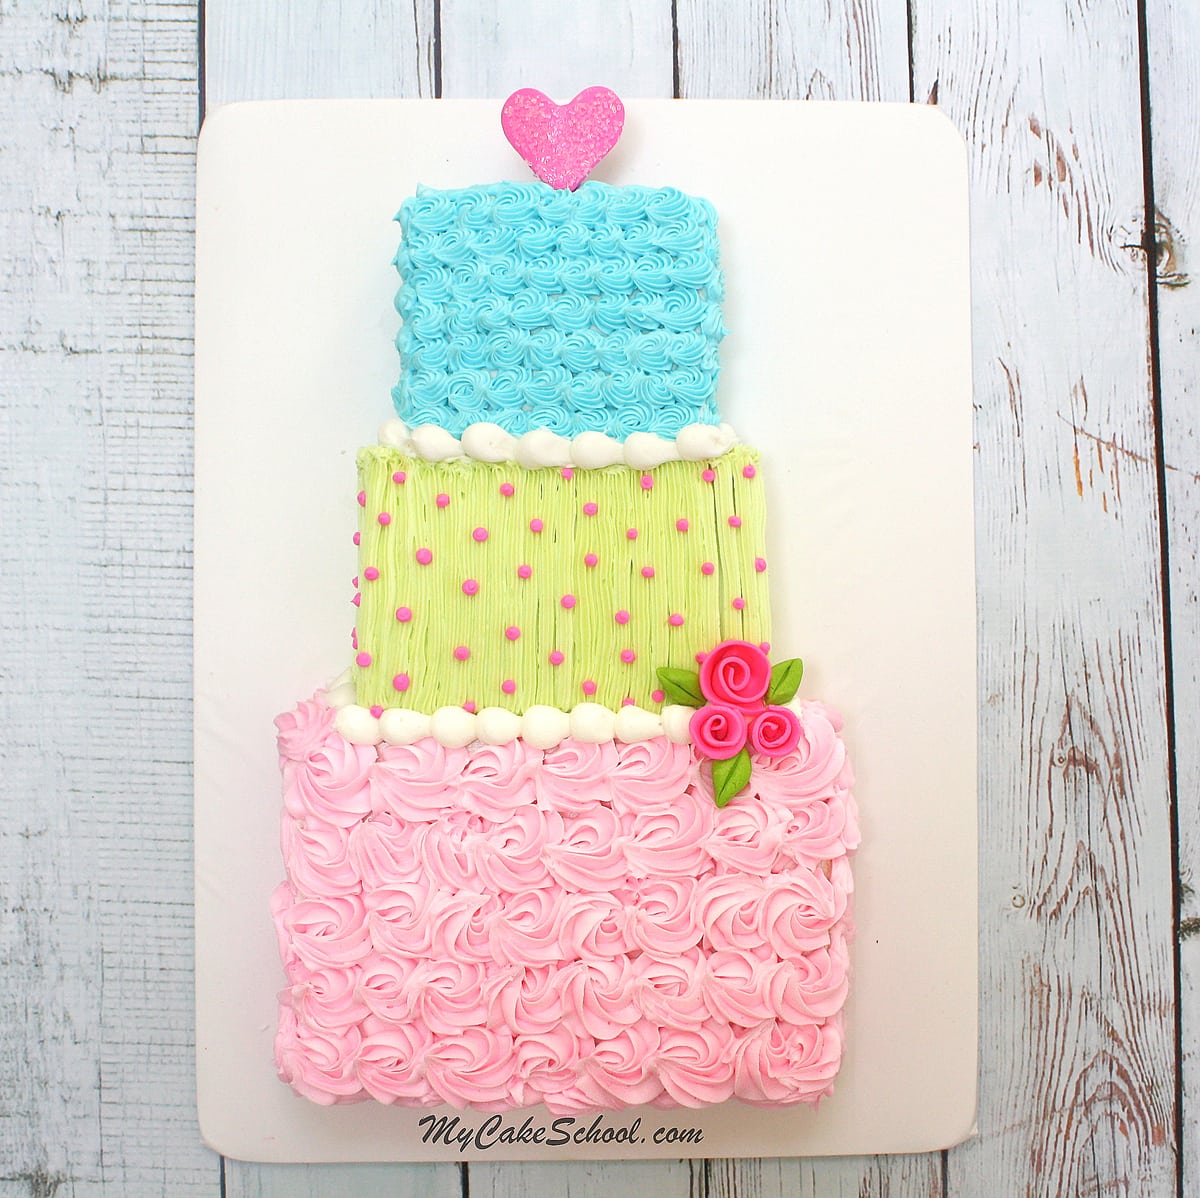
Here, I’m using a 2D piping tip to pipe rosettes row by row . (Buttercream is tinted with Americolor Deep Pink).

Cuteness! Free Tiered Sheet Cake Blog Tutorial by MyCakeSchool.com!

Sweet and Simple "Tiered" Sheet Cake Design! Free Cake Tutorial by MyCakeSchool.com!

For the middle tier, I piped rows of green buttercream (Americolor Electric Green) with a star tip 21.

* I also added hot pink dots of buttercream (Wilton Rose coloring gel) with a tip 4.

Sweet and Simple "Tiered" Sheet Cake Design! Free Cake Tutorial by MyCakeSchool.com!

For the top tier, I’m piping small rosettes of buttercream with a star tip 21 (tinted with Americolor Sky Blue).


Adorable "Tiered" Sheet Cake Design! Free Cake Tutorial by MyCakeSchool.com!

Time to clean up those edges! I’m piped bead borders using a medium sized round tip 12.


Sweet and Simple "Tiered" Sheet Cake Design! Free Cake Tutorial by MyCakeSchool.com!

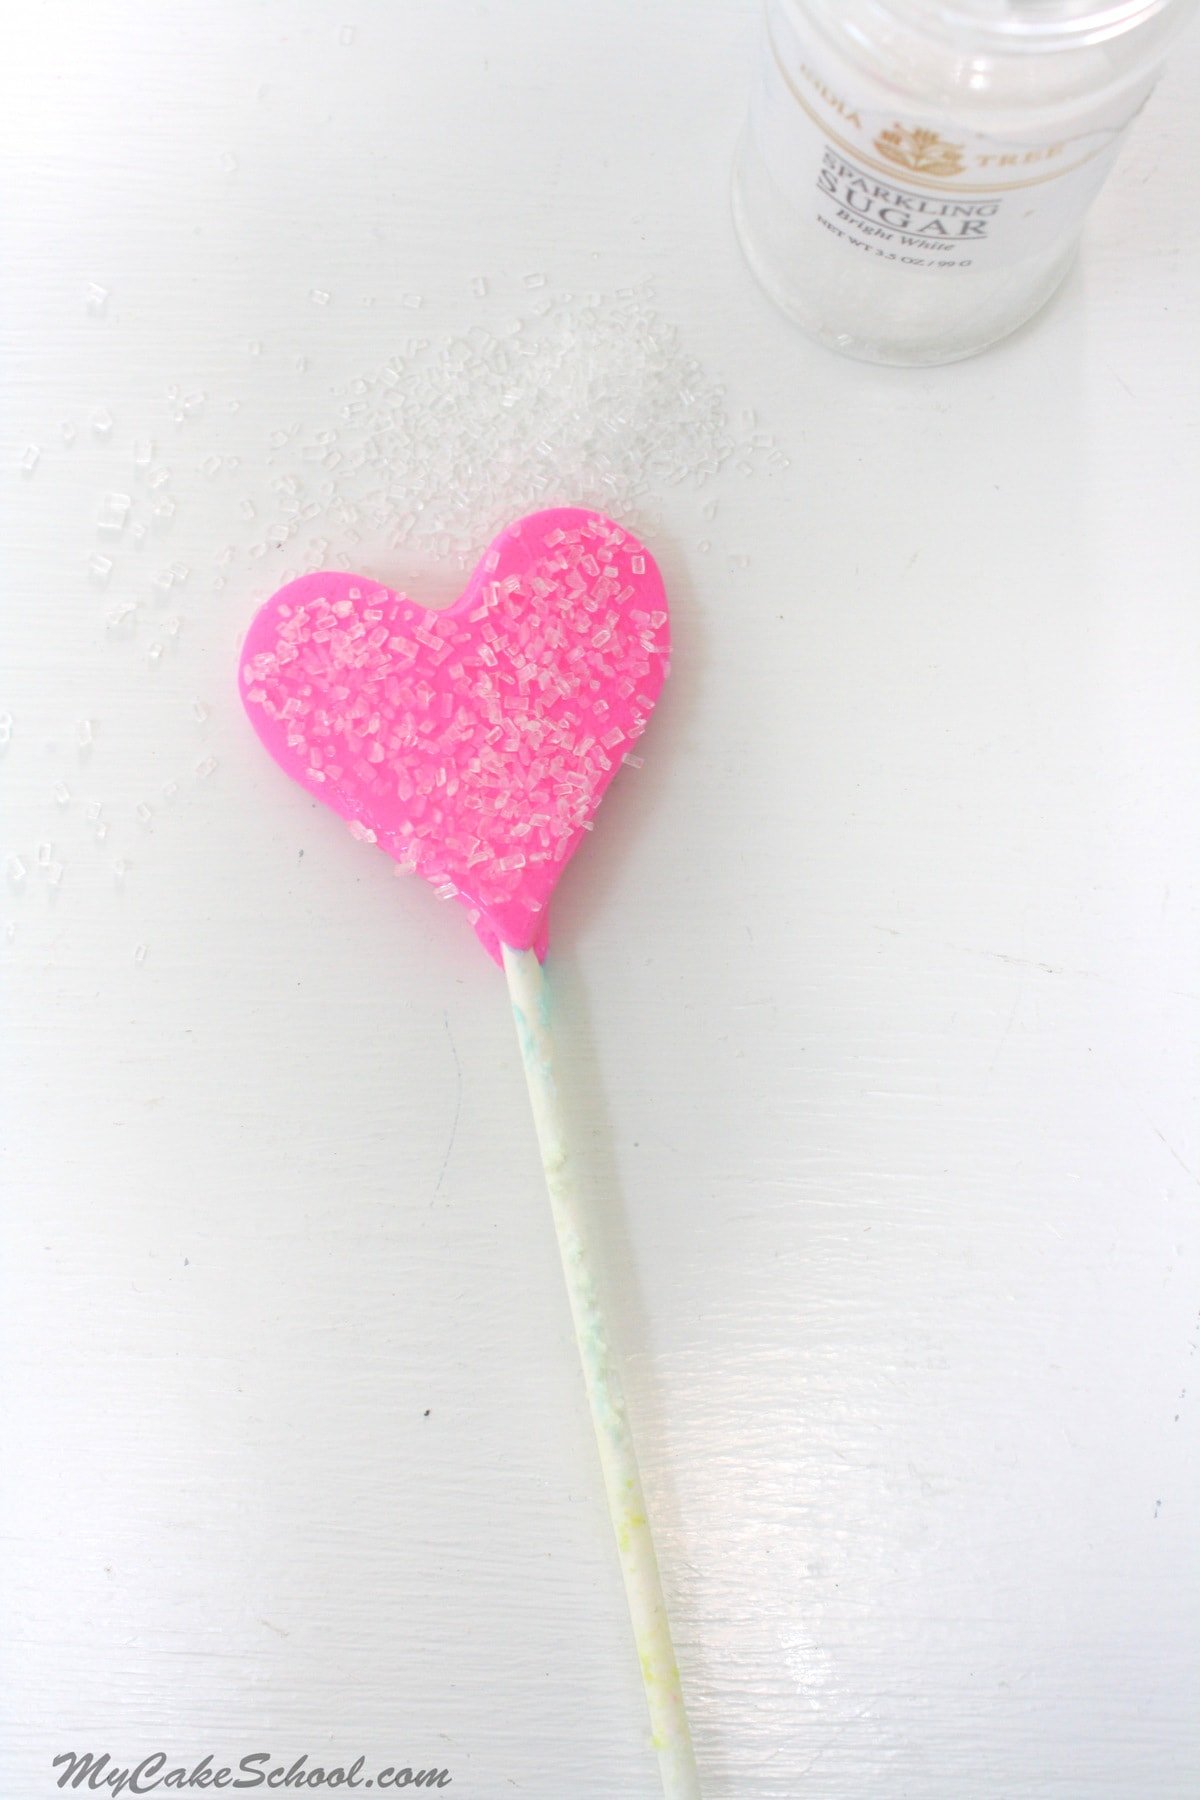
I thought that it would be cute to add a little cake topper. You can use gum paste for this or fondant with a bit of tylose powder kneaded into it.

I tinted my fondant with Wilton Rose coloring gel and rolled it to about 1/4 inch to 1/8 inch thickness. I used a heart shaped cookie cutter to cut my shape.


Sweet and Simple "Tiered" Sheet Cake Design! Free Cake Tutorial by MyCakeSchool.com!

Allow to dry for a few hours or until firm. Then flip it over, place a lollipop stick in back, and secure with a strip of fondant dampened with water or piping gel if you have it!

Sweet and Simple "Tiered" Sheet Cake Design! Free Cake Tutorial by MyCakeSchool.com!

Press the strip around the stick and allow 30 minutes or so to dry.


Sweet and Simple "Tiered" Sheet Cake Design! Free Cake Tutorial by MyCakeSchool.com!

As an optional step, we decided to sprinkle a little sparkling sugar onto the heart. To do this, we brushed the dried heart with piping gel and added the sugar.  Now our topper is ready!  Simply push into the cake and the stick will act as an anchor.

Sweet and Simple "Tiered" Sheet Cake Design! Free Cake Tutorial by MyCakeSchool.com!

Simple ribbon rose accent! To make a fondant ribbon rose, cut a strip of fondant rolled to about 1/8 inch thickness and roll it into a rose, pinching at the base as you turn.  Vary the length of your strip depending on how large of a rose you’d like! I made three of these.

Sweet and Simple "Tiered" Sheet Cake Design! Free Cake Tutorial by MyCakeSchool.com!

I made a few simple leaves by pinching small balls of green fondant into leaf shapes. Then I used the dull side of a knife to create an impression down the center.


Sweet and Simple "Tiered" Sheet Cake Design! Free Cake Tutorial by MyCakeSchool.com!

Our cake is finished! Sweet and simple and the decorating options are endless! Have fun experimenting with different textures, piping techniques, and colors. For more servings, you can make a double layer sheet cake for the same cute look.


 Sweet and Simple "Tiered" Sheet Cake Design! Free Cake Tutorial by MyCakeSchool.com!


[recipe]
 

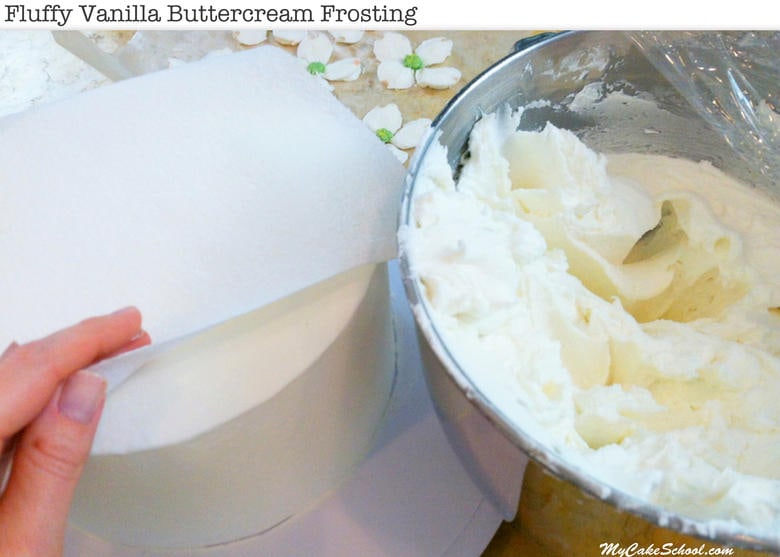
*We used our delicious Fluffy Vanilla Buttercream frosting recipe for this cake, but any buttercream will do! Our Fluffy Buttercream recipe contains shortening (which makes it a bit whiter before tinting).

If you prefer to have a completely butter-based American Buttercream recipe, try our Classic Vanilla Buttercream recipe! We love them both!


Delicious Fluffy Vanilla Buttercream Frosting Recipe by MyCakeSchool.com. The shortening in the recipe makes it a bit more warm-weather friendly! Perfect for piping! MyCakeSchool.com


Thanks for stopping by! We hope that you’ll give this sweet design a try. If you do, we would love to see! Feel free to post a photo in the comments below!

Also, make sure to check out our other Free Blog Tutorials, Free Video Tutorials,  and Cake Recipes in our Free Tutorials section!


Adorable Tiered Sheet Cake Design. Free Cake Tutorial by MyCakeSchool.com.

Related posts:

  1. Tie Dye Fun!- Cake Decorating Blog Tutorial
  2. Ice Cream Cone Cupcakes!!!!-Minute Video & Blog Tutorial!
  3. The Very Hungry Caterpillar–Pull-Apart Cupcake Cake Tutorial!
  4. Fish Cupcake Cake!~A Blog Tutorial
  5. Elephant with a Cupcake!~ A Blog Tutorial

Filed Under: Blog Tutorials, Buttercream Techniques, Kids, Themes and Occasions Tagged With: sheet cake, tiered, Tiered Sheet Cake

« Rudolph Buttercream Transfer- Cake Video
Oreo Buttercream Recipe »

Comments

  1. MsGF January 6, 2017 at 12:42 pm

    That is super cute and so simple! I love it! Great colours too! More fabulous then a regular sheet cake :-)

    Reply
  2. Melissa Diamond January 6, 2017 at 9:36 pm

    Thanks MsGF!! xo

    Reply
  3. June January 7, 2017 at 6:13 pm

    What a cute and clever idea!!! Melissa and BeBe, I’m always impressed how you come up with such lovely cakes and ideas!! Thank you!! ❤️❤️

    Reply
  4. Melissa Diamond January 7, 2017 at 9:31 pm

    Thank you so much, June! xoxo

    Reply
  5. sandra January 8, 2017 at 4:10 am

    This cake looks fabulous.!! I have a big birthday coming up in February, I will use yellow and purple colours with perhaps a gold heart on the top. Thank you so much for this wonderful idea. xoxo

    Reply
  6. Nancy Lawlor January 8, 2017 at 9:31 am

    Great idea! Easy to transport! Very sweet designs on each “layer”. Thanks again for makng me look good!

    Reply
  7. Melissa January 8, 2017 at 9:50 am

    Love this idea for bdays!

    Reply
  8. Sharron Holderfield January 8, 2017 at 12:13 pm

    LOVE LOVE LOVE THIS!!!! ❤

    Reply
  9. Sadia Wasim January 8, 2017 at 1:21 pm

    Hi Melissa! What a cute cake and such an amazing idea! I love the way it turned out. ?
    It’s great for a lot of occasions and so simple to create.
    Thanks!

    Reply
  10. Betty Swavely January 8, 2017 at 1:55 pm

    I love it! What a great idea. Can’t wait to make it.

    Reply
  11. Jennifer Daniel January 8, 2017 at 2:41 pm

    Happy New Year!!!! All of the sudden I am in love with sheet cakes!!!! I can’t wait to make this cake!!!! Thank you sooo much!!!!

    Reply
  12. Melissa Diamond January 8, 2017 at 3:07 pm

    Thank you all so much for your comments! So happy that you like this idea for your sheet cake designs! xo

    Reply
  13. Donna Zell January 8, 2017 at 8:26 pm

    This is absolutely adorable and beautiful… love it! I would be perfect for a wedding shower!!! Thank you for your wonderful tutorials!

    Reply
  14. Seema Latif January 9, 2017 at 6:48 am

    This is super super cool Melissa. Too cute. U r just incredible. Love everything u make. And best of all, not only does it look easy. You make it easy for us to do. What can I say. U make it user friendly. Lol

    Reply
  15. Victoria Brienza April 13, 2017 at 12:39 pm

    Love all your cake designs, especially this one. You are very creative…. My son and I are making it for his girlfriend’s Birthday. I was wondering, do you use your crusting buttercream recipe or the fluffy one? Thank you!!!

    Reply
  16. BeBe April 13, 2017 at 1:01 pm

    Hi Victoria, We did not make a note on which one we used but we think it was the Fluffy Vanilla Buttercream recipe. The Classic Buttercream (all butter) would be fine to use also. The girlfriend is going to love this. Thank you for your nice comments!

    Reply
  17. REGINA ANDERSON May 12, 2020 at 2:46 pm

    Hi Melissa how many cups of batter is needed for 1/4 sheet cake?

    Reply
  18. BeBe May 12, 2020 at 4:10 pm

    Hi Regina, For a 1/4 (9×13) sheet pan you will need 7 cups cake batter

    Reply
  19. Regina Anderson May 13, 2020 at 10:02 am

    Thank you BeBe . Your white cake from scratch is 6 cups how do I get an additional cup of cake batter.

    Reply
  20. BeBe May 13, 2020 at 2:27 pm

    Hi Regina, I suggest that you make 1 1/2 times the recipe. You will have some leftover for cupcakes. As for measuring the egg whites — there will be 5 egg whites plus 2 1/2 more. For the 1/2 egg white. Weigh 1 egg white and divide that weight in half or put the egg white into a measuring cup and remove 1/2 for the cake.

    Reply

Leave a Reply Cancel reply

Your email address will not be published. Required fields are marked *

You can click here to Subscribe without commenting

Add a picture

Melissa Diamond Meet MelissaWelcome! We'd love for you to check out our free cake tutorials & recipes, or join our site for online access to hundreds of videos and more!

Read More

The Perfect Gift

  • Lemon Buttermilk Cake {A Scratch Recipe}

    Lemon Buttermilk Cake {A Scratch Recipe}
  • Sweet Balloons Cake

    Sweet Balloons Cake
  • White Chocolate Coconut Cake

    White Chocolate Coconut Cake
  • Striped Buttercream Panels Cake

    Striped Buttercream Panels Cake
  • Lemon Coconut Cake with Lemon Curd Filling

    Lemon Coconut Cake with Lemon Curd Filling
  • Milk Chocolate Cake

    Milk Chocolate Cake
  • Buttercream Tulip Cake

    Buttercream Tulip Cake
  • Flamingo Ruffle Cake- A Cake Decorating Video Tutorial

    Flamingo Ruffle Cake- A Cake Decorating Video Tutorial
  • 60+ of the BEST Cake Recipes for Spring and Summer

    60+ of the BEST Cake Recipes for Spring and Summer
  • Lemon Cake {A Scratch Recipe}

    Lemon Cake {A Scratch Recipe}
Facebook Instagram Pinterest Twitter RSS
Login
Melissa Diamond Meet MelissaWelcome! We'd love for you to check out our free cake tutorials & recipes, or join our site for online access to hundreds of videos and more!

Read More

Your Favorites

  • Your favorites will be here.
  • home
  • free tutorials
  • videos
  • recipes
  • contact
  • join
  • login
  • home
  • free tutorials
  • videos
  • recipes
  • contact
  • join
  • login

Copyright © 2022 My Cake School. Melissa Diamond. All rights reserved | Terms and Conditions | Privacy Policy