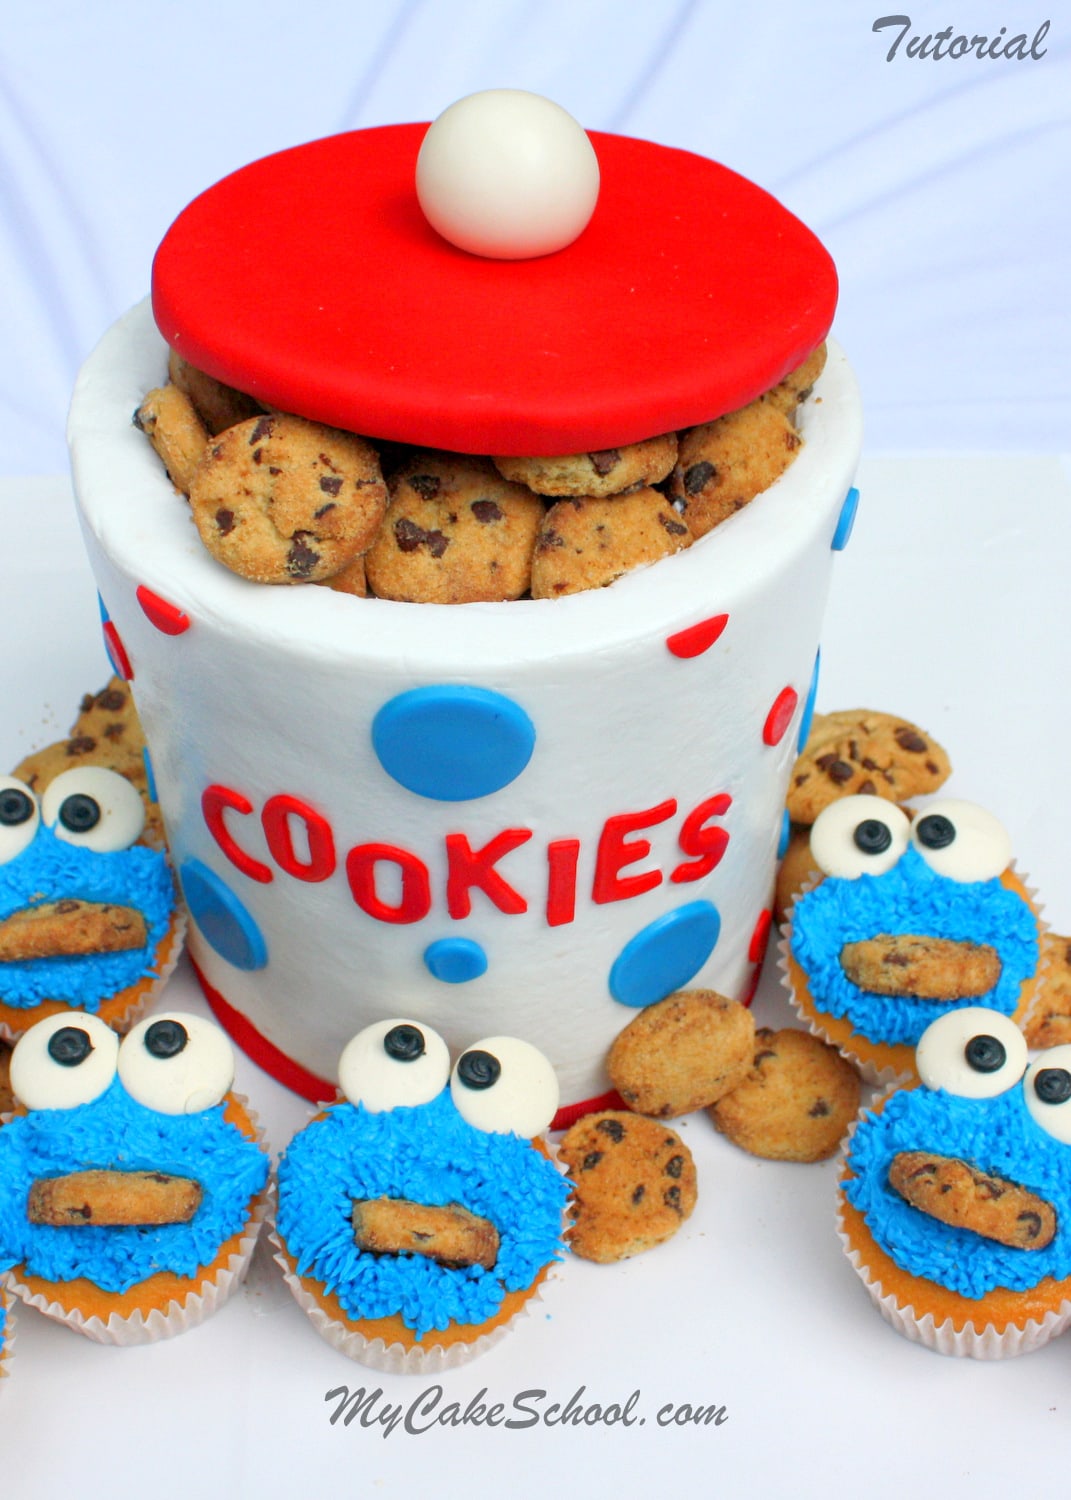
Hey there–today, I am going to show you how to make a CUTE Cookie Jar Cake with quick and easy Cookie Monster Cupcakes!
This cake is quick, cute, & perfect for the cookie lovers…the cookie jar collectors…and of course, all of the Cookie Monster fans!
How to Make a CUTE Cookie Jar Cake
We’ll start with the cookie jar, and then make some Cookie Monster cupcakes to go with it–
Let’s get started!
Step one– Cookie jars come in all shapes and sizes. I decided to go with a cookie jar that is shaped a whole lot like a cake…since that makes things nice and easy. Of course, you could go with a rounded cake if you’d rather!
How to Make a Double Barrel Cake (TALL Cake)
As I often do, I used a double barrel cake construction so that I could have a taller cake. I used 4 fairly fat 6 inch cake layers. I filled and settled the first two layers, and inserted 4 bubble tea straws cut to the size of those two layers. These straws will support the weight of my next two layers, as you’ll see in a minute.
Here, you can see the cardboard cake circle that I trimmed slightly smaller than the 6 inch cake layers. Then, I added the next two cake layers and frosted the entire cake as one tall cake.
You do not need to have a tall cookie jar–I just like the look! When you have a tall cake like this one, the internal supports and cake board not only keep the cake stable, they also keep your servings a reasonable size. (Otherwise, that would be a TALL slice of cake!)
Smoothing the Buttercream Frosting (Using Viva Paper Towel Method)
Next, I frosted my cake with a crusting vanilla buttercream, like our Fluffy Vanilla Buttercream Recipe or our butter based Classic Vanilla Recipe. Once crusted, I smoothed over it with the help of a Viva paper towel.
If you’d rather not use the Viva Paper Towel method of smoothing, another popular method is to chill the cake in the freezer for about 20 minutes until the frosting is firm.
Then, glide over it with a heated bench scraper or spatula. You may need to add a little fresh buttercream to stubborn places to that it can melt as you glide over it.
Carving the Cookie Jar Cake
Next, I used a sharp (non serrated) knife to make a shallow cut into the top of the cake. I wanted to remove a small amount of cake so that the cookie jar would look more realistic. It’s much easier to cut your circle if you have a cookie cutter or round template to mark where you will be cutting.
Next, I removed the excess cake. You can see from the photo that the amount removed was thin, but it will give us just enough depth for our cookies.
I applied a thin layer of buttercream to the newly exposed cake, and then began working on the other accents.
Creating the Lid for the Cookie Jar Cake
My cookie jar lid is two cardboard cake circles, taped together, coated with a thin layer of vegetable shortening, and then a layer of red fondant. (I used pre-colored red Satin Ice fondant.).
I used my cookie cutter as a template for cutting out the cardboard cake circles, so that they would be approximately the same size as the opening that we cut into the top of the cake.
I added a little white fondant knob on top of the lid, securing with a little sugar glue.
I used red and blue fondant for accents to give our cookie jar some personality! Polka dots are cut from large and small piping tips, and I used an alphabet cutter set to cut out the word “cookies” in red fondant.
Adding the Cookies to the Cookie Jar Cake
Adding the cookies was my favorite part–suddenly, our cake turned into a cookie jar! You can slice the cookies in half if you’d like for them to go even further (and give the illusion that they are pushed more deeply into the jar). My cookie of choice today was Chips Ahoy Minis.
Small Ribbon Border
Next, I greased a red ribbon with a little vegetable shortening and wrapped it around the bottom of the cake for a border. Greasing the ribbon is an important step for whenever you make a ribbon border because it discolors the ribbon in a uniform way. If you did not do this, the buttercream would causes splotches on the ribbon.
We’ll show you the cookie jar very soon…but for right now, let’s make some Cookie Monsters!!!
How to Make EASY Cookie Monster Cupcakes
Have you ever made Cookie Monster cupcakes? SO easy and so cute! — All that you need is buttercream tinted Royal Blue (somewhere between medium & stiff consistency), some white candy melts for the eyes, black buttercream, and some cookie halves.
Cookie Monster’s fur is piped with a Wilton grass/hair tip (233), and I used a round piping tip 4 for the pupils of the eyes.
Next, I pushed a cookie half into the icing…
Then, I added our white candy melts (rounded side up) and piped on the pupils with black buttercream. Of course, you can improvise with icing eyes, fondant eyes, marshmallow eyes, etc.
That’s it! Now, let’s huddle them around the cookie jar where they belong!
Aren’t these the cutest?! Whether you make only the jar, only the Cookie Monsters, or both as we did, I hope that you’ll give this idea a try!
The crusting buttercream frosting used for our Cookie Jar Cake
For this recipe, we used Fluffy Vanilla Buttercream which is a crusting vanilla buttercream. This works perfectly with the Viva paper towel method demonstrated above:Fluffy Vanilla Buttercream Recipe . This is a shortening and butter based frosting. If you prefer an completely butter-based frosting, check out our Classic Vanilla Recipe!
My Cake School Online Cake Tutorials, Recipes, and More!
Thanks for stopping by, I hope that you enjoyed the tutorial! Don’t forget to check out our full collection of Free Cake Tutorials and Favorite Cake and Frosting Recipes for more delicious ideas and inspiration!
Now, it’s time for cookies and cake!
I love it! Simple too!
This is absolutely adorable! I’m trying to think of an occasion when I can make this!! :)
This is fantastic!!! Thanks for sharing!!!
Beautiful!!!
It’s beautiful ! I will try to make it .thank you for your great ideas !
Whats your recipie for the Buttercream?
Oh, I love this! I can’t wait to try it out. Thanks so much for posting.
Oh this is so darn cute and awesome.
Thank you so much Melissa for an AWESOME tutorial. You are a genius!! I’m just running through the upcoming birthdays where I could make this. I think mine might be next!!
This is so sweet! I need to try this. Thankyou Melissa for a wonderful tutorial.
love it, want to make this so bad!!
This is the cutest cake EVER!! Thanks for the tutorial;)
What a great idea! you are full of so many fun surprises :) Thank you!
You are a pretty amazing woman. GOD has sure blessed you be such talent. Totally enjoy your tutorials. Thank you so much and GOD continue to bless you in all things.
Brilliant, thank you :-) xx
Adorable! Love it!!
thank you for another cute/adorable and for me doable cake tutorial.
So cute!!! Thanks for sharing another great cake idea!
Beautiful! I only have one question though……how do you separate and serve this cake now?
I love it! So cute and simple too. Thanks for sharing!
Adorable! I wish I had someone to make it for! I will make those cupcakes for my grandsons though!
Melissa, you have outdone yourself. This is ABSOLUTELY the cutest cake ever… I can’t wait to make this for my grandson – I wish he was having a birthday again – I can’t wait ’til next year! I think I’ll make a similar one for Christmas… Thank you!!!!
Did you do the jar in fondant as well, or just plain buttercream? VERY impressive indeed!
Hi Terri, the cookie jar is covered with buttercream, just the lid in fondant.
Great Job!
So adorable, absolutely love it!! I am so going to do this!!!! Thanks Melissa!!!
I made the monster cupcakes today :) they were so much fun to make and turned out great :)
Great job…..thanks for sharing.
Wonderful, I’m so fascinated by all the cake made, cute, elegant….
I wonder if you share the cake recipe?? and how do u make the foundant and buttercream…. ?? TIA
Love it…what brand of letter cutter did you use. I have the Wilton which I like but they are a bit small. These letters look a bit larger.
Hi Rosangel, We used Fox Run Alphabet Cutters (26 piece set), here is a link, http://www.amazon.com/s/ref=nb_sb_noss?url=search-alias%3Daps&field-keywords=foxrun+cookie+alphabet+cutters
It is simply amazing. Thanks for theses wonderful tutorials.
I love it. I think i will make this for my own birthday!!! Never to old to love Cookie Monster anything :) (PS: i’ll be 49 this year LOL).
Love to try…….my daughter will be so happy…..
Thanks for your comments!
@Ingrid, I totally agree, haha ;0)
@Iffat- Thanks!
im making this for my sons birthday this may along with elmo and big bird cup cakes
I need to make a cake shaped like a mason jar…would this technique work for it? I tried to make a cake stacked (four – 6in layers), but the day after I finished and transported it, it started to sink down….. what did I do wrong? Thanks so much for your help.
Hi Gracie– Yes, it should work well for it! You could carve away just a little bit at the top edge to get a slight taper if you’d like… or if you don’t want to carve and still want a tapered look at the top, you could form that section with rice cereal treats and frost over it along with the rest of the cake.
When you had the issue with the sinking layers, was it a double barrel construction with the supports within? If so, maybe the cake was on the soft side and settled? To prevent this from happening, you could wrap each two layer “tier” in plastic wrap, settle for several hours or overnight with a weight of some sort (thin book, thick magazine), and then assemble as usual.
Let us know if you have any more questions! Good luck!
I’m not sure I understand what you are saying about the rice krispy treats…Do you mean shape them as the rounded rim, and then “glue” them to the top of the cake to make it look like a rim??
Maybe I didn’t let the cakes settle enough before stacking them. Could I also put the 4 layers together using a SPS system? I’ve never used that system, but I did find an instructional video on you tube the other day. I believe it said the columns and plastic separators are not hard to find at places like Michaels??
This cake will have to be transported to another location for the client and I would hate for it to collapse like the other one (which was just done for me really; so it didn’t really matter)
Thanks for all your help!
Hi– Disregard the rkt’s idea if you already have something worked out! I was just thinking that if you don’t like to carve your cakes, but still wanted to get that tapered look, it would be easy enough to rest a shaped rkt piece on top of the double barrel cake layers which would be angled in. —
On second thought though, if you want to taper the top at all, it’s easy enough to just carve away the edge of the cake, then frost or cover with fondant as usual, and then create an rkt lid.
I’m just throwing out ideas here! ;0) –
The SPS system is something that you can order online (Michael’s, etc. do not sell the SPS…they have their own version plates/hidden pillars. –
The SPS plates are nice because they really do well in transport….but also think that you should be fine just using a cake cardboard and supports within your double barrel, and then you can just hammer a sharpened dowel through your stacked tiers and into the cake base below to make everything secure. (Of course your cake base would need to be stacked cake cardboards, foam core, or other material that will accept the sharpened dowel.) —
Okay. I’ll give it a try and hope for the best! Thanks for all your great suggestions….
That was awesome! I am going to make this for my grandchildren. Thanks for sharing
I’m a newbie to this. How much cake batter does this cake require to create it the same height as the one you have pictured? Also can you use regular plastic straws or won’t they provide enough support?
Hi Bunny– I would say I used about 2 cups or so per 6″ pan…so that would be about 8 cups total for this 4 layer cake.
I really prefer bubble tea straws to regular straws because they are stiffer and wider. Some grocery stores sell fat straws that are similar to bubble tea straws if you don’t have time to order…and some international grocery stores sell bubble tea straws if you happen to have any nearby. Michael’s and craft stores where cake supplies are sold also sell hollow plastic dowels which are even stiffer than bubble tea straws and work well (but they are pricier).
Re: batter amounts in the future~ Here is a helpful Wilton chart which includes batter amounts that you can use as a guide. Hope this helps!
http://www.wilton.com/cakes/making-cakes/baking-serving-guide.cfm
Thanks, its very helpful. I recently made the tie dye cake for my 11 year old granddaughter’s birthday. Since her birthday is so close to Christmas I was really looking for something very un-Christmassy to make sure it was all about her birthday. She loved it. I also made the gingerbread house cake for Christmas Day. I used a chocolate cake instead and regular plastic straws. I had trouble frosting the cake because the cake wasn’t as dense as the gingerbread probably would have been. It was a little crumbly when I carved it. Decorations and frosting hide a world of imperfections. It looked beautiful and no one noticed the imperfections but me. :) I’m going to get the bubble tea straws for my next endeavor. I love this site. Thank you.
Thanks so much, Bunny! I really appreciate your kind words! I agree, decorations and frosting can make a world of difference ;0) Thank goodness, lol ;0) — Thanks for being a part of our site!
Such a CUTE Cake!! Thanks for sharing
This looks like it would be fun to make. I enjoy all of your tutorials! Keep up the good work.
Thank you Carolyn (and SherryLynn)! Happy that you like it! xoxo
Love the cookie jar cake! I want to make a wine barrel cake soon! How do I go about that? Would a cake mix or scratch cake be better for stacking! Thank you linda
Hi Melissa, I just saw this tutorial and am making this adorable cake for a little boys 2nd birthday. I’m wondering how thick the fondant should be to cover the lid. I haven’t worked much with fondant to date and am assuming the underside of the lid is not covered in fondant. Is that correct? Thanks so much for the tutorial! So cute!
Hi Gloria! I’m glad that you are making this! I would say approximately 1/8 inch thickness. Just enough to cover everything smoothly. You are correct – I didn’t cover the underside. I just trimmed away the excess and smoothed it slightly underneath since the angle of the lid doesn’t show the other side. Have fun!