Western Baby Shower Cake and Cowboy Boot Cake Topper Tutorial
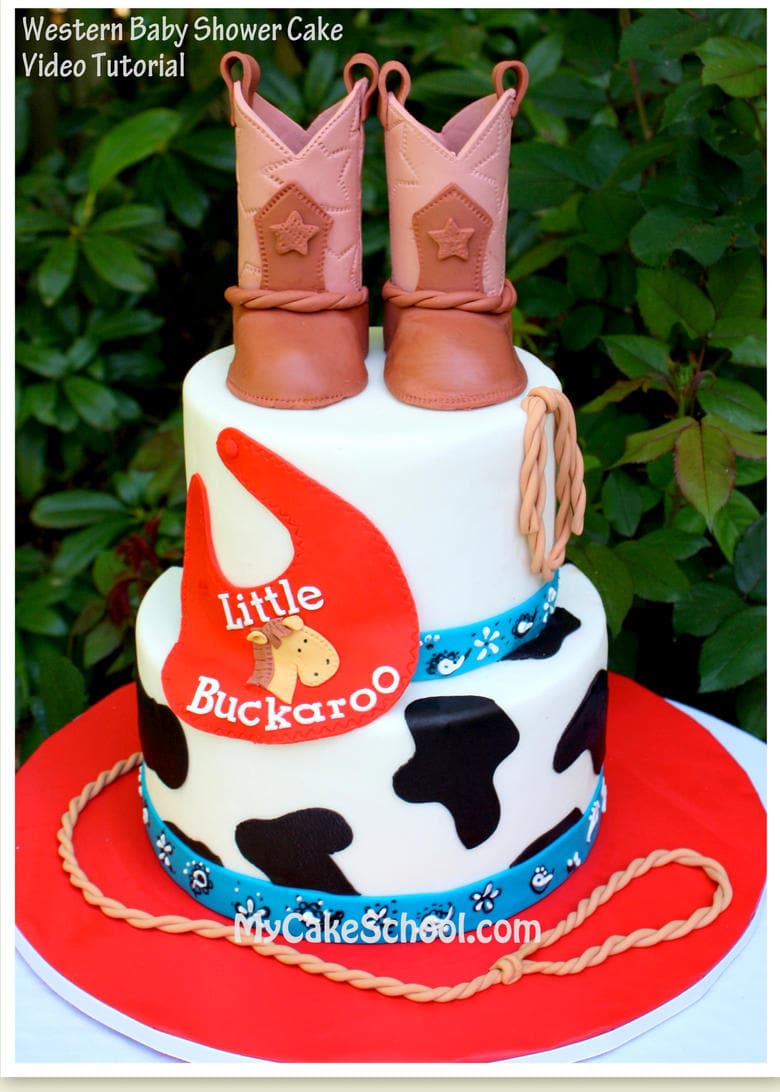
Hi everyone-- I am so glad to finally have a cake with some cowboy boots on top! I've been wanting to make a cake video with a western theme for a long time now.
Don't forget to look beneath the video window for additional details and materials needed. Enjoy the video!
Materials
*Just FYI~ Our stacked tiers are 8"/6" of white almond sour cream cake, frosted with fluffy vanilla buttercream and covered with satin ice white fondant. Each tier is approximately 4" tall.
Gum Paste (or fondant with tylose kneaded into it) -- I used Satin Ice gum paste for the boots and for the letters on the bib.
Paper Towel Roll (split in half) or even cardstock taped into a roll. Then, wrap with parchment. This is the form for the boots!
Americolor Coloring Gel (or your favorite brand)- I used Americolor Chocolate brown for both shades of brown on the boots.
Pre Colored Fondant- (Optional) - I used pre-colored red & black fondant for the bib and cow spots, and pre-colored blue for the border. You could also tint white fondant, but pre-colored makes life easier if you have any.
Star Cutter- (Optinal) - Used to cut out 2 stars for each boot.
Stitching Wheel/Pastry Wheel--I used a Wilton stitching wheel to add detail to the boots. I used a pastry (zig zag) wheel for detail on the bib. These are optional details--you could also make stitches with a toothpick or scriber needle.
FMM Tappit Cutters- I used upper & lowercase alphabet block cutters for the letters on the bib. If you don't have any, just pipe the letters in crusting buttercream or royal icing, or write with coloring pen. Here's a link to one of many carriers.
Royal Icing- (Optional) I used white royal icing to pipe the bandana pattern. You could also use a crusting buttercream.
Americolor Black Pen- (Optional) This is what I used to draw the bandana print. You could also use black buttercream or royal and a fine round piping tip.
Fondant Ribbon Cutter- (Opt) - I used this to cut out my 1 inch fondant borders
Sugar Glue or your "glue" of choice.
Misc- Parchment paper, sharp knife or xacto, mat or plastic to keep your pieces from drying out while you work (optional), bubble tea straws or supports of choice for beneath the boots and beneath the top tier.
Cake Base-- We used a 14 inch, ½ inch thick, wooden base wrapped with red plastic tablecloth and wrapped with ribbon.
In Part One of this tutorial, you will learn how to make a pair of gum paste cowboy boots from start to finish, for a one-of-a-kind western cake topper! We are going to include the template also. You can make your boots in the same style as mine, or you can make them all your own with different colors, buckles, and accents. The template is versatile and the options are endless!
In Part Two of this tutorial, you will learn how to make a baby bib (with horse design), bandana print border, and cow print tier!
Hi Melissa! I am working on this project right now. I saw the recipe for sugar glue flash on the screen and maybe I got it wrong since the Tylose powder is just floating in the water. and tape didn't stick to parchment so I used Elmers glue. But I can't use that when putting boot pieces together. I used 1/4 tsp Tylose to 2 tbsp. of water. Is that right? If so any suggestions on getting it to mix I even tried a fork kind like a whip since I don't have that tiny of one. Also I had a hard time hearing the video as well just in case you need to know that for future videos.
Hi Sheila--Yes, that is the right measurement! Sometimes it takes several minutes for the tylose to combine well with the water. It eventually will though. It won't hurt anything to add a little more tylose if you'd like to...it just may wind up being a little thick by tomorrow in which case you'd just add a little more water ;0) -
Thanks for the feeback on volume too--we've updated several of our videos that needed a little volume boost but may have missed this one! I'll check and see. Let us know if you have any more questions--I'm glad that you are making this!
Omg!!! This was such a great tutorial and SO easy to follow!!! The templates worked great! I’m excited to see the whole cake completed now....I was dreading the boots but you made it easy-peasy!! Thanks so much for the quality content!!
Hi Susan! Yay! Thanks so much for sharing your photo- your boots are adorable :0) xo