Western Baby Shower Cake and Cowboy Boot Cake Topper Tutorial
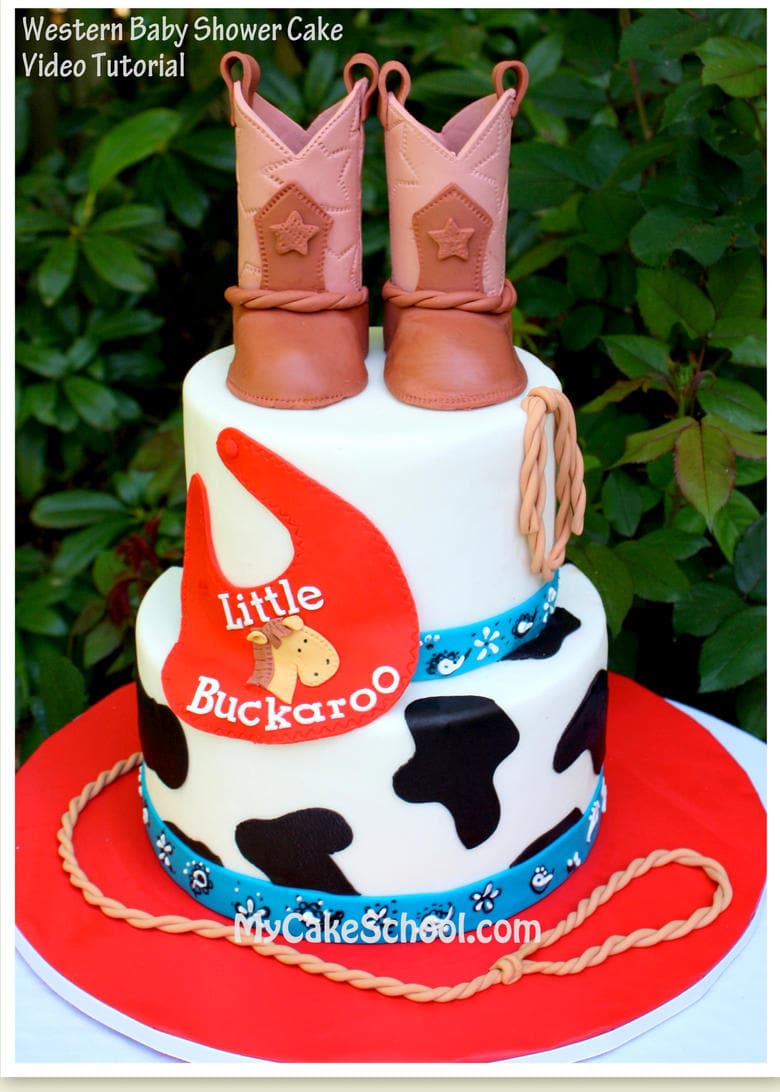
Hi everyone-- I am so glad to finally have a cake with some cowboy boots on top! I've been wanting to make a cake video with a western theme for a long time now.
Don't forget to look beneath the video window for additional details and materials needed. Enjoy the video!
Materials
*Just FYI~ Our stacked tiers are 8"/6" of white almond sour cream cake, frosted with fluffy vanilla buttercream and covered with satin ice white fondant. Each tier is approximately 4" tall.
Gum Paste (or fondant with tylose kneaded into it) -- I used Satin Ice gum paste for the boots and for the letters on the bib.
Paper Towel Roll (split in half) or even cardstock taped into a roll. Then, wrap with parchment. This is the form for the boots!
Americolor Coloring Gel (or your favorite brand)- I used Americolor Chocolate brown for both shades of brown on the boots.
Pre Colored Fondant- (Optional) - I used pre-colored red & black fondant for the bib and cow spots, and pre-colored blue for the border. You could also tint white fondant, but pre-colored makes life easier if you have any.
Star Cutter- (Optinal) - Used to cut out 2 stars for each boot.
Stitching Wheel/Pastry Wheel--I used a Wilton stitching wheel to add detail to the boots. I used a pastry (zig zag) wheel for detail on the bib. These are optional details--you could also make stitches with a toothpick or scriber needle.
FMM Tappit Cutters- I used upper & lowercase alphabet block cutters for the letters on the bib. If you don't have any, just pipe the letters in crusting buttercream or royal icing, or write with coloring pen. Here's a link to one of many carriers.
Royal Icing- (Optional) I used white royal icing to pipe the bandana pattern. You could also use a crusting buttercream.
Americolor Black Pen- (Optional) This is what I used to draw the bandana print. You could also use black buttercream or royal and a fine round piping tip.
Fondant Ribbon Cutter- (Opt) - I used this to cut out my 1 inch fondant borders
Sugar Glue or your "glue" of choice.
Misc- Parchment paper, sharp knife or xacto, mat or plastic to keep your pieces from drying out while you work (optional), bubble tea straws or supports of choice for beneath the boots and beneath the top tier.
Cake Base-- We used a 14 inch, ½ inch thick, wooden base wrapped with red plastic tablecloth and wrapped with ribbon.
In Part One of this tutorial, you will learn how to make a pair of gum paste cowboy boots from start to finish, for a one-of-a-kind western cake topper! We are going to include the template also. You can make your boots in the same style as mine, or you can make them all your own with different colors, buckles, and accents. The template is versatile and the options are endless!
In Part Two of this tutorial, you will learn how to make a baby bib (with horse design), bandana print border, and cow print tier!
Love it!
do you use a pound cake recipe for most of your cake that's tiered?
Melissa...the top part of a boot is called the shaft. I'm married to a boot wearing Texan ;-)
Hi Melissa
did you leave the 'filling' in the toes of the boots or did you remove it.
Thanks and great video!! x
Melissa,
Soooooo cute and unique. Looks simple to make. Again, well done!!
Thanks so for your comments, everyone!!
@Kim-- You'll notice in a lot of our tutorials that I mention using a white almond sour cream cake. This is often our go-to simply because it's good, fast, and it holds up nicely--it is a doctored mix and is denser than a straight-from-the-box cake. Since I don't have an actual cake business, we don't worry too much about changing up our flavors since most of our videos revolve around the decorating. ;0) -- The supports & cake boards in your tiered cakes do all of the work, so the stress isn't on the cake itself. However, softer cakes do tend to settle more and can be a little trickier to assemble.
@ Ita--I removed the filler from one on camera...and now that I think of it, I don't think that I removed the other ;0) -- If it's important to you to remove the filling, it isn't difficult as long as you've made that hole in the "shaft" of the boot (thanks for that info, Vicki-haha) as we showed in the video. It also helps to have a gum paste tool that is long & curved on the end like the one that I used, or a wire that you can curve by hand.
Have you had any comments regarding poor audio? I am having trouble hearing you on some of your videos, and my sound is on high volume.
I really enjoy your site and find your tutorials and videos very helpful and informative. Keep up the good work! Thanks very much.
Hi again. I just watched the video on tennis shoes and that audio is really good. Just wanted to ask if you've heard from anyone else on this, or is my hearing going bad? Lol. Thanks for everything!
Hi Carolyn--Thanks for your feedback. I'm sorry that you are having trouble with the volume on this one! I'm glad that the tennis shoe video is working well for you. We have used a different camera for our last few videos and I'm thinking that that must be the difference for you. I'll see if there is anything that I can do to make the volume louder on these. I'm able to hear the videos with no trouble, but I know that every computer is a little different. We'll experiment with the volume for our next video!
Is it okay to use fondant (mixed with a little tylose powder) instead of gumpaste? Also, how far in advance can I make boots...? should I cover them with plastic wrap after done, so they don't dry out and crack before I need to
put them on cake???
Thanks!
Yes, it is fine to use fondant with tylose kneaded into it. You'll need a pretty good amount for it to take on the consistency of gum paste. I just eyeball it..but a rounded tablespoon to one pound of fondant is a good starting point if you prefer to measure.
You can make them today if you'd like! :0) - Gum paste and fondant creations hold up very well as long as they aren't in sunlight or fluorescent lighting, which can cause fading. If you'd like to put it in a container, a bakery box or something that can breathe is the best choice. Airtight containers can cause the piece to soften. No need to cover with plastic wrap.
Thanks!