Dino is ready to Party!-Pull-Apart Cupcake Tutorial
Today I'm going to show you how to make a cute and easy Dinosaur Cupcake Cake!
There are lots of things to love about cupcake cakes, but my favorite is that you get the look of a carved cake without the stress of, well...carving!

Step away from that serrated knife--cupcakes and icing are all that you need...
Table of Contents
How to Make a Dinosaur Cupcake Cake
First, pick your design. Today felt like a Stegosaurus kind of day--so that's what I'm doing.
Use a dot of frosting on the bottom of each cupcake (or at least the ones along the outer edge) so that Dino won't run away! The smaller the space between your cupcakes, the better.

Next, frost over your cupcake creation with medium consistency icing (if your icing is very soft, it will sink down in between your cupcakes) -- I find it easier to pipe on my frosting for a cleaner look-- I'm using a medium sized round tip 12. (You could also just snip the end off of a disposable piping bag).
*You can use whatever your favorite vanilla buttercream recipe may be. Today, I'm using our Classic Vanilla Buttercream recipe which is simple to make, delicious, and develops a very slight crust.
**If you are using a traditional American Buttercream (butter, powdered sugar, milk, a little vanilla..), and your frosting is too soft, just add a little more powdered sugar. If the frosting is too thick, add a little more of your liquid.

After piping, I smoothed over everything with a spatula.

I want my Dino to have silky smooth skin :0) -so, I'm smoothing him over with a Viva paper towel. Remember, this trick only works with a crusting buttercream.
**If you aren't a fan of the smooth look (it does take a little longer), just go with a textured buttercream! I'm sure dinosaur skin wasn't silky smooth anyway, haha- so go with what ever you like.

Next, we work on the spikes! There are many possible variations--including fruit roll up cut-outs or fondant--but I'm going with melted white chocolate bark (or candy melts), which I melted in small increments in the microwave.
I tinted mine red with coloring powder-one of the few times I've used coloring powder but I had some one hand! -But you can also use candy coloring (which is oil based rather than water based). You can also buy pre-colored candy melts.

Now, smooth it onto a cookie sheet lined with waxed or parchment paper. Use a fork or cake comb to create ridges.
Use a knife to form your spikes--this will make it easier for you to break them apart nice and clean. Pop into the freezer for five minutes, or until chocolate has hardened.
 Now we're getting somewhere! This is the fun part. Apply a little frosting to the back of your spikes, then onto the dinosaur.

Mini chocolate chip eye, and friendly face applied with a toothpick.
 Add a few buttercream dots and accents...

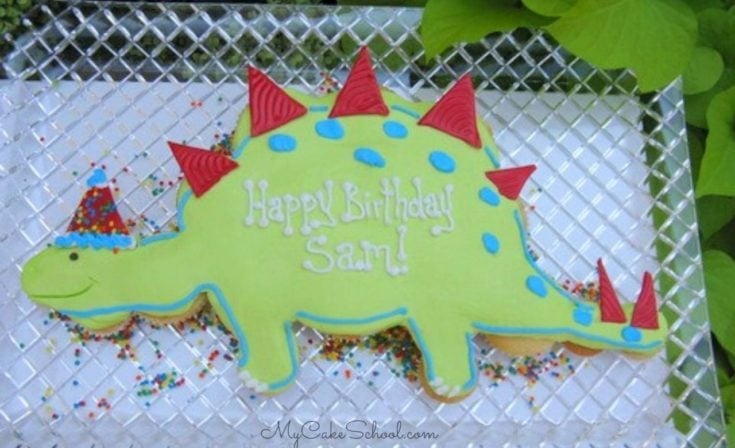
few sprinkles....a chocolate party hat (leftover from our chocolate spikes)--a birthday message--and we're done!
Isn't our little dinosaur a cutie? I think kids would love this sweet cake, and he is so easy to pull apart and serve!

Easy Dinosaur Cupcake Cake Tutorial
Learn how to make a CUTE Dinosaur Cupcake Cake! This cake is perfect for kids parties!
Materials
- Cupcakes- This can easily vary, but our Dinosaur was made of 12 cupcakes and 6 mini cupcakes.
- Butterecream of Choice- We used our Classic Vanilla Buttercream Recipe
- Candy Coating for Spikes, tinted red with coloring powder, candy coloring gel (oil based), or you can use red candy melts.
- Coloring Gels: Americolor Sky Blue, Electric Green (or your colors of choice!)
- Piping Tip: I outlined my dinosaur & piped on spots using a smallish round piping tip 4 (or similar). I piped on the green frosting with a medium round tip 12 (or just snip the end off of your disposable piping bag). I used a round tip 3 or 4 for the birthday message.
- Mini Chocolate Chip for eye (Don't buy a bag of chips for one eye- you can pipe it on also!)
- Toothpick for adding a smile
- Cake comb (optional) for making pattern in the chocolate spikes
- Sprinkles- we used flat confetti sprinkles
Instructions
- Assemble cupcakes into the shape of the dinosaur, adding a dot of buttercream to the bottom of the cupcake liner to "glue" them to the platter or cake base. The less space between the cupcakes, the better...you can stagger the placement to minimize the open spaces between cupcakes.
- Pipe on the green (medium consistency) buttercream using a medium round tip 12 or you can also snip the tip off of a disposable piping bag.
- Gently smooth over the frosting with an offset spatula.
- If you want a smooth finish and are using a crusting buttercream (like our classic vanilla or fluffy vanilla recipes), allow the frosting to set up for about 5-10 minutes after frosting and then gently smooth over it with a Viva paper towel. Hold the towel on the surface of the frosting, and gently slide your hand back and forth.
- Melt your candy coating in a microwave safe bowl in small increments until melted. Tint with red candy coloring or red coloring powder if you aren't using red candy melts.
- Spread over a parchment lined cookie sheet, comb with a cake comb if you'd like the added detail, score the chocolate as pictured so that they will break apart in spikes more easily later, chill in the freezer for about 10 minutes or until firm, and then adhere to the dinosaur with a little fresh buttercream.
- I used one of the spikes as a party hat and decorated with sprinkles and blue buttercream trim.
- Add mini chocolate chip eye (or eye of choice) and draw on a mouth with a tooothpick.
- Add blue spots, birthday message with a small round tip 3 or 4, and any other details you'd like!
Love Cupcake Cake Designs? Don't miss our Roundup of Favorites!
We love cupcake cakes and the options are endless. Here are some of our cupcake cake tutorials as well as pull apart cupcake cake designs from other sites that we just love! Favorite Cupcake Cake Designs

Thanks Tori!! ;0)
This is so cute and the tutorial is great! Have you done a garbage truck before? I can't seem to find anything for my son's birthday and he loves them.
Thank you! My three year old was thrilled.
So cute, thank you for posting!
Hey there! I used your tips to make a onesie pull apart cake recently and it turned out great. It was a practice run for this dinosaur cake that I intend to bake for my son's 3rd birthday. Do you have a recipe for the "crusting buttercream"? I used my regular buttercream recipe and it sort of hardened up.
Thanks in advance!
Hi Apurve, If you like an all butter buttercream, you might want to use our Classic Buttercream recipe. Here is a link . If you would like to use half butter and half shortening, use the Fluffy Buttercream recipe. Click on the Recipe tab at the top of the page and you will find it under Frostings. If you prefer a light crust on the buttercream, add a bit more milk. Hope all goes well with the dinosaur cake.
Do you have a recipe for the crusting buttercream?
Hi Devan, In our recipe section, the Classic Vanilla Buttercream and Fluffy Vanilla Buttercream recipes are both crusting buttercreams.
Do you mind sharing your frosting recipe? Doing this for my sons 1st birthday!
Hi Kristin, We used our Classic Vanilla Recipe, the Fluffy Vanilla Buttercream would be fine also. On the homepage, click on Recipes, then choose Frostings from the "drop down" selection. Let me know if you have other questions. All of our recipes are open to everyone.
Thanks for the tutorial! I used the following frosting recipe which made it super easy: 1 small box instant vanilla pudding, 1/4 cup powdered sugar, 1 cup milk. Blend by hand. Let set five minutes then stir in 8 oz cool whip. Tint with desired color. Very easy to spread on cupcakes. I used boughten frosting for the writing which I didn’t do very well. Grandson loved it!
Hi Vicki- You did a great job (and your writing looks good too)! Thanks for sharing your recipe & photo! xo