My Cake School

Cake Tutorials & Recipes

  • Facebook
  • Instagram
  • Pinterest
  • Twitter
  • Free Cake Videos
    • The Basics
    • Buttercream Techniques
    • Carved/3D
    • Chocolate Techniques
    • Cupcake, Cake Pop, etc. Methods
    • Gum Paste & Fondant
    • Themes and Occasions
    • See All Videos
  • Free Blog Tutorials
  • Recipes
    • Cakes and Cupcakes
    • Fillings
    • Fondant/Gumpaste
    • Frostings and Glazes
    • Miscellaneous
  • Contact
  • About

Winter Wonderland of White Chocolate Trees- Blog Tutorial

November 28, 2012 By Melissa Diamond 55 Comments

4.3K shares
  • Share
  • Tweet

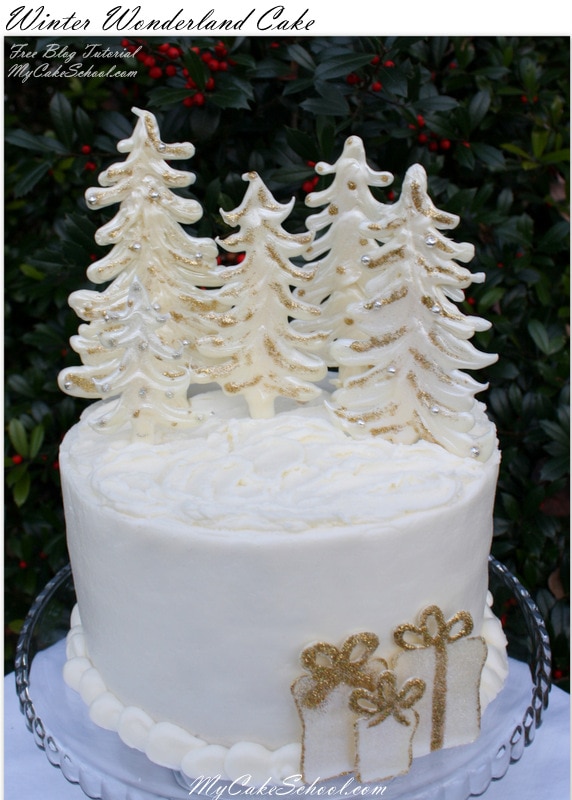
Today I’m going to share a gorgeous Winter Wonderland Cake of White Chocolate Trees! This surprisingly simple cake tutorial has been one of our most popular for Christmas and winter gatherings!
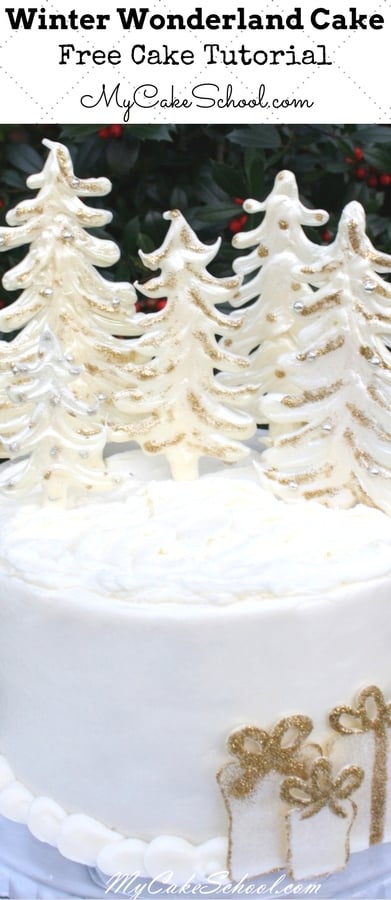
 

Elegant Winter Wonderland Cake Tutorial by MyCakeSchool.com featuring White Chocolate Trees! Free Tutorial!


One of my favorite decorating mediums for creative accents is candy coating (aka candy melts, compound chocolate, chocolate bark, etc.). There is no tempering required–just microwave, pipe your designs, pop in the fridge or freezer to speed set, and you’re done!

Let me show you how I made some beautiful Christmas trees today. This design is also perfect for “winter wonderland” themes all through the season.


Here are the basic materials that I used~

Candy coating (Today I used Ambrosia brand white candy coating which is at my local grocery store.)

Various dragees/sprinkles/hologram twinkle dust

Lollipop sticks

“Glue”  My glue was light corn syrup today, but I also like basic tylose glue (aka sugar glue), or piping gel.

Pearl dust or Pearl Spray (Wilton and PME make pearl spray)

Waxed paper or parchment paper lined cookie sheet…..and you’ll need a frosted yet empty, lonely cake ;0)
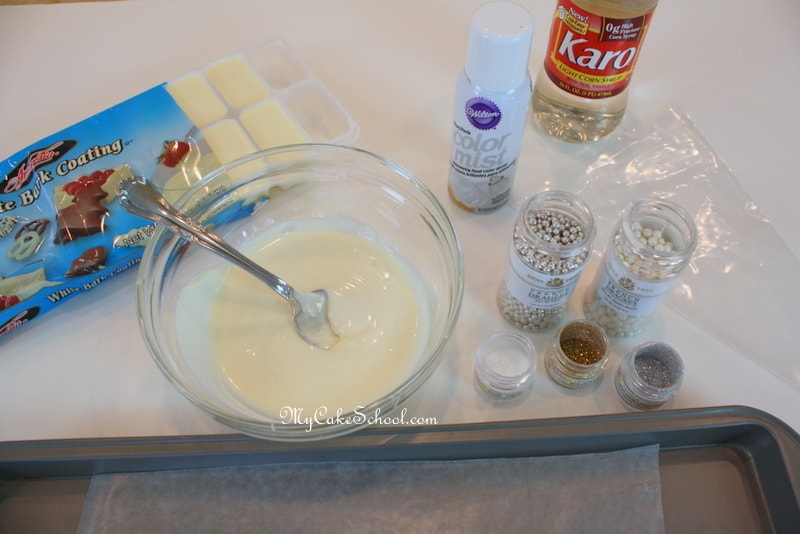
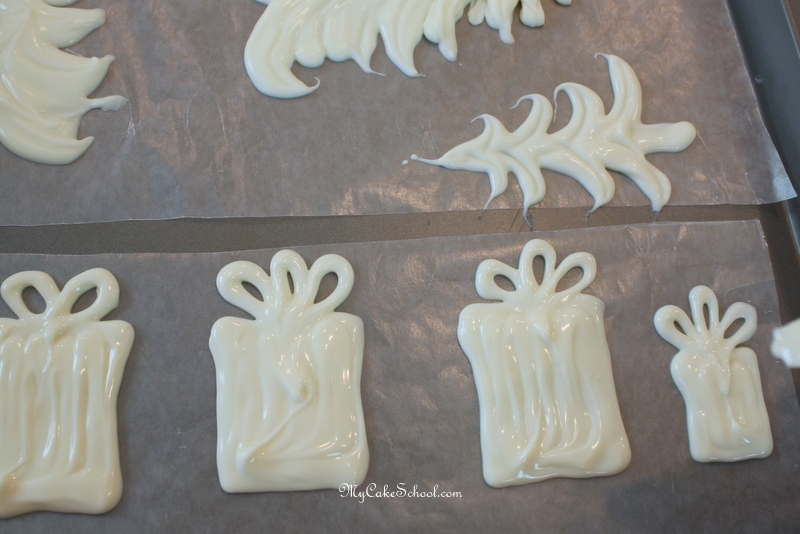
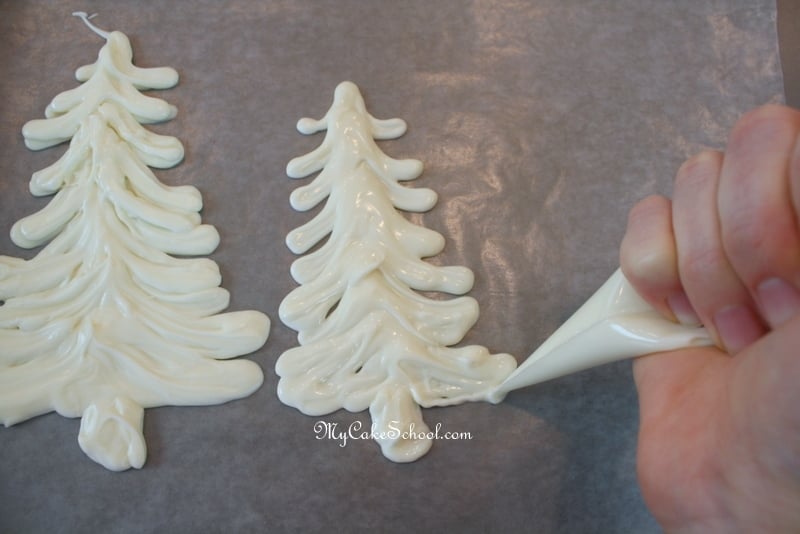
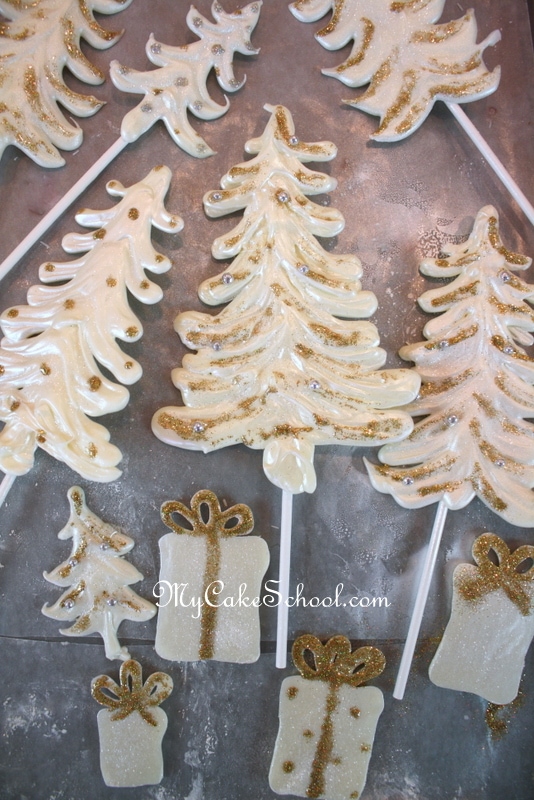
Gorgeous Winter Wonderland Cake Tutorial Featuring White Chocolate Candy Coating Trees! So simple! Free tutorial. First, I melted my white chocolate candy coating in the microwave.  Then, I filled a disposable piping bag with the “chocolate”, snipped the end, and began piping Christmas tree shapes in various sizes.

I like to freehand but if you’d prefer to use a template, you can slide one beneath the waxed paper and trace.  **Make sure to pipe your trees fairly thick. Mine are pretty lumpy and bumpy.  If they are thin, they will break more easily.

Gorgeous Winter Wonderland Free Cake Tutorial by MyCakeSchool.com! Learn to Make Elegant and easy Chocolate Tree Toppers!

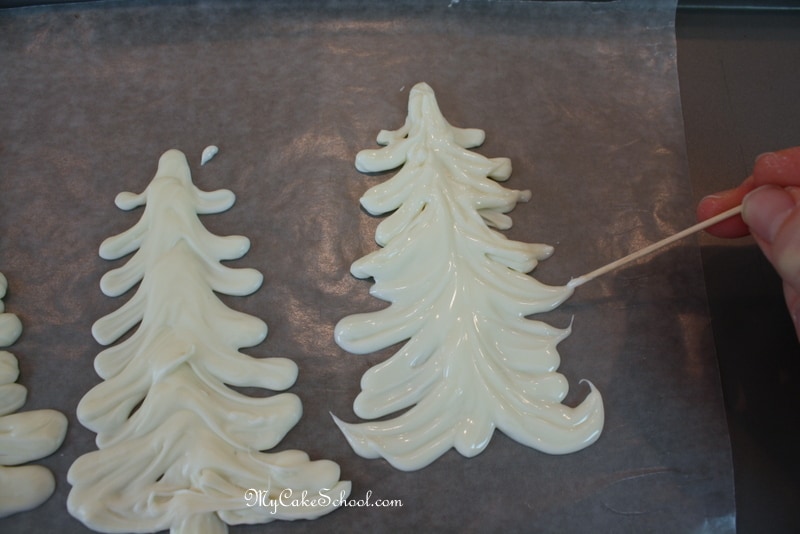
Some of my tree branches have a rounded look, but for others, I used a toothpick to drag out the tips of the branches into a point.

Learn how to make White Chocolate Trees in this Winter Wonderland Cake Tutorial by MyCakeSchool.com! Free Tutorial!

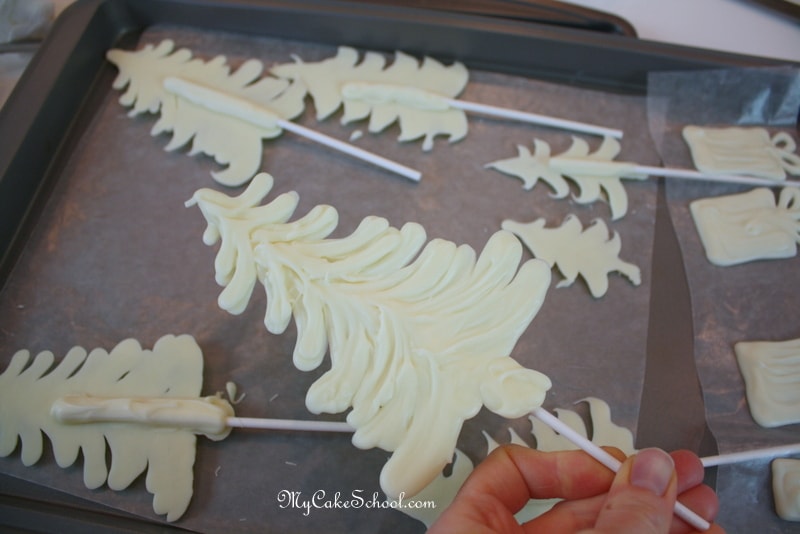
I piped some presents too!  Then, into the freezer–the whole tray, for about 10 mintues.  Once firm, they’re ready for the next step.Beautiful Winter Wonderland Cake Tutorial featuring elegant White Chocolate Trees! Free cake tutorial.Fresh from the freezer!  I flipped over my chilled trees and attached lollipop sticks to the back with melted chocolate (piped on). I flipped them because I wanted the textured, bumpy side to be in front.  If you prefer the smooth side, no need to flip!  These candy stick anchors will allow our trees to stand nice and tall with no worries tilting or breaking.

Back into the freezer they go for about 10 more minutes.  (You don’t have to freeze or chill the chocolate to set…it will set up at room temperature also, but it will take longer & the trees will be a little more fragile when handling.)
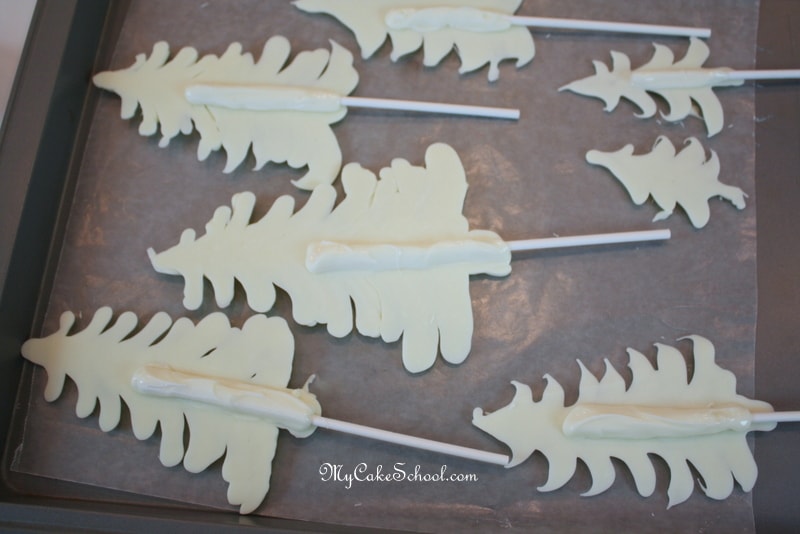
Gorgeous Winter Wonderland Cake Tutorial with White Candy Coating Trees! Free Tutorial by MyCakeSchool.com! Once everything is nice and chilled, you can safely pick up your trees!


Now, for decorating…my favorite part~

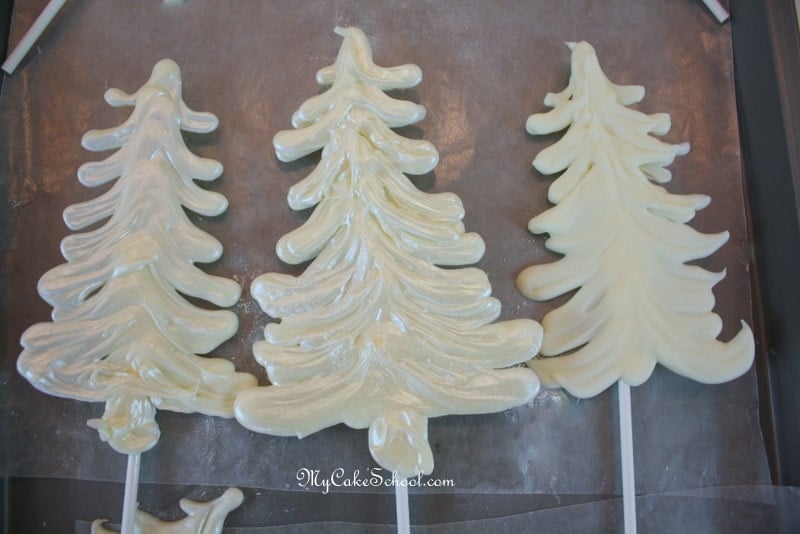
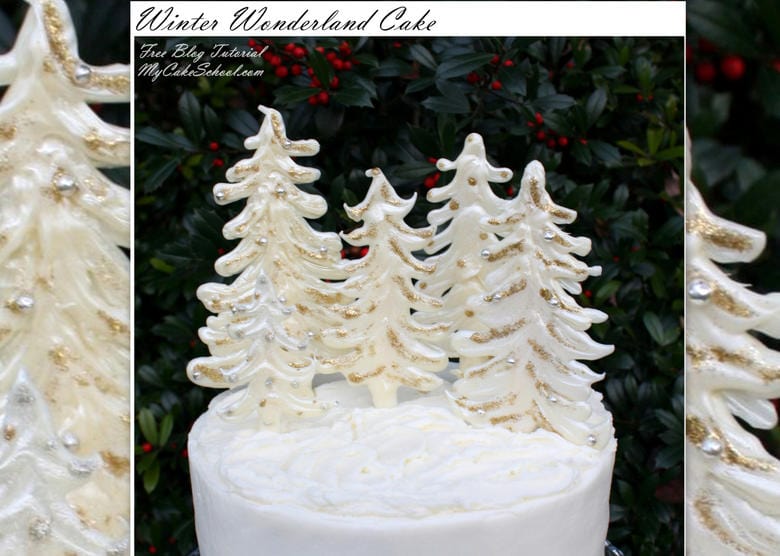
Elegant Winter Wonderland Cake Tutorial by MyCakeSchool.com! These gorgeous white chocolate trees are so easy to create! I love pearlizing.  I experimented with Wilton Pearl Spray for the first tree below, and brushed dry Super Pearl dust for the middle tree.  You can see that they look very similar… the pearl dust may be ever so slightly more shimmery.  The last tree is naked for now.  What a difference!

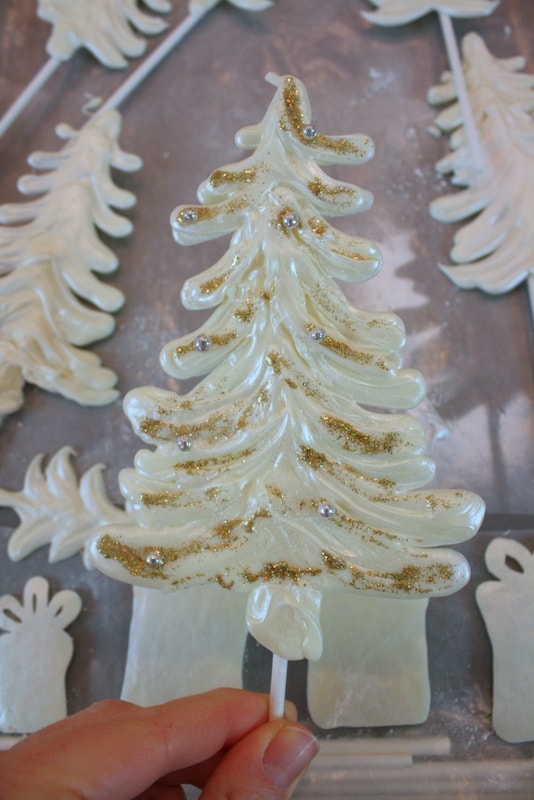
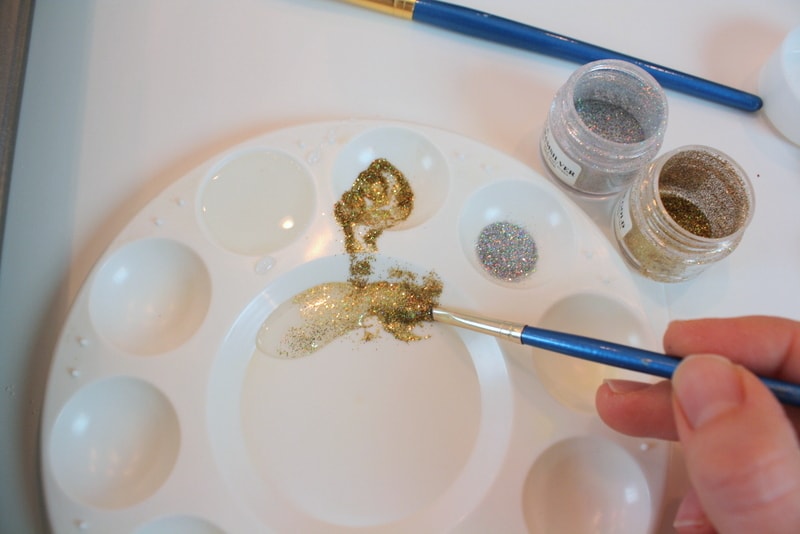
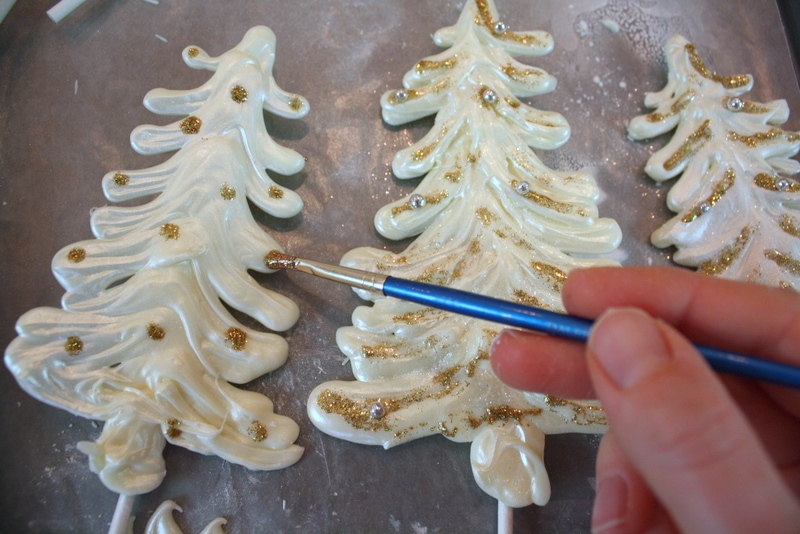
This elegant winter wonderland cake tutorial is so simple and perfect for winter and Christmas parties!Next, sparkle time.   Here, I have both Gold & Silver Hologram Twinkle Dust.  I experimented with mixing a little light corn syrup right into the gold dust.  This allowed me to paint on the glitter only where I wanted to.

The corn syrup took several minutes–probably a good 15 minutes or so to dry.  If I had mixed in a little vodka, it would have dried more quickly.  It’s fun to experiment though.  Piping gel would have worked well too–and so would “sugar glue”.

One quick word about the Disco/Twinkle dusts & dragees~ I prefer to use my “bling factor” accents on decorations that aren’t going to be eaten.  I

f you suspect that your partygoers will devour the forest along with the cake, I would use sprinkles, sanding sugar, candies, etc. instead (And pearl spray is fine!)


Easy and Elegant Winter Wonderland Cake with White Chocolate Trees! Free Cake Tutorial by MyCakeSchool.com!

I love the sparkle!  I added some silver dragees.  I pressed them into the light corn syrup “paint” I had just brushed on, but sugar glue or piping gel would dry a little more quickly.

You know what would have been even better?  To have dropped on my dragees just after piping the chocolate trees, before the chocolate had a chance to set.  Next time, that’s what I’ll do.Elegant Winter Wonderland Cake with White Chocolate Trees! Free and Simple Cake Tutorial by MyCakeSchool.com! I LOVED this part.  I could have decorated trees all afternoon.

Elegant Winter Wonderland Cake with White Chocolate Trees! Free Cake Tutorial by MyCakeSchool.com!

I decorated the presents using the same method (only I wanted the smooth side of the gifts to be the front).  These would be fine to leave at room temperature or a cool place in your house until you need them.  I still like to pop the cookie sheet with decorations into the freezer for just a few minutes before placing the decorations onto the cake.

 Elegant Winter Wonderland Cake with White Chocolate Trees! Free Cake Tutorial by MyCakeSchool.com! Online cake tutorials, cake recipes, and more!

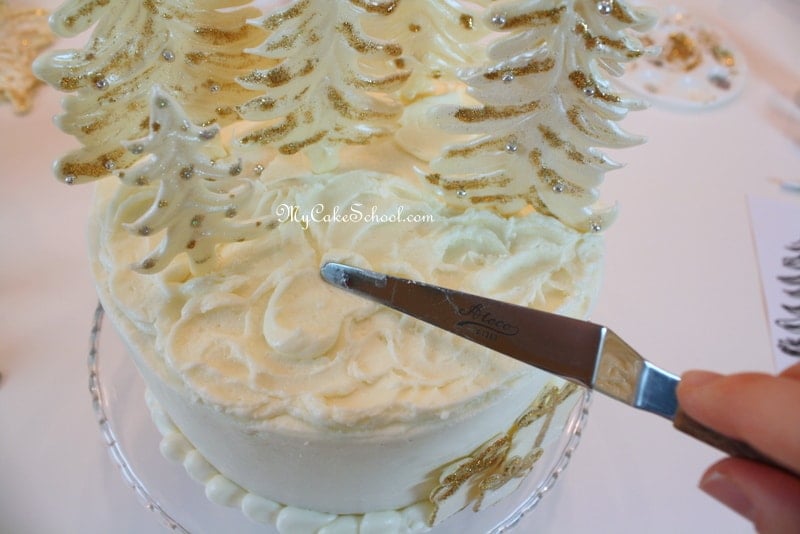
I placed the trees into our 8″ round cake which was frosted with vanilla buttercream. I attached the presents to the front side of the cake with a little buttercream.  The snowy bottom border was piped from a Wilton tip 12 (medium round tip), in no particular pattern.   The frosting on top was applied with just a swirly motion of the spatula.


Beautiful Winter Wonderland Cake with White Chocolate Trees! A Free Step by Step Cake Tutorial by MyCakeSchool.com! Perfect for Christmas and Winter Gatherings!

And here we are!


Winter Wonderland Cake Decorating Tutorial by MyCakeSchool.com! This Free Tutorial is perfect for Christmas parties!


Free Winter Wonderland Cake Tutorial with White Chocolate Trees by MyCakeSchool.com


Thanks for stopping by, I hope you learned something new!  If you’ve never tried working with candy coating for decorations, this is the perfect time to start.  Have fun with with it!

It would be so easy to use the same method but with much more color–you could even use green candy coating for green trees.  Enjoy making winter wonderlands of your own, and I hope you’ll share your creations with us!


Make sure to check out our full collection of tried and true frosting and cake recipes in our Recipes Section!

You can find more beautiful cakes and ideas in our Winter and Christmas Roundup of Cakes, Recipes, Tutorials, and Ideas!

*We create very similar chocolate trees (but green) in our Red Truck Cake Topper-free video tutorial also if you’d like to see a video of this simple process!


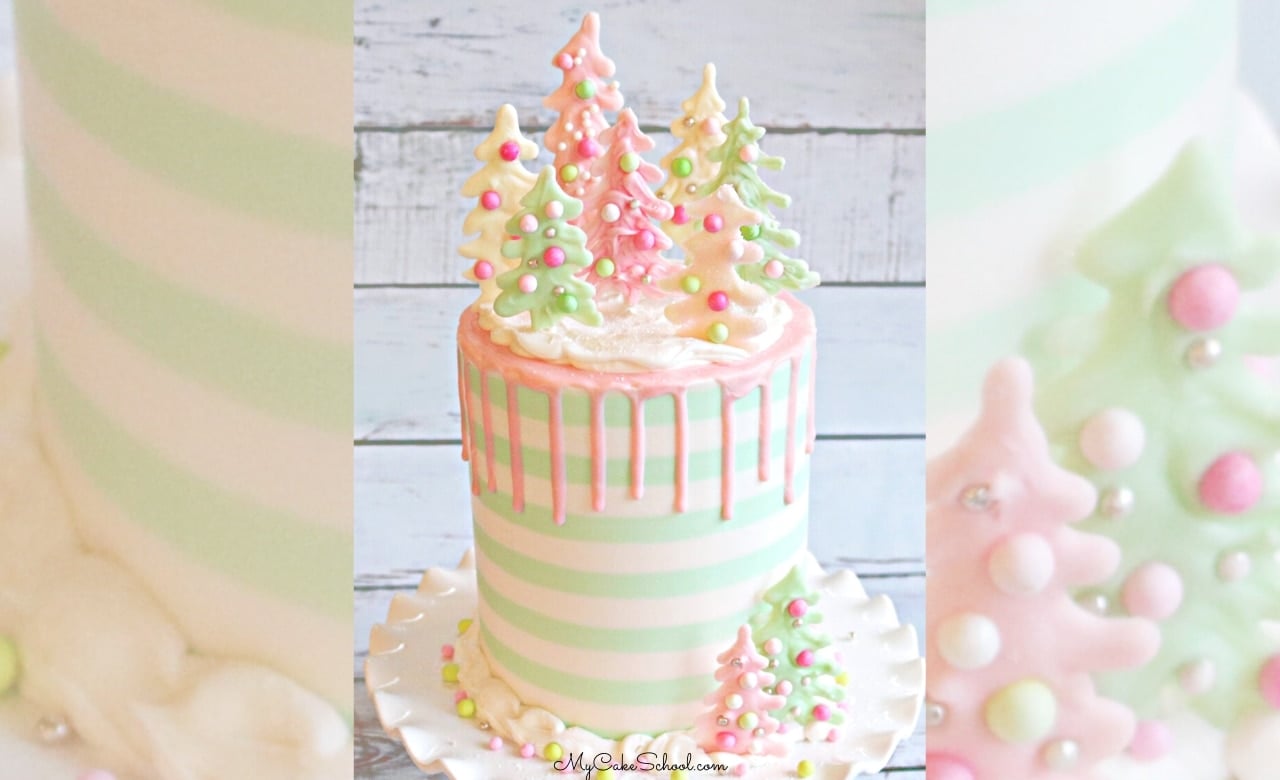
We also have a similar variation of this design in pastels in our member section! Pastel Christmas Cake
Pastel Christmas Cake Video Tutorial


This elegant Winter Wonderland Cake is surprisingly simple to create and is PERFECT for Christmas and winter gatherings! From My Cake School's step by step free cake tutorial!


Related posts:

  1. Not a Creature was Stirring~ Strawberry Mice Blog…
  2. Lots of Love!~ A Valentine’s Cake Tutorial
  3. Let it Snow!- Royal Icing Snowflake Tutorial!
  4. Happy New Year Cupcakes!
  5. Raised Heart Cake Tutorial

Filed Under: Chocolate Techniques, Blog Tutorials, Seasonal & Holiday, Winter Tagged With: white chocolate trees

« How to Make Petit Fours~A Video Tutorial!
Sledding into Christmas Video- A Cake Video Tutorial »

Comments

  1. Yaneri Rodriguez November 28, 2012 at 11:48 pm

    Beautifully done!!! So inspiring!!! My little wheels in my head are turning full of ideas just looking through your blog!!! I LOVE being a member of MCS!!!! :D

    Reply
  2. Paula M. November 29, 2012 at 1:32 am

    I love this Melissa!! Really gorgeous..thank you for creating your site…it inspires me and is so well organized that anyone can follow your directions and be successful! I think I will try this design..wish me luck!

    Reply
  3. Lynn / L2 just Cakes November 29, 2012 at 1:46 am

    This cake is beautiful! I know you can get candy melts in lots of colors these days too, great for green trees, presents, tree lights, etc.
    If you use a crock pot set on low with plain hot water in it, you can drop your piping bags in a baggie and you don’t run the risk of scorching the chocolate while re-heating it. (while things are in the freezer)

    Reply
  4. Shelly Brown November 29, 2012 at 7:06 am

    Love the simplicity of this! I see this design on my holiday table perhaps with blue on the trees and packages! Thanks for sharing!

    Reply
  5. Anna November 29, 2012 at 7:32 am

    Thanks much….

    Reply
  6. judy oaks November 29, 2012 at 9:11 am

    I love it!!!

    Reply
  7. Elizabeth Jordan November 29, 2012 at 4:17 pm

    Thank you, thank you, thank you, this is awesome and I so have to try this for Christmas…..

    Reply
  8. Melissa Diamond November 30, 2012 at 1:42 pm

    Thank you all so much for commenting! I’m glad that you like it!

    Reply
  9. TRISHA November 30, 2012 at 10:54 pm

    ~~Makes me want to dance around my kitchen in my fleece pants and sweatshirt and sing at the top of my lungs…”I’m dreaming of a WHIIIIIIITE CHRISTMAS…Just like the one MELISSA made……….”

    Oh ya…I know you can picture me doing that!

    Reply
  10. Regina Kolaja December 1, 2012 at 11:30 pm

    This cake is breathtaking! We have a big family Christmas get together in Houston every year and GUESS what I’m taking! Thanks so much, I love it:)

    Reply
  11. Joan Gamble December 2, 2012 at 7:25 pm

    Thank you! I can’t wait to make this for Christmas!

    Reply
  12. Heather Stanley December 2, 2012 at 10:25 pm

    I have been thinking about what to do for a Christmas cake ( we are cake people!) and now I know!! Thank you, amazing job :)

    Reply
  13. Dorothy December 2, 2012 at 10:46 pm

    I love the trees simple & beautiful very beautiful!

    Reply
  14. vera jorge December 3, 2012 at 7:12 am

    Hello
    Amazing :)

    What cream did you use, to the cake outside?

    Reply
  15. Irma Uriña Arana December 3, 2012 at 7:25 am

    Gracias por compartir estas ideas maravillosas me encanto, lo haré de seguro.

    Reply
  16. Pat December 3, 2012 at 7:39 am

    Gorgeous! My next thing to try ~ thanks so much for sharing! Your photos and instructions are always so easy to follow & I appreciate that so much.

    Can’t wait to see what’s next!

    Reply
  17. sarah December 3, 2012 at 8:01 am

    I love this! I love that it is so easy and elegant, thank you for removing the mystery! I only wish I had more events to go to so I could make more cakes! I am making this one for Christmas though! LOVE IT!

    Reply
  18. ForSweetsSake December 3, 2012 at 8:47 am

    Simple…..yet so Elegant!

    Reply
  19. Kátia December 3, 2012 at 9:12 am

    so beautiful…
    beijos do Brasil!

    Reply
  20. Theresa Marlett December 3, 2012 at 11:44 am

    very cute. I think I am going to try this design.

    Reply
  21. MaggiesCakes December 3, 2012 at 2:27 pm

    Love this one.

    Reply
  22. Chellie December 3, 2012 at 5:28 pm

    What a beautiful way to top a holiday cake. As always, you are one talented lady. Happy holidays…

    Reply
  23. Margie December 3, 2012 at 6:51 pm

    What a beautiful cake!!!! I know what
    dessert I’m making for our family
    Christmas Eve dinner!!
    I love being a member of your
    cake school….you always come up
    with such good ideas!
    Happy holidays!

    Reply
  24. Melissa Diamond December 3, 2012 at 8:43 pm

    Thank you all so much for your nice comments! I’m so glad to hear that many of you are planning to make Christmas trees! Can’t wait to see them ;0)

    Reply
  25. Nanna December 4, 2012 at 8:35 am

    So pretty :)

    Reply
  26. Ligia December 4, 2012 at 9:07 am

    So beautiful I will try to make it this christmas thanks

    Reply
  27. Belinda Davis December 4, 2012 at 11:29 am

    Hi i was wondering could you lay the lollipop stick down first and pipe the chocolate over it?

    Reply
  28. Yvonne Brilhart December 4, 2012 at 12:37 pm

    I tried this, came out good..only mine was thinner. So, it was spreading…I added more chocolate after it hard, put them back in refrigerator. Do I need to wait until the chocolate cool or I warm it too warm ?

    Reply
  29. BeBe December 4, 2012 at 1:41 pm

    Hi Yvonne, after you have melted your chocolate, let it cool slightly so it will not run. As it cools it will thicken, what type of chocolate are you using?

    Reply
  30. Melissa Diamond December 4, 2012 at 11:01 pm

    @Belinda–I think that it should work fine! You may have a thin strip of the stick exposed in back but maybe you could dip the stick in chocolate first or just pipe a tiny bit of chocolate on the waxed paper before placing the stick on top of it and piping your tree. If you experiment, let us know how it goes!

    Reply
  31. Paula M. December 5, 2012 at 11:55 pm

    Hi Melissa..I am going to make this design soon (I may make my presents out of colors of fondant, and I am toying with making some skiis standing criss cross together along with the presents…), but I did have a question. Can you give me an idea as to the “height” of your trees? I know you have an 8″ cake in your blog, maybe 5″ tall? I am going to make a 6″ cake approx 5″ tall; so as to not make trees too small or large for the height of the cake, do you have advice as to what would look good tree height wise? Thank you.

    Reply
  32. Perth Cake Decorating Supplies December 6, 2012 at 2:25 am

    I so love your cake! Simple but elegant, will definitely try this recipe and see how it looks on my cakes.

    Reply
  33. Ester December 6, 2012 at 11:43 am

    Very beautiful !!!
    A great job.

    M’agrada molt, és preciós.
    Una gran feina.
    Ester

    Reply
  34. Angela Ammons December 6, 2012 at 11:53 pm

    I tried making the trees tonight! I loved the results and will post my cake soon! Thank you Melissa for this great tutorial!

    Reply
  35. Melissa Diamond December 7, 2012 at 12:03 am

    Thanks again, everyone for your lovely comments! — @Paula–Yes, probably my tallest was approx 4.5-5″. Others were probably closer to 4″ and even 3″. — We actually used the same trees on a much smaller cake later that week–it was only a 6″ cheesecake and they still looked cute! We just needed fewer trees. I think you’ll find as you are piping that they are very quick to make–you can throw in a couple of small and medium sized trees so that you’ll have more to choose from ;0) —

    @Angela–I’m so glad that you made them! Can’t wait to see ;0)

    Reply
  36. Paula M. December 7, 2012 at 1:04 am

    Thank you Melissa!

    Reply
  37. Tracy December 7, 2012 at 8:58 am

    Just beautiful! Did you add corn syrup to the chocolate? Could you also use white chocolate chips or are the bars better
    Thanks for all ur help and tips in my baking!

    Reply
  38. BeBe December 7, 2012 at 10:20 am

    Hi Tracy, we did not add corn syrup to the chocolate. We think the trees made from the bark/candy coating are a bit more firm after setting up but I think you would be fine if you wanted to use the white chocolate chips. Be careful not to scorch the chocolate when you microwave. Melt a short intervals and when the cho. chips or cho. bars are soft but holding their shape, just stir and they will gradually melt to the consistency you want.

    Reply
  39. Tracy December 8, 2012 at 12:54 am

    thank you…my trees are seeming a little fat and the chocolate a little think
    I did not see a tutorial on this…just doesnt seem as simple as melissa makes it seam I have been able to follow Many turorials very successfully
    haha–just first time with the chocolate

    Reply
  40. Melissa Diamond December 8, 2012 at 10:09 am

    Hi Tracy–I’m so sorry that you are having trouble. What are you using for your chocolate? We find that candy coating/chocolate bark is really easy to work with. If it gets too thick, you simply re-warm it. If it somehow becomes too hot and runny, you let it cool for a few minutes. Usually, I can use it straight from the microwave though.

    Also, maybe the hole that you snipped at the end of your piping bag is a little large? I just snip enough to create a small hole, so that the chocolate doesn’t come out so thick or quickly. Also, one difference in piping with chocolate vs. buttercream is that the chocolate will continue to flow even when you are not applying pressure. So, I keep the bag moving. It may take 5 seconds to make one tree to give you an idea.

    Would it help you to have a template of the trees that you could place beneath the waxed paper? I could post a rough sketch of the general shape of the trees I made. —

    While we don’t have a video tutorial of this (we usually keep our blogs and videos separate), we do have several video tutorials where I make chocolate decorations from melted candy coating. These are in our “Working with Chocolate” section– (Chocolate letters, chocolate bow, chocolate transfers, chocolate daisies and shards, etc.) We also demonstrate chocolate decorations in our “Cupcake Basics” video. No need to watch all of these, but you could watch one or two if you want to see how quickly I moving the piping bag, etc.

    I hope this helps! Finally, if you have “fat trees”, don’t throw them away. The appearance can be dramatically improved with a little decoration! You can give the illusion of thinner branches when you paint on your glitter, or pipe on a little snow (or whatever you have in mind!) ;0)

    Reply
  41. pam December 10, 2012 at 4:46 pm

    absolutely wonderful….i had seen something similar but i LOVE your decoration the most…thanks for sharing

    Reply
  42. GlamMa8142425 December 20, 2012 at 9:49 pm

    Hi Melissa. I used this project for a cake for my husband’s holiday party. It was a huge hit!! Thank you so much for sharing all of your wonderful inspiring ideas, they’re too cute and I want to do them all!! With all of the ideas and techniques that are out there, following a tutorial simply makes it easy and less stressful, cuz I can never decide. :-). I posted the pic in the gallery.

    Have a wonderful holiday!!

    Reply
  43. gracie December 21, 2012 at 9:53 pm

    I think it’d be very helpful if you could make up a template for the tree
    I am having a hard time shaping mine.
    They look nothing like yours ….

    Reply
  44. Melissa Diamond December 22, 2012 at 1:57 am

    @Pam- Thanks!!

    @”gracie” – I will work on adding a template for you to use for the next time! I’m sorry that you aren’t happy with your shapes–I bet that they look good though! Mine are all a little different since I freehanded.

    Reply
  45. HollyLE December 22, 2012 at 2:49 am

    After playing with the tree designs a bit, I found it easier to begin my piping at the bottom of the tree and working my way to the top point. Starting in the center where the trunk would come out of the bottom, I make narrow ‘infinity signs’ or number 8’s laying on their sides if you will. Each layer going up is just a little shorter than the one below it until I reach the top of the tree. It works better that way for me than starting at the top.
    I do believe for beginners that drawing out your tree with a black marker on a sheet of paper then taping it UNDER the wax paper for a guide has to the be the easiest way to make trees.
    I read that some trees are too thick…over heating the chocolate can cause it to cease up (or get very thick). The best way to melt the chocolate is on MEDIUM power for 30 second intervals, checking between each 3 seconds to see if your chocolate is soft enough to flow…it doesn’t take much. I’ve even run my piping bag under hot water till the chocolate is soft enough.
    Hope this helps!
    Melissa and Bebe,
    Thank you so much for all the incredible inspiration and instruction. I’m so blessed (as are so many others) to have found your cake school. You’re so pleasant to watch and a gifted instructor! I’ve learned so, so much from you both. You keep me excited about cake baking and decorating!
    I wish you and your family a VERY Merry and Blessed Christmas!
    Holly

    Reply
  46. HollyLE December 22, 2012 at 2:52 am

    LOL, sorry for the typo…Checking every 30 seconds to see if your chocolate is soft enough…Not every 3 seconds.

    Reply
  47. Melissa Diamond December 23, 2012 at 1:11 am

    Haha- Thanks Holly, that would be a lot of checking ;0) –And thanks also for your input on what works best for you!! Everyone approaches each project a little differently and I appreciate learning what works best for everyone else! Thanks for your nice words about the site too. Merry Christmas! ;0)

    Reply
  48. Wanda Higgins February 10, 2013 at 9:17 pm

    I just made a cake using these chocolate trees. They worked out great. I piped chocolate on both sides so the trees looked 3 D. They turned out awesome! I made the green and used them on a “Gold Rush” cake. (I needed them to look like fir trees in Alaska. ) See my cake in the novelty section of the gallery. My three grandchildren LOVED eating them. Everyone couldn’t believe I made these. They were so easy. I will definitely use this technique again.

    Reply
  49. BeBe February 10, 2013 at 11:07 pm

    I just took a look and you did a great job, I’m happy you gave the trees a try, thanks for posting!

    Reply
  50. Julie September 13, 2013 at 10:08 am

    I love you! Brilliant, this is just what I need. Thank you for being so selfless, posting and sharing your skill and knowledge!

    Reply
  51. paintmycake December 6, 2013 at 6:17 pm

    This was fun and easy to make. Unfortunately I made my presents too large for the cake, so I quickly made some in royal icing and put them on the plate.
    I made peppermint frosting for the snow and the filling inside of a dark chocolate cake, vanilla buttercream on the outside. It was wonderful, everyone loved it. I’ll post a picture on the member gallery. As usual, thank you!

    Reply
  52. Melissa Diamond December 7, 2013 at 1:40 pm

    Thank you so much!!

    @paintmycake, I’m glad that you made it, your cake sounds delicious! ;0)

    Reply
  53. Nancy Lawlor December 10, 2013 at 7:17 pm

    I just finished my trees and even though they aren’t as beautiful as yours, they are so cute! I decorate a buche de noel cake a little different every year and these are perfect to stick in the log.Love your site. All the cakes are terrific. You ladies are good!Thank you and Merry Christmas!

    Reply
  54. Nellie December 11, 2013 at 3:53 am

    Thanks for the tutorial what a fast easy way to decorate a cake. My grandson can make this with me.

    Reply
  55. Teresa Falo December 12, 2018 at 1:38 pm

    Just gorgeous, Thank you for the Tutorial of the Xmas trees and also the Xmas truck just amazing I will be trying the truck soon.
    Thank You!

    Reply

Leave a Reply Cancel reply

Your email address will not be published. Required fields are marked *

  • Lemon Buttermilk Cake {A Scratch Recipe}

    Lemon Buttermilk Cake {A Scratch Recipe}
  • Sweet Balloons Cake

    Sweet Balloons Cake
  • White Chocolate Coconut Cake

    White Chocolate Coconut Cake
  • Striped Buttercream Panels Cake

    Striped Buttercream Panels Cake
  • Lemon Coconut Cake with Lemon Curd Filling

    Lemon Coconut Cake with Lemon Curd Filling
  • Milk Chocolate Cake

    Milk Chocolate Cake
  • Buttercream Tulip Cake

    Buttercream Tulip Cake
  • Flamingo Ruffle Cake- A Cake Decorating Video Tutorial

    Flamingo Ruffle Cake- A Cake Decorating Video Tutorial
  • 60+ of the BEST Cake Recipes for Spring and Summer

    60+ of the BEST Cake Recipes for Spring and Summer
  • Lemon Cake {A Scratch Recipe}

    Lemon Cake {A Scratch Recipe}
Facebook Instagram Pinterest Twitter RSS
  • Free Blog Tutorials
  • Free Cake Videos
  • Recipes
  • Contact
  • About
  • Free Blog Tutorials
  • Free Cake Videos
  • Recipes
  • Contact
  • About

Copyright © 2022 My Cake School. Melissa Diamond. All rights reserved | Terms and Conditions | Privacy Policy