My Cake School

Cake Tutorials & Recipes

  • Facebook
  • Instagram
  • Pinterest
  • RSS
  • Twitter
Login
  • home
  • Videos
    • The Basics
    • Buttercream Techniques
    • Carved/3D
    • Chocolate Techniques
    • Cupcake, Cake Pop, etc. Methods
    • Gum Paste & Fondant
    • Themes and Occasions
    • See All Videos
  • Shop
    • Miscellaneous Cake Decorating Supplies
    • Kitchen Appliances
    • Chocolate and Candy Making
    • Fondant and Gum Paste
    • Piping Tips
    • Molds, Mats, Embossers, and Cutters
    • Cookbooks
    • Dusts and Sprays
    • Pantry Items
    • Bakeware and Tools
    • Sprinkles and Candy
  • Free Tutorials
  • forums
  • recipes
    • Cakes and Cupcakes
    • Fillings
    • Fondant/Gumpaste
    • Frostings and Glazes
    • Miscellaneous
  • contact
  • join

Bicycle with Balloons Cake~ A Blog Tutorial!

August 2, 2013 By Melissa D. 66 Comments

12.2K shares
  • Share
  • Tweet

Today I’m going to share an adorable Bicycle with Balloons cake tutorial!  

I wanted to take a little break from fondant today and so we are working with two of my FAVORITE cake decorating mediums–buttercream & chocolate candy coating! ;0)


Cute & Easy Bicycle and Balloons Cake- A Free Tutorial


How to Make a Bicycle And Balloons Cake


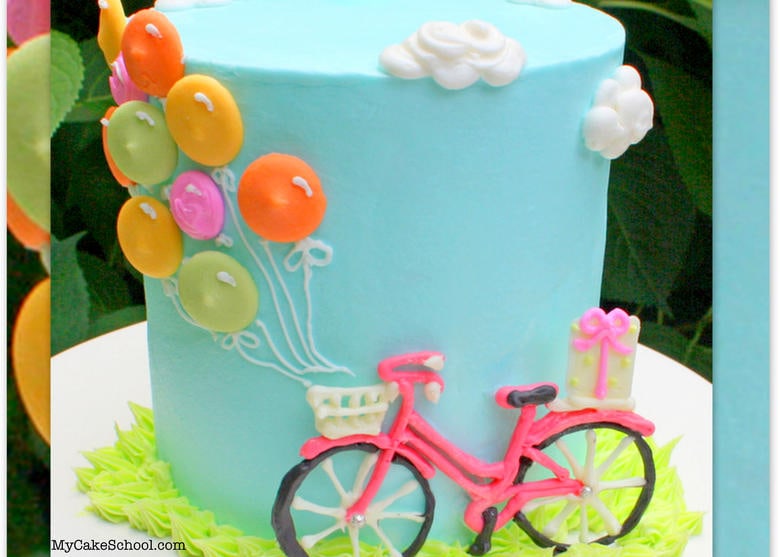
I started out by frosting a six inch cake with Classic Vanilla Buttercream Frosting (tinted Americolor Sky Blue).  Then…the fun part…


The main focus of our cake will be our chocolate bicycle.  Use whatever colors you’d like–our bike is piped with pink, black & white candy coating.  

You can find colorful bags of candy coating (Wilton Candy Melts for instance) in your favorite cake supply shops–but for our bike, we deepened our shade of pink candy coating with Wilton Pink Candy Coloring.

(*You cannot tint candy coating/candy melts with the ordinary coloring gels that you would use with frosting or fondant.  The chocolate will seize. It  needs to be candy coloring, which is oil based.) –

The CUTEST Bicycle with Balloons Step by Step Cake Tutorial by MyCakeSchool.com. Free Tutorial!


For your template, you can draw your own bicycle, print one off of clip art online, or Click HERE to use mine.  You’ll want to tape your template to a cake board or cookie sheet, and then tape a piece of waxed paper or parchment on top of it.

Next, melt your candy coating & put into your piping bags.

Adorable Bicycle and Balloons Cake! Free cake decorating tutorial by MyCakeSchool.com! Online cake classes & recipes!

Ready?  Here we go!

Here I am, tracing my bicycle.  I’m using  a Wilton 4 tip.  (If you’d rather skip the piping tips altogether, you can just snip the ends of your piping bags.  The tips ensure a nice round opening, the only drawback is cleaning out the chocolate later ;0)

Adorable Bicycle and Balloons Cake! Free cake decorating tutorial by MyCakeSchool.com! Online cake classes & recipes!


After outlining the bicycle once, I went over it once again.  This is optional, but the thicker your chocolate decoration, the more sturdy it will be.

I used silver dragees in the center of each wheel.  You can see that my bicycle is not perfect…but still very lovable ;0) — I did mine all in one sitting, but if you’d rather chill the cookie sheet/bicycle in the freezer for a few minutes in between color changes, that works very well too.

Once your piping is finished, place in the freezer for a few minutes or just until firm.  (It would firm up at room temperature too, but it would take longer & would be more fragile when placing on the cake.   Adorable Bicycle and Balloons Cake! Free cake decorating tutorial by MyCakeSchool.com! Online cake classes & recipes!

Once the bicycle is nice and firm, run your hand gently beneath the waxed paper to release it.

Adorable Bicycle and Balloons Cake! Free cake decorating tutorial by MyCakeSchool.com! Online cake classes & recipes!

You’ll notice that your bike has a smooth side and a bumpy, more textured side.  Choose your favorite and then flip it over to apply dots of buttercream here and there to the back.  It’s best to handle your chocolate pieces while still cold.

Adorable Bicycle and Balloons Cake! Free cake decorating tutorial by MyCakeSchool.com! Online cake classes & recipes!

I decided that I wanted a chocolate present for the back of the bike.  Since I didn’t think of this earlier, I’m going to have add it to the bike later with a bit of chocolate…but for you, I’ll go ahead and incorporate it into the template ;0)

The cutest Bicycle and Balloons Cake! Free cake decorating tutorial by MyCakeSchool.com! Online cake classes & recipes!

Now, let’s talk balloons!  We considered tinting buttercream lots of different shades so that I could pipe on buttercream balloons.

Tinting buttercream is not my favorite though, and it just so happens that I have several different shades of Wilton Candy melts.  These became my balloons–hooray!  Of course, if I didn’t have these on hand, I would have made them in buttercream.


I used a dot of buttercream to apply the chocolate balloons to the cake.  Some balloons had more buttercream on the back than others, to add a little depth and movement.


Adorable Bicycle and Balloons Cake! Free cake decorating tutorial by MyCakeSchool.com! Online cake classes & recipes!

While most of my balloons are candy melts, I snuck in a couple of hot pink buttercream ones too.  These are piped with a Wilton medium sized tip-12.

Adorable Bicycle and Balloons Cake! Free cake decorating tutorial by MyCakeSchool.com! Online cake classes & recipes!

I added buttercream strings using my Wilton Tip 1…  Things are starting to come together!


Adorable Bicycle and Balloons Cake! Free cake decorating tutorial by MyCakeSchool.com! Online cake classes & recipes!

I added a few puffy clouds with my Wilton 12 tip and some grass with my Wilton 21 star tip (grass is tinted with Americolor Electric Green.) –


That’s all there is to it!  I think that the cake turned out really simple & sweet.  The chocolate present on the back is decorated with buttercream dots & bow. I hope you like it– if you ever give it a try, we would LOVE to see.


Adorable Bicycle and Balloons Cake! Free cake decorating tutorial by MyCakeSchool.com! Online cake classes & recipes!


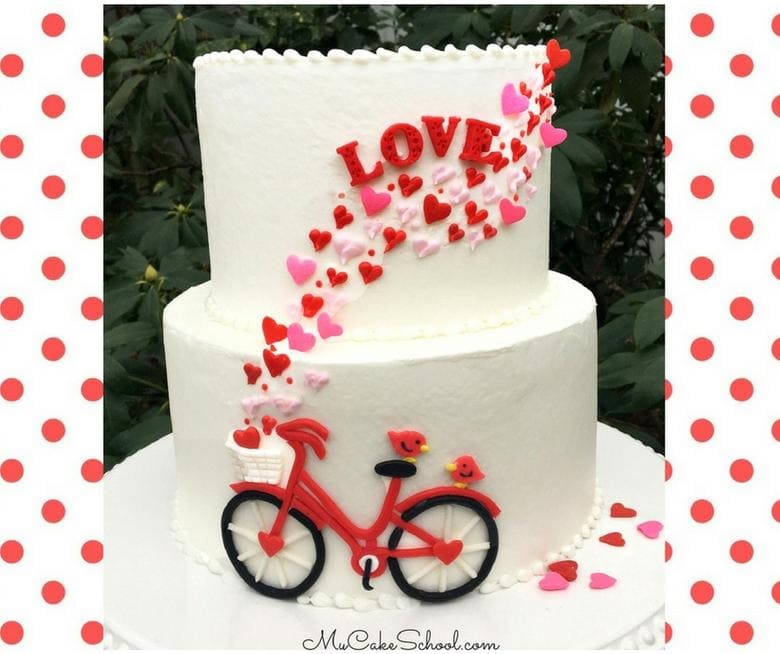
Another Bicycle Cake Tutorial!

**Update Jan. 2018: We’ve recently added a Valentine’s Day Bicycle Cake to our Member Cake Video Section! We used the same template, only with fondant instead of candy coating. We love this look also! Feel free to take inspiration from this version whether working with fondant or candy coating ;0) —


Valentine's Day Bicycle Cake Video Tutorial (Member Video Section) by MyCakeSchool.com- Perfect for Valentine's Day, anniversaries, and engagement parties!

Adorable Bicycle and Balloons Cake! Free cake decorating tutorial by MyCakeSchool.com! Online cake classes & recipes!


Online Cake Tutorials, Free Cake Recipes, and More!

Thanks for stopping by! Make sure to check out even more free tutorials in our Free Tutorials Section, and our most FAVORITE cake and frosting recipes in our Recipes section!

Also, if you are interested in having full access to our entire collection of Cake Decorating Video Tutorials, you should consider becoming a member of My Cake School!

It’s so much fun, and perfect for all skill levels of cake decorating. You can find more details here: Joining information for MyCakeSchool.com


Bicycle with Balloons Cake! Free cake decorating tutorial by MyCakeSchool.com!

Related posts:

  1. Beach Cupcake Tutorial~ A Free Blog Tutorial
  2. Coconut “Drink” Cakes~A Blog Tutorial
  3. Fish Cupcake Cake!~A Blog Tutorial
  4. Swimsuit Cake Blog Tutorial~ (with simple beach cupcakes!)
  5. Fourth of July Cake & Cupcake Ideas!~ Blog Tutorial

Filed Under: Blog Tutorials, Chocolate Techniques, Seasonal & Holiday, Summer, Themes and Occasions Tagged With: Bicycle Cake

« Castle Cake Video Tutorial
Buttercream Ruffled Roses Cake~A Video Tutorial »

Comments

  1. Tammy Lantz August 2, 2013 at 9:51 pm

    So cute. Thanks

    Reply
  2. Gloria August 2, 2013 at 9:54 pm

    Wonderful! Thanks for the tutorial :-)

    Reply
  3. Phoneny Verly August 2, 2013 at 10:14 pm

    I love it ,that very cute thank you for sharing tutorial

    Reply
  4. Luanne August 2, 2013 at 10:19 pm

    Really cute! Thanx =)

    Reply
  5. Sue {munchkin munchies} August 2, 2013 at 10:19 pm

    Love it so much! Thanks for the tutorial, Melissa!

    Reply
  6. BrandiO August 2, 2013 at 10:41 pm

    So adorable! Thanks!

    Reply
  7. Melissa Brown August 2, 2013 at 10:49 pm

    Thank you so much. I love all the different techniques used. Just might give it a try!

    Reply
  8. Marjorie Dormer August 3, 2013 at 1:13 am

    Very clever to use the colorful chocolate wafers for balloons. I also love the bike.

    Reply
  9. Mihaela August 3, 2013 at 1:44 am

    Just amazing !

    Reply
  10. Laura August 3, 2013 at 7:52 am

    Thank You for the AMAZING cake tutorial. I LOVE all your work that you have done and hope to see more? Have a sweet and wonderful day :)

    Reply
  11. Iris58 August 3, 2013 at 11:45 am

    Cute!

    Reply
  12. April Costello August 3, 2013 at 12:46 pm

    Looks amazing! I am definitely going to attempt this one!!!

    Reply
  13. Taz August 3, 2013 at 12:47 pm

    that is too cute. thanks for the tutorial. i will have to try it.

    Reply
  14. rosi lopez August 3, 2013 at 2:55 pm

    Very lovely.

    Reply
  15. Melinda Parker August 3, 2013 at 7:52 pm

    Adorable!

    Reply
  16. Yiggie August 3, 2013 at 9:12 pm

    Thanks, Melissa. So simple, but very sweet. I really must try this.

    Reply
  17. cyndi barnett August 3, 2013 at 9:53 pm

    It is really a fresh and happy cake : ) I have a suggestion…you know how the candy melts have that little bump? why not just turn the bump side toward the cake and use the flat side out for the balloons. It might even add a little “stand out” from the cake.
    I get so excited when I see you in my inbox! Great ideas!

    Reply
  18. Anita barron August 3, 2013 at 10:05 pm

    So cute and a different way of decorating using choc. melts. You are so talented. Love my cake school!!!!

    Reply
  19. aarti sarin jain August 4, 2013 at 1:30 am

    Hi can i make the bicycle with royal icing ?

    Reply
  20. Cristina August 4, 2013 at 12:09 pm

    What a cute idea..thank you Melissa

    Reply
  21. Rima August 4, 2013 at 12:45 pm

    Such an adorable design! Thanks so much for sharing!

    Reply
  22. Julie August 4, 2013 at 12:50 pm

    Thanks so much for sharing, this is a very nice design. :)

    Reply
  23. Anne marie August 4, 2013 at 5:40 pm

    I love your chocolate / butter cream videos – they are my favorite – thanks

    Reply
  24. Wendi August 5, 2013 at 9:28 am

    So cute!

    Reply
  25. Melissa Diamond August 5, 2013 at 11:06 am

    Thanks so much for your comments!!

    @Aarti- Yes, you could make the bicycle in royal. I would make it a few days in advance to be on the safe side, and apply to the cake close to the time of the event. (I would make an extra just in case!)

    Reply
  26. Lori August 5, 2013 at 4:27 pm

    This cake as lovely as well as so many others I’ve been exploring today! I love your style. :)

    Reply
  27. Terri Tate August 6, 2013 at 9:57 am

    The cake is darling. Thanks for sharing with us!

    Reply
  28. Keri August 7, 2013 at 8:36 am

    How tall is the cake itself? How many layers? I am making this for my daughter’s birthday this weekend. Thanks!

    Reply
  29. BeBe August 7, 2013 at 1:32 pm

    Hi Keri, this cake would be very cute using the standard 4 inch high cake. Ours is 6 inches tall, we used 6 inch cake pans, 4 layers. It is a double barrel construction and Melissa demonstrates how to do this in the Cookie Jar tutorial, here is a https://www.mycakeschool.com/blog/cookie-jar-cake-with-cookie-monster-cupcakes-blog-tutorial/

    Reply
  30. Yaneri Rodriguez August 8, 2013 at 12:37 am

    Beautiful Ladies!!!! What a great summer cake!!!

    Reply
  31. Keri August 8, 2013 at 10:58 am

    Thanks so much!!!!

    Reply
  32. ggomo August 13, 2013 at 5:45 pm

    sooooooooooo cute!

    Reply
  33. Tamarah August 15, 2013 at 10:19 pm

    This was so great and beautiful! You made it look easy and fun to do!

    Can you add melted Wilton Candy melts to buttercream to colour it? I have problems achieving rich pinks and purples with even Americolor gel food colouring. It makes my buttercream very bitter at the slightest overdose which is the amount I need to get a true pink / purple.

    Reply
  34. khatereh August 19, 2013 at 7:05 am

    i made this tnx very much

    Reply
  35. Melissa Diamond August 19, 2013 at 11:50 pm

    @Tamarah- Sorry for the delay! I’ve never heard of coloring buttercream with chocolate candy coating. I’m not sure that you could get the intensity that you are looking for going that route. I haven’t noticed the bitter taste with Americolor Coloring Gels…but I use my deep shades mainly for small accents. Americolor is also highly concentrated, so you should be able to use less dye & let it sit for several hours to give it a chance to intensify a few shades.

    @khatereh- I’m so glad that you made it!

    Reply
  36. fiona September 2, 2013 at 12:58 pm

    This looks wonderful – I would love to make it for my husband who runs a bicycle shop. I live in the uk and I don’t think they sell candy melts here, do you have any idea what the equivalent would be? Thanks

    Reply
  37. BeBe September 3, 2013 at 12:51 pm

    Hi Fiona, I have read that you could use Dr. Oetker’s Scotbloc. If it does not come in various colors, you could use oil based candy coloring to achieve various colors.

    Do you have Candy Bark, also known as Almond Bark or Candi Quick Bark available to you? In the US it is sold in grocery stores. It could also be used with oil based candy coloring. White chocolate chips (Nestles or Ghirardelli) could be used but I don’t know if the bicycle would be firm enough using the
    chips.

    Reply
  38. fiona September 3, 2013 at 2:22 pm

    Thanks Bebe, I’m quite new to all of this so am not very familiar with what products are available, perhaps I’ll ask in my local cake craft shop. Thanks for getting back to me so quickly! Can’t wait to try this cake with whatever I manage to find, it’s gorgeous!

    Reply
  39. marie, the EpicureanPiranha September 12, 2013 at 12:55 pm

    Very sweet design – thanks for sharing, Melissa.

    ~ marie, the EpicureanPiranha

    Reply
  40. Fabiola September 13, 2013 at 2:07 am

    Hi! Just found your blog, amazing!, thanks for the tutorials!,,
    I have a question, how do you get that perfectly smooth buttercream frosting on the cake? I don’t know much about frosting a cake but would love to learn more!
    Thanks!
    Fabiola

    Reply
  41. mayra September 18, 2013 at 9:47 pm

    Great idea and beatiful cake.

    Reply
  42. suchie September 22, 2013 at 2:07 am

    wow… that is the most easier to make bicycle.. thanks alot!

    Reply
  43. Sagarika Mitra September 27, 2013 at 11:52 am

    Hi Love the bike :) super duper cute
    @Fioana: U will find wilton candy melts at http://www.hobbycraft.co.uk/advancedsearchresults.aspx?query=candy-melts
    (online and store both) in UK

    Reply
  44. Suebaru327 October 29, 2013 at 4:58 pm

    i love this cake so much. can’t wait to try it some time.

    Reply
  45. Uyen Ly January 18, 2014 at 10:40 am

    Thank you for the detail tutorial. Simple but elegant and cute. Can’t wait to try it this summer!

    Reply
  46. Melanie Macpetrie January 18, 2014 at 10:56 am

    Beautiful, fun cake. Thank you for sharing.

    Reply
  47. Okeahialam Nkechi January 18, 2014 at 2:23 pm

    fantastic work I will like to learn more

    Reply
  48. Carrine January 18, 2014 at 6:18 pm

    I am not a big fan of buttercream. Can I frost the cake with colored pastry pride whipped cream instead but keeping the rest of the decorations with buttercream and candy melt?

    Reply
  49. DOLORES MARIEL ASCENCIO GONZALES January 19, 2014 at 4:52 pm

    MUY LINDO TUTORIAL SOY DE PERU Y GRACIAS POR COMPARTIR SON UDS. MUY AMABLES GRACIAS.

    Reply
  50. Heather @ Curly Girl Kitchen February 14, 2014 at 10:59 am

    I love this cake! I used your template to make my own bicycle cake for Valentine’s Day and linked back to your tutorial. Piping the candy melts and not having them run all over the place was harder than I thought it was going to be, but I think it turned out really cute. Thanks for a great idea!

    http://www.curlygirlkitchen.com/2014/02/bicycle-and-balloons-valentines-cake.html

    Reply
  51. Connie February 20, 2014 at 1:52 pm

    So cute;) I`m goimg to try to make this for my birthday;)

    Reply
  52. Rachel August 10, 2014 at 9:13 pm

    Adorable!! My birthday is the 14th. I’m gonna attempt this. Thanks again you’ve been very sweet by sharing.

    Reply
  53. Suky September 9, 2014 at 6:07 pm

    This is just what i was looking for! I tried making this using stiff buttercream but before I saw your tutorial! But now Im sure it will work using your method.
    Thank you. Its lovely.

    Reply
  54. Melissa January 8, 2015 at 9:56 pm

    Wow I LOVE this!!! Do u happen to have a tutorial or blog about how you make the cake? I’ve tried making a layered cake before and can never get it to stack correctly and definitely can’t frost it like that…please provide the link to a cake recipe/frosting tutorial if you’ve got one!!! Thanks so much :)

    Reply
  55. Debbie March 2, 2015 at 4:49 am

    I love this cake and am hoping to make it for a benefit that I have been asked to donate a cake or two…thank you so much for posting and especially for including the printable pic of the traceable bike….I am also happy to see that I can use some of the choc disks for this…

    Reply
  56. JenGN October 17, 2015 at 12:27 am

    Ok. So I made the cake. It was a challenge. I’ve learned I have a long way to go with my chocolatiering skills. The bike was a real struggle, but I got there..sort of.

    Reply
  57. Sarah Roehlk August 28, 2016 at 11:51 pm

    I just have to say, I realize this was 3 years ago that you posted it, but this was a great cake idea! I made it today, mine had 4 bikes around the base and balloons out of each one, and it was so simple! Thanks for the tutorial and the inspiration for our bike birthday party!

    Reply
  58. Melissa Diamond August 29, 2016 at 12:58 am

    Hi Sarah- Thank you for your feedback! I’m so happy that you made the cake, and love that your version had four bikes! I’m sure it was adorable, and a bike party sounds like so much fun. xoxo ;0)

    Reply
  59. Maria September 7, 2016 at 6:44 am

    Beautiful work. I lovely. Sorry, I’m brazilian e i don’t speak english. Kisses for you.

    Reply
  60. Danica October 18, 2018 at 9:27 am

    Hi! I’m wondering how far in advance these decorations can be made and how to properly store them?

    Reply
  61. BeBe October 18, 2018 at 8:09 pm

    Hi Danica, The bicycle is made from candy melts. To make in advance, keep the bicycle out of heat and sunlight and it should be fine for a long time. The balloons are also candy melts, a few of the smaller balloons are buttercream.

    Reply
  62. Iwona January 31, 2020 at 2:55 pm

    I’m wondering if I can put the bike and balloons on the cake two days in advance. I won’t have time at the last minute to play with it. Will the candy melts decor be ok? I’m worries they may go soft.

    Reply
  63. BeBe January 31, 2020 at 3:47 pm

    Hi Iwona, Since the bike is just leaning onto the cake for support and the balloons are whole candy melts, then there should be no problem. I would feel comfortable placing on the cake 2 days in advance.

    Reply
  64. Maryna April 30, 2021 at 9:50 am

    I made it last night for my daughter’s 22nd birthday, and I couldn’t be happier.

    Reply
  65. Melissa Diamond April 30, 2021 at 10:47 am

    Oh Yay! You did such a fantastic job!! Thanks so much for sharing. Hope your daughter has a great birthday!

    Reply
    • Maryna April 30, 2021 at 9:52 pm

      Thank you so much.

      Reply

Leave a Reply Cancel reply

Your email address will not be published. Required fields are marked *

You can click here to Subscribe without commenting

Add a picture

Melissa Diamond Meet MelissaWelcome! We'd love for you to check out our free cake tutorials & recipes, or join our site for online access to hundreds of videos and more!

Read More

The Perfect Gift

  • Lemon Buttermilk Cake {A Scratch Recipe}

    Lemon Buttermilk Cake {A Scratch Recipe}
  • Sweet Balloons Cake

    Sweet Balloons Cake
  • White Chocolate Coconut Cake

    White Chocolate Coconut Cake
  • Striped Buttercream Panels Cake

    Striped Buttercream Panels Cake
  • Lemon Coconut Cake with Lemon Curd Filling

    Lemon Coconut Cake with Lemon Curd Filling
  • Milk Chocolate Cake

    Milk Chocolate Cake
  • Buttercream Tulip Cake

    Buttercream Tulip Cake
  • Flamingo Ruffle Cake- A Cake Decorating Video Tutorial

    Flamingo Ruffle Cake- A Cake Decorating Video Tutorial
  • 60+ of the BEST Cake Recipes for Spring and Summer

    60+ of the BEST Cake Recipes for Spring and Summer
  • Lemon Cake {A Scratch Recipe}

    Lemon Cake {A Scratch Recipe}
Facebook Instagram Pinterest Twitter RSS
Login
Melissa Diamond Meet MelissaWelcome! We'd love for you to check out our free cake tutorials & recipes, or join our site for online access to hundreds of videos and more!

Read More

Your Favorites

  • Your favorites will be here.
  • home
  • free tutorials
  • videos
  • recipes
  • contact
  • join
  • login
  • home
  • free tutorials
  • videos
  • recipes
  • contact
  • join
  • login

Copyright © 2022 My Cake School. Melissa Diamond. All rights reserved | Terms and Conditions | Privacy Policy