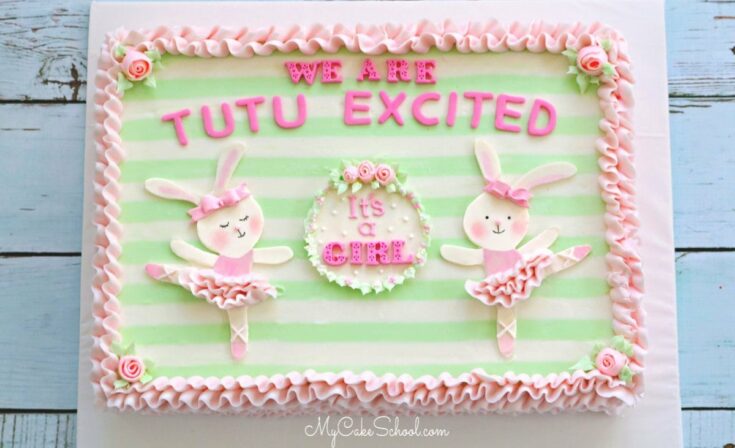
Bunny Ballerinas Cake (Baby Shower Cake)
This ballet-themed baby shower sheet cake is such a sweet design for baby girls!

In this cake video tutorial, we'll demonstrate a striped buttercream sheet cake, using a template for our bunny ballerinas, and more.
We have made so many cute Baby Shower Cake Designs over the years, but not many of them have been sheet cakes.
We thought that this ballerina theme would be a great opportunity to create a sweet and simple baby shower cake. We also love the "Tutu Excited" phrase- We saw this on a baby invitation (several actually) and knew it would be the perfect way to tie it all together!
We hope that you enjoy our video tutorial! We'll also go over creating buttercream stripes on sheet cakes!
Materials:
We used a 9x13 sheet cake
Buttercream (Our Classic Vanilla or Fluffy Vanilla Buttercream are good choices for striped frosting because the butter firms up quickly in the freezer).
Coloring Gels: Avocado Green + a touch of Leaf Green, Wilton Rose
Food Writer Pens (Bunny faces)
Piping Tips: Tip 352 (leaf tip), 104 (petal tip for ruffles & roses), For small roses- 101 Tip or similar, Tip 3 or similar round tip for dots on sign and ribbons of frosting on ballet shoes
Fondant (We kneaded in a small amount of tylose powder to make it set up more quickly)
Piping Gel or Edible Glue of Choice
Letter Cutters/Molds of choice
Cake Comb (if creating stripes as we did)- Ours is from Evil Cake Genius
Miscellaneous: Disposable piping bags, small offset spatula(s), Rose Nail & Waxed Paper or Parchment squares, pink petal dust (rosy cheeks), vodka or lemon extract for mixing up "paint" for bunny leotards.
Baby Shower Ballerinas- A Cake Video Tutorial
Learn how to make an adorable Ballerina themed baby shower cake in this free cake decorating video! We'll also show you how to create striped buttercream in this sweet sheet cake design.
Materials
- We used a 9x13 sheet cake
- Ballerina-Bunnies-Template
- Buttercream (Our Classic Vanilla or Fluffy Vanilla Buttercream are good choices for striped frosting because the butter firms up quickly in the freezer).
- Coloring Gels: Avocado Green + a touch of Leaf Green, Wilton Rose
- Food Writer Pens (Bunny faces)
- Piping Tips: Tip 352 (leaf tip), 104 (petal tip for ruffles & roses), For small roses- 101 Tip or similar, Tip 3 or similar round tip for dots on sign and ribbons of frosting on ballet shoes
- Fondant (We kneaded in a small amount of tylose powder to make it set up more quickly)
- Piping Gel or Edible Glue of Choice
- Letter Cutters/Molds of choice
- Cake Comb (if creating stripes as we did)- Ours is from Evil Cake Genius
- Miscellaneous: Disposable piping bags, small offset spatula(s), Rose Nail & Waxed Paper or Parchment squares, pink petal dust (rosy cheeks), vodka or lemon extract for mixing up "paint" for bunny leotards.
Instructions
Buttercream Stripes (optional)
- To make the striped pattern, frost your sheet cake as usual but apply the frosting a bit more thick on top of the sheet cake.
- Comb the frosted top with a cake comb that will work well for the striped pattern. I used a metal cake comb.
- Comb the cake to create the horizontal "stripes". Repeat if needed. Then chill in the freezer for about 20 minutes until the frosting is very firm.
- Remove the cake from the freezer.
- Using a piping bag with the tip snipped away, pipe green buttercream into the space/lines that fall between the raised lines of your combed pattern.
- Using a metal bench scraper (or the straight side of your comb), Smooth over the top of the cake from one side to the other, removing the excess green frosting. (I heated my bench scraper in hot water first).
- It will take a couple of passes over the cake before the striped pattern looks neat. Each time, you are removing just a bit more frosting. Re-chill if necessary in the freezer for 15-20 minutes before going back in and fine turning.
Making the Bunnies
- Roll out fondant to about ⅛ inch thickness. Let it set up for a few minutes. (I kneaded a small amount of tylose powder into my fondant but that is optional)
- Cut out two bunnies using the template. They will be facing each other/mirror images.
- Allow to dry on a surface or cookie sheet that has been lightly greased and dusted with powdered sugar to prevent sticking.
- Once the fondant cut-outs are dry to the touch, you can add their faces with a thin food coloring pen (Mine are Wilton). I dusted on a little pink petal dust with a dry paintbrush for rosy cheeks.
- I painted on the bunny leotards, shoes, and inside of the ears using a little pink coloring gel + white coloring gel+ a touch of vodka (mixed on a little palette). This "edible paint" detail is optional- you could also layer on thinly rolled pink fondant.
- Add little pink fondant noses and little fondant bows.
Sign and Letters
- We used various letter cutters/molds that we had on hand (including a tappit cutter set for the smaller letters).
- The sign is just a circle of fondant (with a bit of tylose powder kneaded into it) and the letters added with a little piping gel.
Buttercream Ruffles
- I added buttercream ruffles to the bunnies to create tutus as well as around the sides of the cake. (You could just do a ruffle border if you don't want to use so much buttercream). You will use a piping tip 104 for this.
- The thin end of the piping tip should be facing away from the cake as you pipe so that the edges of the ruffles will be thin.
Ribbon Roses
- Buttercream ribbon roses were piped onto a wax paper square (attached to rose nail). Pipe the buttercream using a Tip 104 (for larger roses) and Tip 101 for smaller roses. The thin end of the piping tips will be up as you do your piping.
- Pipe the ribbon rose as you spin the nail counterclockwise, starting in center of the square and spiraling outward. Remove wax paper with rose and place on cookie sheet.
- Freeze the roses for 15 minutes or until firm-- then peel away from paper and place onto the cake. We placed a few small ones at the top of the sign (along with leaves piped with a 352 tip). Larger roses were placed in the corners of the cake.
Notes
Before placing decorations onto the cake (letters, bunnies, etc.), it is best to chill the cake to firm up the buttercream. I pop my cake in the freezer for about 10-15 minutes just before adding these details so that if I need to rearrange the letters or bunnies, it won't leave marks in the frosting.
")
This cake is so sweet. Love the design!
That is so stinkin cute! :-) I love it. Fabulous and simple as always! :-)
Adorable! For sheet cakes in general, can you triple or quadruple a favorite recipe ? Are some recipes not ok to triple or quadruple? TIA