My Cake School

Cake Tutorials & Recipes

  • About
  • Recipes & Tutorials
  • Newsletter
menu icon
go to homepage
  • About
  • Recipes & Tutorials
  • Newsletter
    • Facebook
    • Instagram
    • Pinterest
    • Twitter
  • search icon
    Homepage link
    • About
    • Recipes & Tutorials
    • Newsletter
    • Facebook
    • Instagram
    • Pinterest
    • Twitter
  • ×

    Home » Recipes » Cake Decorating Tutorials

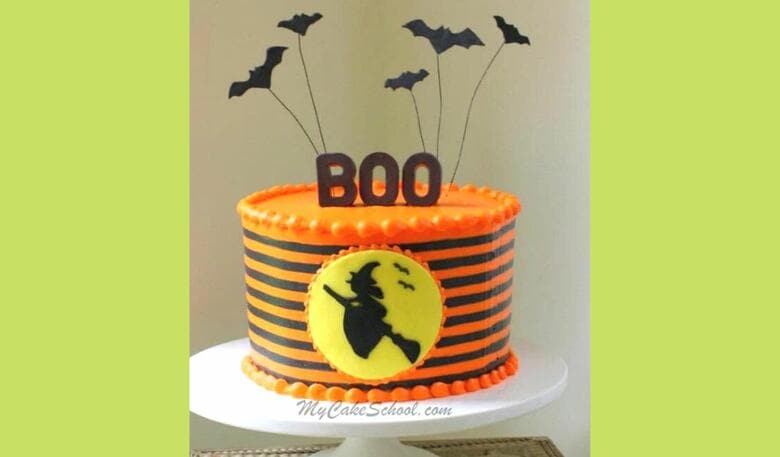
    Witch Silhouette Cake- A Halloween Cake Video

    September 27, 2015 By Melissa Diamond 6 Comments

    204 shares
    • Share
    • Tweet

    In this free Halloween Cake Video, I'm going to demonstrate a few fun techniques, including creating a buttercream striped cake, a witch silhouette, BOO cake topper, and flying bats!

    Halloween Witch Silhouette Cake Tutorial! Learn to create this festive cake in My Cake School's video tutorial! MyCakeSchool.com Online Cake Classes & Recipes


    We hope that you enjoy this Halloween witch cake tutorial!

    First, we will be creating a black and orange buttercream striped cake for a dramatic effect.  (For even more detail about this technique, you can see our free video on How to Make Buttercream Stripes here: How to Make Buttercream Stripes.)

    Next, I'll demonstrate how to create the focal point of the design which is our silhouette and moon plaque. And finally, we'll add a little height with chocolate letters and flying bats! We hope that you enjoy the video! Make sure to check our Materials list below for more details.


     Witch Silhouette Halloween Cake Tutorial


    Materials for Halloween Cake:

    Our tier is a 3 layer 8 inch round that stands about 5 inches tall (we doubled our doctored cake mix White Almond Sour Cream recipe. If you do this, you'll have a little batter leftover which you can use for an additional layer or cupcakes.)

    Templates for witch and bats

    Buttercream: I would recommend a butter based recipe like our Classic Vanilla recipe.

    Cake Comb for the Stripes- (Ours was from a set of Wilton Cake Combs)

    Piping tips: We used a Tip 10 for the stripes and bead border, and a tip 4 for the smaller bead border around the silhouette plaque.

    Coloring Gel: We used Americolor Orange, Super Black, and Lemon Yellow

    Fondant: Black (22g) and Yellow (4og). (We kneaded a bit of Tylose Powder into the fondant to speed up the dry time.)

    Waxed Paper -optional, but I find the waxed paper transfer method easy to move the silhouette

    Vegetable Shortening- Used with the waxed paper transfer method.

    Piping Gel: Our "glue" of choice in this video

    Floral Wire:  We used white, paper covered wire which we painted black. It was 26 gauge wire although any gauge as fine as long as it is fairly thin but strong enough to hold the weight of the bats.

    Straws or cocktail straws (to provide a barrier)

    Circle Cutter for the moon (ours was 4 inches)

    Black Candy Melts for the BOO letters.

    Misc: Cake board beneath the tier, turntable, small paintbrush for applying piping gel,

    Witch Silhouette Cake- Free Tutorial


    Related posts:

    1. Monster Cupcakes- Free Tutorial!
    2. Halloween Cupcake Tutorial!
    3. Clumsy Witch!~A Halloween Blog Tutorial
    4. Park Your Brooms! Halloween Cake Tutorial
    5. Creepy Spider Cake-A Halloween Blog Tutorial!
    « Gingerbread Cake {Scratch} with Spiced Cream Cheese Frosting
    Quilted Buttercream- A Video Tutorial »

    Comments

      Leave a Reply Cancel reply

      Your email address will not be published. Required fields are marked *

      The maximum upload file size: 2 MB. You can upload: image. Drop file here

    1. MsGF September 27, 2016 at 1:32 pm

      Looks awesome! I love the stripes. Very clever as always! :)

      Reply
    2. Jennifer Daniel September 27, 2016 at 4:26 pm

      Adorable! I never thought about using candy melts for the silicone letter mold. As usual, I love it!!!
      ~Jennifer

      Reply
    3. Catherine September 28, 2016 at 12:51 am

      So beautiful <3 Thank you!!

      Reply
    4. Jennifer Puckett September 28, 2016 at 6:43 pm

      Cute cake and great tutorial!
      I was wondering what you used to paint the wire?
      Thank you so much!

      Reply
    5. Melissa Diamond September 28, 2016 at 7:04 pm

      Thank you for your comments! @Jennifer Puckett- I used Americolor Super Black coloring gel mixed with a touch of vodka. (the vodka helps it to dry quickly) I just applied it to the wire with a small paintbrush. ;0)

      Reply
    6. Elisa Prado September 29, 2016 at 3:17 pm

      Fantastic !!!! Elisa Prado Brasil

      Reply

    Popular Recipes

    • Collage of bunny cake ideas
      Bunny Cake Ideas
    • Platter of assorted decorated Easter Cupcakes
      Easter Cupcakes
    • Sliced Hummingbird Bundt Cake on a white pedestal
      Hummingbird Bundt Cake
    • Collage of Cake Recipes with Fruit
      100 Cakes with Fruit
    • Sliced Irish Cream Cake on pedestal
      Irish Cream Cake
    • Sliced Strawberry Lemonade Cake
      Strawberry Lemonade Cake

    Featured Holiday Cakes

    More Seasonal Cakes

    Popular Recipes

    • Sliced Lemon Coconut Pound Cake on pedestal
      Lemon Coconut Pound Cake
    • Boston Cream Pie from Cake Mix on a white pedestal
      Boston Cream Pie (from Cake Mix)
    • Lemon Bundt Cake on white Pedestal
      Lemon Bundt Cake
    • Collage of Cake Mix Photos
      35+ Box Cake Mix Recipes!
    • Mocha Cake on pedestal
      Mocha Cake (Doctored Cake Mix)
    • Closeup of Oreo Cupcakes
      Oreo Cupcakes (Doctored Cake Mix)

    Featured Holiday Cakes

    More Seasonal Cakes

    • Free Blog Tutorials
    • Free Cake Videos
    • Recipes
    • Contact
    • About

    Copyright © 2023 My Cake School. Melissa Diamond. All rights reserved | Terms and Conditions | Privacy Policy