Fondant Crimper Tutorial
In this quick tutorial I'm going to show you how to use a fondant crimper to quickly and easily add a bit so style to your cakes!
Fondant crimpers come in a variety of shapes and sizes and are really inexpensive (considering that they will last forever!)
I have had mine for ages and while I love the look of crimped borders, I have never used it on a cake before today.
My cakes just never seemed to call for crimping. My problem was that it never occurred to me that I could use my crimper to create designs as a focal point. Eureka! (I'm sure that many of you have thought of this...but my poor crimper has been misjudged as a "borders only" tool for a long time.) -
Table of Contents
How to Use a Fondant Crimper
Now, time to see what we can do....
I started with a tall six inch cake which I covered in Satin Ice brand fondant. Any fondant will do.
The fondant is tinted with Americolor Turquoise coloring gel. My fondant was rolled to just under ¼ inch thickness.
If you roll your fondant too thin, you run the risk of your crimped pattern exposing the cake beneath. You should practice with scrap piece of fondant using various widths so that you can decide what works best for you.
Here's my crimper. It is a PME brand "open vee" design. As I said, there are so many options out there and I hope to order more soon!
The adjustable band that you see helps to keep the pattern uniform. You can adjust it up or down...but don't create too wide of an opening (unless you like a lot of "teeth marks" in your pattern).

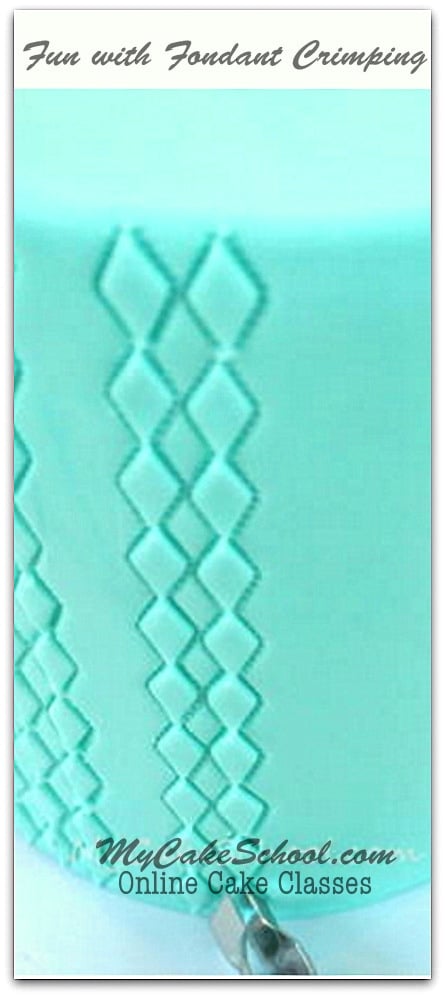
Starting from the top edge, I decided to take my pattern down vertically. You want to choose a pattern that you can complete within approximately 15-20 minutes of covering your cake with fondant.
This is playing it safe...since a clean, crimped pattern will become more difficult as the fondant sets.
I pushed the crimper about halfway into the fondant and then squeezed it together to form a diamond shape.
Again, you'll want to practice this before diving in (since there is no turning back!) The process is very easy. If you are doing a vertical pattern like me, it is very important to make sure that your first line is straight. I eyeballed mine, which probably wasn't the safest route to take, but it turned out fine!
I lined up my crimper so that where one diamond stopped, another one began.
 It's easier to start at the top and work your way down rather than vice versa.
You can better see where you are going as you crimp, and if things don't work out perfectly with the way that your pattern falls, any less-than-perfect spacing or diamonds will be at the very bottom of the cake.

After creating my first row of diamonds, I created a second row (using the neighboring row as a guide) and then a third.
 I considered taking the pattern all the way around, but instead opted for a pattern in the front only.
I created three rows, then used a ruler as a guide to create a uniform space. You could use anything--I just liked the width of this ruler.
I crimped another row of diamonds right next to the ruler. This time, rather than three rows, I made two. * The picture is a little misleading. I had to hold the ruler in place as I crimped next to it, but I needed my left hand for taking this photo. ;0)

Making progress! My pattern would consist of three rows, then two rows, then three rows once again.

Quick Fondant Flowers
After completing my pattern, I wanted to add a few very simple flowers. Nothing too frilly. So, I used gum paste tinted with a combination of Americolor Orange a touch of Americolor Red Red. I like the contrast with the turquoise.
(You could use fondant for this also, but kneading in a little tylose powder will speed up the dry time and make the flowers easier to handle.)
I took a 1 ½ inch circle cutter and cut out several shapes to create flowers for the top of the cake. To make a larger flower for the bottom of the cake, I started with a 2 ½ inch circle.

I used an x-acto knife (any sharp knife will do) to create a fringed look all the way around, keeping the centers intact.
 I used the wells of my palette as flower formers, to let the gum paste pieces dry with a little movement. I used my knife to lift the fringed petals here and there.
 If working with gum paste, you'll want to allow your flowers to dry at least several hours or overnight. (Mine dried overnight). If you live in a more humid area, or if you are working with fondant, it may take longer.
Painted Accents
I painted my petals with a paint created by mixing my Americolor orange with a little bit of vodka. The alcohol dries very quickly, leaving the color.
This is optional but I like the color variation (and it takes about 2 seconds).

You can get as creative as you'd like with the centers of your flowers. Fondant, gum paste, dragees & sprinkles are all good choices.
I decided to use royal icing tinted turquoise, and thickened to a good piping consistency.
**You could also use a crusting vanilla buttercream like our classic vanilla buttercream recipe.

I also piped a small bead border using a Wilton tip 2 around the top and bottom of the cake. I attached the flowers to the cake with royal icing.
I wanted my flowers to tilt forward and so I piped royal icing in varying heights on top of the cake and pressed the flowers into it.
Don't worry...we'll hide the ugly with more flowers! (If you'd prefer, you could also use bits of fondant to elevate the flowers.)
 This is the backside of the cake. No more exposed royal icing ;0)
 And we're done! Ta da~...........

Thanks for stopping by the blog today! I don't know about you, but I have new favorite tool. Now, let your crimpers run wild--there are many more designs waiting to be made! Have fun ;0)
Where do you buy a crimper? I have never heard of it before
Hi Kelly and Tanya, ours is a PME brand Serrated Open Vee Crimper. I think we bought from Global Sugar Art product #17409
Here is a link: http://www.globalsugarart.com/search.php?q=crimper You'll find it on the 4th row of crimpers.
Another cute cake! I always get excited when I see a new blog or video post. Please keep 'em coming!
Hello
I loce this kind of cake, so tall!
Do you use any kind of base between the cakes?
Is is safe to do with any at all?
thanks Vera
Hi,
As always, amazing job well done!!!
wonderful! Love the whole look and the crimpers I have will be used in the near future...how many layers is your 'tall" cake...IOW, How many 6" cakes did you bake to create your tall? 3 or 4?
Thanks, Melissa!
Simple and beautiful! Thank you for sharing and congratulations for another lovely cake!!!!
very nice idea thanks very much
This is a great tool. I use it all the time.
Thanks for inspiration... but would that crimper work on buttercream???
Hi agyaggie, no, the crimper will only work with fondant.
beautiful, thanks for the idea!!!!definatly a wow factor