The Very Hungry Caterpillar--Pull-Apart Cupcake Cake Tutorial!
We are excited to share a CUTE cupcake cake tutorial based on one of my favorite children's books--The Very Hungry Caterpillar (by Eric Carle)!
This would make an adorable birthday cake or even baby shower cake.
This sweet little hungry guy seems to be making quite a comeback. Lately I've seen birthday party themes, toys, and even Hungry Caterpillar children's bedding--(See Pottery Barn Kids--The Cutest!!!) -- So, the time has come to cupcake-cake him.... you will love it!
Table of Contents
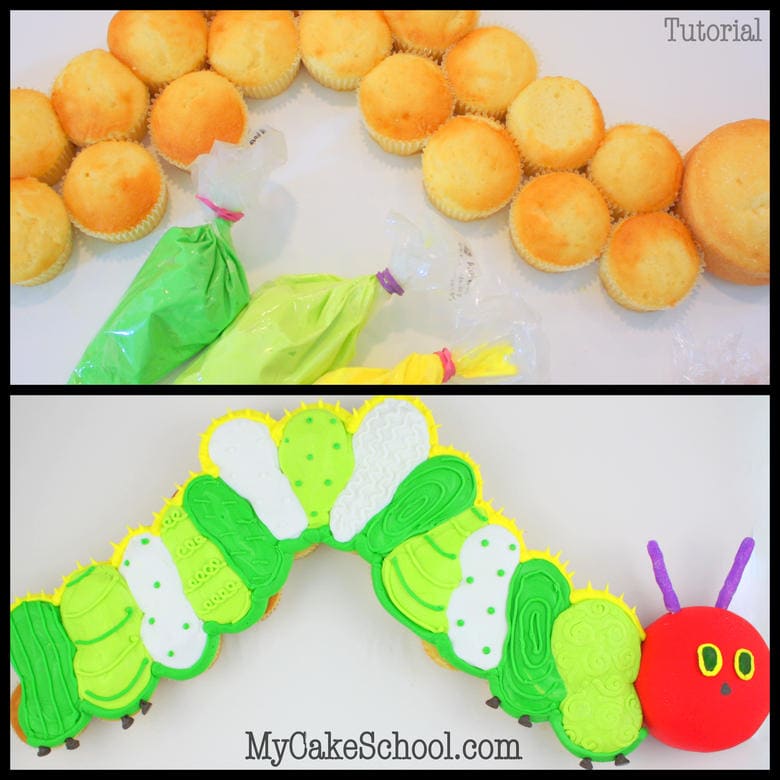
Mapping out the Cupcake Cake Design
In case you've never made a pull-apart cupcake cake, you'll want to make sure to add a dot of icing to the bottom of your cupcakes--this will help them to stay put. Notice the head that I added to the end-- it's a 4" round.
You'll also want to stagger your cupcakes so that they are nicely nestled next to each other---we don't want any large spaces in between. This feels a bit like assembling a puzzle!
I've loaded up my piping bags with a medium consistency crusting buttercream--and fitted them with a piping tip 12.

Let the buttercream piping begin!
Here, I'm piping over the cupcakes wtih alternating "stripes". I'm somewhat staying within the color scheme of the actual caterpillar from the story--but not exactly. 
Now, I'm smoothing over my slightly crusted buttercream with a piece of a Viva brand paper towel. This step is optional, I just felt like a smooth finish today!
However a little lumpy bumpy texture would be great too- there's no wrong option.
Some of my stripes are pretty chunky and thick--I wanted to add a little extra dimension.

Remember when I said that I wasn't going for the exact look of the caterpillar from the story? Well... now you'll really see what I mean. I love patterns--and I love piping! :0) -- I think that our caterpillar needed a little extra pep!
All of my piping is done with a tip 3 or 4-- with the exception of the outlined border on top and bottom---that is done with a tip 12.

Hungry Caterpillar Face and Final Details
Now, time to make our caterpillar really look like a caterpillar! Earlier, I covered my 4" cake with some pre-colored red fondant. If you are not a fan of fondant, you could also use buttercream.

That's all there is too it! Are you ready? Here he is!
Yay! I love him ;0) I hope that you enjoyed the tutorial! It really is a fun one.

Thanks so much for stopping by the blog today.....now, who's hungry for cupcakes? ;0)
Hi Nicola, great, I'm glad you found it. Good luck to you.
I'm planning on trying to do this cake/cupcakes for my granddaughter's first birthday party later this month! Hope it turns out half as cute as yours.
Hi! Love this idea and I am attempting to make this. I have a question: what colors were used to color the frosting?? Please help!
Hi Marisa--I'm sorry, I normally list the colors! Hmmm...this looks like Americolor Lemon Yellow, Electric Green (for the lighter shade), & Leaf Green.
Thank you so much!! It's an adorable cake.
Thank you so much for the instructions. I made a Very Hungry Caterpillar cake following your design this weekend for a neighbor's 1st birthday party and everyone loved it. I 'downsized' by using mini cupcakes for the body and a regular cupcake for the head and it fit comfortably on a 14" x 20" cake board with plenty of room around the edges. I prefer Swiss meringue buttercream to fondant but I managed to get the head a beautiful scarlet red by dipping it in red sanding sugar. I also found that dipping the antennae in purple sugar stopped them from becoming too sticky to handle. A mini chocolate chip was the perfect size for the nose. Thank you again - the cake was a huge success!
Hi Niki-- I'm so happy that you made this! Great to hear that the changes that you made using minis instead! I know that it must have been adorable! ;0)
crusting buttercream? Would you share the recipe? I haven't heard of this. Love your blog!!! Great design's!!! I am new to baking...thanks again : )
1 cup (2 sticks) (226 grams) unsalted butter (softened, don't use microwave)
8 cups ( 920 gr) confectioners sugar
2 teaspoons (8 gr) vanilla, clear vanilla for a whiter frosting
1/3 cup (86 gr) milk
1/2 teaspoon salt to cut the sweetness
Cream the softened butter, add salt and vanilla, gradually add conf. sugar along with the milk. Beat at med speed for 3 to 4 min. then slow down mixer to very slow for 2 more minutes. After you frost your cake, wait just a short while and when you touch the frosting and it does not come off on your finger it has crusted. Recipe can be doubled.
I am going to attempt to make this for my son's first birthday, it looks amazing. I will make it the day before, just wondering what is the best way to store the cake, will the fridge dry it out??? Just wondering due to the size.
Great work, great site.... love it!
Hi Leanne--To prevent the cupcakes from drying out, you can place in the fridge just long enough for the frosting to firm up, and then place plastic wrap over the cupcakes so that they won't dry out.
If you'd rather not refrigerate and if your frosting has crusted enough, you can loosely cover them with plastic wrap at room temperature.
I'm assuming that you don't have a sheet cake bakery box to fit this in, but if you did, that's always a good option too. ;0) -
I don't suppose you can remember what size the board is?