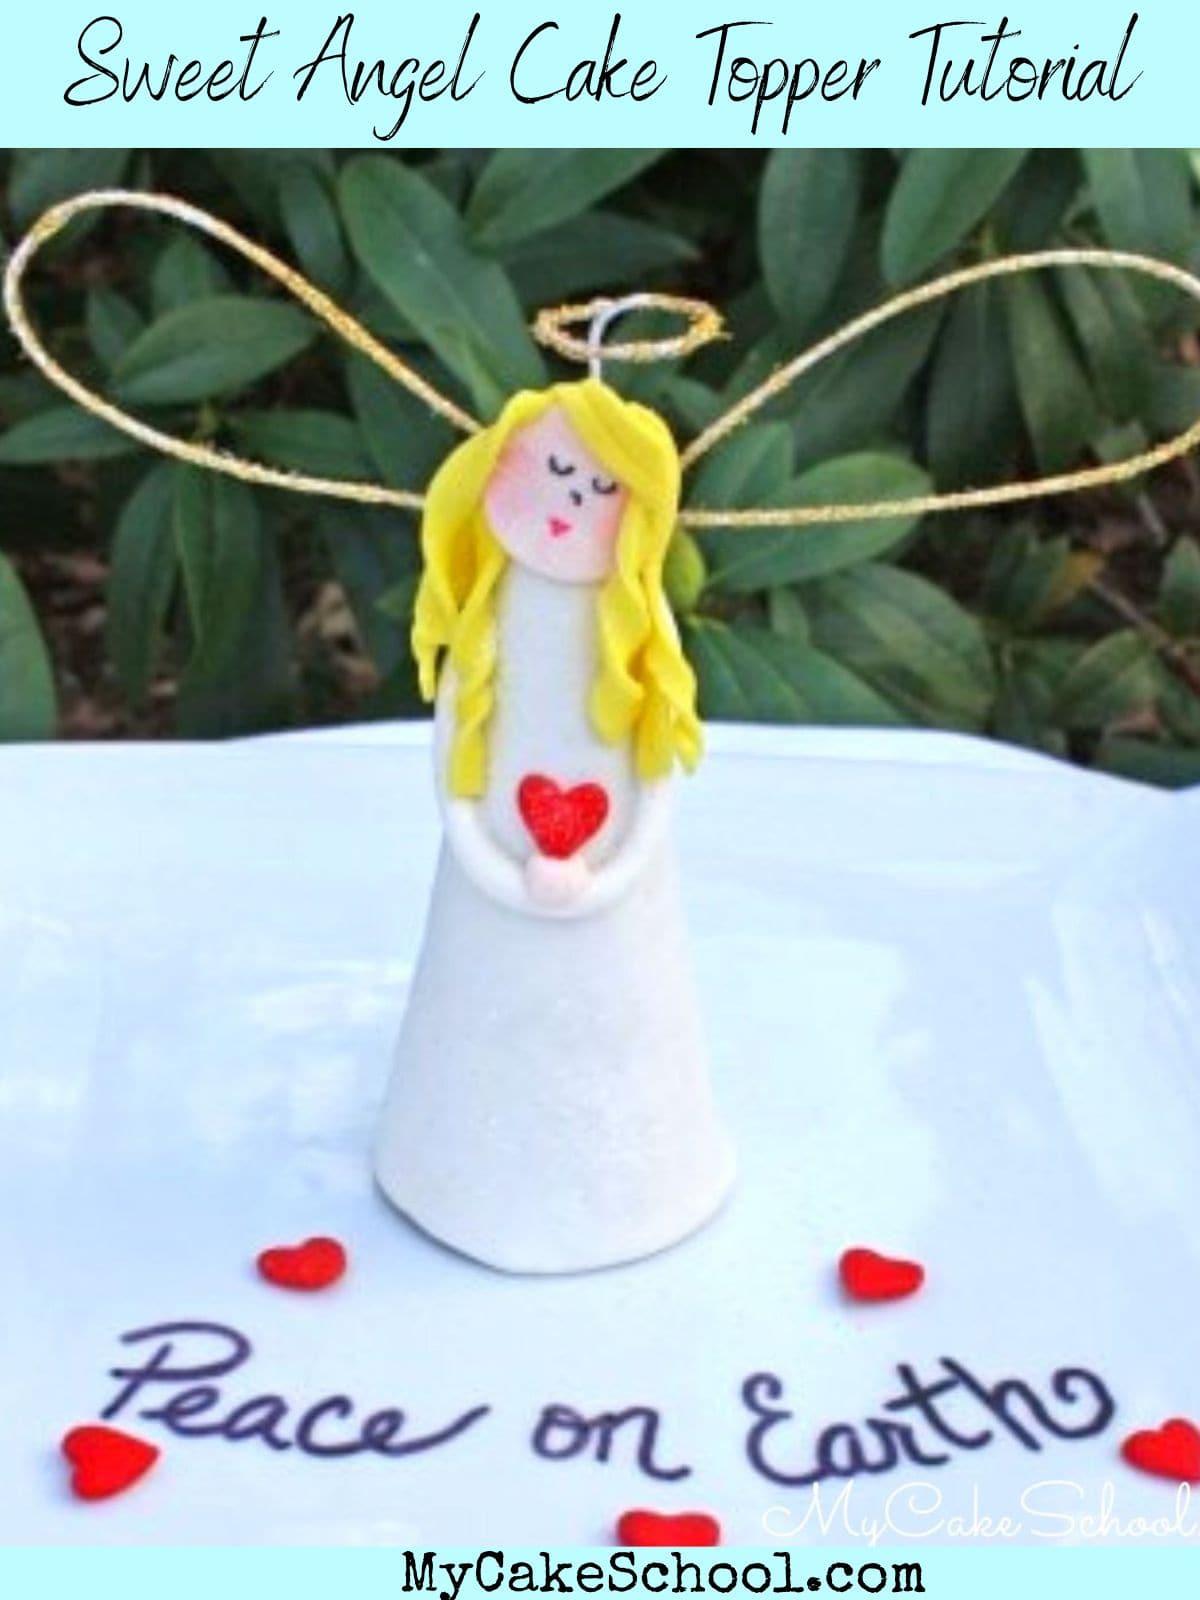
Sweet Angel Cake Topper
Today, I made a little angel cake topper!
For anyone in need of holiday ideas, I think that our angel would add an instant bit of sweetness to your holiday cakes & platters. I've always had a soft spot for anything in an angel theme. We hope that you enjoy this sweet and simple tutorial!
How to Make an Angel Cake Topper
Here are the materials that I started with:

I started off by slicing the tip off of the sugar cone, creating a small hole. This will make things easier for us later.
Next, I rolled out my white fondant and brushed the cone with light corn syrup and then wrapped it with white fondant. The corn syrup helps the fondant to adhere. (I forgot to include corn syrup in my photo above) ;0)


Face the fondant seam to the back. We'll come back to that in a second.
Now, for the wings! I formed two wings from one piece of 20 gauge floral wire. I also created a halo (as seen in the first photo).

If you like glitter (and I do), you'll want to brush the wire with a little light corn syrup or piping gel. Then, dust with sparkle! I used my gold hologram twinkle dust.

What a difference a little sparkle makes! I did the same for my halo.
Remember our fondant seam from earlier? Lift it slightly so that you can seal in the wire for your wings. You can seal the fondant back in place over the wire with a little water.

Next, I made my angel's face. Her face is copper-tinted fondant, rolled out and cut with a 2D piping tip. I let it dry for several minutes before drawing/painting on the features.

Next, I dampened a small ball of fondant and placed on top of the cone. I inserted the halo into this ball.

...and on the front of the little fondant ball, I attached the face with a little bit of water.

Next, I made a little snake of fondant and attached on either side of the angel to create arms.

After several minutes, once the head was nice and secure, I began adding strands of soft yellow fondant for hair. I used a little bit of water as my glue. I twisted the ends to make curls. You'll notice I briefly removed the halo--it was getting in the way of my hair styling ;0)


And finally, I placed a ball of fondant to create her hands, and pressed on a heart shaped sprinkle (Wilton).

Now, our sweet angel is finished. I didn't have a cake for her today, but I'm sure that you all could come up with something lovely for your angel to watch over ;0) --
Thanks for visiting today-- see you next time ;0)
OMGoodness!!!!!!!!!! So simple, but so pretty. Makes what to run out and buy everything to do this. Thank you for sharing!!!
thank you, very simple and yet looks so special x
this is so cute and EASY...you really do make everything so much less stressful...my favorite teacher :) have a merry christmas melissa!
Some times the most simple make the most elegant. This is so charming and the face is so precious. Very creative indeed. I love it.
Dee
That is so cute! I wish I had seen that earlier for a couple of cakes I had to make!! What is funny for me is seeing you picture of the finished angle with no snow in the background and lush green plants!!!LOL Here in Winnipeg or as others call it Winterpeg we have snow and will for the next 3-4 months!!
Have a Merry Christmas!!!
Oh my goodness, you are amazing. She's darling and so easy. I want to be just like you when I grow up -- even though I'm older than your mom!!! Merry Christmas to you and your family.
How cute, and so easy to create. Thank you.
So nice, simple and easy.............I like the way you displayed rthe steps making it doable for everyone! Thanks.
She is so gorgeous!
WOW--I collect angels and this little one will certainly become part of my baking collection. Thank you for showing us how to create such a sweet little angel.
So cute .... love it .... I have just the cake to put it on .... my granddaughters will just love it
omg its soooooo cute to use as a topper for my birthday cake on the 25th thanks for such an idea merry christmas to you