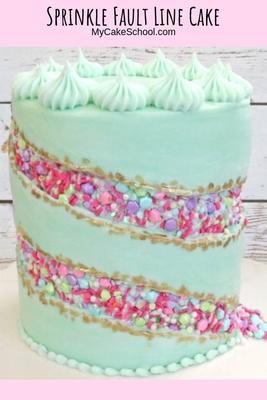
Sprinkle Fault Line Cake Tutorial
Today I'm excited to share a new cake trend which I'm seeing everywhere at the moment for Sprinkle Fault Line cakes (also referred to as Sprinkle Geode Cakes)! I first saw this design on @cakedesignbysheri's Instagram, and in the past week or so, I've seen countless others.
Everybody loves colorful sprinkle cakes and in addition to that, I love that this can be created so easily with buttercream (although it could be achieved with fondant cakes as well)! If you search sprinkle geode cakes online, you will also find some fun designs done in a similar way to the popular geode cakes, except with sprinkles in place of rock candy! I love techniques that can be taken in so many different directions!
For our video tutorial today, I'm doing a spiral version of a sprinkle fault line cake, carrying the line all the way around as it travels from top to bottom. Once you've learned the technique, you'll see that there are endless possibilities- from the colors of your sprinkles and frosting, to smooth vs. textured buttercream, and most importantly, the size and pattern of your "fault lines".
We hope that you enjoy the video! Please let me know if you have any questions, and if you give this method a try, we would love to see!
Table of Contents
Materials:
For today's cake, we made a double barrel cake which was made of four 6 inch cake layers. (This was one batch of our scratch yellow cake if you're wondering!) -- As usual, we filled our first two layers of cake and inserted 4 bubble tea straws cut slightly shorter than the height of the first two filled layers. Then, we placed a cake cardboard cut slightly smaller than the size of the cake on top of that, followed by two more filled cake layers. Finally, we settled the cake by wrapping it in plastic wrap, then placed a 6 inch cake pan with a small inside on top to serve as our "weight". We let it settle for a few hours before proceeding with frosting the cake.
Classic Vanilla Buttercream Frosting- We used this recipe (2 batches) because I knew that we would be chilling the cake often to firm things up for smoothing, and butter-based frostings become firm more quickly.
Your Assorted Sprinkles of Choice (We used a bottle of Wilton Diamond Medley)
Bench Scraper and/or spatula
Piping Tips: I used a Tip 4 for the bottom border, and 8B for the french tip stars on top
Edible Gold Paint: Use your edible gold paint of choice or edible gold luster dust + a small amount of everclear or vodka (or lemon extract) to create a paint. Gold leaf is another good option.
Coloring Gels: I used Sky Blue (although because of the slight yellow tint to my buttercream, it was more of a blue/green shade).
Miscellaneous: Cake base/pedestal of choice, two cake boards cut down to size, cake turntable is helpful for frosting the cake, small paintbrush(es) for applying gold paint.

Notes:
We used a double barrel cake for our tutorial but this look would be great no matter what size cake you are working with-- even on top of a sheet cake!
A you saw in the video, I like to pop my cakes in the freezer now and then- especially when it's time to smooth my frosting. It just makes everything easier to firm things up! It really just takes about 15-20 minutes to firm up the frosting. You don't want to freeze the cake through and through or you will have a lot of condensation as it returns to room temperature.
In the video, I mentioned that you could hammer a sharpened wooden dowel through your double barrel cake to help secure it to the cake base for traveling. If you would like to see a demonstration, hop over to our Carousel Cake Topper tutorial--in part one, we show building the double barre cake, and in part 2 (at around the 6:30 mark) we show hammering in the dowel.
nbsp;
Looks terrific! I love it! Fun and simple as always.
You gals never cease to amaze me with your creativity! Beautiful job!
Melissa, how did you get your layers so “fat?” I recently discovered “collaring” a cake. I’ve gotten great results with high, full layers.
Hi Debbie-- I didn't do anything special, we just used our 6 inch (2 inch deep) cake pans as usual. We actually used the cake layers that we made in our recent scratch Yellow Cake video tutorial if you'd like to see!:
https://www.mycakeschool.com/yellow-scratch-recipe/
Fantastique technique!